supernova_6969
-
Posts
229 -
Joined
-
Last visited
-
Days Won
2
Content Type
Profiles
Forums
Blogs
Events
Gallery
Downloads
Store
Everything posted by supernova_6969
-
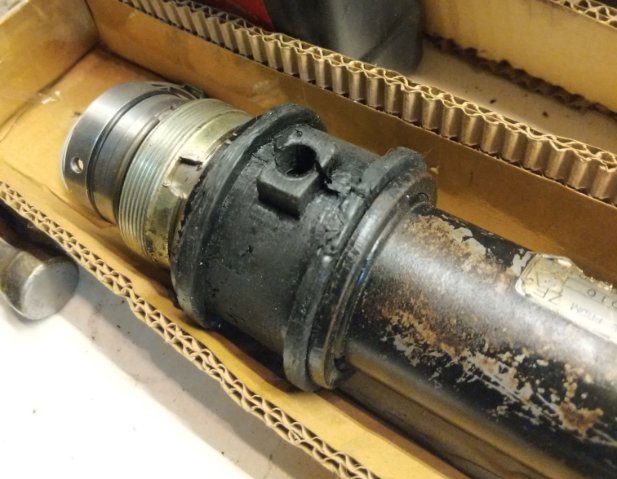
not much interest. no matter. I solved the issue, so i`ll write it for future reference. I ended up removing the "washer" that is in the middle of the shaft. Im my car it's help in place by circlips, si I removed all of that , and it was a toothless path, and shorter too. I ended up cleaning the shaft VERY thoroughly (or else the tape peels), putting some packing tape on the end (sharp lip) and on the grooves where the ciclips are inserted, and the seal slip over everything without too much effort (with lots of lube).
-
hi! I`m rebuilding my rack and pinion (a seal burst). took it all apart, changed all the seals, and now started putting it back together. one of the first step is to insert the rack in the tube, teethed side in.. to do that, they recommend putting a plastic film around the shaft where there are teeth, so the teeth don't chew up the new seal. here is a photo from the manual. I tried using electrical tape, and then 2 layers of packing tape, all super lubed up, but it was very hard to even get the seal started on the shaft, and as soon as I started sliding it down, the tape would get super shredded between the shaft's teeth teeth and the seal. (panic!) next, I tried to use a thin plastic sheet (from food packaging). that seemed promising except that I wasn't even able to get the seal started on the shaft.. I guess that adds too much thickness to the shaft diameter. I plan on trying again tonight, maybe with only covering the toothed part of the shaft with the plastic sheet (instead of wrapping it around).. but I was wondering if anyone else had experience with this and what could be used to protect that seal. thanks!!! seb

-
280zx door seal weatherstripping alternative?
supernova_6969 replied to Luke_elkins32's topic in S130 Series - 280ZX
they are still on their website... man, I'd seen some that were expensive, but that's CRAZY!! 250$ per side.. Then again, to someone who's not a cheapskate like me who's properly restoring their car, it`s just part of the game. I guess the lack of demand makes it expensive to make, no economy of scale... -
hi! I printed it out of PLA, with 5 walls and 30% infill. the 5 walls were probably overkill. there wasn`t much pressure even pushing the center in, and the mold is SOLID. Here is an image of the cross section of the mold.. there is also a center plug and a tiny plug that sticks in the side, to create hole in the part that sticks out. here is all the parts, including the bolt that I used to squish the center in... essentially, since I wasn't pouring in material, I was injecting very slowly and painfully from a caulking gun, I slightly filled the bottom ridge (to avoid voids), then a ring around the bottom 1/3 in both halves (leaving the center part mostly empty, to be filled with the center plug) , like this: Then I put matted the two halves, put them in a vice (the holes on the side, with the square projections, are for nuts and bolts to hold the mold together, but ended up being too small) and pressed in the center bit in from the top, by hand at first, then finished it with the big bolt, through the center (with a nut under). that squished all the material up, filling almost all the mold without any voids. It would look like this (but filled and with a bolt running in the center, vertically): (the screws on top were for pulling the center out after it cured... it didn`t help actually, I wiggled it loose) After that, I pushed in the side plug (push then screw in the center plug) and filled the top from above. it worked out really well, with minimal waste.. I hope that's somewhat clear. if not, let me know what part isn't, and I`ll edit it to make sense.
- 3 replies
-
- 1
-

-
- urethane
- rack and pinion
- (and 1 more)
-
-----
-
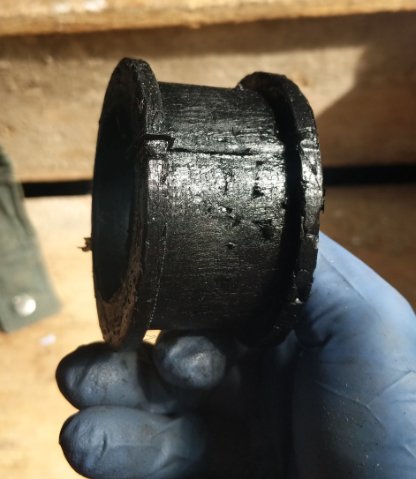
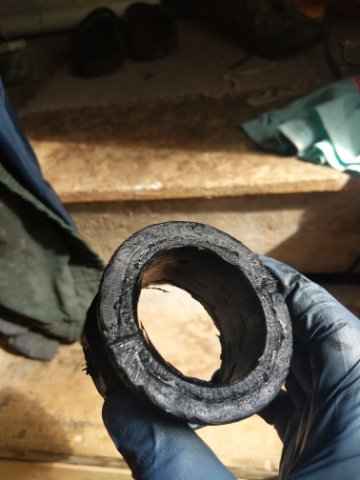
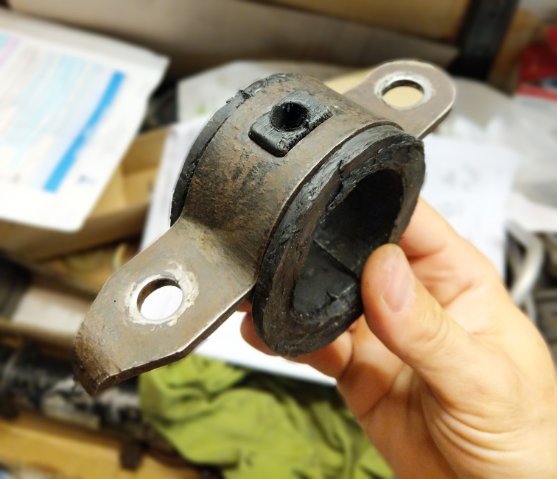
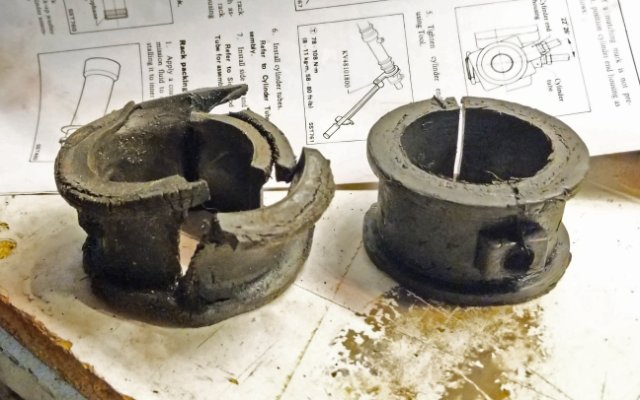
*admins, please put this where you think it goes. this was the best section I found for it.... Hi guys. So. last year, I changed my front suspension. and as I foolishly turned the wheel hub by hand (with a lot of strenght to overcome resistance), making the rack and pinion move as I did that and and one of the rack and pinion seals blew. Fast forward to this year (cause I'm lazy and didn't do it during the winter), I took the rack out and am rebuilding it. As I did that, I realized my passenger side rack bushing, which has been copiously bathed in engine oil for years, was shot. All mushy and broken. And just my luck, they don't really sell them anywhere, or if they do they charge an arm and a leg for it. or it's just the driver side. or... whatever. So I made one! Here is the crummy one next to the brand new one. I used the measurements from the rack, the old bushing and the bracket that holds the rack in place to 3d design mold, 3d printed it, greased it up with petroleum jelly, and some (not all tha tmuch, actually) 3M windshield urethane (high viscosity, which cures a little harder)... Here are some more shots of it, including fitted on the rack, and with the bracket that holds the rack on.. I'd say the hardness is right on par with the other side's bushing which is old but still looks healthy. Yes the surface finish is a little rough, but it's sound.. I'm happy with it. I'll be putting it back on the car as soon as I motivate my sorry ass to put the rack and pinion back together (btw, used a 55 CAD$ kit, that came with almost all the seals (all the important ones, really), and that worked really well. it's not hard at all following the FSM manual). I'll make certain to wrap it really well in some plastic or another to try to keep the oil off of it (yeah I know I should fix the leak). If I'd have to do it again, I'd try the lower viscosity urethane as this one was a b*tch to get out the tube... if I'd live in the states, I'd buy some pourable 2-part urethane and simply pour it in, but there is none around me, at least not in reasonable quantities at a reasonable price. THAT would be a dream to use... This technique can be done for the other side as well, or any other similar bushing. if anyone is interested I can post pictures of my mold (4 parts), and even share the 3d files. Keep in mind that this bushing is bigger than the driver side (I have the files for 3d printing the other one too) and won't fit older models. Making a new model for a mold for any sort of similar part is a pretty quick affair and printing one in this size was about 6$s worth of plastic. I can also make and sell some, if anyone is in need of one. Questions welcomed. have a good night! s.
-
Twin cam head for the L6 from Derek at Datsunworks
supernova_6969 replied to Derek's topic in Nissan L6 Forum
Hi Derek. It`s been a while (time wise) that we've seen some form of an update in production. I'd be curious to see a breakdown of all the heads you`ve made and what happened to them. for example headd 001- - prototype, scrapped headd 002, prototype, in my car head 003, vvt prototype, scrapped. head 004 - client was dynoed on a 3.2 to xxx hp.. head...... *****note that all these are made up!!!! something like that. maybe including the future plans, like how many heads have been ordered and are "in production". thanks! s -
hey! I miss your updates... can't wait to see what is next on the cars.. did you end up posting some new work here on hybridZ for your other cars? s
-
Why would you ship that from America? A 2+2 story
supernova_6969 replied to Villeman's topic in S30 Series - 240z, 260z, 280z
hey! so.. what's the news. I know it's been a while, but did you manage to get the engine rebuilt? how is she doing now? -
are you looking for something new or used? same level of power or more? got a budget in mind? I have an aftermarket T3/T04E on mine, didn`t pick it it came modified. wikipedia says (it`s true if I can remember) that "The turbocharged 280ZX used a single Garrett AiResearch TB03 turbocharger with an internal wastegate"... this post has a few options..
-
Hey jdm junkie. I'm franciphone (from quebec). If you want, give me the person's email, i'll write to them and figure out the history. Send me a private message and we'll figure out the details. Sebastien
-
@B50MX hey! thanks for sharing! seems like a mighty nice build, fun to drive too! simple, but to the point, and it works, which is more than my car can say. seems like you have a nice, evenly balanced setup.. 👍
-
280zx (1983) shocks and springs, anyone?
supernova_6969 replied to supernova_6969's topic in S130 Series - 280ZX
smoothz nice! I`ve really not ridden mine since I changed my shocks and I had problems with the steering, which i`m still working on (not often),. but whatever runs around the block I did, I also say a night and day change... -
280zx (1983) shocks and springs, anyone?
supernova_6969 replied to supernova_6969's topic in S130 Series - 280ZX
hi tokuzumi. I live in quebec, canada, where we normally have a lot of rust., although it seems my car never saw much moisture.. I had no issues what so ever, so I wouldn`t worry too to much. The good thing about this set up is you can remove the shock and top plate by removing the 3 nuts that are on the shock tower.. this way, you have better access to the central nut, if I remember. Worst come to worse, if you're changing the shocks themselves (after 41 years, i`m guessing yes) and the top nut won't budge, you can always put a pair of vice grips on the shaft and use an impact or a long breaker bar on the nut. but only if you are changing the shocks, as that would mar the finish on the shaft and break the seal on the shock. good luck, and let us know. seb -
Godzilla Raceworks MS Kit for S130 turbo
supernova_6969 replied to montyz81's topic in S130 Series - 280ZX
what manual or instruction set did you use to hook everything up? was there any mention of that problem? I seem to recall some forum or another talking about this type of issue, but that was a few years ago; I don't remember where... or how much details there was.. and when you mention the factory wiring, I imagine you mean all those wires that are connected to the cold that lead back to the tach (I think that's how it's set up, I didn't do the MS installation on my car so I'm not sure how it works). I know my car still has some of the old wiring attached to some of the posts on the coil.. probably exactly for that... -
tension rod bushings - any source?
supernova_6969 replied to supernova_6969's topic in S130 Series - 280ZX
hahaha. yeah, my wife agreed once or twice, but the second I didn`t drive like an old man going to sunday church, she was not happy. I guess we`re (read she) is not young and dumb anynmore and should act accordingly. nice control arms!!! not too epensive, I suppose... although they are such a simple part, I think i'd make my own. especially with the model you shown, that split shaft in which you insert the plate to weld (the transition between shaft and plate) is a very good idea on how to make certain i't`s very solidly joined... good inspiration... -
hey! I don't know about the price, but have you calculated the volume/size you need? I have a similar sized intercooler (both entry and exit on the driver side though). it came with the car, don't know if it's a good one or what, but I always wondered if it's not a little big... Too big of an intercooler would introduce a little bit more turbo lag (well it's not turbo lag, but the effect is the same)... unfortunately, that's about as much as I know. I can't help with calculating what is needed. hopefully someone who's installed a few intercoolers can chime in... seb
-
tension rod bushings - any source?
supernova_6969 replied to supernova_6969's topic in S130 Series - 280ZX
hey S1300TTop. look at that, you posted on both my topics.. thanks! I debated buying a kit too, but I think changing the bushings on mine is going to be more an attrition battle than winning the war all at once. my missus has a love-hate relationship to my car... one that has no love in it, so I have to stretch out the purchases.. let me know how the kit does for you. WHATEVER YOU DO though, don't replace both sides of the tension rod bushings with poly bushings. you can find it in a lot of posts, both side poly bushing ends up being too stiff and people break their tension rods. The standard recommendation is either go stock with both rubber bushings per side or one rubber, one poly per side (that is on each side of the car, not right side poly left side rubber...) if you go this route, the kit that I mention is supposed to be rubber, and they come with 2 bushings (the equivalent of one side) so you can buy one kit only at your fave autoparts, and take one bushing for each side... -
280zx (1983) shocks and springs, anyone?
supernova_6969 replied to supernova_6969's topic in S130 Series - 280ZX
got a link for the Vogtlands? are you getting them and putting them on the car in secret, and only posting the photos when you get permission? seb -
tension rod bushings - any source?
supernova_6969 replied to supernova_6969's topic in S130 Series - 280ZX
hey New Zed. thanks for this. the link you sent in your second post is perfect. not only does it confirm that the parts at Rock auto are what I'm looking for, but it give some info on installing it.... Captain Obvious actually gives out a part number, which is the same part number that Rock Auto gives for those "Strut Rod Bushing". I've looked at photos that are posted and they are DEFINITELY what is needed for the tension rods. Thanks New Zed. impressive memory, by the way. Also. the AC delco kit no 45G25036 has pictures of just the rubber, while Capt. Obv. stated it came with nuts and washers and all you need when he bought in in 2012 (it seems it's the same part umber for older and newer Z cars). let's hope it still does. I'll try to post an update when I get then and put them on the car.. photos and stuff maybe. seb -
hey guys i'm on the market for new tension rod bushing (rubber, ideally), and one of the only place where I found any were these ones.... https://www.thezstore.com/page/TZS/PROD/classic20m02b/23-4322 when I look at them, they look suspiciously like these "Strut Rod Bushing": https://www.rockauto.com/en/catalog/nissan,1983,280zx,2.8l+l6+turbocharged,1209406,suspension,strut+rod+bushing,7608 some of these kits even come complete with the metal sleeve that would fit nowhere on the strut rod, but would totally fit on the tension rod, I think... can anyone confirm my suspicions, that these are the same part, but misnamed in a few places, or that they are the same for both locations? thanks! seb EDIT: you should read this, it`s a short topic, but in essence, the bushings that were suggested to me are a great fit, cheap, and come with the bushing, the metal sleeve and the 2 buig and 2 small washers. great value. Here is ac delco product number, and a link to where I bought then (not affiliate, same link as above). AC delco kit no 45G25036 https://www.rockauto.com/en/catalog/nissan,1983,280zx,2.8l+l6+turbocharged,1209406,suspension,strut+rod+bushing,7608 they got the name wrong, but it`ll fit on most of the older z cars. very neat kit. by the way, anyone not 100% certain about fdoing this should look at this page. great site, great photos,. http://www.atlanticz.ca/zclub/techtips/suspension/comprod/index.html thanks for everyone who joined in.
-
hey guys. I have the email of a guy who had a small scrapyard with only early zcars, he's got 5-6 bodies in various shapes, but a large.. shed? the side of a 2 spot garage full of parts, engines, manifolds, trannies, mirrors, etc. Dunno what else he has, but I can hook anyone up with his email if you pm me. I'm not comfortable sharing his email here, out in public... it is in the Montreal, Quebec Region, so shipping will be required for most people. seb. oh! I also have one. it's 5500$ and comes with the rest of the car attached to it. BAT.....
-
Rear Koni Adjustable Shock install - Hardware question
supernova_6969 replied to tokuzumi's topic in S130 Series - 280ZX
I did the rear brakes when I go the car - normal job. If you have to get the calipers rebuild, make certain you go somewhere where they know what they are doing cause there are a couple or tricky steps to putting them back together. I advise against doing it oneself if you don't have a lot of experience. Then I did the fronts last year. what a shitty design.. you have to remove everything, including the bearings and everything to change the disk. It went well enough and repacking is no biggie, except I had very slight grit the first time (while testing the bearing in my hand, on the car you can't tell), so I did it again. Slight grit again, so I said **** that shit and called it a day. So far, so good, with about 3-4k kms on them. Still, what a weird way to do it. oh! By the way, if you have the time, buy yourself some new bump stops. The little round rubbers a the top of the shocks were pretty good on mine but the bump stops were either rotten and broken or completely missing on mine. Also, consider buying new covers/bellows/boots if your shocks don't come with them. When pull the shocks apart and notice that there are more cracks in them than a 1990s Detroit city park at midnight, it's too late. -
280zx (1983) shocks and springs, anyone?
supernova_6969 replied to supernova_6969's topic in S130 Series - 280ZX
SO..... I finished the job last night, and took her out today. What a change. It's no F1 or lowered monster, but it doesn't squat like it used to when I start off (it went from what felt like 2-3 inches to .5-1), won't dip when I brake, even hard (from what felt like 3-4 inches to maybe 1) and won't lean very much anymore as I turn. BUT most importantly, it'll now stick to the road. In the last few months, driving it felt like it was floating on the road, and not like a Bentley might cruise gently, but more like walking on a grate, where you foot is flat, but nor making contact everywhere. That's what it felt like anyways, and it wasn't reassuring. Now, it feels like any other newer car, and follows the road and sticks to it, mostly. It's very satisfying. I can't compare to the stock shocks (new), but the KYB are very satisfactory. Probably a little but harder/harsher than stock but not too much, and if you have a car like this you won't mind a little extra "sportiness". Very curious what it'd feel like with new springs though.... So my final though : shocks alone are definitely worth it if you don't want to spring for a new set of springs (yeah, lame pun, but it was originally unintended). (Also, I just edited another post up here where I suggest anyone doing the shock (or shock/spring) job should buy all new boots and bumper stops from the get go, without even consider not buying any. )