Jazz86
-
Posts
27 -
Joined
-
Last visited
-
Days Won
1
Recent Profile Visitors
4818 profile views


Jazz86's Achievements
")


-
[help/opinions needed] Oil pressure won't go past 40psi.
Jazz86 replied to Jazz86's topic in Nissan L6 Forum
Yes, I have a genuine Nissan Turbo oil pump. I also compared the height of the rotor to several pumps and confirmed that it is indeed the high volume pump. Oil pickup being clogged was a small possibility. When I first took the OEM pan off to go to my new baffled pump I looked at the pickup and it was clean. I did a pretty clean job of installing the baffled pan, but hopefully there isn't anything there like when I first built the motor. -
[help/opinions needed] Oil pressure won't go past 40psi.
Jazz86 replied to Jazz86's topic in Nissan L6 Forum
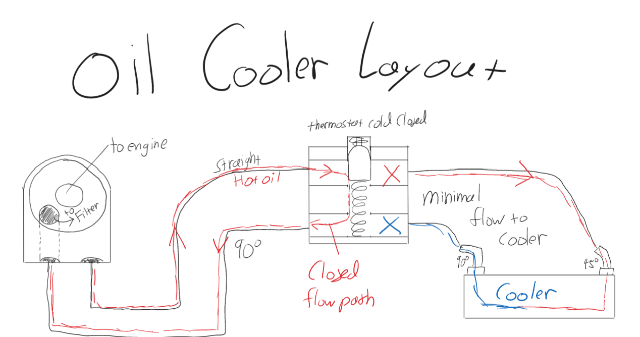
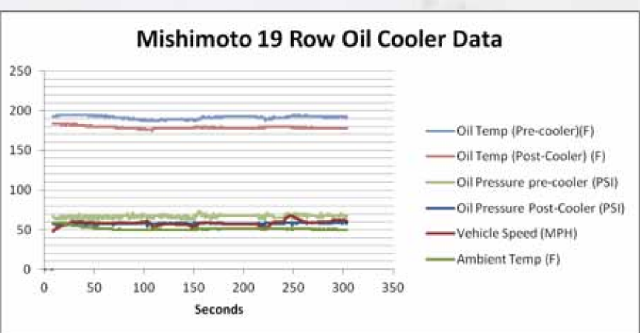
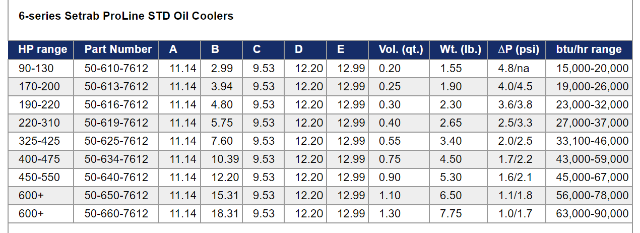
!!!!!!!!!!!SOLVED!!!!!!!!!!! Special thanks to @jonbill @NewZed for helping me with suggestions. I thought I would post my findings here so in case anyone in the future has my issues you might find some insight into your issues. Happy racing! To recap things we looked at: 1. Upgraded Baffled Oil pan (fixed for oil starvation on track) 2. High flow Oil pump (didn't change anything) 3. Shimmed Oil pump relief valve (no change) 4. Oil filter bypass deleted (lead slug pressed into block) 5. Oil cooler You all suggested 6. Oil pump springs (confirmed not the issue with several spring configurations and preloads) 7. Oil pump tried 240z Standard pump (springs tested no change) 8. 280ZX AT high volume pump (springs tested no change) 9. Cleaning oil channels from the oil filter to various locations on the block (nothing clean as a whistle) 10. Pressure drop from the oil cooler and or oil channels @NewZed I sat on what you showed me with Bernoulli and Venturi principles. Out comes my old college text books! I will leave all my mock math out of this post for simplicity. I found a large restriction at my oil cooler system, at the heat exchanger. I removed the oil cooler system completely and the engine now had a peak pressure of 75psi. A few small revs and my mechanical oil pressure gauge would flick really quickly and I verified the data on my electronic oil pressure transducer setup. Meaning the oil cooler setup was causing a significant pressure drop. Those who have read the whole story will say, "but wait Jazz, you said you always had low oil pressure". I did, and what I also suspected was the oil relieve valves. Sadly I was an idiot and did both the oil cooler and pressure relieve valve around the same time and never really drove the car above 3000 rpm. So my bad, and onwards to the story. Here is a bad drawing of my oil cooler setup. So to simplify the pressure drops of the whole system with warm oil I will talk of peak oil pressure that is generated and the final pressure at my gauge with all the restrictions on it. Without Oil cooler setup, just filter on block, peak pressure was 75psi. With Oil filter adapter, 3 90 degree fittings, 10AN lines and a Mishimoto oil thermostat and a bypass line peak pressure was now at 70psi. With oil filter adapter, 3 90 degree fittings, 10AN lines going directly to the Mishimoto oil cooler (heat exchanger) peak pressure was at 45psi. With Oil filter adapter, 3 90 degree fittings, 10AN lines and a Mishimoto thermostat and the mishimoto heat exchanger (oil cooler) peak pressure is at 40psi. And noted sluggish oil pressure readings. All the above configurations yielded a very fast response from the oil pressure gauge. Funny enough the oil pressure gauge is so quick to respond it can almost double as a tachometer. So I have now confirmed that the oil cooler heat exchanger from mishimoto is trash and that my oil bypass was also the cause of the issue. Looking into more into the data looks like Mishimoto does not release official data on their heat exchangers. This is a red flag for me and I am stupid for not trusting a cooler without any form of datasheet. Shame one me I should have my engineering degree taken away. A quick skim on the interwebs about mishimoto oil coolers showed thier engineering report on a test they ran on a car. I will include that document below in case Mishimoto reads this post and takes down their findings. mmoc-gen4-10_engineeringreport.pdf . Here is a snip of their readings before cooler and after cooler: This looks like a 10psi oil pressure drop from the 19 row cooler. That is A LOT considering the motor was not being revved out. More red flags on mishimoto's oil cooler heat exchangers. I was looking into other oil cooler heat exchangers to see if other makers were expecting similar pressure drops. Sadly there isn't much data on it but lucky I remembered my track 350z is running a 19row Setrab cooler setup and I have not had any issues at all on the street and on track. Oil pressure was the same with out without the Setrab oil cooler setup. Luckily I found Setrab's data on their coolers. See screen shot below: Setrab has estimated numbers for their coolers, and how much heat they can dissipate along with the change in pressure from running one of their coolers. Visit their site and you can see the engine parameters of where they got their numbers and what speed and oil pump flow etc. Here is the link: http://www.setrabusa.com/products/oilcoolers/engine/index.html So I thought, why the hell not this car is already a money pit. I bought a the same cooler that I run on my 350z track car. This motor should be pushing 300hp crank like my 350z does. I installed the new Setrab oil cooler to my existing setup and low and behold pressures are all good. Peak pressure is now at 65psi. This should be fine for my motor. I will be sending black stone labs an oil sample to see if there was any damage to the bearings but so far so good. Again thank you all for those who had input. I will see you all at the track! CAUSE OF MY LOW OIL PRESSURE: OLD OIL PRESSURE RELIEVE VALVE POS MISHIMOTO OIL COOLER (HEAT EXCHANGER)
-
[help/opinions needed] Oil pressure won't go past 40psi.
Jazz86 replied to Jazz86's topic in Nissan L6 Forum
Thanks guys! I got to tearing apart my oil cooler set up and the oil pressure line on the gauge. I used compressed air, thin metal wire and a spray bottle filled with thin oil to see if there was any obstruction between the post oil filter union and the block. Please excuse the horrible diagram as it was drawn on my phone during my lunch break. There doesn't seem to be any thing blocking between the post filter union and the oil sensor location. For reference I am using the OEM location where the OEM electronic sending unit would be instead its plumed to my mechanical gauge. I will make plans to measure the pressure drop before and after the filter and at my gauge location as I can do that with two pressure transducers. I will report back to this page if there are any interesting results.
-
[help/opinions needed] Oil pressure won't go past 40psi.
Jazz86 replied to Jazz86's topic in Nissan L6 Forum
Quick update on the issue. I changed my oil and on the first crank I saw the needle on the mechanical gauge shoot to 65psi on the first rev to 3000rpm. This had me excited and the oil pressure would keep pegging out to 65psi with each small rev. Then I shut the car off to go clean up a few things, returned to the car and on the second start the oil pressure is back to topping out at 40psi. Checked oil level and it is right at the top of the dipstick. Drama summarized here: 1. Oil change with fresh oil 5w40 rotella, first start after new filter and oil -Oil pressure while cold and at 3000rpm is at 65psi 2. Shut engine off 3. Start engine again -Oil pressure is back to 40psi Max (cold oil rpm at 2500, oil pressure is back to being pegged at 40psi) -Hot oil pressure is 4000rpm is again at 40psi max. Possible causes? Clogged pickup? Jammed oil pressure relief? At a loss here, Again thanks for all the suggestions! -J -
[help/opinions needed] Oil pressure won't go past 40psi.
Jazz86 replied to Jazz86's topic in Nissan L6 Forum
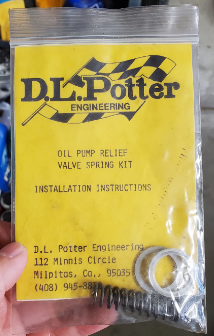
Yep I tried a few combinations of oil pumps and springs. OEM Style Oil pump OEM spring: 40psi max pressure OEM Style Oil pump with OEM spring shimmed with 0.120" M4 washer: pressure still topped out at 40psi I did notice a quicker response to the oil pressure on my mechanical gauge. This could be a false since this is all "eyeball" on how fast the mechanical needle rose. 280ZX AT Turbo High Volume pump with factory spring: 40psi max pressure 280ZX AT Turbo High Volume pump with 0.120" washer: 40psi max, again quicker response to oil pressure. 280ZX AT Turbo High Volume pump with LD Potter springs: 40psi max, again quicker response to oil pressure. At this point I was really sad about it all so I kept the 280ZX pump on and moved on to trying different things. -
[help/opinions needed] Oil pressure won't go past 40psi.
Jazz86 replied to Jazz86's topic in Nissan L6 Forum
Glad you asked! Oil is 5w40 rotella T5. On a 75F day a cold start with idle RPM at 800rpm the oil pressure is at 25psi. Give it a small rev to 2500 rpm the oil pressure again tops out at the same pressure around 40psi maybe a little higher at 42psi. I have not logged that using my transducer setup. The pressure shoots up and hits a wall at 40psi. As for the bypass plug. Was worried that it might be the cause of my issue as this was the only original part of the motor. Weak spring pressure, maybe causing the lack of pressure as it always tops out at 40psi. But I was clutching at straws. -
[help/opinions needed] Oil pressure won't go past 40psi.
Jazz86 replied to Jazz86's topic in Nissan L6 Forum
Thanks NewZed, I was really hopping it was the spring inside the oil pump. It does line up with my issue as the oil pressure is locked in at 40psi abouts. I have tried two things relating to that oil pressure relief spring. 1. Spring Shim (m4 washer at 0.120" thickness) No change in pressure 2. DL Potter Oil pump relief springs No change in pressure even with a single thin washer. -J
-
[help/opinions needed] Oil pressure won't go past 40psi.
Jazz86 replied to Jazz86's topic in Nissan L6 Forum
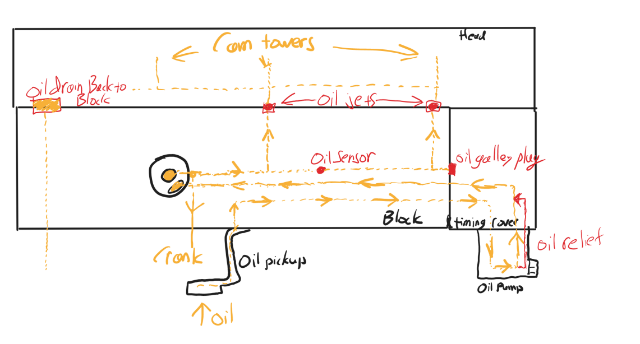
Hi Jon, The engine has quite a bit done to it when I built it my last year of college. I don't have the list off the top of my head but here is the short list: 1. Head Ported 2. Isky Cam 3. Triple carbs 4. Bored over L28 block When I was building the motor it was on the looser side but not out of spec. Clearance for the Crank to main bore: 0.0021-0.0025" Clearance for Rod big end to crank: 0.0015-0.0018" If the bearing clearances were off wouldn't I see low pressure at idle most? Crank plugs: I am not sure but wouldn't that bleed all pressure out of the crank and oil pressure be zero? Oil Gallery plug: I am 100% it is in the motor verified when the timing cover was removed for the oil pan install. Oil Jet: I installed new oil jets when I built the motor Cheers, J -
Good Evening gurus, I am having an issue with my L-series L30 motor. I have been chasing this issue for a long time. In short my motor will not be able to go over 40psi of hot oil pressure. I am hoping some of you might be able to shed some insight into this. Here is a table of the oil pressure when warm. Measurements were gathered using both my mechanical gauge and a custom electrical gauge using a 2% accuracy 150psi pressure transducer. RPM Oil pressure 1000 (idle) 12.5psi 2000 23.9psi 3000 30.2psi 4000 40.4psi 5000 40.6psi 6000 41.8psi 7000 (not attempted) 8000 (not attempted) From 1000 to 4000 rpm the motor has no issue following the rule of (10psi per 1KRPM). Past 4000@40psi the motor will no longer build oil pressure. I suspected many things and began my burning of money to try and fix the issue. Here is a list of things that were done that ultimately did not fix the issue. 1. Upgraded Baffled Oil pan (fixed for oil starvation on track) 2. High flow Oil pump (didn't change anything) 3. Shimmed Oil pump relief valve (no change) 4. Oil filter bypass deleted (lead slug pressed into block) 5. Oil cooler Any one have experience with this issue? Thanks, J
-
Yeah that seems like a much better proposition! I was looking into doing that instead. Though my 240z is a 1973 which is the odd year I am not sure there is a center split for the rear brake lines. It should be the same system on a 260z and 280z. But I would love to run a line from the center split directly to the caliper instead of dealing with the OEM hard-line routing. Onwards to more projects. The Zcardepot kit seems to have the same issues as your kit did from years back. Food for thought! Thank you sir!
-
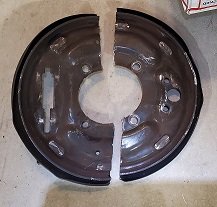
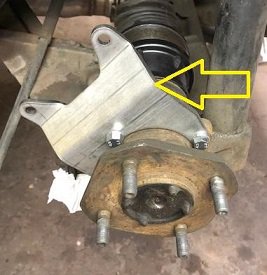
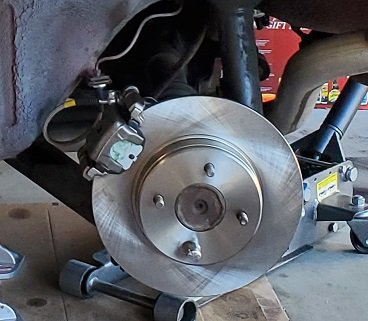
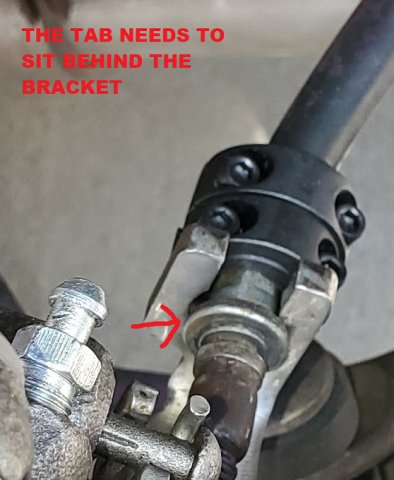
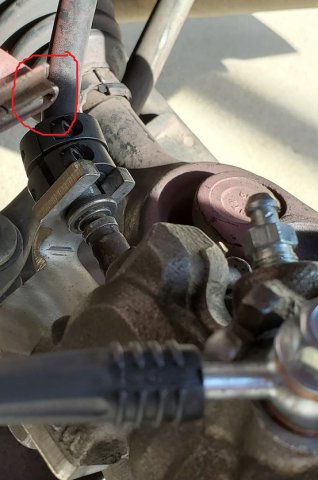
Hello HybridZ! My 240z recently seized up its drums at the track and I thought it is time to convert to a disc brake. I went with the kit from Zcardepot and ended up adding some parts of my own as well to make it work. Here is my review and headaches and pointers from installing this kit. I will go though the process and when the issues occur will be written in chronological order. GOOD POINTS WILL BE HIGHLIGHTED IN BLUE. MEH I AM NOT MAD NOR PLEASED IN GREEN. BAD POINTS WILL BE HIGHLIGHTED IN RED. 1. Removing the Stock Drums There are tons of write ups on this. I chose to cut the back plate because I will never really go back to drums, and I have had it with the drums seizing or messing up or not adjusting right, and messing up my brake points. OEM brake lines were easy to remove since I soaked them in PB. Clips were easy with pliers, and a wrench. 2. Bolting up the ZcarDepot bracket. THE GOOD There is really only one way to bolt up the bracket and Zcardepot has many photos and write ups on this part. So here is a photo from their website(no copywrite infringement intended 😊) Both the stock bolts work and the new JNC bolts that Zcardepot supplies. 3. Bolting up the Calipers Clean up the hub and slide the rotor on. Put a lug nut on and hold the rotor to the hub surface. Now the rotor spins in line with the hub surface. With the whole caliper try bolting up to the zcar bracket. THE MEH, the calipers needed to be shimmed on the driver side caliper in order to center the rotor in the middle of the caliper slot. The passenger side is okay and did not need any shims at all. I have installed willwoods on several cars and they also required shims to get the caliper and rotors inline. SOOO thinking I would rather have to shim the caliper outward than having to grind the back plate or caliper retainer. 4. Hooking up the brake hose (hose is the flexible bit, hardline is the solid metal bit) The brake hose used are some 240sx rear brake hose, I recommend a stainless braided hose. I had some 240sx braided hose sitting from my older projects so I used those instead and they are DOT, but for a 240sx. THE BAD the idiot installing the kit ME 😂 This was my problem, caused by me but you might run into a similar issue with the normal rubber hose provided. The brake hose are quite short for the application and I recommend a brake hose that is at least 15inches long end to end. The 240sx brake hose is 12 inches end to end. The good thing is the 240sx brake hose is just long enough to clear all the critical points. 5. The handbrake.... THE BAD THE PAIN THE STRUGGLE Everything was going smoothly, up until this portion of the install. Trying to get the oem handbrake to work with the 240sx calipers. There are two options now. If you have the oem 240sx handbrake brackets (rare) you will need to make an adapter plate to link the 240sx caliper handbrake hook to the 240z handbrake cable. Here is a picture from a nice man who has a page on how to install the 240sx rear brakes from way back when. http://www.zhome.com/ZCMnL/tech/Calipers/zbrakeupgrade.htm If you have the Zcardepot 240sx handbrake brackets (provided with the kit) you still need to modify a few things. I have both but I chose to go with the zcardepot handbrake bracket. On the OEM 240z handbrake there is a flat tab, that flat tab has to sit behind the flat of the caliper handbrake bracket. The Zcar depot brackets are shorter than the 240sx OEM handbrake bracket, this makes is possible to simply hook them up. BUT HERE COMES THE BAD the driver side bracket was too long and I could never get that tab behind the flat of the zcardepot handbrake bracket. The passenger side zcardepot bracket was perfect, and the 240z OEM handbrake fit perfectly. I ended up using some shaft collars on the oem handbrake to hold the handbrake tab on the driver side. 6. CONCERNS JUSTIFIED After having bolted up everything I am really concerned with a few things. 1. The bracket for the handbrake is really close to the chassis and the OEM brake hardline. 2. The handbrake cables being too close to the drive shaft. I know you can swap sides and it fixes it, but I just used a zip tie and held the oem cable to the mustache bar. As its turned out I the bracket made contact with the mountings. here is a photo of what happened when I compressed the suspension. THE SOLUTION COMES IN THE FORM OF TWO THINGS. 1. THE BRACKETS NEED TO BE PUSHED TO THE REAR OF THE CAR AND THEN BOLTED 2. BUMP STOPS NEED TO BE THERE AT LEAST 1INCH TO KEEP THE HANDBRAKE BRACKETS FROM MUNCHING YOUR BRAKE LINES. Overall, the kit works perfectly fine. There aren't any major issues that cannot be fixed by normal means. The braking is greatly improved, with much better pedal feel and heat capacity. I am running the 280zx master cylinder as well, so that helps. BRAKE balance is just as good as properly adjusted drums, I will lock up the fronts a touch earlier than the rear, but all 4 wheels will lock up with R comp tires on the car. The rear of the Z gets a few mm increase in width because the oem drums are not as thick as the rotor. The kit gets a 7.5/10. A passing grade.
- 7 replies
-
- 1
-

-
- 240z
- disc brake conversion
- (and 3 more)
-
Very interesting input. Sadly I have not dynoed my 3.0 motor. Very interesting, my misfire was around the exact same RPM range. This is definitely something to look into since you have a large torque drop at the same RPM. I am currently rebuilding my MSD unit with a few of my friends. I was told, that it might NOT be my failed MSD that was causing my misfire, rather an electronic noise issue or odd frequencies. Personally I would love to test the MSD box for high speed triggering and see if there is a drop off or maybe a timing delay in the system. If only I had access to my old college electrics class equipment. So far things I am planning to rule out and test 1. Bad capacitors in my MSD unit (currently dissecting) 2. Electronic noise/interference (solved with either capacitor or resistor or a high pass or low pass filter) 3. MSD timing delay, so maybe there is an input out put delay from the trigger and box (simple fix advance timing more/high risk of detonation) I do know that MSD had a special box that will delay the spark a little in the case of high boost or nitrous, and that box is meant to retard timing.
-
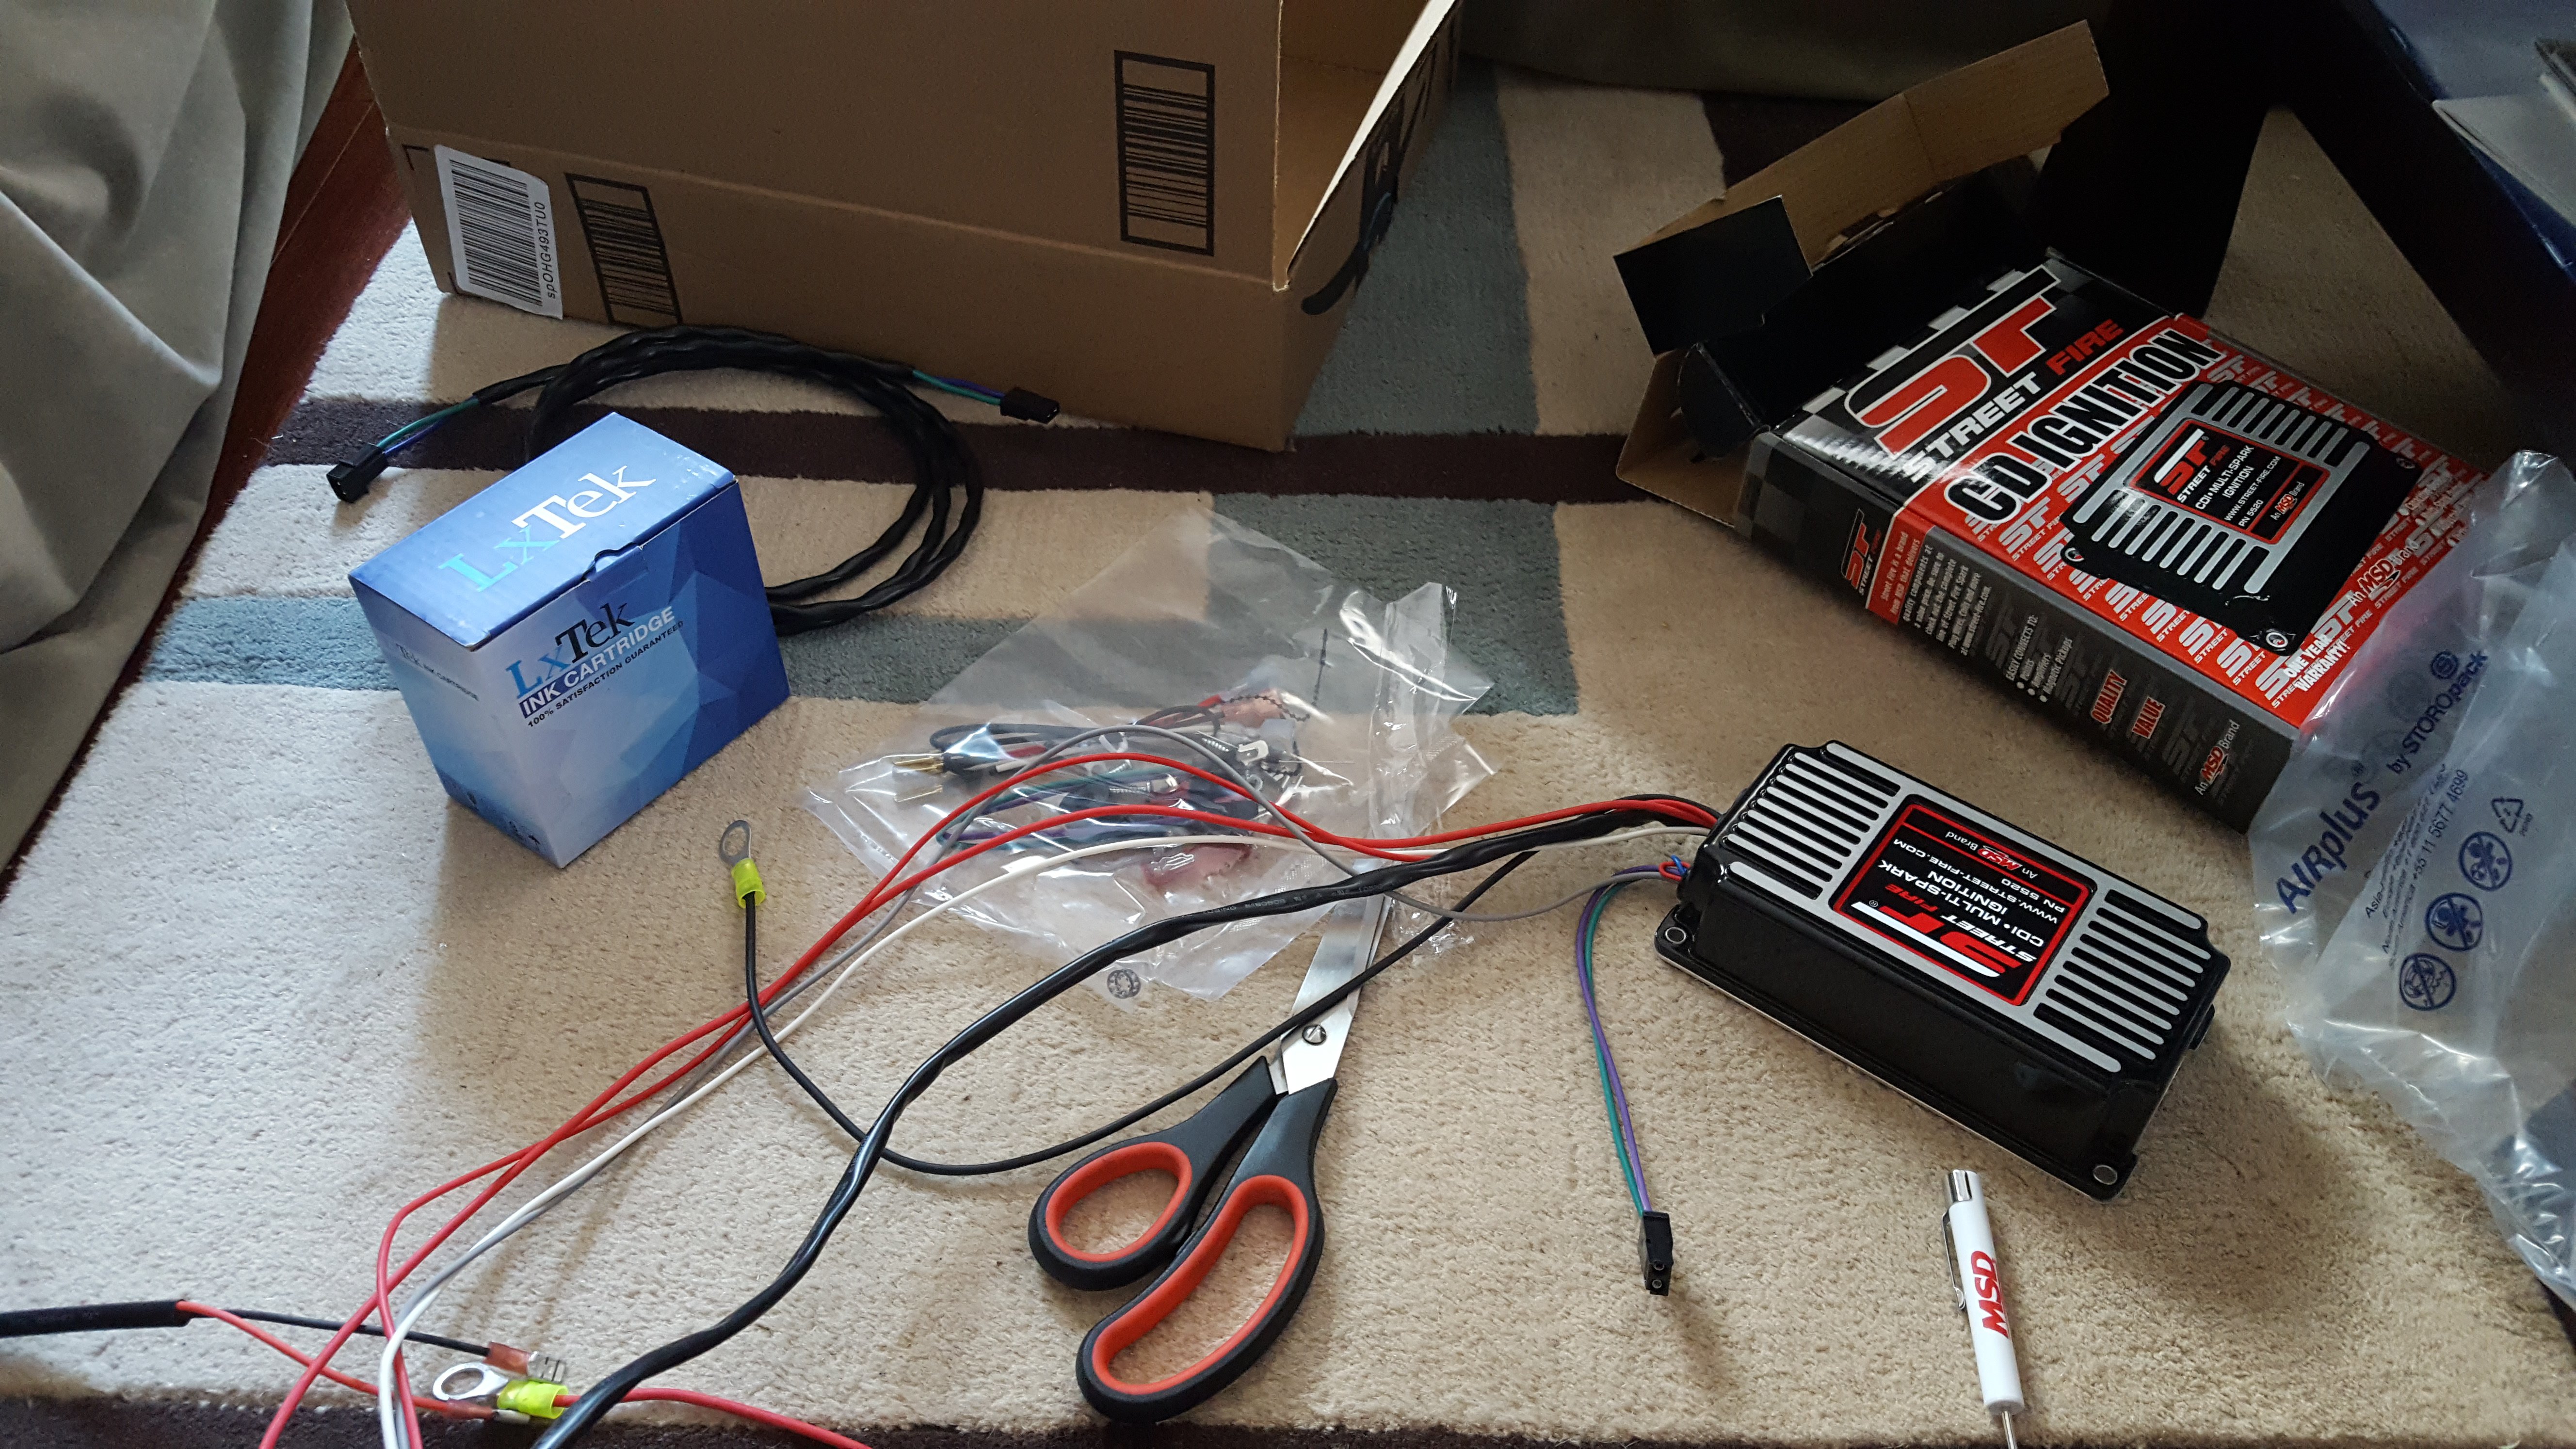
Hello good folks at hybridz. Time to share my bittersweet experience with my MSD street fire ignition. In one phrase: "Sweet, but not to last" I bought the MSD ignition after all the things people were praising it for. I was sugared into the idea that my 240z needed a special spicy shocky sparky super smash MSD ignition. In all honesty for 3 months it worked wonderfully. However, after 3 months the MSD unit showed horrible signs of failure. 1. Misfires from 1000-3000 rpm. When cruising around town, normal driving the engine will have a few farts and coughs. 2. High RPM MISFIRE, the engine would start to "break up" at any rpm over 4500rpm. The engine felt like it had an imposed rev limiter by not firing. NOT the MSD's rev limiter, that was working fine(easy test) 3. Odd idling, the engine would idle around 2000 rpm, then 600rpm then it would have problems starting . 3 months the unit started to fail... 8 months the unit stopped firing all together. MSD probably built this unit to fail right after the warranty. I had to rewire my ignition on the side of the road to fix it. Next thing I know my pooch of a 3.0 motor now is driving great. I had built this sweet 3.0 motor for road racing but what is the point if the engine could not rev past 5000rpm. THE DARN MSD was the weak link, and prevented me from using the power that was hidden past 5000rpms. Now the engine revs to 8000rpm no problem. HIGH RPM MISFIRES CAUSED BY MSD IGNITION
-
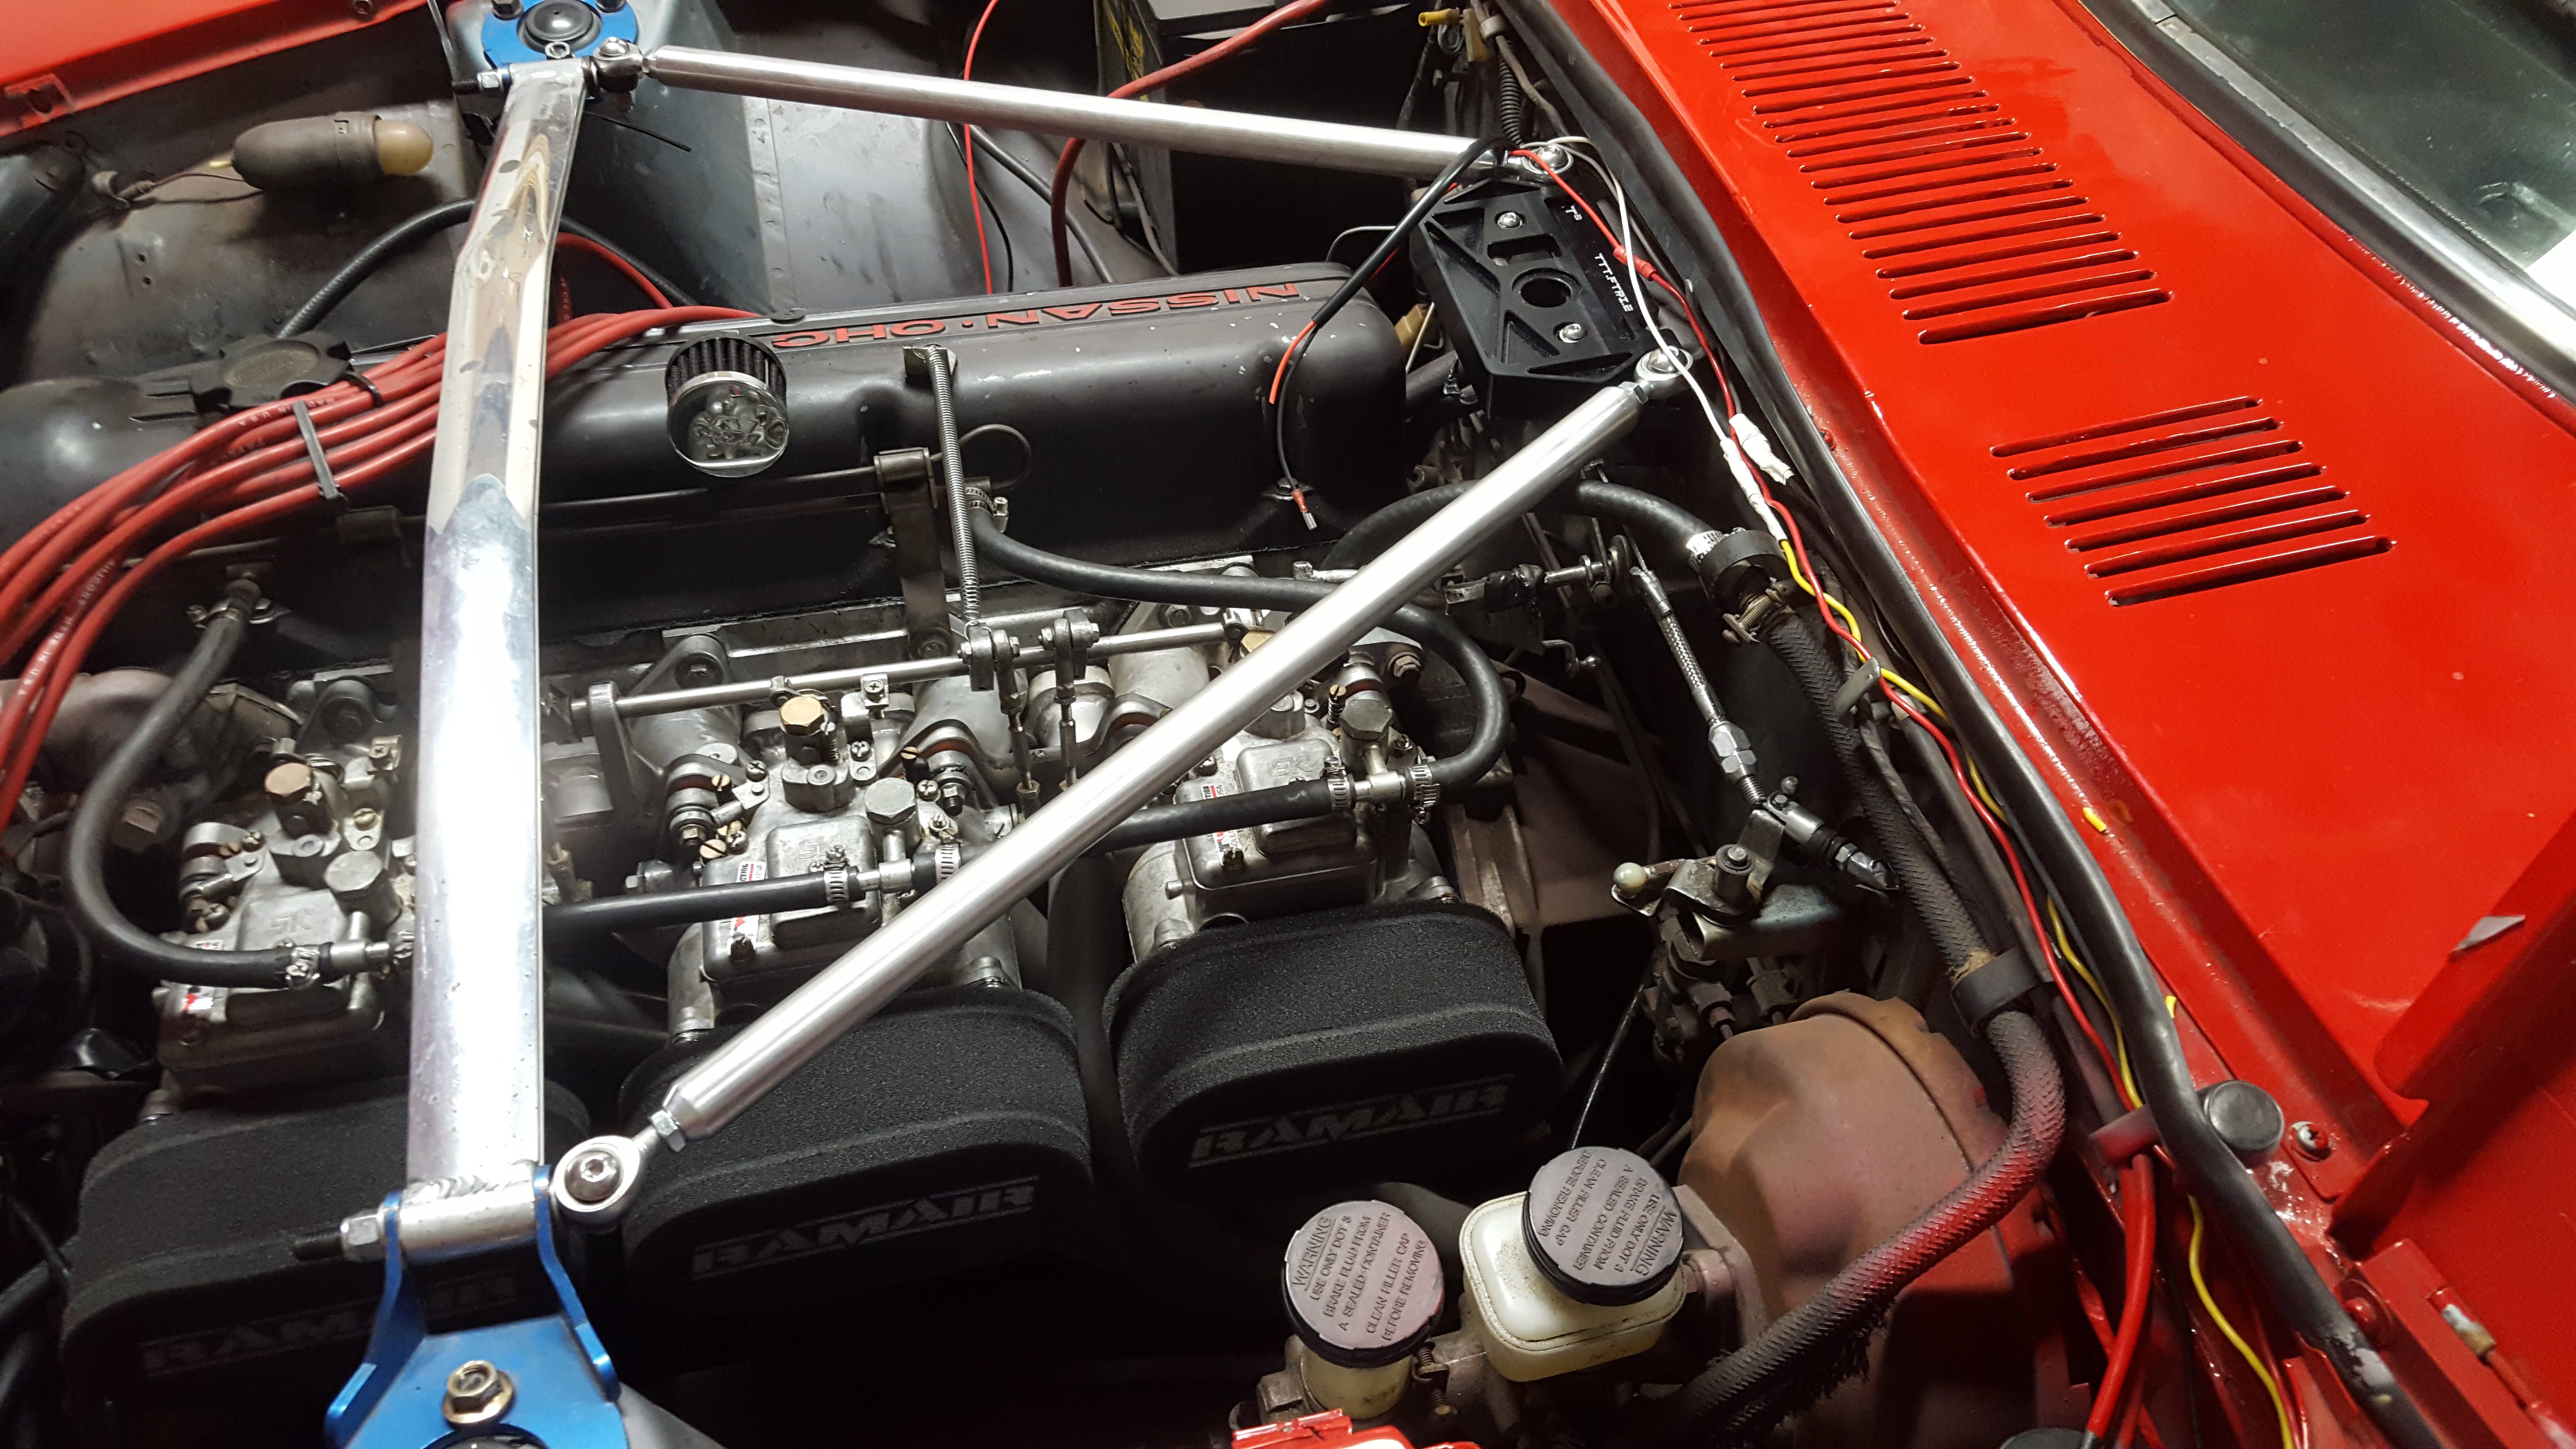
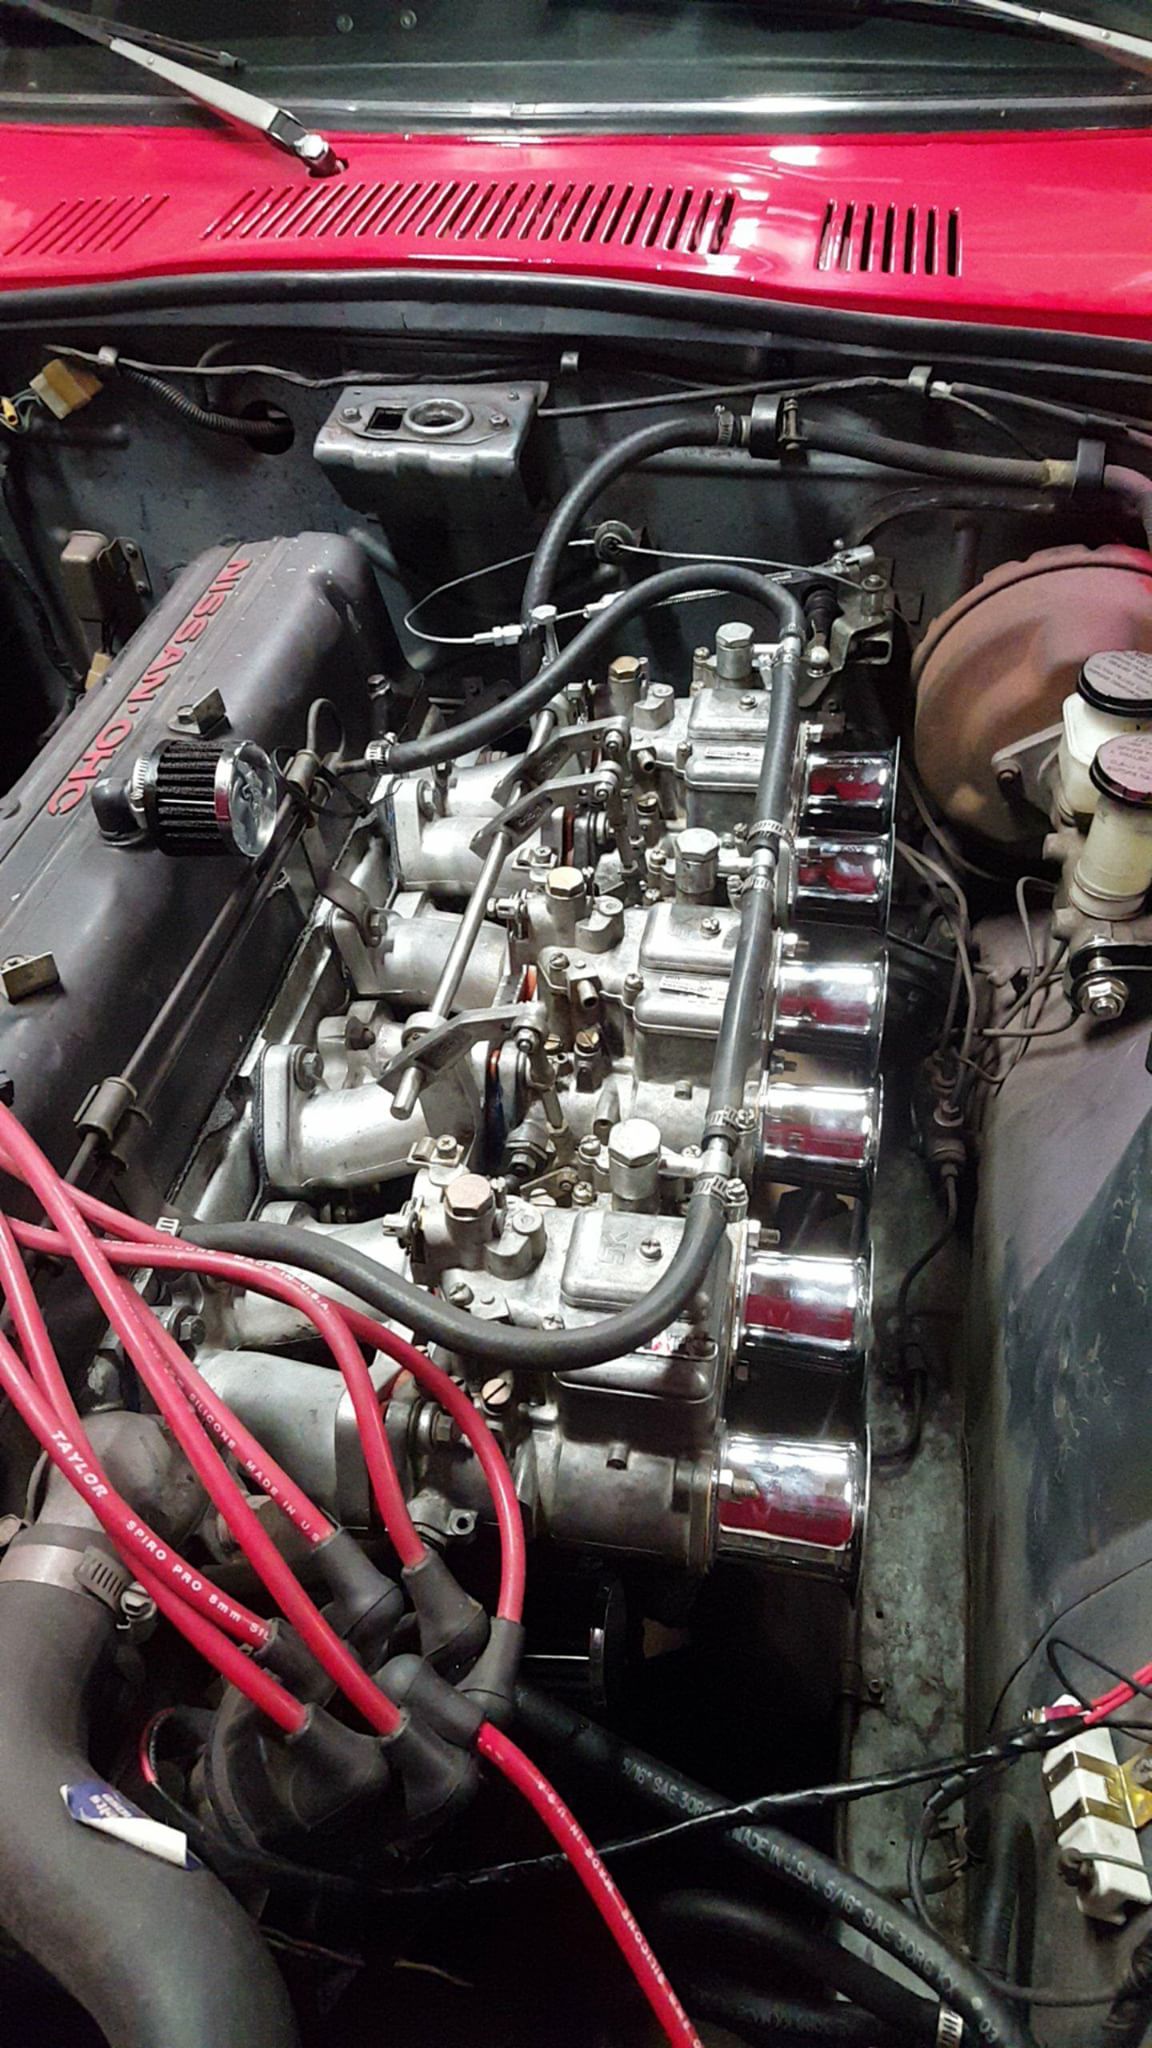
I have been having so many issues tuning my triple OER/SK dcoe 40 carbs. I recently bought these carbs secondhand. I have been running into issues with idle speed, and synchronizing. The car runs very rough and the engine shakes quite a bit. Problem #1 I attempted to synchronize all three of the carbs but ran into many issues. The carb (#2) in the middle seems to be drawing in a lot of air compared to the carb (#1) and carb (#3). This is with all the carbs set to the same idle speed screw distances. I suspect that carb #2 has a bent throttle shaft or butterfly, but the butterfly opens smoothly with no obstructions. I also checked for vacuum leaks and there doesn't seem to be any. Problem #2 When I put the synchronize tool onto any of the carbs the idle drops and the carb drools fuel everywhere, like a toddler drooling. I am not sure if that is normal or not. Every carb seems to do that when I hold the tool up to the throat. Also when I hold up the sync tool to carb#2 the engine almost dies out. Desperately, trying to find a solution I have to increase the idle speed of #1 and #3 in order to match the flow of #2. This resulted in a super high idle speed of about 2000rpm. Problem #3 Carb #2 seems to also be running much leaner than the others. I had to turn the idle mixture screws a few more turns than #1 and #3. please any advice is welcome.
-
240z T3 NCRA and Camber/Toe bushings review
Jazz86 replied to Jazz86's topic in S30 Series - 240z, 260z, 280z
Tried blue locktite on them and they seem to be holding on well. If those ever come loose again I will get new lock washers and clean up the threads a lot more thoroughly. As for the tire letters those were using one of those tire makers, they tend to yellow and fade the harder I drive. However, all my friends seem to like the slightly faded look, they say it gives a touch of patina ... as if the car didn't have enough patina.