

JMortensen
-
Posts
13742 -
Joined
-
Last visited
-
Days Won
67
Content Type
Profiles
Forums
Blogs
Events
Gallery
Downloads
Store
Posts posted by JMortensen
-
-
21 hours ago, AydinZ71 said:
1) I put a relief in the firewall to allow access between the OEM cowl vents and the engine bay. The cowl was completely rusted and needed replacement anyways, so seemed like a clever idea. Some say the air will actually flow from the cowl down into the engine bay, but the vents are several inches in front of the high-pressure point on the windshield so who knows. The idea was to relive the low-pressure on the underside of the hood with the means available so we'll see.
I think this is the wrong move, but it would be pretty easy to test if you put yarn tufts on the cowl vents. If they blow into the cowl, you're forcing air under the hood. You mention relieving the low pressure under the hood, but you want low pressure under the hood. You'll already have low pressure on top of the hood as the air flows past, and if you can get it, you want lowER pressure under the hood. The pressure differential will act on the surface of the hood, making downforce. If you equalize the pressure, you'll eliminate the downforce. The opposite is when you see a hood blowing up like a balloon, like the Janspeed car. You can imagine if that's .1 psi on the bottom surface of the hood, which is something like 3x5 feet as a rough estimate, that's 2160 square inches or 216 lbs pushing up on the bottom side of the hood. You can see what looks like here. Leading edge and sides of the hood are bowed up pretty severely. Looks like a thin FG hood, but makes the point pretty clearly:
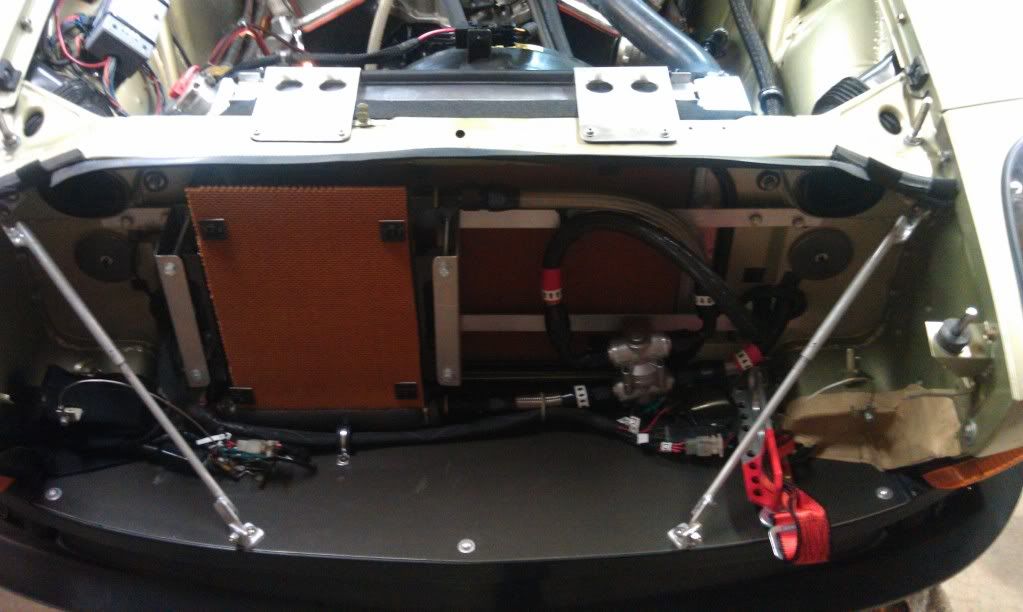
21 hours ago, AydinZ71 said:2) rad area. I have not put the aluminum cladding in yet, but as several have mentioned I will be blocking air from diverting away from the rad support going over the top and bottom. What you can see is how I block the horizontal flow of air from going anywhere other than for a purpose. There is an engine air intake, two air intakes for the fresh-air ducts (I was told you need as-much fresh air as you can for a race car), and the rad of course. Two holes on the left are for grommets to allow the oil cooler lines to pass-through. Plenty of room and space for riv-nuts for fastening of AL cladding.
Eventually I will be installing the 280Z FRP bumper to further block and re-direct air away from this massive front-end opening.
Not sure I follow you here, but just to give an example here is a link to some pre-fab rad ducts: https://www.jegs.com/p/Five-Star-Race-Car-Bodies/Five-Star-Radiator-Ducts/2834016/10002/-1
Years ago I linked to an article from Circle Track magazine where they showed the difference between a ramped duct with a smaller inlet like in the link above vs a duct as big as the hole in the grill without a ramp, and there was a significant advantage to the smaller opening with the angled duct. I want to say it was worth 100 lbs downforce or something crazy like that. The article is gone now, unfortunately. A NASCAR isn't exactly the same as a Z because circle track cars have no fenderwells and they can exhaust a lot of air out of the sides, but I would still do the duct that way since it's better in theory and I don't think it will be significantly harder to make. YMMV. -
You're searching forums for your own name so that you can chime in with your thread jacking pedant posts? LOL I suppose I should have known. Like a hair trigger Beetlejuice. Please, can we spend less time talking about how you're misusing words and more time talking about spoilers and aero and how they work, and less about who made them or making excuses for them?
-
Just now, HS30-H said:
The OP is asking about putting a 'BRE' rear spoiler on his 280Z. And ".....This will be a street car with a few passes at the dragstrip per year." I don't think we are at the "modern aero" stage quite yet...
")
He's asking a question about a spoiler. We are having a conversation about which spoiler works best and why. You are derailing it with bullshit about why we shouldn't criticize a given part because it was produced 50 years ago.
Just now, HS30-H said:I was talking about critique. You are talking - automatically, it seems - about criticism. Quite different.
Must be using that British English, or your language pedantry isn't as strong as your Datsun pedantry. From Merriam-Webster:
critique: an act of criticizing
criticism 1a: the act of criticizing usually unfavorably
Just now, HS30-H said:Hey, hagiographic pedantry is a dying art. Somebody needs to keep it going.
And that would be just great, thank you. But only if you could try to rein in some of your more Phyllis Stein-like tendencies when talking about matters that are - when all is said and done - historic.
I don't need to rein in anything. You should rein in your tendency to interject with offended posts that have nothing to do with critiques of these shoddy parts.
-
6 hours ago, HS30-H said:
The HybridZ forum mostly revolves around the S30-series Z, which was designed and built as a road car for several different markets. The engineers involved had to be pragmatic and I don't think anyone has the right to critique their product (with 50 years of built-in hindsight) without taking into account the restrictions forced on them. As some of the photos above show, Nissan *did* conduct aero-related testing and parts development before the Z was in full production but that department was not going to be allowed to add anything to a 3.5k USD sports coupe in which the engineers were too frit to use a Servo synchroed transmission because the average buyer might think it was already broken. Built down to a price, with only one spec, right? Most of the time you didn't even get to order a particular colour.
I think we finally got to the heart of it, Alan. Only took 20 years. The HybridZ forum is dedicated to putting modern engines and aero on the S30. We have every right to criticize what was done 50 years ago and there is no mandate for anyone to consider why it was done that way originally. The purpose of the site is to modernize the cars, using all of the knowledge and developments that have taken place since then, not to consider the limitations of engineers back then or restrict ourselves to them, let alone canonize those badly designed roll bars or flares or undertrays on race cars. Don't force your hagiographic pedantry on me, and for my part I won't bolt a carbon fiber swan neck wing onto your 432 when you aren't looking.
-
It's a no brainer that the tray would help reduce drag, although we know through 50 years of experience that making it flat, incorporating a splitter in front and having it lower at the front than the back will make it better than the original design. Some of the stuff they did back in the day was pretty shady. Look at their homologated roll bar. Terrible. And now we'll get Alan Thomas in here being an ass because I criticized the factory roll bar. BTW, you better hope those aren't his pics. He's super generous about it when people use his pics to spread the general knowledge online.
")
-
Probably not useful to dredge up the past, but my take on it at the time was that they probably asked Bob if a flat paneled floor would make downforce, Bob looked at a stock ride height Z with stock front end and said paneling the bottom wouldn't do anything for downforce. That's probably true. You'd need it a lot lower and with some rake to do much for downforce. Mike's take away was "undercar aero doesn't work on Z's" and this info came from on high. BOB said it. I mean, it was BOB, FFS. I don't know what Mike asked him about the radiator duct, but he specifically called me out and tried to make an example of me on that one. We already didn't get along, and hey, I rub a lot of people the wrong way and I don't make excuses for it, but that one really got on my nerves because he obviously hadn't thought to test a rad duct and then tried to make me look like an idiot for asking about it.
You can go back and read all the drama if you want, but I think the basic point was this:
They put together a wind tunnel test, which I donated to and am eternally grateful for.
Mike said he read some books but in the end they didn't test anything outside of some simple bolt ons.
I pissed Mike off really badly because he went all out on this and as soon as he posted the results I started asking about all the stuff I thought he should have done and didn't.
The second time he asked for donations I said things like "Make a flat plywood floor that you can clamp or screw to the bottom to test" and Matt came back telling me how ridiculous it was to use plywood and how they were making all of their parts out of carbon fiber. Before testing to see if they worked. Then they got pissed and started throwing insults.
-
They did not test any paneled floor ideas at all and said Bob at the wind tunnel told them it wouldn't work. Mike Kelley who organized the first test said that the radiator ducting was a bad idea because Bob said so.
 I mentioned testing flat bottoms they were talking about doing a follow up wind tunnel test and pissed off the guys involved to the point where I think I single handedly killed the project. Double Then they went and put both ideas on their own cars. Mike and Matt did NOT accept suggestions very well, let alone criticisms. Quickly resorted to insults and took their ball and went home.
I can tell you that I emailed Simon McBeath, the author of Competition Car Aerodynamics and he suggested paneling as much of the bottom side as possible. The things you need to look out for are getting air to the trans and diff for cooling (NACA ducts work to get some air in there), exhaust heat, and when I do mine I will go aluminum in the middle so that the paneling itself isn't flammable. -
-
Look at the way bjhines did his air dam support. He covered the whole space between the rad support and the air dam, preventing air from going under the rad support. That's a much better way than what you're showing here. Doesn't prevent the air from going up and over the top, but 1/2 the job done is better than none.
-
Both. Stock height is kind of ridiculously high for track/high speed stuff. The front of the car is wide open and just shovels air in under the hood where it gets trapped and ends up going under the car, creating lots of drag.
If your rules allow, making a duct from the front to the radiator so that all the air that goes in the front has to go through the radiator will reduce the amount of air going in, as without a duct it goes down in front of the rad and up over the top, and through all the holes in the rad support. Also louvering the hood to get rid of that air under the hood without forcing it under the car is a good idea. -
Not sure if this link direct to the album will work. https://www.facebook.com/media/set/?set=a.1581733071873043&type=3
-
DM me your email address I'll send you the full size ones, or you can find them in my albums on FB: https://www.facebook.com/Jon.E.Mortensen/
-
4 minutes ago, JMortensen said:
-
-
We don't need to guess here. The wind tunnel testing did the MSA spoiler (BRE spoiler) and a 5.25" tall spoiler. At 120mph, the BRE made 22 lbs downforce. The 5.25" one made 30 more lbs downforce. Without a spoiler at baseline, it made 55 lbs of lift.
The much bigger thing with regards to Z car aero is to do something in the front. Cover up that huge hole in the front and I expect you'd see some real gains at the drag strip. Stock, the test car made 320 lbs LIFT. That work that the air is doing is slowing you down. If you look at the wind tunnel results the stock test #2 the car had .471 CD. If you look at the last test with the car with the most aero mods was .407. The hp to drive the baseline car at 120 was 102. The hp to drive it with the front end mostly blocked off was 88. So closing up the front is like giving yourself another 14 hp at the fast end of the track.-
 1
1
-
-
I wanted something around 10.5:1. I cc'd the chambers and did all of that and was going to hit my numbers. On the first build of this motor I used the wrong machinist. He installed the previous, smaller cam and there was coil bind. Rather than replace the springs he cut the crap out of the valves to lower them in the head, so the "margin" on the valves was zero. from the cut part of the valve to the top was pretty sharp, and the valves got hot and tuliped because of this. Set them on a table and they rolled funky, but the engine still made pretty good power when the harmonic damper failed and keyway on the crank broke. After the crank took a crap I went for a rebuild with flap tops.
Anyway I had everything just where I wanted it as far as chamber size, then replaced the valves. the new valves had no dish in them and sat much further into the chamber so it jacked the compression up, and then the head needed to be surfaced just a hair, and between the two that bumped it into race gas territory.
Mark's car is easy to drive around the grid. I don't think the cam will be your problem. It will be the clutch. Mine is much harder to move around at low speeds. You can do it, but you just don't even try to be smooth, because those tiny clutches wear quickly, so just be rough and don't slip the clutch.
I don't know if you were here when Monzter was an admin, but he had I think a triple disk 5.5 on his street car. He made a crazy intake manifold and actually seemed to get decent numbers out of the MSA Stage 3 cam (only person I've ever seen make that POS cam work). Might be worth looking up his old threads. -
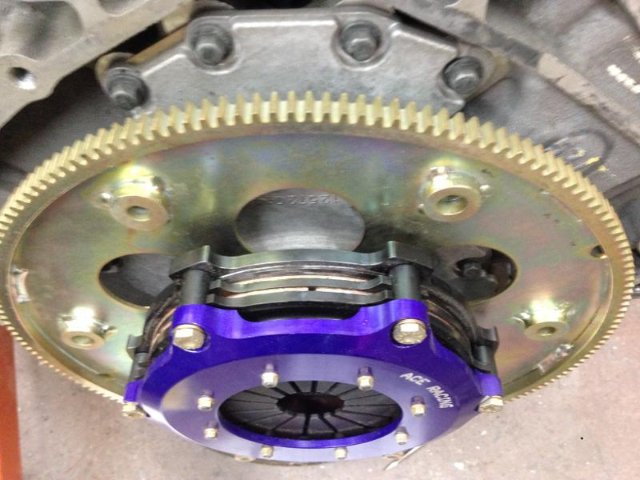
I can answer some of these. I'm running a dual 7.25" button clutch on my V8. There are smaller 5.5" ones also and you can get 1, 2, 3, and 4 disk units (maybe more) to hold more power. They use a flex plate to engage the starter in the standard location. For the super hardcore racers they'll have a smaller starter that goes in backwards on the transmission side and hits a smaller diameter flex plate. You can get button clutches for the L6, don't think I've seen the tiny bellhousing and flex plate for them though. Regardless, a flexplate and button clutch reduces the weight a lot because the pressure plate is smaller, the clutch disks are smaller and lighter, etc.
I believe Cary was running steel wheels, but when you get them down that small they just don't weigh that much. The Formula Atlantic tires are not that expensive for slicks. I understood that my Yokohama 15" FA slicks I used in the 90s and 00s had a kevlar strip down the center and was told that this prevented them from expanding and changing the effective gear ratio at high speeds. FAs can get going pretty fast on super speedways, and used to run before CART cars at their events back in the day. Wasn't aware they had kevlar belts too.
-
Mark has the strongest L6 I've ever driven by a long shot, it's hard to say it's lacking power. But yeah, the "area under the curve" is WAAAY bigger with the V8, and it's most noticeable when I don't shift in slow corners and he does. I also have a lot more tire than he does. My springs are about twice as stiff too. They're just different. He always raves about how my car turns in a lot harder than his. His is easier to drive, just does everything a bit slower and more calmly.
I would suggest you get that 300+ duration cam. I had an 11:1 L28/E31 .490/280 cam with the chambers polished and valves unshrouded and all the stuff done and it pinged really badly until octane got to about 95 or 96 (had to mix race gas). It both pinged and could have used more top end. I was planning for a bigger cam and all that and then finally succumbed to the V8 temptation. -
Mark Haag and I have driven each other's cars many times. Here's a cool shot of his, with mine going around the autox course (I'm driving Mark is passenger) in the background.
He has a high strung 12:1 stroker that pushes a little over 300bhp. I have an L33 which is an aluminum 5.3, makes about 370 whp. I've got more tire, obviously. Both cars are built to autocross, mine more seriously.
You can make arguments for both, and they're both fun to drive. I have to say if you were looking for the best noise, his wins hands down. But mine is faster at autox and I think if we went to a big track I'd just drive away. I know he wouldn't trade me, and I wouldn't trade him either. We both are big fans of each other's car. Different strokes... -
We had a guy here 20 years ago, gramercyjam was his user name I think. I believe his L24 autox car was 1800 or 1850. Cary, aka Tube80z, might have been even lighter in his autox car. 1750 or so. Those two always stuck out as the lightest. I don't think either of them swiss cheesed their cars to get that weight. Just stripped out race cars with nothing that wasn't needed.
-
I spy a necroposting spammer.
-
The wheel wells are pretty stout. Not the wells, but the walls that the connect to. There are 3 or 4 layers of sheet metal on the inside of the dog leg area. I know because I picked the seam sealer out to stitch weld in there. Huge PITA. Should have skipped it. I've seen some people lay a piece of sheet over the gap and then stitch there, that would have been a million times easier.
Those NHRA rules probably make sense on a ladder frame car, but that bar that you're showing doesn't make a whole lot of sense on a Z. Same with the main hoop supports connecting to the floor. -
Gonna be really low on my priority list. Maybe next winter. Was supposed to do the flat floor two winters ago...
-
Shit. Now you got my brain rolling on this. Thanks a lot.
I don't think there is room for this front brace, I think the oil pan and bell housing would be in the way, but I'm thinking the rear one would definitely work. Maybe if there is too much crap in the way up front I could make a single horizontal bolt in xmember possibly bent to go under the oil pan, and then I could do the sheet AL on the bottom.


how do you feel your engine swap changes the character of your Z?
in Non Tech Board
Posted
I've got 14" wide slicks, V8 swap and I'm at 2352 lbs. Could turbo the 5.3 and be at 2425 lbs or so and have 1000 hp if I wanted. I don't want, but it's well within the realm of possibility.
The 3's are doing pretty well at the local autox. I appreciate what they are and the advantages that electric cars have. I just want that battery weight to come down.