
heavy85
-
Posts
1227 -
Joined
-
Last visited
-
Days Won
2
Content Type
Profiles
Forums
Blogs
Events
Gallery
Downloads
Store
Posts posted by heavy85
-
-
Bump - John you out there?
Thanks
Cameron
-
hey gasoline' date=' I bought my Z when I was 15...the last day I was 15. lol
back on topic...
How old were you Austin when you got your early 260?[/quote']
Sorry back off topic ... I bought my first Z - a 260 - when I was 14 but that was four kids ago.....
Cameron
-
So' date=' I wasn't knocking anyone out there. I'm just getting old and Its taken me so long to start this project.
Thanks for all the help I am getting.
Mike[/quote']
No offense taken here whatsoever but then again I was still just a tike back then.
Cameron
-
so I have 3 choices. Roll the lips even more. Cut them and use flares. Stretch a 245/45/16 on 10 inch rims. Can be done. What would you do?
.
That's easy - flare (flair?) it!
Cameron
-
Anyone see any advantage/disadvantage to moving the rod ends closer to the strut with no spacers vs having them at the distance originally designed for the bushings and using spacers?
Moving the rod ends closer to the strut would increase the force through them due to being a shorter moment arm resisting the tire wanting to spin around the strut. For the small amount of movement you're talking about I doubt it would be much but pretty easy to figure as it's just a ratio of the old vs new distance with respect to the centerline of the strut. Without spacers would save weight but we're obviously talking ounces here so I doubt you care.
Cameron
-
The package tray is one of the torque boxes in the Z chassis....I think the section that goes over the tranny tunnel on the vertical area is reinforced, and I think that's about the thickest metal in the whole chassis, excepting maybe the TC buckets. If memory serves that plate is about twice as thick as the "frame rails".
Are you sure? Mine is a '72 and the tray is very thin sheetmetal. Thin enough I can easily just push on it and it visibly deflects quite a bit. Definitely a lot thinner than the floor pans for example which I have to beat on pretty good to get them to move around. Looks like almost an afterthought to provide some storage and a flat spot for luggage as it's just tacked on top of the the more substantial floor structure below.
Cameron
-
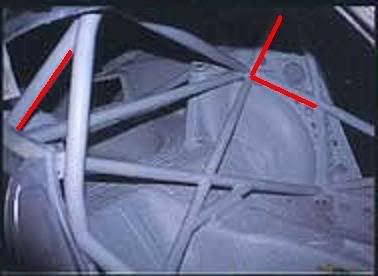
I'm not sure what you mean. All the bars are connecting to the front part of the tower the best I can tell from the picture. There is a bar continuing from the door x top bar too. Is that the best place to connect all the bars' date=' I dunno?
[img']http://img.photobucket.com/albums/v201/zlalomz/xbar.jpg[/img]
What I mean is they connected to the wheelwell but the load comes into the strut tower. So there is no direct connection from the loads which come from the strut to the cage - the load has to go from the strut into the strut tower then into the wheelwell and finally to the cage. From a loadpath perspective seems like a less than efficient design - to me you would want to tie into the tower and not the wheelwell. Maybe the cross bar is welded to the front of the tower but it's hard to tell?
PS: sorry, didn't mean to hi-jack Mull's thread
Cameron
-
I always thought the package tray area provided some level of side stiffness by connecting the wheelwell to each other and the tranny tunnel. However, after playing with it for a while I realized the metal is soooo thin that I can't imagine they could really provide much if any strength. I'm thinking why not just remove it and maybe run a tube across to tie the wheelwells and tunnel together. Thinking it might be a lot stiffer for the same weight. Could also potentially allow me to move the battery forward and down which would be good. Anyone studied or done this have some comments?
Thanks
Cameron
-
Jon, check out how they are doing that style in Japan with lower x-bars in the doors, rocker panel tube and the rear xbar to the strut towers. [url']http://www.classiczcars.com/forums/attachment.php?attachmentid=10177&d=1133539656[/url]
Why would they have not tied the cage into the rear strut towers?
Cameron
-
John,
I remember you once saying your front strut tower bars on the ROD were design using FEA plus I just like your design from a structural standpoint so would like to steal it for my car if you dont mind. Do you have any details other than the one pic on your sight? Maybe any close-up photo's, material thicknesses, etc. I'm most interested in exactly how you re-inforce and tied into the firewall and strut tower.
Thanks
Cameron
-
Cameron, which strut insert are you refering to?
8610-1437RACE
-
Cameron, which strut insert are you refering to?
8610-1437RACE
-
Well' date=' I ordered my 8610s today. I wanted 8611s, but this body width (according to Koni) is 1.8 inches, and the ID of my 240 tubes are only 1.75". It appears the 8610's width of 1.72 is gonna be close, but work.
Does this sound correct by other's out there?[/quote']
It took A LOT of work to make them fit my 240 tubes. Sand all the paint off the struts, ream out the inside of the strut tube, and I found there is the strut number stamped near the bottom of the strut that is raised a bit and catches as it goes in and needs to be knocked down. I got them to fit even after sectioning but just barely and it took a lot of effort. They were not consistent as one just fell in even with paint, one required some paint removal, and the other two were just a PITA. One of the scariest parts is trying to get the gland nuts started without cross-threading them since everything is so tight.
Cameron
-
Sorry to get back on the subject but ..... I just opened the box with the 2x3 tubing in it. Holy heart attack batman that stuff is waaaaaaayyyyyyy overkill OMHO for a Z plus they weigh about 16 lb each side! I've got to rethink this SFC thing because that's just silly beefy (no offense to those who've pioneered this method as it's definitely stout). Maybe I'm over-reacting but those things seen better suited for a truck or something. What about what I suggested a couple posts up and split the 2x3 in half into two 1x3 U pieces and use one half attached to the inside of the rocker and the other half to the bottom of the floor? Then attach the front of the rocker to the engine rail & T/C bucket.
Cameron
-
My wife's a sweetheart. Wasn't feeling well the other night and went to downstairs to find her cleaning up the other garage bay - the one the Z's not in. Looks like the 'maro is will be inside for the stripping!
Cameron
-
awesome work guys looks great but that cat... damn its scary looking..............
That's a cat??? Would have fooled me ... and who photochopped it's eyes ...
-
Is the other side wiped out. It doesn't look in that bad of shape.
No just the rear edge of the passengers side back. Not looking forward to the work of parting it out but sure am looking forward to the smile on my face when I punch it for the first time
 .
.Cameron
-
Be here tomorrow 7 AM to join the backyard and eventually the Z.
Cameron
PS: Sure anyone doesn't want to buy the leftover roller before I part it out?
-
Holly crap - that could not have hit at a worse spot! I'm really starting to rethink the 2x3 SFC as I think there is a more efficient way to get the stiffness. Been looking around at Camaro/Mustang SFC and most the ones I've found were 2x2 or 2x1.5 albeit .125 wall thickness. Those are more used for drag racing which can put a lot of twist in a chassis ... and are 1000 lb heavier. For the little ole Z I'm wonder if I should take the 2x3 (I already ordered) and cut it in half to make two 1/3 U shaped pieces. Cut off the factory rail (I have to replace my factory subframe since it is beat to hell and back and is pretty much useless now otherwise I'm not sure I would even touch them) and replace them with one of the U's and take the other U and weld it to the inside of the rocker. Then tie in the U at the front of the rocker with a tube diagonally forward to the engine frame rail / TC bucket. Could kill two birds with one stone and end up with the same weight I would have added with just the SFC and not have to disturb my not very rusty floorboards. I'm going to cut out the factory seat brackets to lower the seat and just go with 1x1 directly on the floor. To tie it in even bettey maybe run a couple extra side to side bars from the reinforced rockers to the tunnel with a backing plate to spread the load into the tunnel. This extra bar would be right in front of the seat as high as possible without interfering with the bottom of your legs. What's everyone think? In the end I'm going for as much stiffness and driver safety as possible while minimizing weight.
Thanks
Cameron
-
The idea for this originally came after seeing a competitor get seriously injured at a hillclimb. His car left the road and hit a tree at speed. The cage worked perfectly but the car rolled up onto the rocker' date=' which failed and the this lead to his getting partially crushed. Looking at the wreckage it was pretty clear that is this area were stronger his injuries may have been a lot less. [/quote']
Cary - how exactly did it fail? Did it buckle in the middle or did the while rocker get shoved in? Trying to understand the failure mode to better judge exactly how to re-inforce it.
Thanks
Cameron
PS - just got the welder, scraped off all the tar paper, steel is in the mail, just have to get the bottle. Oh yeah and learn to weld!
-
I was told that CH Topping relines 240Z brake shoes with exactly the same material that Ferodo used. I have not confirmed this but here's their web site:
Thanks for the tip John - ordered a set today. They said Ferodo is basically non-existant anymore but that these are built to the same basic specs as the Ferodos and they sell quite a few into vintage racing applications. They are called 'Spectraone' (dont quote me on the spelling) and come from a company in Canada. They were only like $26 so we'll see how they do.
Cameron
-
Lots of good advice up here that you should take in and apply, but also consider you can make up three seconds just by switching to race tires from street tires. Tires make a HUGE difference.
Cameron
-
Thanks for the links. To close out the list does anyone know where to find some Ferodo Green Stuff shoes? Courtesy says they are NLA and MSA only has ones for '75 and newer. Anyone know who sells them for the 240's?
Thanks
Cameron

What are you using to control your electric fan?
in Miscellaneous Tech
Posted