Bartman Posted February 14, 2005 Share Posted February 14, 2005 Okay I finally got ny engine bay painted! http://home.earthlink.net/~570z/images/paintedEngineBay.JPG I need advice on color sanding. I put on three coats of PPG Omni SV 2.1 Clear and it looks pretty good, but I'd like to have a smoother finish. What process would you recommend for color sanding the engine bay? Should I use 2000 grit or start with 1000 or 1200? I don't want to sand through the clear coat on the edges, so I want to be very careful. Quote Link to comment Share on other sites More sharing options...
Tim240z Posted February 14, 2005 Share Posted February 14, 2005 Man, I don't envy you!! Color sanding is a beeeache at the best of times, but all those curves and crevaces!! Looks like it came out really nice. Looks to be quite a bit of orange peel, so i would start with 1000. Just take care around the edges. It was for this reason why I used single stage in my engine bay..... Quote Link to comment Share on other sites More sharing options...
EvilRufusKay Posted February 14, 2005 Share Posted February 14, 2005 Looks great. I plan on putting a false firewall on my car as to avoid having to sand all those nooks and crannies. I figure on sheet of 20 gage cut and tacked inshould do the job. I take it you painted it yourself? Tim, What is single stage and why does prevent orange peel? If your response has the word search in it.....well lets just hope it doesn't... Rufus Quote Link to comment Share on other sites More sharing options...
Tim240z Posted February 14, 2005 Share Posted February 14, 2005 Single stage is just a base coat without clear over coat. I guess it's the way the color coat goes on, as opposed to the clear....I think the clear is thicker, therefore has much more of a tendancy to orange peel....but hell, i could be talking out my @ss..... I used PPG single stage black. BTW...do a search!! Quote Link to comment Share on other sites More sharing options...
datsunlover Posted February 14, 2005 Share Posted February 14, 2005 Meh.. I just buought a few cans of flat black spray bomb, layed on a few coats and called it done! It works for now.. maybe in a few years when I have a house and the space (like Tim there.. ) to properly do it, I'll strip it down to a shell and do it 'properly'. Looks good though man! Hey Rufus, you gona have that beast driving this summer? Quote Link to comment Share on other sites More sharing options...
EvilRufusKay Posted February 14, 2005 Share Posted February 14, 2005 I don't think so man. My surgery recovery took loger than i thought it would.... I am going to try for fall I started working on the custom hatch last night!! Quote Link to comment Share on other sites More sharing options...
Zhadman Posted February 14, 2005 Share Posted February 14, 2005 Are you sure you want to color sand your engine bay? That's ALOT of work and buffing the clear after the sanding is going to be a mother of a job. Looks great, though! WRB, right? Quote Link to comment Share on other sites More sharing options...
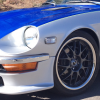
Bartman Posted February 14, 2005 Author Share Posted February 14, 2005 Are you sure you want to color sand your engine bay? That's ALOT of work and buffing the clear after the sanding is going to be a mother of a job. Looks great, though! WRB, right? I'm not looking forward to it, but I think it's the only way to get it to look right. Like Tim pointed out there are a lot of nooks, crevices, ripples, edges, undulations, etc; and its going the be a beeeache. But I'm hoping it will be worth the effort. I'm really concerned about not sanding through on the edges, so I want to be conservative on this project. Do you think starting with 1000 is safe? It is World Rally Blue Pearl, and I painted it myself in my garage. You can see some of the plastic I hung on all the walls, ceiling and floor. It was really close quarters in there, and it was a lot harder than I expected to move around with the paint gun. It's not perfect, but I'm pretty happy with the results. The pearl in the paint is beautiful and it looked good after the basecoat, but the clearcoat really made the difference. It looks like it's wet even after it dried. Quote Link to comment Share on other sites More sharing options...
Vintage-TechZ Posted February 14, 2005 Share Posted February 14, 2005 I Did finishes for high end cars and show cars for 23 years professionally. Please save your frustration and time.............Wetsand only the areas that are heavy with texture ,then Scotchbrite the rest and BE DETAILED ABOUT IT ! All of the areas,not just some. THEN RE-SHOOT your clear with the proper air settings and get it right ! Take some time and shoot a test panel until you KNOW that your gun is good to go ! You'll thank me I assure you. You'll only need a pint of clear to re-do it. Use a small jamb gun if need be, so its easier to handle. And remember....once all the engine and firewall,fenderwell componets are in place ......very little can be seen well ! The only other advice to say if you don't like the prior...........think of the areas that ACTUALLY will be seen....sand ONLY those areas and polish them out good and move on. Whew,OK...........................Vinny Quote Link to comment Share on other sites More sharing options...
Zhadman Posted February 14, 2005 Share Posted February 14, 2005 And remember....once all the engine and firewall' date='fenderwell componets are in place ......very little can be seen well ! The only other advice to say if you don't like the prior...........think of the areas that ACTUALLY will be seen....sand ONLY those areas and polish them out good and move on. Whew,OK...........................Vinny[/quote'] That's kinda what I was getting at. It looks like it's wet even after it dried. Yes, when clean , this is an awesome color! Quote Link to comment Share on other sites More sharing options...
Bartman Posted February 14, 2005 Author Share Posted February 14, 2005 think of the areas that ACTUALLY will be seen....sand ONLY those areas and polish them out good and move on.The more I think about it the more I think this is what I should do. I'm thinking just the relatively smooth inner fenders and shock towers. The firewall and radiator support area came out pretty good, it will be mostly covered, and there isn't enough flat area to work on. Quote Link to comment Share on other sites More sharing options...
Zhadman Posted February 14, 2005 Share Posted February 14, 2005 I think it looks good. Especially if you've never painted anything before (and in such tight quarters). I would just hit the large, flat, sections. I was going back and forth on this subject awhile back and I decided not to paint my engine bay. Well... it'll be painted... just not the 2-stage exterior color. I'm too afraid I'll do all that work and then mess the finish up either by installing the motor or dropping something. Duplicolor Truck Bed Coating here I come! Might not look so shiney (or professional), but it's functional! Quote Link to comment Share on other sites More sharing options...
Vintage-TechZ Posted February 14, 2005 Share Posted February 14, 2005 The more I think about it the more I think this is what I should do. I'm thinking just the relatively smooth inner fenders and shock towers. The firewall and radiator support area came out pretty good' date=' it will be mostly covered, and there isn't enough flat area to work on. Here's another shot that shows the orange peel in my reflection that I would just like to get rid. I could even live with it if it's too much trouble to deal with. I'm actually pretty happy with it, but if I can make it a little nicer before I start putting it back together... [img']http://home.earthlink.net/~570z/images/paintedbay.JPG[/img] Hahaha...Holy Crap.......Bart ,I was reading your post and scrolling down slowly ,the BOOM...there's your head ! Kinda freaked me out .LOL. Go with the reality one. Less is better in this situation for sure. ...............Vinny Quote Link to comment Share on other sites More sharing options...
Guest zfan Posted February 14, 2005 Share Posted February 14, 2005 I really like the color choice and think the engine bay already looks pretty good. Hell better than my Z anyday. Mike Quote Link to comment Share on other sites More sharing options...
Bartman Posted February 14, 2005 Author Share Posted February 14, 2005 Hahaha...Holy Crap.......Bart ' date='I was reading your post and scrolling down slowly ,the BOOM...there's your head ! Kinda freaked me out .LOL. Go with the reality one. Less is better in this situation for sure. ...............Vinny[/quote'] Sorry, didn't mean to freak you guys out by putting my ugly mug in there. You're right, less is better in this situation. I'll work on removing the orange peel from the larger relatively flat areas, and be done with it. It's not a show car...but while I'm at it;) Quote Link to comment Share on other sites More sharing options...
Bartman Posted February 15, 2005 Author Share Posted February 15, 2005 Bart' date=' Gorgeous color!!! If you applied 3 applications of clear (did you apply heavy wet passes or did you mist on the clear?)you should be able to colorsand and rubout the heavily peeled areas. Just tape off edges that you feel you may cut thru while sanding/polishing. RacerX[/quote']The clear was applied in heavy wet passes, so I should have plenty of thickness to work with. I am extremely happy with my color choice, and the color looks even better up close than in the pictures (you can't see the pearl in the pic's). The problem is with closer inspection you can also see that the surface has some imperfections. Hopefully I can colorsand and rubout the high visibility relative flat areas this weekend. Quote Link to comment Share on other sites More sharing options...
Zhadman Posted February 15, 2005 Share Posted February 15, 2005 The problem is with closer inspection you can also see that the surface has some imperfections. Well... get the learning curve (experimenting) outta the way in the engine bay before you apply color to the exterior panels. Save you quite a bit of hassle in the end. Quote Link to comment Share on other sites More sharing options...
Bartman Posted February 16, 2005 Author Share Posted February 16, 2005 Well... get the learning curve (experimenting) outta the way in the engine bay before you apply color to the exterior panels. Save you quite a bit of hassle in the end.This was a good learning experience, and I feel like I will be able to do a much better job when I'm ready to paint the exterior. Heck, the exterior seems like it will be much easier than working in the cramped little engine compartment. Of course I will have much higher standards for the exterior than this job. P.S. - with this post I just became a 'Senior Member':shock: Quote Link to comment Share on other sites More sharing options...
Guest 305240 Posted February 16, 2005 Share Posted February 16, 2005 Beautiful color and detail. I have to agree with Tim. I'm old school when it comes to paint. I've never had to color sand any of my paint jobs. I use acrylic enamal with hardner. It gives you the wet look, just like the polyurithanes do. Then I shoot a clear, also with hardner. The paint looks really deep. You can get orange peel with this if you don't have enough reducer mixed with it. I've melted repair jobs into fenders, doors, roofs, with the same paint, but with varing degrees of reducer. The last coat would be almost all reducer, just misted over the old paint to help melt it in. It takes practice, but looks great. Door jams, trunk and hood openings, I use acrylic emnamel mixed with laquer thinner, I know it's cheating, but it drys to a high semi gloss pretty quick. Reducers usually come in 3 stages, being fast, medium,and slow. Slow for hot weather, fast for cold weather. Meaning, you want your paint to dry faster in clod weather and slower in hot weather. Using the old high pressure gun, your paint jobs are subsceptable to paint runs. Experience will stop this. Good luck to you with the rest of the car. Hope to see pics of it finished! Quote Link to comment Share on other sites More sharing options...
ZR8ED Posted February 16, 2005 Share Posted February 16, 2005 Well I hope you haven't started yet. Looking at the orange peel, I'd be hesitant to sand with grit paper. You can go a long ways to improve using mild polishing compounds, and a small foam pad orbital sander. 1000 grit will take the peel out, but will leave deep scratches that will take some work to polish out OEM grade polishing compounds with a foam pad on a orbital sander, does a wonderfull job of taking out orange peel. Stay away from edges and bumps and dents in the metal. Your clear is likely less than 2 thou thick (most oem jobs are in the 2 thou range. more on the horizontals, less on the verticals.) It wont take long to burn through when sanding. 3m Have some great over the counter products that are identical to polishing compounds used at OEM mfg sites. Quote Link to comment Share on other sites More sharing options...
Recommended Posts
Join the conversation
You can post now and register later. If you have an account, sign in now to post with your account.