280zjoel Posted January 26, 2010 Author Share Posted January 26, 2010 Hey ever take any pics of the alternator relocation? and what belt part number did you end up using? Actually, I will be working on making the bracket for the alternator this week. I will post pics as soon as make the bracket. I will have to check the part number on the belt, I took my old belt to the Auto store and they just got me one that was the same size length wise. Quote Link to comment Share on other sites More sharing options...
280zjoel Posted January 27, 2010 Author Share Posted January 27, 2010 Well, not much going on so far. I changed the timing chain on my engine and its just about ready to go in. I still need to fab up a bracket for my alternator ( I might do it tomorrow depending on the rain:sad:) Hopefully ill have this thing wrapped up pretty soon, then ill get to drive it again:mparty: Quote Link to comment Share on other sites More sharing options...
mysteremech Posted January 27, 2010 Share Posted January 27, 2010 The part that you have indicated in red outline, in the above picture, continues on out and covers the back of where the hood hinge nuts are welded. Do you by any chance still have about 12 to 18 inches of that piece left on your donor clip? Mine is rusted beyond repair in that area and I need both sides to weld back in. If you would be interested in selling these pieces please let me know. PM me if you prefer and I could shoot you a picture of my car showing how much of the parts I need. Thanks in advance. Quote Link to comment Share on other sites More sharing options...
280zjoel Posted January 28, 2010 Author Share Posted January 28, 2010 Hey ever take any pics of the alternator relocation? and what belt part number did you end up using? Here is what I did today to switch the alternator to the left hand side. First off I took the alternator bracket and flipped it upside down and positioned it on the other side, I had to measure how much to offset it to line up with the other pulleys. I ended up drilling a new hole, and making 2 brakets to help support it(circled in yellow). Also the spot I drilled the hole needed to be grinded flat since it is not level. Here is a better shot of the new hole I had to drill, hehehe I machined it flat( actually I grinded it down:icon45:) It came out pretty well, one thing I did not like was welding the steel piece to the cast steel bracket, not the cleanest weld but I will make sure to check it often to make sure I doesnt crack. Alternator On And thats about it. All I need to do now I get some right sized bolts and im good to go( Notice the ghetto bolt spacers on the bracket). Quote Link to comment Share on other sites More sharing options...
mr jdm Posted January 29, 2010 Share Posted January 29, 2010 Nice, I competely overlook things very often. I made a my own bracket from scratch but the alternator faces up and the terminal on the back sits close to the exhaust manifold so I think im gonna flip mine like yours. Thanks for the idea and nice work. Quote Link to comment Share on other sites More sharing options...
piston Posted January 30, 2010 Share Posted January 30, 2010 dude, your engine bay looks better than mine. any paint on a engine bay will give you more thumbs up than a black one. black does look good with any color though. Quote Link to comment Share on other sites More sharing options...
280zjoel Posted January 30, 2010 Author Share Posted January 30, 2010 dude, your engine bay looks better than mine. any paint on a engine bay will give you more thumbs up than a black one. black does look good with any color though. I know what you mean. I wish I had more money to work on the car, in order for me to paint the engine bay with the red, I would also need to buy some black base coat to spray on first. Originally when I went to the paint shop the guy there told me that the color I bought was a 2 stage paint. When I got the tech sheet for the paint, it mentioned to spray the red base over black base to get the desired color. So now I have to buy black base coat and hardener( Cali state law prohibits solvent based paints unless used with a hardener to bring it up to spec) which would cost me more $$$$. So its satin black for now. Maybe in the future I will repaint it, when I have more time and money. I think it looks a whole lot better than before, It will also be easier for touch ups. Quote Link to comment Share on other sites More sharing options...
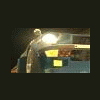
280zjoel Posted January 30, 2010 Author Share Posted January 30, 2010 Ok guys, got more work done. Here is where I stand as of now( Today I used my brothers Nikon, and man that thing works great:mrgreen:): POW!! MOTOR IS IN!! It took some TLC to squeeze it in but its in. I did run into a few problems though. Notice How close my clutch Master is to my intake? So here Is my problem, the clutch master line barely touches the intake manifold, I think Im going to place a washer under the the motor mount to move it slightly over and away from the line. Here is a pic of the Alternator bracket... Its super close to the rail but will work. I did have to take the alternator, and lower bracket off when I put the engine in. Another angle of the alternator. Hehe... check out my Gangstered out shifter:icon45: My uncle who is a machinist made it in the early 80's. Its pretty cool, so im going to use it. Anyhow Ill have this thing going pretty soon, ill keep you guys posted. Quote Link to comment Share on other sites More sharing options...
redlinevo7 Posted January 30, 2010 Share Posted January 30, 2010 Nice, keeping me inspired. I will post up my project soon as well..same RHD conversion and SR20 swap. Check your PM btw. Quote Link to comment Share on other sites More sharing options...
280zjoel Posted January 31, 2010 Author Share Posted January 31, 2010 No pics right now but here is a list of the things I got done today: - Inststalled outer tie rods - Eyeballed Alignment - Bled the front brakes - Installed Down pipe - Fixed the intake from hitting the clutch line - Installed the slave cylinder And some other bits and piece's I cant think of right now. Anyhow its getting close to being back on the road soon. Quote Link to comment Share on other sites More sharing options...
280zjoel Posted February 1, 2010 Author Share Posted February 1, 2010 Its getting there: Installed the Radiator, Intercooler, fenders, and some other stuff. Im surprised by how much CLEANER the engine bay looks from before. Its been so long I forgot how dirty it looked. Before: After: ....*drools* looks much cleaner. Gotta love them Rota RB-R's Almost done Quote Link to comment Share on other sites More sharing options...
mr jdm Posted February 2, 2010 Share Posted February 2, 2010 I had the same issue with the clutch master. I bought a I believe was a 75 series tilton. Its almost 2 inches shorter than the stock master and fits perfect w/o modification. It was a 100 bucks. Easy solution. Quote Link to comment Share on other sites More sharing options...
280zjoel Posted February 2, 2010 Author Share Posted February 2, 2010 Thanks, I had to add a spacer on one motor mount to tilt the engine more to to one side, I have 1/8'' space between the line and intake manifold. So thats something ill have to buy in the future. Quote Link to comment Share on other sites More sharing options...
280zjoel Posted February 2, 2010 Author Share Posted February 2, 2010 Forgot to post some pics of the progress I got yesterday. Did some work on the dashboard. It has 3 layers of fiberglass cloth on top with a thin layer of body filler to even things out. I also ended up adding a very small amount of fiberglass Resin to the body filler to add some strength to it, it just makes it a little harder to sand You can see in the last picture how warped the dash got, notice the high spot where there is no filler above the second gauge curve is, all and all its looks pretty decent and I think it should come out good. Quote Link to comment Share on other sites More sharing options...
icapture Posted February 9, 2010 Share Posted February 9, 2010 damn man, talk about "built not bought" - gotta tip my hat to you. Quote Link to comment Share on other sites More sharing options...
280zjoel Posted February 11, 2010 Author Share Posted February 11, 2010 damn man, talk about "built not bought" - gotta tip my hat to you. lol thanks, havent had too much time lately to work on the car. I did manage to get the driveshaft in, do some more work on the dash, and worked on some electrical stuff, on a side note, im not having fun getting a belt for the thing. Ive already made 2 trips to Autozone( first time too short, second time too long) now its a matter of picking one that in between the two lol. Hopefully I will have it running soon. I did place the extra RHD dash in my Z and I am really liking the 240kph Speedo. I just might use that instead of my Autometer Gauge. Here is a quick cell phone pic of my Z when I rolled it out of the garage. The engine bay looks awesome. I cant wait to repaint the rest of this thing, It will look HAWT!!! Quote Link to comment Share on other sites More sharing options...
hoov100 Posted February 11, 2010 Share Posted February 11, 2010 lol thanks, havent had too much time lately to work on the car. I did manage to get the driveshaft in, do some more work on the dash, and worked on some electrical stuff, on a side note, im not having fun getting a belt for the thing. Ive already made 2 trips to Autozone( first time too short, second time too long) now its a matter of picking one that in between the two lol. Hopefully I will have it running soon. I did place the extra RHD dash in my Z and I am really liking the 240kph Speedo. I just might use that instead of my Autometer Gauge. Here is a quick cell phone pic of my Z when I rolled it out of the garage. The engine bay looks awesome. I cant wait to repaint the rest of this thing, It will look HAWT!!! A trick with getting a measurement for belts, is to get a piece of rope or string and run it where the belt would go, measure that piece, count how many ribs you need and your set. Quote Link to comment Share on other sites More sharing options...
mr jdm Posted February 11, 2010 Share Posted February 11, 2010 haha. I went to parts store 3 times, guys starting giving me their advice and constantly asking "what year and make". I mounted my alternator differently, I didnt finish it yet. I have never really had to "fab" up as many things for a project as this one. I hope the crank pulley doesnt just slip around the belt. Its tight. Belt outer circurmance is 40 3/8. Dotn think its going to help you though. Quote Link to comment Share on other sites More sharing options...
280zjoel Posted February 11, 2010 Author Share Posted February 11, 2010 lol Good point Hoov, my brother told me the same thing after I mentioned that I got the wrong size. The belt I got would have worked, but since the alternator is so close to the frame rail, I would have the belt snug just a bit and the Alternator would already be hitting the rail itself. So I need one that is about 1/2inch shorter. mr jdm: looks good, I was kind of worried about how much( or less) contact the crank pulley has to the belts. I hope it does not slip, I will find out when I drive it lol. Quote Link to comment Share on other sites More sharing options...
280zjoel Posted February 13, 2010 Author Share Posted February 13, 2010 HAHA!!! got some more work done today:mrgreen: Did some sanding on the dashboard. I got a pretty good shape already, I just need to touch up some spots. After I worked the filler, I decided to primer it black to see how good the body work is so far.... well its going to need more work:icon45: Most of it looks good. The hard part is the gauge bumps, im trying to make sure that they look as identical as possible to each other. It not perfect, but so far looks a lot better than I expected, but still has some rough spots needing to be fixed. Here is my little goober spot I need to fix. This spot is kind of difficult since the dash had warped and cracked so bad around there( I did fiber glass work to the worst looking dash, just in case if I would have messed up then I would not feel as bad about it.) but It looks a lot better than before. Once I get everthing straighened out them Im going to hit it with a couple heavy coats of primer, smoothen it out, and buy some SEM Vinyl Texture coat and Vinyl paint to make it look OEM. Then hopefully it will NEVER EVER crack again..... I hope:mrgreen: Quote Link to comment Share on other sites More sharing options...
Recommended Posts
Join the conversation
You can post now and register later. If you have an account, sign in now to post with your account.