

trwebb26
-
Posts
589 -
Joined
-
Last visited
-
Days Won
1
Content Type
Profiles
Forums
Blogs
Events
Gallery
Downloads
Store
Everything posted by trwebb26
-
Tonight I tacked all of the verticals for the fuel cell and made/tacked all of the fore-aft supports (2 forward - 2 backward) and lifted it out of the car to finish weld tomorrow. Hopefully all welded up and test fit back in the car - ready for some 26ga skin tomorrow.
-
Yes. I plug welded the folded seam that sticks out as the 2 pieces of metal come together and also plugged about 15-20 other places per patch to make sure it was all tied in good.
-
http://store.summitracing.com/egnsearch.asp?Ntt=oxygen+sensor&N=700+115+4294859977&Ntk=KeywordSearch
-
Zero rust paint.
-
I wasn't sure which was the appropriate forum for this update. I've been waking up blowing my nose all black with grinding dust - so I figured the fabrication/welding forum was as good as any. Here was my first post for some background: http://forums.hybridz.org/showthread.php?t=148283 Been working my ass off. Here are some updated pictures showing the progress. Floors - welded in - ground flat - painted - seam sealed. I think they came out pretty nice. Not bad for my first time anyway. [/url] I didn't realize until taking this picture that the stock shift hole is offset to the passenger side... strange? And pictures of the front frame interface - welded and ground in... I went ahead and used 16 guage. The frame is stiff enough now that you can put jackstands at the back of the car and jack it up on the radiator core support and everything stays straight. 3" exhaust with 6" diameter straight thru magnaflow exhaust welded up and ready for the front section / flex connection / downpipe. Almost done welding up the 1" square structure for the 15 gallon aluminum fuel cell w/ sump, foam, sending unit from summit racing. I'm going to skin the box in some light 26 ga steel when it is finished. The cell sticks up a bit, but I think it'll look nice when it is all skinned and painted. The cell sitting a little low... I've got some rubber I'll be setting it on for a little bit of dampening. My pregnant wife is the best... Letting me store parts in the family room while I finish up the fab work. Lots of parts. 2 Corbeau A4 seats, 2 rolls of retarded expensive rubber sound deadening (like Dynomat), HY35 turbo, New Treadston 9" tall intercooler, -8 stainless fuel lines, intercooler piping, Corbeau racing harnesses, an exhaust flex connection, a few exhaust hangers, TTT tension compression rods (really nice pieces), my dash, the new Tial MVS wastegate set up for 7 pounds of boost, and the new HKS SQV blow off valve. The 280zforce rear control arms are paid for and I hope to be getting soon as well. And the best picture I took tonight... I bought some of that stripper that another guy on this site does a good job of taking off the undercoating. I have yet to try it, but I thought it was ironic where it ended up on my workbench. I had to laugh - June does look like a... well... stripper! As always - I always appreciate the feedback!
-
Be very careful how you proceed... That long "strip" of rust on the right side of the picture that goes with the length of the car - that is the top of your frame rail... If you think you are going to just replace the "rusty places" - you'll end up doing a mess of work if you expect to do it "right". What are the goals for the car?
-
I've seen Austin's writeup and I was hoping to get a few more pictures to see if anybody had done anything else different. In addition - I have a Holset I'll be welding the wastegate shut... Should I fill the hole with a plug and weld that in - or do like most people say and just weld the flapper. Thanks!
-
I torched the plastic piece that is on the end of the e-brake rod on my 280z. It is the piece on the ebrake handle that goes into that round part that is next to your leg when you sit down... It is a spherical type joint. Anybody know what I'm talking about and can hook me up? Black dragon auto doesn't have one : (
-
LOL - U just wait until you hear the sound of the blow off valve as I pass you in that LS powered 240... boss. ; )
-
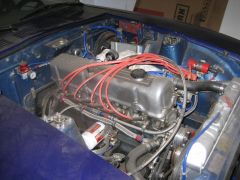
I've taken the 78K mile L28 engine from my 78' 280z to finish up my subframe connectors. I know this engine runs fine. I've already added megasquirt and will be adding a turbo (I've already got the manifold and turbo). I have a 83' Turbo motor in my garage. All I know about it currently is that it has 250K+ miles. So I need to decide what to do next: Option 1) Put the known good L28 motor back in the car and run low (less than 7psi) boost. Option 2) Run a compression check on the 83' Turbo motor and if it turns out good - use it and boost away. Option 3) Do a very basic engine freshening to include new bearings, head gasket, fasteners, rings, timing set, and a check of the tolerances (probably will include a freshening of the head). I'd guess this would cost me ~$600-$1000 in parts/machining. I'd rather not build the block up because I want to eventually swap out for another engine. I'd consider building it up.. maybe. Anybody done a L28ET motor build up that can tell me what a build up would cost? I'm guessing just north of $2K? Option 4) Find a more "known" junkyard turbo motor. Right now I'm leaning toward just using the L28 motor that I've got, but I'd appreciate other people's thoughts.
-
I did the final install on my MSA 240z fiberglass bumper on my 280z - and it is too wide for my car. It doesn't fit properly to the slots on the side of the car. I bolted it together and it bent the crappy bracket on one side of the bumper. It doesn't look TOOO bad... but it doesn't "hug" the fender like I want it to. Anybody else have fitment problems with the bumper being too wide?
-
I just put standard A4's in my 280z... If the "wide" version are wider at the shoulder "wings" - there is no way they will fit in a Z.
-
Condition of the car is more important than the engine that is in it. Check for rust and damage.
-
Progress on my new frame rails and other pics
trwebb26 replied to trwebb26's topic in Brakes, Wheels, Suspension and Chassis
A little more progress... 18ga floorpans are cut and drilled ready to be welded in the car. I'll hopefully get to it tomorrow. Started thinking about boxing in the new rails to the front rails of the car. I hadn't seen how many people do this, but this is what I came up with. What do you think? I had bought some 16ga to do the boxing, but it seems far too stiff. I think I'm just going to use 18ga. Opinions? -
Progress on my new frame rails and other pics
trwebb26 replied to trwebb26's topic in Brakes, Wheels, Suspension and Chassis
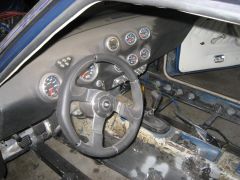
Here is another shot of the dash... The dash is fiberglass. I took the 280z dash and stripped it to the frame. Some floral foam, dowels, paint sticks, etc and some fleece laid out the shape. I used 2 layers of strips of weave mat on top of the fleece. This was my first fiberglass project and boy-o-boy did I learn a lot. I would use only 1 layer of chop mat if I was doing it again - and I did a poor job of determining how much resin to put on - so it isn't as light as it should be. Overall not bad for my first glass project though. It bolts up in the stock location no problem. The gages are autometer cobalt (and one innovative Air/Fuel gage). They are Speed, Tack, Air/Fuel, Boost, Water Temp, Oil Pressure, Volts, and Fuel Level. There are 2 rows of lights between the speedo and tack. The first row of 3 is for turn signals and high beam indicator. The second row of 2 is for oil pressure and brake indicator (low fluid or parking brake engaged). The switches are pushbutton start, oil pressure over-ride (to get the car started... I have the car stop if the oil pressure drops but to get it going I have to over-ride the cutoff), lights (high or low beam), wipers (just off or on), Electric fan over-ride (Megasquirt controls them but I added a switch in case I wanted to turn em on), and hazard lights. There are blue or red led's above the switches to show if they are on. When I get the car running on its own power I'll post up some more pics of it working. I'd consider selling it if the price was right. I'd love to try and make a new one. -
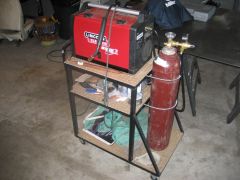
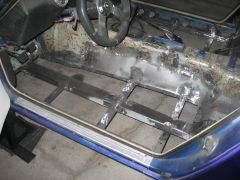
I've never uploaded pics to hybridz before - so i thought i'd give it a go... I've gotten lots of good info off of this site (most of it from pictures) so I figured I'd show how my frame rails are going. Pic of the car on jackstands - level on the rockers. I found a string level and pieces of 18 ga. steel under the jackstands to make it perfect to be my best friend when setting it up on my less than level garage. Pics of the subframe... used the standard 2x3 0.83 wall tubing. You'll notice I'm mounting my floorpan on top of the subframe. I've flanged up the existing metal to make a shelf to spot weld the sheet to. Extra 1/8" steel supports where the seats will bolt to. I'm bolting the Corbeau A4 seats directly to the floor (see the bolt holes). [/url] Just another shot of the passenger side. I had to cut the trans tunnel on both sides to get rid of the "humps" on either side to make room for the seats. Just a pic of the T/C bucket interface: Shot of the engine bay - buried in grinding dust. I'm sick of grinding. The drivers side: And 2 pics of my welding cart (my first welding project). It is true what they say... you get better and better every time you weld. These don't show it - but I hard-wired the maximum reccomended 10ga extension cord to the cart so I'd always have it with my welder. It allowed me to wire in some outlets on the front of the cart for grinders/lights/disco ball /whatever. 3 features I think make my cart stand out are the outlets on the front of the cart, the bottle is held in by bent threaded rod, and the build in extension cord. I appreciate any feedback. Thanks hybridz.
-

-
-
-
-
-
Looking for a super clean 240z bumper with the brackets to fit to my 280z. Pics required.
-
PM Sent
-
I'm looking for a complete VQ swap. I'd prefer a 2007 or 2008 VQ35HR, but would consider a low mile 05' or 06'. Engine Harness w/ ECM and ALL accessories/manifolds, o2 sensors, etc. 6 speed tranny w/ shifter Driveshaft Throttle Pedal Fuel Temp sensor Dash Harness w/ gage cluster Keys, BCM, NATS, and all other wiring
-
An update on my problem... I took John's advice and set the jackstands under the 4-corners of the rockers. With just these four jackstands - the door gaps were aweful. If you jack up the front of the car (like John suggests) until the front frame rails are level then the door gaps will be perfect and everything will be right. Things to take away when doing this: - Buy a bunch of sheet steel and wood of varying thickness. Floors in general are not level due to settling, wear, cracks, manufacturing tolerance, and drainage... I used a bunch of sheets of 18ga steel and 1x10 wood under each of the jackstands to get everything perfect. - Be patient... it is amazing how changing the height of one jackstand by 1mm will tweak the car - and it doesn't take a lot to make a noticable difference. - Measure several places! Highs and lows are everywhere and where you measure as level on one place of the rocker may show it off on another. - Get the four rocker jackstands perfect before screwing around with the front of the car. - I had to put the jackstands under the radiator x-member in order to get the front frame rails level. Jacking up on the front x-member just picked the car up off of the front side rocker jackstands. My front side jackstand is sitting on the radiator x-member. - I tried to put a jackstand under the diff - but (like John has suggested) it had a very slight (if any) affect. I left it there with some slight pressure as a safety measure to keep the car up in the air in case the front end gets light for some reason. -Tim