nismo kid
-
Posts
529 -
Joined
-
Last visited
-
Days Won
4
Content Type
Profiles
Forums
Blogs
Events
Gallery
Downloads
Store
Everything posted by nismo kid
-
-
https://youtu.be/OicvPIUvUEE https://youtu.be/zXUpOwE8HFg https://youtu.be/kwrh-k_JMBI
-
Thank you for the kind words. I'm glad you enjoyed it. I did have my build posted in a few sections but the mods deleted the highest traffic threads & left me this one. This section doesn't see much traffic. I don't see very many people looking into Z31 builds which I can't blame them.
-
Here’s the last bit of pics & a video to finish off this build update. https://youtu.be/6CpHQWoV0pw As Bob Ross would say "Let me take just a moment to thank you for allowing me back into your homes." Thank you to everybody for all support & continuously following my build! Look forward to seeing you around.
-
Custom mounting brackets.
-
The final exterior item(s) I installed were JDM front turn signals. They mount very differently from the USDM units. Luckily Omron Hassan & Steven Culbert were nice enough to share their mounting solutions (Thanks guys!). I drew some inspiration from these designs to create my own. I used 1in x 1/8 aluminium to fabricate the bracet to secure the JDM signals to the USDM bumper. JDM signals. USDM signals JDM VS USDM
-
Moving on I had my windshield wiper motor rebuilt. Then I gave it a fresh coat of paint to "clean" it up a bit. As for the windshield wiper arms they were powder coated & had brand new wiper refills installed.
-
-
I quickly found night driving almost impossible with halogens. Mainly because I deleted my headlight motors & wiring to them. Causing the headlights to never raise. This cuts off about 60% of the headlights output. It would take too much time to pull what was needed from another car. I also felt the factory setup was over complicated. By making my own solution I could achieve the same goal while being more "streamlined". Each headlight motor had a 7pin harness, relay, & internal circuit board. All of which were deleted during disassembly. Everything was desoldered & removed from the circuit board. The wires for the headlight wires were then extended & finished off with weather pack connectors. A custom headlight motor harness was also fabricated. To control/ send power a GAMA Electronics 30 Amp Polarity Reverse DC Motor Control Rocker Switch installed into the center console. This switch raises & lowers the headlights by reversing the polarity. Small stops were installed on headlight motor brackets in fully up & down locations. That way the headlights would stop in the exact same spot every time. Still unsatisfied with the my light output I installed a Innovited 55W 6000k Bi-Xenon Hi/Low dual beam HID kit. To me this is more of a band aid fix than a solution. HID's in halogen housings cause excessive glare & can make it hard for other drivers to see. Usually I drive with the headlights down to prevent this from happening. I do plan on doing a projector retrofit. But that'll be left for a future project.
-
I began to weigh my options. (1) I could weld rear quarters from an 86-89 Z31. (2) Swap everything into my 86T then convert it to slicktop. For these 2 options I'm too invested in this shell & I lack time. Years ago Hanif Muhammed aka Mutantz was producing replica Crossfactory widebody panels for the Z31. Thinking he had discontinued this service I still reached out to him anyways. The worst he could tell me was no. Luckily for me he was still offering this service but in limited time frames. This purchase couldn't have gone any smoother. Hanif is 1of the best people I've ever done a transaction with. I received the panels within 5 weeks of payment. Others should seriously take notes. Once shipped they arrived within 16hrs via Greyhound. The complete install will be covered in my next update. Here's some mock up pics to give you a general idea.
-
Also here's some pics with the padded covers on the Kirkey's. These were the finishing touch of the interior. Originally I wanted to install Anniversary Edition Z31 skirts & rear fender flares prior to the show but I ran out of time. In all my years messing with z31's I never realized AE flares don't really gain more fender well space. They sit over the existing fender, which makes them more of a cosmetic item. During the install I discovered a other few issues. The fender lip on the body will need to be trimmed for the AE flares to fit nicely IMO. Without doing this I'd never get the body lines to match. I was thinking of rolling/ pulling the factor fenders then retrying the AE flares. But this wouldn't gain the additional space I'm looking for. Here's the issues I was talking about.
-
To alleviate driver entry & exit a quick release steering wheel was installed. With the factory steering wheel removed a NRG Short Steering Wheel Hub Adapter for S13-S14 (part # SRK-140H-3) was installed. Then a black NRG quick release hub (part# SRK-200BK) was mounted to the short hub. For the steering wheel I felt the Momo Montecarlo 350 mm Leather Steering Wheel (part# MCL35BK1B) fit my build quite nicely. Quick notes for anyone looking to do the same in a Z31. 1) You don't need to remove prongs on the backside of the short hub. 2) No hardware is included to mount the steering wheel to quick release hub. I used M5 x .8 x 20mm long flat socket head bolts/countersunk hex bolts. 3) Compression ring must be used. It secures the horn button inside the steering wheel. Now here's some installation & completion pics.
-
The fender braces after powder coating & installed.
-
I also participated in a fender brace group buy just to help push the deal through. I paid a higher premium due to mine having to be made differently than everyone else. What's a fender brace you ask? Fender braces reinforce the chassis structure at one of the cars weakest areas. Which is located at the firewall. Fender braces install on top of the frame behind the front fenders. This triangulation reduces chassis flex between the front section & cabin/rear section of the car. The braces came out pretty decent considering the guy only had pictures of my car to work from. They would require additional bracing to actually be functional/ beneficial IMO. Here's how they looked when I received them. Here's after my modifications.
-
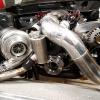
The map sensor was also replaced because it was fried as well. I finally installed a front sway bar while the car was down during fuel system upgrades. My last update I attempted to install MSA front & rear sway bars. Key word ATTEMPT. Space requirements for a larger front sway bar was implemented during the turbo kit fabrication. Unfortunately the MSA sway bars are bent completely different than factory units. This difference caused the MSA front sway bar interfere with my crossover tube. I picked up a 88 Turbo Z31 front sway bar which is much larger than the non turbo unit my car came with. It fit without modification but I was concerned it could make contact with the crossover tube in high load scenarios. Custom sway bar drop spacers were fabricated & powder coated. The sway bar mounts were stripped & painted. Then Prothane polyurethane sway bar mount bushings were installed. Moog sway bar end links (part# K9543) paired with Prothane polyurethane sway bar bushings connected the sway bar to my adjustable control arms.
-
My bad luck continued as I discovered the coils on cylinders 2 & 6 were fried. I decided to replace all 8 coils. I also discovered the passenger manifold was a bit close to my plug wires. Which led to a few of them getting burned up near the ceramic boot. On these cylinders I switched to 45° ACCEL 9002C Extreme 9000 Ceramic Spark Plug Wire. These 45° boots place the wire on the other side of the exhaust manifold. Keeping them far from making contact with the exhaust manifold. As before DEI 010475 Titanium Protect-A-Sleeve was used for heat protection. I discovered one of my new wires was missing the spark plug terminal. I'm glad I caught it prior to installing it. Keep in mind just because parts are new doesn't mean they'll never be defective. [/url
-
As previously stated I'll share all problems/obstacles I encounter. Magnafuel rebuilt my 4303. Afterwards I disassembled it for inspection & everything was perfect. So I reassembled & installed it. When I tried to start the car I noticed 0 fuel psi. This was strange because the 4303 was running. I verified there wasn't any flow by removing the hose from the 4303 outlet then bumping it. Not a single drop came out. A bench test yielded the same results. I shaved down the 8 ORB swivel bung that was in outlet to assure it didn't obstruct anything. Still no luck. The next day I called Magnafuel searching for help something didn't add up. They flow test all pump after every rebuild surely they would've experienced this......right?? The technician that rebuilt my pump asked if I disassembled it. I told him yeah. His next question was "Is the inlet bung opposite from the serial number?". Not being 100% I quickly removed the pump while on the call. That's when the problem was staring me right in the face. I reinstalled the inlet housing 180° out. The bung was on the same side as the seriel number. The Magnafuel technician guaranteed me that was my issue. After rotating the inlet housing I reinstalled the 4303 & dropped it in the fuel cell. And what do you know, the pump was now operating properly! The Magnafuel technician hit the nail right on the head. I'd like to thank Magnafuel for the awesome products & support. The technician didn't have to stay on the phone with me while I removed my 4303. He went the extra mile to help me solve my issue. So here's my PSA. When inlet bung on the same side as the serial number of the 4303 it starves it of fuel. The fuel has no way to enter the pump. The proper orientation is 180° / opposite of the serial number. The technician said other common issues are the improperly sized/restrictive fittings for inlet & outlet. Outlet fitting making contact with the circuit inside the pump thus sealing the outlet. Undersized fuel tank vents. Coming in at #1 is poor electrical connections especially grounds. So keep those things in mind when building your setup. This was a rookie mistake I made. Hopefully me sharing this info this will help others. If not I hope it provided plenty of laughs lol. Any how here's a video comparing how the 4303 sounds. External vs Intank Magnafuel 4303 https://youtu.be/50ONV5vTfTQ Unfortunately this success was short lived. I wanted to take the wife for a cruise in the Z real quick. To give my wife some more foot room I stuffed my ECU above my flip down fuse box panel. Figured it was just a quick ride & it wouldn't hurt anything. Boy was I wrong....... During a very small pull (40%throttle) something began arching & sparking above my wife's feet. I turned the car off immediately & killed all power to the car via my safety switch. A electrical burning smell filled the entire cabin. During further inspection it had became clear the ecu slide into the junction posts on the fuse panel. Which caused the sparking/arching. The Gold Box was the source of my burning smell. With the ecu moved to the floor I turned tried to see if there was communication between the ecu & Pidash. This is when I noticed my fuel pump ran well past the priming time. Once arriving back home after a short tow ride the diagnosis stage began. Initially I could only find 2 blown fuses and a few breakers tripped. While checking a few items that required 12v switched I began smelling raw fuel. Strange thing was I didn't see any. I promptly discontinued & began seeking the source of my fuel smell. It seemed to be from airfilter & catch can. This could only mean 1 thing. An injector or injectors were open with the key on. Wanting to narrow it down I killed the power to the fuel pump & disconnected the injector pigtails. I confirmed my suspicion using a noid light, the ecu would open all 8 injectors when powered on. Needless to say a Magnafuel 4303 & 8 210lb injectors move a ton of fuel in a matter of minutes. But how much you ask? Enough to completely fill my engine, intercooler piping, & intercooler. All totalling 9.5 gallons worth of E85. My misfortune continued when I shipped fried ECU to Efisource for repairs. USPS lost it. They couldn't locate it within their 3 day investigation. The package was fully insured. But to submit a insurance claim it can't be scanned for 15 consecutive days minimum 60days maximum. On would be the 7th consecutive day my ECU was located. So what should've been a 2 day delivery took 9 days. I'm just thankful it was located. Once Efisource recieved it, they discovered every single driver chip was fried on the entire circuit board. Normally it would be cheaper to purchase another unit. But luckily Efisource hooked me up with a new prototype board with additional features & safeguards for much cheaper. They also transferred my tune to this new board. This is just another example of their amazing service. I wouldn't expected anything less from Efisource. Once I received the goldbox I mounted it in the factory z31 ecu location.
-
To finish off the fuel cell install the post fuel filter was relocated. I picked up a nice billet mount to secure the Weldon fuel filter. A new Fragola PTFE 10an hose connected the Weldon filter & fuel outlet on the fuel cell fill plate.
-
Custom anchors were made by welding 3/8in grade 8 nuts to 1/4in steel. These would slide inside the factory frame & provide a robust mounting location. Gates 1.5in fuel fill hose (part# 23924 4663K) was used to connect the stockish filler neck & fuel cell.
-
Fuel cell straps were made using 2in wide strips of 16ga stainless steel. Extra pieces were welded to provide reinforcement for the mounting points. Rubber strap backing was installed on the straps to protect the tank from metal to metal contact & isolate any unwanted movement. I figure if semitruck fuel tank straps can be constructed this way mine would be more than sufficient. Hood bump stops were installed above the fuel cell to prevent any contact with the factory floor.
-
With the 4303 now being located intank a wiring bulkhead needed to be sourced. My previous wiring bulkhead setup was going to be adapted to this fill plate. Unfortunately the correct sized grommet couldn't be found. So I began to search for another solution. I wanted to maintain my 6ga power wires so a traditional ATL wiring bulkhead was out of the question. IMHO Behind bars Racecars had the best & cleanest wiring bulk head. It came with an o-ring to use as a seal. On their fuel cells there's a channel for the o-ring to sit in. My fill plate was too thin to do the same. The o-ring was too thick for my application. So I made a gasket using gasket material. A Radium E85 compatible fuel level sender (part# 20-0247-09) was also installed. The Bosch unit would've worked too but the Radium unit will allow much easier servicing. An adapter harness was made to connect the sending unit to the factory harness.
-
The return was next. A Fragola 8an 90° bulkhead fitting was installed with PTFE washers & Gasoila E-Seal Pipe PTFE Paste Thread Sealant to ensure a good seal. To prevent aeration a return tube was made with 1/2" OD Aluminium Tubing (Dorman part# 800-628) A 37° flare was made in the tubing using my Mastercool hydraulic flare tool. Fragola 8an tube nut & sleeve (part#'s 481808-BL & 481908-BL) attached the vent tube to the bulkhead fitting.
-
Roll over vents were also needed for the fuel cell. I've seen traditional vents allow fuel to spit out during fill up. This is because the fuel can't lift the steel ball, so it flows right around it. I found Tecmo roll over vents that have the ball & a plastic insert. This plastic insert will float up to close off the vent during fill up. Thus allowing no fuel to escape. Many companies sell this as their own for over 5 times the original msrp. True msrp (not cost) is 14.99$ ea. Coyote-Gear on Ebay sell them for just under 20$ ea. I installed 2 Tecmo 1/2in NPT 5/16in roll over vents. These are both connected to a single evap purge valve. This evap purge valve is used on Coyote F150's. You can get them for 20-30$ shipped on Amazon. This valve remains closed when the car isn't on which prevents my E85 to draw moisture. The valve opens when it sees 12v switched. All pressure that's builds up inside the fuel cell vents out the gas cap when sitting. Call me paranoid but I'm not taking any chances this time around.
-
While waiting for the fuel cell to be powder coated I remove the last bit of sound deadening. It was located in the hatch area & weighed in at 8lbs 4oz. Bringing my overall weight of sound deadening removed from the entire car to 60lbs 6oz. I also created a large access hole so the filler plate could be removed without dropping the fuel cell.
-
The fuel cell was powder coated for added protection. Here's another set of comparison pics. 19 gal factory fuel tank vs 27 gal custom fuel cell.