nismo kid
-
Posts
529 -
Joined
-
Last visited
-
Days Won
4
Content Type
Profiles
Forums
Blogs
Events
Gallery
Downloads
Store
Everything posted by nismo kid
-
Correction, swiped on the phone*
-
Rofl! Typed it on the phone.
-
Hey man I spoke to after some rolls on Babcock outside of the medical center here in San Antonio. I was in the white g35 sedan. I hope you found the forum alright. Thumbs up on the car. Hopefully we can meet up again sometime to talk cars. Reply here or pm me.

-
LSX gets my vote! RB's can be bolt in affair too(good luck getting parts in the U.S when in a pinch). There's a couple 2jz kits floating around. All these options require some type of fabrication ranging from light to heavy. The LSX swap mount's are the swap none nissan engine mounts you can buy off shelf. I'd only go LSX over any of these routes if you're dead set on doing an engine swap. Just a fair warning you'll go through that 5k quick fast & in a hurry on any swap. What's your realistic goals? Anything up to 575-600whp, The VG is more than enough in stock bottom end form. Any where near that power range you wont be getting the best MPG's
- 1 reply
-
- 1
-

-
Can't even see the coils or wires. Just the way I wanted Thanks again to all for stopping by. Attached Thumbnails
-
Passenger side Attached Thumbnails
-
Spark plug wires installed Driver side Attached Thumbnails
-
Spark plug wires complete Attached Thumbnails
-
Last but not least was the making of the spark plug wires. I didn't want my spark plug wires to take take away from my "clean look". With that said I chose to run them behind the exhaust manifolds. Accel Extreme 9000 wires were chosen. Due to not wanting to deal with melting boots all the time. These wires have cermic boots that withstand 2000 degrees. In kit #9001C the shortest plug wire was 31.5 inches long from the base of the cermic boot. This kit doesn't come with boots for LSX coils. I used Taylor Cable #46069 boots. For extra protection DEI Titanium Protect-A-Sleeve was installed to cover the portions of wire nearest to the exhaust manifolds. Pics of the parts used to make my wires. I'm also posting the measurements of all the wires included in the #9001C kit. Maybe it'll help someone that stumbles on my build. Attached Thumbnails
-
Another preventative step I took was the installation of new sensors & intake manifold gaskets. Also installed new steam port gaskets. The steam port gaskets I used were Dorman #56390. New stainless steel hardware was used to secure the TPS & IAC. The stainless steel hardware specs was M4x.7mm x 12mm & M4 washers. Only thing left is to weld the IAT bung on & install new oil pressure sensor. Attached Thumbnails
-
Passenger side Attached Thumbnails
-
Now to tackle making mounting brackets for them to bolt to. Driver side Attached Thumbnails
-
After some quick machining they fit perfectly. It's worth noting Michigan Motorsports did issue a reimbursement to cover machining costs. I couldn't be happier with their customer service. Attached Thumbnails
-
To keep a clean look I chose to relocate my ignition coils. So I purchased Michigan Motorsports ignition coil relocation kit. Unfortunately it wasn't a plug & play install. Even though I had coils that were advertised to fit. They didn't. Here's some pics showing the Coils not fitting. Attached Thumbnails
-
Here's the new belt Attached Thumbnails
-
I also installed a new shorter serpentine belt. Due to my fear that excessive heat would cause my serpentine belt to prematurely fail. Attached Thumbnails
-
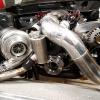
The hot side ended up looking great after Ceramic coating. Attached Thumbnails
-
Moving on I finally got my hot side of the turbo kit cermic coated. It's a shame to cover those fantastic welds but, it's for the greater good. Shot a quick pic when I dropped it off. Ignore the parts under the red x. They're not mine. Attached Thumbnails
-
Here's the remaining sound deadening being weighed. It came in at 33.5 lbs Attached Thumbnails
-
As you can see the brake master cylinder was leaking just as bad. It leaked so long it overfilled the brake booster. Then leaked out the back of the booster, eating a large area of paint. Which I circled with red. Attached Thumbnails
-
Weighing of the firewall sound deadening alone. Attached Thumbnails
-
The speedo cable leaked terribly. It heavily saturated the firewall sound deadening. Just the firewall sound deadening I removed weighed in at 18.1 Lbs! I was shocked to say the least. Here's some pics of the gear oil that was leaked everywhere. Attached Thumbnails
-
After Attached Thumbnails
-
I lucked out by removing some pretty large pieces of sound deadening. Attached Thumbnails
-
During Attached Thumbnails