nismo kid
-
Posts
529 -
Joined
-
Last visited
-
Days Won
4
Content Type
Profiles
Forums
Blogs
Events
Gallery
Downloads
Store
Everything posted by nismo kid
-
Materials were gathered to build the custom fuel cell. Including 1.5in aluminium hose barb, (2) 8 ORB bungs, (3) 1/2in NPT bungs, SAE 5 bolt sending unit flange, 3in aluminum C-channel, 6in x 10in fuel cell fill plate & flange, Improved Racing trap door baffles, & aluminium tubing. .090 5052 Aluminium was used to make fuel cell. A sump was created that housed a baffle with trap doors to keep fuel around the fuel pump at all times. 4in C-channel was welded to the fill plate to secure the 4303. 2 8 ORB fittings with a short section of aluminium tubing were used to create a stationary union on the fill plate. This was done to make pump removal a breeze. A Earl's 8 ORB swivel union (part# AT985208ERL) connected the 4303 to the fill plate. As for the pre filter a Magnafuel stainless steel filter sock & fitting kit (part # is FL-7071) was used. Here's the fuel cell after fabrication was completed.
-
IMO the E85 Pros easily out weigh the cons. Especially if you have it readily available. I will continue to run E85 in my car just wanted to share my experience. Even if it was a rare occurrence. I truly believe with ethanol treatment added to every fill up & more driving the gel wouldn't have formed. Shockingly the car never ran rough or experienced any hindering. I believe a vast majority don't tear down their fuel systems unless an issue arises. Kinda a "Set it & forget it" mindset. My problem was a massive miscalculation. The Walbro still functioned normal. Imagine if I blindly added a 2nd Walbro to "solve" my issue. A catastrophic failure would've been imminent. I'm no longer going to be running a surge tank & plan to run my Magnafuel 4303 intank. Several manufacturers were approached in hopes to manufacture a billet fuel pump hat for the factory Z31 fuel tank but most declined. Only 1 company was able to provide me a quote. It was 440$ + material for just a billet fuel pump hat with 2 ports. This wouldn't include the hanger or any fuel pumps. I opted to design/build a custom fuel cell that would retain my factory floor & stockish filler neck. Armed with posterboard I created a mock up fuel cell. It's dimensions were 22in x 27in x 10in. Here's a few comparison pics. 19 gal Factory fuel tank vs 26 gal mock up cell
-
I noticed it didn't experience any pitting. Upon further inspection I discovered armature bearings were rusted & very rough. Every needle & roller bearing was rusted as well. As for the gears & pump housing they had some flash rust that wiped right off. I was informed by Magnafuel they rebuild & flow test all their pumps for free. The only charge applied is for parts. So I reassembled the pump & sent it off. Magnafuel ended up taking almost an entire month to rebuild the pump. Here's few things to take into consideration. (1) I was told pump rebuilds take a back seat to new pumps because new pumps are their bread & butter. So don't expect a lightning fast turn around. (2) If you'd like tracking information be sure to request it & provide an email. Once your pump is rebuilt it ships super fast. I received mine in 2 days. Outside of these minor points Magnafuel customer support has been top notch. Tech has always been able to answer all my questions & point me in the right direction. I found very heavy gel build up in the injectors too. Here's a quick video showcasing my findings. https://youtu.be/aBdMMCYJCkI Both the injectors & hats were ultrasonic cleaned. The injectors only flowed about 75% of their 210lb rating, while the largest flow loss came in @ 30%. After ultrasonic cleaning all the injectors flowed 215lb with a 1.1% variance. The fpr was also disassembled & cleaned. The fuel cooler was cleaned & flushed out as well. Luckily all the lines were spotless but were still flushed out just in case.
-
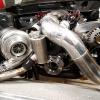
At this moment I decided to check the remaining fuel system components. Dis-assembly of the Magnafuel 4303 began. Here's a pic of it mostly broken down.
-
When went to check my pre & post filters it became clear that the E85 had became contaminated. There was heavy gel build on both filters. Sometime between my 1st start up & my 1st drive. Which there was about 4 months the car sat during upgrades. Nor did I treat/pickle my fuel. The only place it could've drawn in moisture is from the open fuel tank vent. Living in San Antonio it's very humid pretty much everyday. So that's a huge possibility.
-
The drive home was from the show was entertaining to say the least..... While on the way home my 4303 sucked my surge tank completely dry. No biggy. I filled it for about 5 minutes by cycling the key. A few miles later the 4303 sucked the surge tank bone dry again & popped a fuse this time. I replaced the fuse, filled the surge tank completely. Finally made it home. Needless to say I wasn't a happy camper. I was hoping the Walbro to keep up better. Especially since it has an entire gal head start along with the return fuel filling the surge tank as well. This issue frustrated me to no end. After a quick pressure test on the Walbro I removed fuel cooler, surge tank, & stock tank. Then pulled the Walbro from the stock tank. It appeared the baffle was reacting to the E85. The baffle felt mushy. What was even more concerning was the appearance of the Walbro. Heavy pitting was present on the bottom. Normally E85 compatible components are fine. This is the 1st time I've seen this type of damage happen to a Walbro 450. I took pics & approached Walbro with my findings. Tech support couldn't give me an immediate answer. They told me they've never seen this pitting happen before. I offered to send it for inspection/investigation on my dime. Unfortunately they weren't interested, even though I made it clear I wasn't looking for a replacement or money back. I just wanted answers to why an e85 compatible pump looked this way after only 10 months of use. After a few days a Walbro self claimed "scientist" informed me he thought it was contaminated or too high ethanol content fuel. Funny because I sent them a pic of my fuels content which was 85%. I did discover e85 inside the connector during removal. Their supplied connector was used. I brought that up to Walbro as well, but they said it wouldn't cause my damage. So I took it upon myself to tear it apart in the name of science. Notice the pitting continues on the inside of the plate. The top plate had similar pitting. These were the only parts to experience this pitting. I spoke to a few others about this, including a metallurgist. Which said the plates appear to be a pot metal composed with low grade materials that are susceptible to the E85. He's seen older carburetors meet the exact same fate with newer fuels. After the tear down the Walbro was tossed. [/url
-
That very next morning was the day of the Nismo Fiesta car show. As the title hints it's a car show for Nissan's/Datsun's. Matt (Flawlez) & I rolled into the car show together. The gate attendant lol'd when I told him I'm in the show. I only registered in the show so the car could be viewed by everyone. There was only 3 LS swapped cars present. A Ls1 Z32 300ZX shop car, Ls1 240Z, & myself. My car definitely caught people off guard & attracted good amount of attention. Majority of people enjoyed the car. Initially some people would talk shit about the Kirkey's. I offered all of those people to take a quick seat, then tell me what they thought. I let almost 50 people sit in the Kirkey's that day. They all changed their tune & were shocked by how comfortable they are. Note this was without my padded covers(didn't get them in time). I had great time @ the show. I was flattered by all the love it got from everyone. Especially people that had much nicer builds than mine. I.E. Mark Rolston, he's built a badass RB26DETT swapped 240Z & AWESOME tube chassis 240Z w/fully carbon fiber body powered by a twin turbo VQ35HR. Here's pics of said cars. His Carbon 240Z Here's some pics of my car @ the show. Thanks to Frame Photography for this pic!
-
The last item I was able to install prior to the show was a MSA front lip. Originally I contacted MSA to order the lip but they were trying to charge me 285$ just for shipping, which seemed a bit steep. So I held off. Some time went by & I got married. My wife & decided to take a road trip for our honey moon. We visited Arizona, New Mexico, Nevada & California. While in California we stopped by MSA & purchased the lip in person. The crazy thing is we drove over 3800 miles on our honeymoon for cheaper than what would've cost to ship that lip. Matter a fact it we spent almost 100$ less than that shipping quote. These lips do require some sanding & trimming so they fit. Which is to be expected. I drove the car to the gas station for the 1st time after installing the lip.
-
The dash was finished off with ABS plastic fillers for the center factory gauge pods. A good friend of mine Andrew(Andre84zx) donated a 87-89 steering wheel (Thanks!) Then I leather wrapped to it to clean it up a bit.
-
MDF rings were made to install the 6.5 speakers. I also installed Noico 80 mil sound deadening mat around the speakers on the front doors. The tweeters were installed into the door panels near the components to keep the them from sounding too sharp. Many top tier audio installers say 1 of the most common mistakes made during install is mounting them high. Whether if they're on the A pillar or high up on the door it's a big no no for sound quality. My setup produces very clean mid & highs. The lows are ok but that can be remedied with a installation of a sub. Overall I'm very pleased with the results.
-
These were powered by a 600w Kenwood 22154656 Compact 4 Channel Digital Amplifier. This thing is tiny & has a foot print almost the size of a dollar bill. It's power output is crazy for it's size. There's several amp dyno videos showing just how capable this amp is. It's connected to the head unit with Rockford Fosgate rca's. 12ga OFC (Oxygen Free Copper) was used to wire all 4 speakers. All wires were labeled with heat shrink using my Dymo label maker. The mounting bracket for factory security system box along with 1/4 inch ABS plastic were used to mount the amp underneath the passenger seat.
-
All the factory speakers & speaker wiring was removed. I went to local car audio shops to compare several different speakers. To be "budget" friendly I chose 6.5in Alpine SPR-60C Type-R components for the fronts & Alpine SPR-60 6.5in Coaxial 2-Way Type-R speakers for the rear.
-
My factory antenna was inoperative. Upon further inspection the "cord" for the mast was broken into several pieces. I picked up a Z32 unit from a friend. Which was sacrificed to rebuild my Z31 unit. The mast & a few other components are interchangeable. Prior to installing the mast I cleaned all the old grease from the Z31 assembly. Then packed it with fresh dielectric grease during assembly. Here's some pics. Z31 Antenna. Z31 VS Z32 Antenna. Z31 Antenna rebuild.
-
Moving on a Pioneer DEH-X4900BT head unit was installed.
-
Reupholstering the badly damaged & faded brown headliner was next. I gently peeled backed the factory material. Which left glue residue & foam behind. That was removed using a soft brass wire wheel attached to a drill. The cardboard backing was repaired & thoroughly cleaned. Then foam backed black suede was attached with 3m headliner adhesive. The headliner install was finished off by the dome light paired & a brand new dome light cover.
-
-
I also installed a set of exterior mirrors, mirror triangles, & door window seal since mine were demolished.
-
-
The remaining items required more work than I had perceived. Obviously the Z31 coupe is different from the 2+2 version. I assumed the only difference between the slick top & t-top versions was only headliner & weather stripping. You know what they say happens when you assume. You make an ass out of you and me. The following parts are different between the slick top & t-top versions. A pillar panels, B pillar panels, rear quarter window panels, headliner, weather stripping, & coat hooks. Luckily for me I saved my original slick top panels. Black interior pieces are hard to find, so are slick top pieces, but black slick top pieces are even harder to find. My original Panels were brown but I changed them to black thanks to SEM products. First the panels were all cleaned with hot water & Dawn dish soap. The panels were then scrubbed clean with SEM 39362 Soap. SEM 38353 Plastic Prep was used to clean any oils & contaminants from the panels. Not wanting to chance the color coat flaking off over time SEM 39863 Plastic Adhesion Promoter was applied. Now the SEM 15013 Landau Black Color Coat could be applied. The results are amazing. You can't even tell what is factory black or what's painted. I opted to install rivnuts to secure the door sills instead of using the factory "fastening system". A brain fart came when I went to install my black door panels. I totally forgot the interior door handle is high up 84-85 models vs "centered" on 86-89 models. Everything previously covered was in preparation of attending my 1st car show/event with my Z31. It was just 24hrs away. I was dead set on having the interior as complete as possible. Luckily I was able to score a spare set of doors from my local pick-n-pull. I quickly swapped the doors out. My original door lock cylinders were then swapped into the "new" doors prior to installing the black door panels. New door switch covers were also installed.
-
I already owned a couple sets black interior pieces. The center console was trimmed to accommodate my shifter. A Zspeed Z32 shifter plate was installed to give the shifter area a more finished look & completely seal it off.
-
With carpet installation complete, the hunt was on for a functional seating solution. I wanted something lightweight & fixed back. Z31's don't really accommodate most aftermarket race seats too well. Shoulder pads of most seats will hit the door panel or window when installed. Some seats even touch the roof. Many of my friends had fading issues with entry level Sparcos & knock off seats. My decision was quickly made after sitting in my friends car equipped with Kirkey Pro Street Drag seats. Little did I know these seats & covers were on back order. Several weeks went by but none of the major suppliers had received their shipment. Summit Racing got me in direct contact with Kirkey. Kirkey drop shipped the seats to me once they were completed. The seats arrived here all the way from Canada to Texas within 48hrs! The same for the seat covers. But those weren't completed for another 11 days. My foamless factory manual seats weighed over 37lbs each! That's without the rails. The Kirkey's only weigh 11.6lbs each. That's over a 25lb weight savings per seat. The Kirkey's were mounted to the factory manual rails using Kirkey side mounts. Factory manual Z31 seat brackets are double locking. It's crazy how similar Sparco & Corbeau rails are to my factory rails. These seats were pretty comfortable even without the padded covers installed.
-
The brown ebrake made its way into the trash & was replaced with a black unit. When I purchased this car the factory carpet had already been removed. The previous owner "installed" old house carpet in its place. American Custom Carpets Molded Mass backed Essex black carpet was ordered. It's super plush & far more superior when compared to factory carpet. Of course factory carpet has a little better fit especially in the corners & tool tray area. ACC offerings are the only option(s) available for the Z31. Factory carpet is NLA (No Longer Available) good luck finding BNIB (Brand New In Box) carpet now days. A old socket was heated with a torch to create nice clean holes for bolts. This will keep the carpet from fraying while creating a perfect circular hole. I salvaged plastic carpet clips from the junk yard & stapled them onto the new carpet. These clips hold the carpet tight to the door sill area.
-
The Pidash was followed by installing interior. This meant converting to black interior pieces, new carpet & replacing the padless factory seats (field mice ate all the padding). Before the carpet could be installed a couple panels would be needed. One to cover the surge tank & fuel cooler. Another to seal off the factory shifter hole. The foam tool tray was shaved down to level floor above the surge tank & fuel cooler panel. This maintained a flat floor in the hatch area. Then the shifter hole was blocked off by another panel. Tool tray panel Shifter panel
-
A few short months later a new Raspberry Pi 3B+ was released. Intrigued with it's added potential & faster boot times, I upgraded from my Raspberry Pi 3B to 3B+. This upgrade granted me much faster boot times. Here's a comparison video that shows how long it takes to go from off to fully booted. https://youtu.be/KzA18WQRo2M Raspberry Pi 3B Raspberry Pi 3B+ As the weeks & months went by I never heard anything about my 3d printed cluster. My order was placed 1/12/18. After 2 months I decided to make a temporary solution with parts from a spare gauge cluster & ABS plastic. The spare cluster donated by my good friend Matt (Thanks!). This temporary solution actually didn't turn out too bad IMO. Unfortunately I've yet to hear anything about my 3D printed cluster to this very day. This shitty experience is by NO means Nick Pahls fault. He's waiting on clusters himself. It's purely Custom Instrument Panels fault. He hasn't responded a single time, not even 1 word.
-
Fuel level wasn't the only thing my dash was missing. The factory gauge cluster leaves very much to be desired IMO. I began investigating & pricing out different gauge solutions. Speedhut, Autometer, & Racepak setups would've been a small fortune. My search ended when I stubbled upon Nick Pahls & few others using displays backed with Raspberry Pi 3B's as gauge clusters. Until this moment I had been using a laptop to monitor everything while driving the car. These Pi setups could be built for relatively cheap especially if you code everything yourself. Unfortunately my heavily congested work schedule wouldn't allow me enough time for learning how to code. Luckily Nick Pahls ran a site/group called Raspberry Pi dashboard aka Pidash. Which offered plug & play solution for only 275$. It's a little more expensive than building it yourself but it's convenient & still very affordable honestly. The PiDash uses Tunerstudio so you can view gauges, make changes to your tune, Datalog, & view datalogs. It's touch screen, supports gps speedometer, endlessly configurable, has built in WiFi, has built in Bluetooth so you can wirelessly upload/download files & connect to the internet. This was my solution. He also partnered with Custom Instrument Panels that was offering 3D printed clusters for just 50$(what a deal!) The pidash was accompanied by GlobalSat BU-353-S4-5Hz USB GPS Receiver & back lit Rii i8+ Mini Wireless Keyboard with built in Touchpad Mouse. I recieved the pidash & accessories lightning quick. Then sent my original gauge cluster out to Custom Instrument Panels. While waiting for the 3D cluster, I setup the Pidash. A word of advice, use a desktop when designing your guage cluster for the Pidash. Use a cellphone charger to power the Pidash so you can test your gauges. This would've made things SOOOOO much easier & faster. Apparently I prefer to do things the hard way, aka doing it in the car with my mini keyboard. A 5v power supply was hardwired to supply power to the Pidash. I opted to have it on a switch instead of it powering on with 12v switched. That way I can have it on without the car being on. A spare usb cord was also connected to the Pidash & installed inside my ash tray so thumb drives could easily be connected. I've got to give mad props & thanks to Nick Pahls for badass customer service. This man answered every dumbass question I’ve had & provided tech support at all times of day/night even at 4am sometimes. I couldn't be happier with his product & support! Easy access USB extension