
dat240zg
-
Posts
818 -
Joined
-
Last visited
-
Days Won
1
Content Type
Profiles
Forums
Blogs
Events
Gallery
Downloads
Store
Everything posted by dat240zg
-
Guys: I'll try to answer the questions you guys asked. The DAD seats were sold to a friend of mine for his firebird. When the body shop was doing the body, I took them the Miata seats and had them weld in steel plates on the underside of the floor pans where the seats would mount up, so yes, they mount on the floor. Joel: The packaging and shipping cost via Con-way freight was $200. Steep for sure, but in the end, worth it to me. My car is going to be driven on a regular basis, so I wanted comfort, strength (non flimsy design) and supportive for "fun" events and long trips. The durability factor eliminated a lot of aftermarket sport seats and the size of the Z limited my other options. The solstice seats fit all those requirements for me. I'll get some pics of the seats in the car tomorrow. Bryan
-
Yep - he said that people could pick them up. He shipped my set to a depot about 6 or 7 miles away. Really comfortable - I know I already said that, but dang! I'm happy! Bryan
-
Guys: One of the areas of the rodstoration of #248 that has been a major pain in the butt (and leg and head and shoulder...) has been the seats. I started out removing the stock seat mounts, reinforcing the area where the seats would then mount (during the restoration), and then had the roll bar welded in. I removed the stock mounts to position the seats a little lower due to the main hoop. So I measured and bought a set of DAD sport seats. Fit fine - a little low - but my wife vetoed them due to the fact that they were really restrictive. So I sold those and purchased a set of '07 miata seats. Fit really well, comfortable but way too low. They would work well with the stock mounts. Finally, I was cruising fleabay and found my solution: Pontiac Solstice seats! I checked the measurements and pulled the trigger. Well, today they came in and man! These things are awesome. Brand new, no airbags to worry about and fit perfectly height wise. Super comfortable and supportive without trying to do a ricer impression. They have a slightly different footprint than the Miata seats, but just a drill hole away! Also, they're made to mount flat to the floor, so the seat "sits" perfectly in the Z. Pics will follow tomorrow, but in the mean time, the guy has 3 more sets, and they're priced really well. He did a really good job getting them to the nearest freight terminal for me. For those of you who might be interested, the link is: http://motors.search.ebay.com/_W0QQsassZmotownQ2dpartsman Maybe this will help someone out! Bryan
-
LT1 Guys: No more gutting the power steering pump!
dat240zg replied to dat240zg's topic in Gen I & II Chevy V8 Tech Board
Yikes! That's a way shorter. If you're running the Bowers as well, there shouldn't be a problem (at least it worked for me). Don't mean to pry, but did you mount the pulley on the lowest bolt? Only reason I ask, is that when I spoke with them on the phone, they told me to mount it using the top bolt. Doing so made the belt too long. I went back and had to re-tap the lower hole for the larger bolt and then flipped the bracket and mounted it that way - problem fixed! No clearance issues and the belt was tight. Bryan -
LT1 Guys: No more gutting the power steering pump!
dat240zg replied to dat240zg's topic in Gen I & II Chevy V8 Tech Board
Hey Dale: I just searched through the PSC website and the LT1 kit that they sell uses a 38" belt, pn # BT-60380. If you're not running A/C, it looks like that may be the belt that you're needing. HTH... Bryan -
LT1 Guys: No more gutting the power steering pump!
dat240zg replied to dat240zg's topic in Gen I & II Chevy V8 Tech Board
Dale: Honestly, I'm in a little bit of a different situation. I have the Bowers A/C mount kit and it came with a belt and their A/C delete pulley. I don't have a good reference as far as comparative length. Are you running A/C (gotta be in that hot GA weather!)? Bryan -
To add to Barts questions, is there anyone who has finished out (and has pics) a set (covered and mounted) with speakers and the other grab handles? Bryan
-
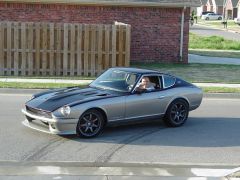
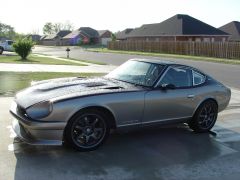
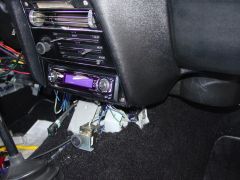
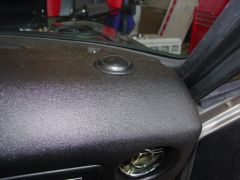
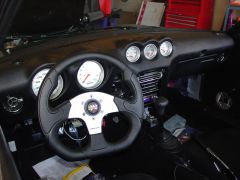
I have posted pics of the process in several of the different segments of the site, but never in one place. The car is closing in on being done with only tuning and some loose ends to tie up. To recap, I bought the car from an elderly couple down in Texas who had posted the car on Zcar.com. Price was $1500 for the shell and "a bunch of parts". When my wife and I got there, what we found was the remains of an early Z and a whole porch fulll of brand new, 30 year old parts. Evidently, the son of the couple had purchased the car and all of the parts with the intent of rodding the car and then just dissappeared.... No joke! Pic of the car as we found it: Included in the parts was a brand new, never opened Banks twin turbo v8 kit, a complete brand new scarab mounting and suspension kit and lots of NOS datsun parts that are no longer available. It was one of those types of once in a lifetime stories.... I ended up selling the Twin Turbo V-8 kit to Banks for their museum! The car was in such rough shape that I used a pressure washer on it to get out years of junk: Once we saw what the car looked like, we got busy stripping the body for paint and restoration. A couple of problem areas quickly jumped out: Stripped and ready to roll: Shell went to R&R Street Rods for stripping and from there, on to The Hack Shack for prep and paint. The drivers side front corner was tweaked pretty badly and ended up requiring a corner transplant: Quarter panel was also cut out and replaced with new metal: While Gary and crew were at it, they installed TTT camber plates, filled seams, took out the old lead and re-leaded the joints, filled the firewall, installed Baddog frame rail connectors, smoothed the side marker lights and welded the headlight buckets to the fenders. The also installed a somewhat custom roll cage - started out as a jegster kit, but got changed up. The remaining rust was taken car of and the car prepped for paint! A few of us had been tossing around the idea of a two tone paint job and this was what I finally decided on: Porsche Twin Turbo Charcoal (everybody knows that it'll make the car faster on the top and a Mercedes titanium on the bottom. I think that it turned out pretty nice. While Gary was working on the body, I had all of the suspension parts blasted and then powdercoated for a nice clean finish. Gary sent the shell home for me to mount the suspension and steering components. For suspension, I went with MML coilovers, tokico struts and suspension tech swaybars. For brakes, the car has the big(er) toyota brakes in the front, and the 240sx disc setup in the rear - someday, the goal is to upgrade both the front and the rear brakes further. Wheels are 17 x 8 MB Motorsports on 2 piece adapters. While I had the car, I went ahead and put FatMat throughout the entire car including firewall and roof. Reassembly: Once the body work was done, we got started on reassembling the car. I installed a Painless wiring harness (for me, anything but painless) and the engine wiring was handled by a Speartech harness. All wiring was run through the body, so there is only one place where wires are exposed. Keeps it clean. I trimmed the wiper valence area during body work so that the LT1 computer could be mounted inside the valence. Getting ready to drop in the LT1: From there, it's been a matter of working to get all of the parts back in. While I had the chance I went through and installed a NOS Motorsports brake line kit and have had nothing but problems since. Not trying to trash anyone, but just be aware - new condition doesn't by anymeans indicate good fit/design. On to the interior: The dash was trashed from being left exposed in the Texas sun, so off to Just Dashes to be rebuilt. Now reinstalled: While they were rebuilding the dash, I had them insert holes for tweaters on the top of the dash: I'm really pleased with the quality of work that these guys did. They changed up the size of the instrument openings to exactly fit the gauges and did very good work. Behind the dash is a Hot Rod A/C system. When I got the system, I sent them the Datsun cable controls and they modded the system to work with the Datsun controls - the result is that it looks stock (other than the knob). I just finished today wiring up the sound system and power antenna. Pretty happy to report that there were no flames and no smoke. Seats are out of an '07 Miata, but they are too tall and had to be mounted too low. The end result is that I look like Dilbert driving the car. Some random pics: Glove box gauge panel: Integrated turn signals: Outside: First Wash: Zee ya! One thing that is very true is this: I couldn't have gotten the car to this point without the help of people here on Hybridz. Dale, Bart, Sommers, Guy, Jody and many others have answered way too many annoying questions. Also, the largest credit goes to my wife, who put up with and even encouraged the build. I'll have a few more pics in the coming days as we wrap the car up. Thanks for looking! Bryan
-
-
-
LT1 Guys: No more gutting the power steering pump!
dat240zg replied to dat240zg's topic in Gen I & II Chevy V8 Tech Board
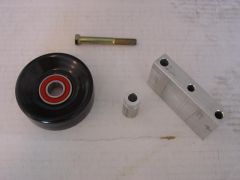
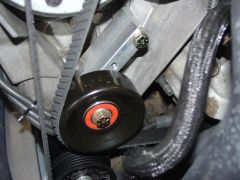
Here are the pics of the kit and the kit installed as I promised....again, nothing that I'm sure a lot of you guys could do up in your shop, but great for me! Kit: Installed: Hope this will help some you other LT1 guys who have had to rig up something. Bottom line: easy install, fairly cheap, neat and no noise, very little resistance/drag on motor. Dale: I accidentally stumbled on to this on another component site. I called up PSC and they said they had what I was needing. I couldn't find a pic of it either. Bryan -
-
-
-

-
-
-
Wanted to share this with you guys. After having burned out a P/S pump on #248, I did more searching on the web and found PSC Motorsports. They make a P/S delete pulley for the LT motors both F and B body. Installation took 30 min, but I was taking my time. Basically, the kit includes an idler pulley and a billet bracket that completely replaces the P/S pump and allows you to use the stock belt. Info: PSC Motorsports (http://www.pscmotorsports.com/) Allen Performance Resources 11468 FM 730 South Azle, TX 76020 Part Number: BK-MB31K LT-1 F-Body Idler Bracket Cost: $46 I recognize that some of you are fabricating geniuses. I envy your skills. For those of us who either aren't or don't have the facilities or tools, this parts for you! Pics of the install to follow this afternoon (families in town). Bryan
-
Fellas: Thanks for the tips. I've been out sick for the last 2 days and haven't been able to look at the Z. Hopefully, tomorrow will be a little better and I can get some answers. Thanks again. Bryan
-
Guys: I've had the Z on the road a couple of times and am still getting a fairly significant miss. Rick at R&R street rods checked the cylinder temp and it looks like two cylinders are not firing. I've previously tested my electrical and I don't appear to have any glaring mistakes. I went to read the codes on the OBD port and when I start the car, the trouble code light simply flashes continuously. I sat there counting the flashes and finally quit at 50+. Captain Obvious! it's just flashing! I've searched, and unless I missed something, there are no posts similart to this. Anyone have any thoughts or have experienced this before? I'm dying to get this thing done! It sounds mean as all get out and - even on 6 cylinders - this thing runs like a scalded dog. Just a scalded dog with 3 legs Help?! Bryan
-
Actually, I'm grateful that you (Pete) and the other admins walk the straight and narrow with the site. I enjoy being able to check in every once and a while and not have to worry about something inappropriate being there. There's a reason why this is the only board (for the most part) that I spend my time on. Keep it up! Bryan Dat240zg
-
Short vid of #248 Running....
dat240zg replied to dat240zg's topic in Gen I & II Chevy V8 Tech Board
Thanks guys. What the video doesn't show was me dropping the hood closed and yelling at myself. Fortunately, no damage done. I'll take pics of the dash tonight - got a little surprise! Bryan -
Finally! The Z is almost there. I still need to adjust the clutch master cylinder so that the clutch will take up, install the new dash (pics to follow), carpet and headliner and have a muffler shop intall the O2 sensor bungs. Target is sometime this week - there's a local Mustang club show this weekend. I may try to get over to enter. Here's the link to the vid: I'll get a longer one with a test drive and walk around later this week. I'm pumped! Bryan
-
Rollcage install with seatbelt retractors
dat240zg replied to 240Z2NV's topic in Fabrication / Welding
Here's another possible solution.... I am running a roll bar on the back and harnesses. I'm like you and wanted retractors; so I talked with Corbeau and they have harnesses with retractors at the top, where they would mount to the roll bar. You use a weld on mounting tab and the bases of the harnesses mount like stock. I'll try to get a link to their product page and some pics. Bryan Dat240zg -
Guy: John at speartech did the harness. Harness has a seperate fuel pump relay wired in. I'm going to keep tinkering with it over the next few days. I have a few issues that I need to sort out (unrelated, but still an issue). Thanks for all of the input.