MONZTER
-
Posts
828 -
Joined
-
Last visited
-
Days Won
28
MONZTER's Achievements
")


-

-
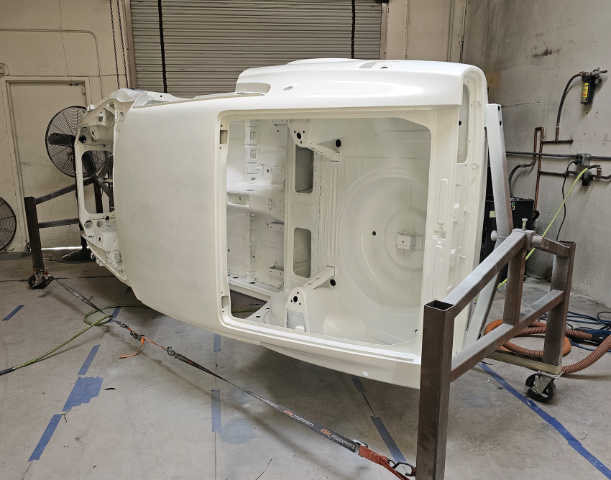
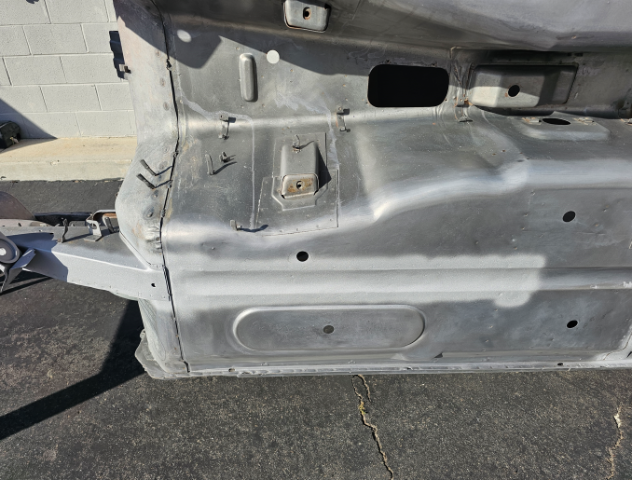
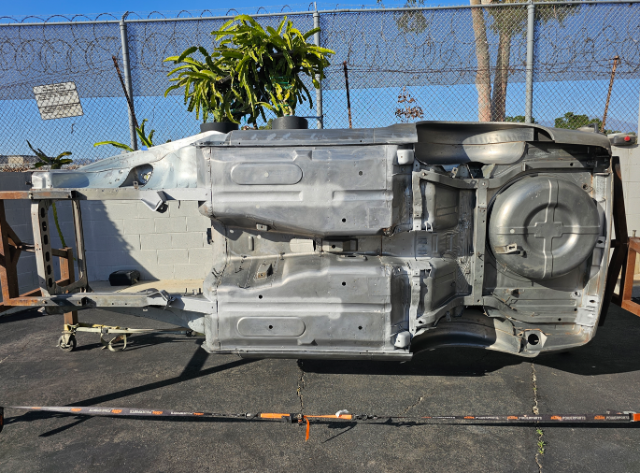
Its been an exhausting month of hard work getting the chassis in Epoxy to move it back home before the end of the month. Here is the process. 1.) strip all factory sound deadening/undercoating with a scraper, heat gun, wire brush. 2.) clean any residue with paint stripper and after-wash solvent. 3.) strip original paint from body with Citri-Strip paint stripper - again clean with after-wash 4.) remove interior tar paper with dry ice and liquid nitrogen. 5.) wash and clean entire body with Mastercoat metal prep - phosphoric acid rust neutralizer https://nomorerust.com/collections/metal-prep-rust-remover-products 6.) sandblast all seams and overlop joints. 7.) brush Mastercoat rust sealer primer into all seams and nooks https://nomorerust.com/products/mastercoat-ultimate-permanent-rust-sealer-silver-primer-original-sprayable-slim-quart 8.) lightly blast the floor pans with white aluminum oxide until white metal 9) brush 3 coats of Mastercoat rust sealer primer on to floors 10) blast the internal frame chambers clean and blow out any sand 11) spray the internal cavities ( rocker panels, rear fenders, rear internal quarter, and front internal cowl area with Matercoat using a 18 inch long extended tip spray gun https://paascheairbrush.com/collections/extension-spray-guns?shop_consented_scopes=email%3Averified+openid+pay%3Asession_token+profile+shop%3Aaccount_uuid&shop_sign_in=true using a 360 degree spray tip to coat all surfaces 12) sand the entire body removing any Mastercoat not reaming in pits or detents 13) sand the entire external body shell and underside with 180 grit and clean with wax and grease remover 14) lightly blast entire body inside and out until perfectly clean and lightly textured to promote adheision - holding the blast nozzle 12 to 15 inches away at 60psi with white aluminum oxide 15) hours blowing out the remaining grit 16) again using 360 degree long extension spray gun, paint all internal cavities and under sides with DPLV Epoxy Primer 17) Spray entire body inside, outside, underside with 2 coats of Epoxy Ridiculous amount of hours https://www.youtube.com/watch?v=y-kogRrJYJU
-
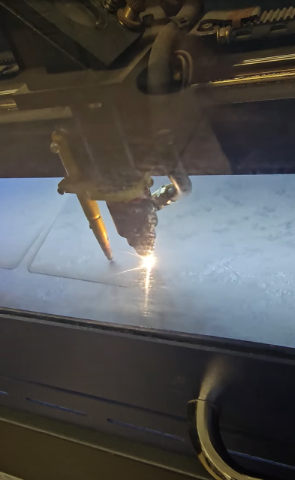
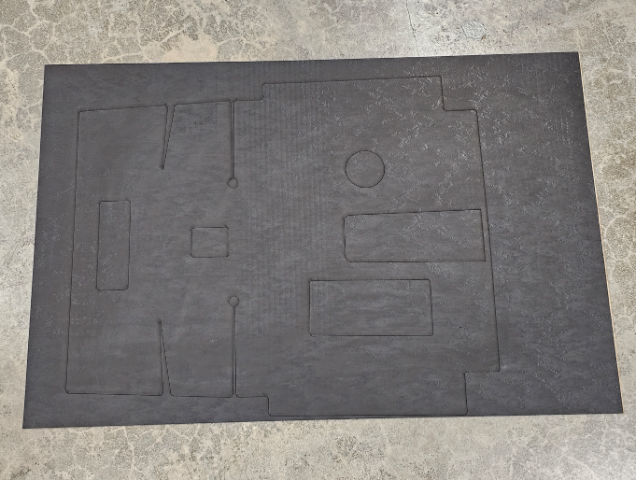
I also finished cutting the new Tar paper that will go on the interior floors and trans tunnel. I have a laser cutter at work. This is a Nissan part and still available as blank sheets. Unfortunately, even though it is correct, it is expensive at $100.00 USD per sheet. It took 6 sheets for the entire interior. This is the material on the laser After the metal is ready, I will epoxy coat it first then apply the sheets. Unlike OEM that had bare metal under it, this should be substantially better at keeping water from getting under it and rusting the metal
-
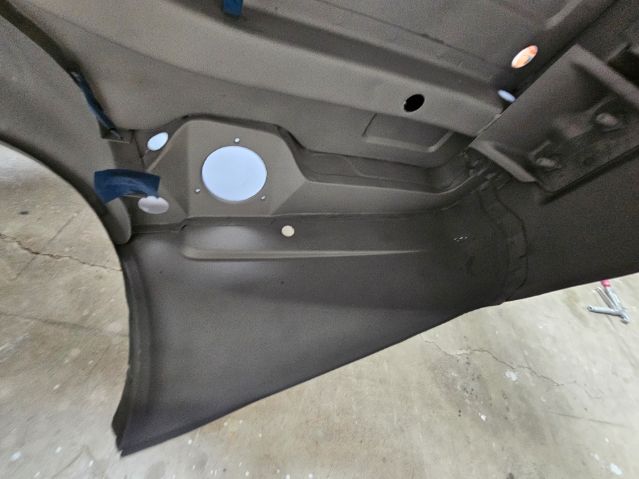
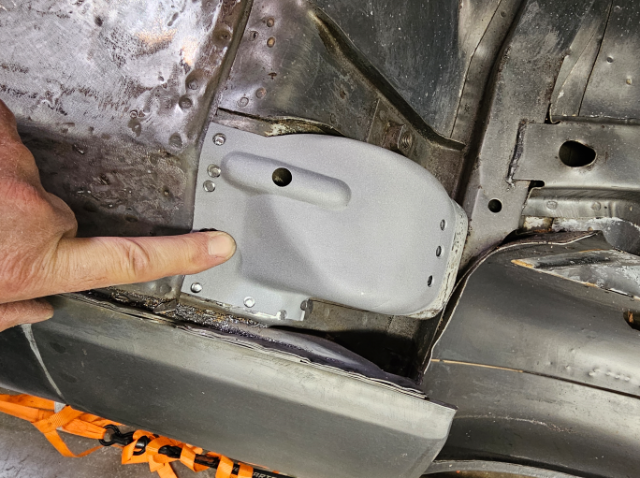
Another productive weekend. Unlike my Turbo chassis that has a late 71 build date, this car having a mid year build date has protection plates over the seat belt pockets. But of course they were used by the PO to jack the car and dented them up. I drilled out the spot welds and removed them, allowing me to straighten the dents and blast underneath them. Before: After: All sprayed with weld thru primer and ready for plug welding back on.
-
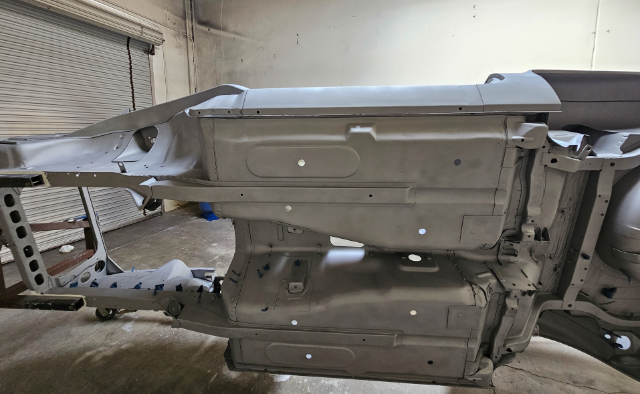
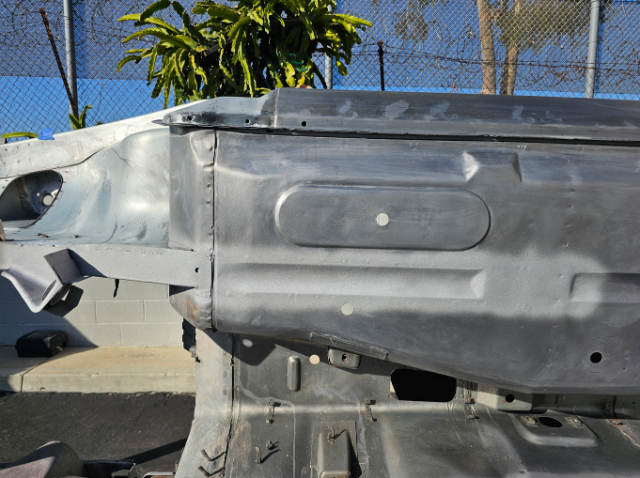
Since the frame rails were dented up pretty good from wrong floor jack positioning, I decided to replace them and this would also give me the opportunity to really get the original metal floors flat, and the metal shrunk and tight. They were surprisingly clean inside. This is the floor pan after removing the spot welds and frame rails. After some wire wheel work, and metal prep acid wash with Scotch-Brite, I worked and shrunk the metal with a shrinking rod and them smoothed it with a shrinking disk. Nice and flat getting it to what original would have looked like, leaving all spot welds and original deformations in place. I then lightly blasted the overlap areas and applied Weld-Thru paint. I then fitted the new frame rails, they took a bunch of work to get the correct shape and to match the original contour of the floor pans. I then copied all the original spot weld locations and drilled 3/16 hole to plug weld. I used several Cleco clamps to hold it in place and tight up against the floor pans. Next I used my MIG and plug welded them in place Finally I will grind smooth the plug welds More after the weekend
-
Thanks for the replies and comments. Time is always an issue, however Im at the age now where my daughter is 26 years old and working full time. Been married 30 years so the wife is obviously understanding of my hobbies. Hopefully continuing to make progress regularily. Hoping more people come back to the forum and participate in the community. Here is a picture of me and my daughter when she was probably 2ish years old, same car Im working on now. I need to get her back in the shop for a new photo - Time flies
-

Catch me up the last six years of how to Z community the internet
MONZTER replied to tim.d's topic in Non Tech Board
I miss the old days of humble build threads, great comments and passion for building. All the FB and You Tube stuff seems like "hey look at how special I am, I can weld metal... ect" then people just talking shit how they suck and how much better they are. Just self-promotion for one’s self over passion for our cars and community. I think the Me/I generation is the problem mixed with ADD for anything longer than a sentence and complex thought. To ask for help is to say you dont know everything and today that is death. So yes I am an old guy now so look at me just like I used to look at my parents when I was young HA. Ill keep posting here, at least it is one thread that follows my project for anyone interested. I appreciate the comments, critisim, and help. -
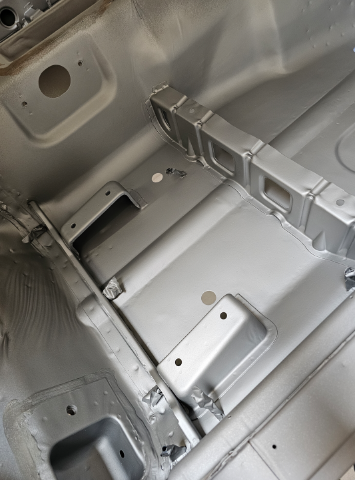
Been spending alot of time getting the chassis on the NA car cleaned up and ready for paint. Its a super clean almost a no rust car, so I want to strip it completly bare, metal prep it, straighten the floor pans which are really clean just slightly dented from wrong jack points. I started out by stripping everthing off and making digitized and CAD files of all the tar flooring. You can still buy it from Nissan. I have a laser cuttter so I will use it to cut all the replacements. It is an original paint car, so it was hard going in on it. Next I put it on my rotissary I built for the Turbo car and got to work on stripping all the factory undercoating. Using a heat gun, scraper and some mineral spirits did the trick but it took a long time. All super clean original metal under the car This is what it looked like under the front fenders BEFORE cleaning, so super happy and even under the cowl all original paint
-
Looks nice, Im guessing 260hp at 6500 to 7000k Do you plan on dyno testing it? Seems like it will be a super fun street car. Realy clean but not so over the top that you cant drive it everyday and enjoy it. Looking forward to more.
-
Been a while since I posted any updates. Been moving along. For the Turbo car I decided to build my own wheels. Ill CNC machine the center sections myself and have the lips and barrels spun for me. I really like the old SSR RS8 wheels but finding them in the correct bolt pattern, offset, and caliper clearance is impossible. I fould a set close, from Japan and had them shipped over. Since this car uses Z31 hubs and such, the spacing is out much more than a standard Z so I need a bit more positive offset. I dissasembled the wheels and scanned the center section into my computer and reverse engineered the shape. Next I re-assembled them and had the 245-45-16 tires Im going to use mounted. I test fitted them to the car, and close, but not good enough. This is the fist time this chassis has been rolling on its own wheels in 27 years. Its been on a cart or a lift. Felt good to see some progress now that the suspension, brakes, and cross-memeber are finally complete Scanned this complete assembly and put it in CAD. Now I have the exact shape of the tire on the rim. Cool cross section of it. Finally I scanned the side of the car, put it into CAD. Now I can adjust my wheel center offset for caliper clearance, and adjust it to work with new Lips and Barrels I will order for the proper offset and fit to the car. Having it in CAD alowed me to look at it from every angle and check all clearances, for calipers, springs wheels lip, ect. Even compressing the suspension to make sure I have fender clearance at full travel Final wheel spec is: Rear - 5 lug = 245-45-16 on 8.5" width rim- 27mm positive offset, 2.25" outer lip on the rim Front - 5 lug = 245-45-16 on 8.5" width rim - 31mm positive offset 1.75" outer lip on the rim Next I need to find some time to program the CNC and start cutting chips. But I got distracted on the NA car, so that update is next.
-
Yes, still working on then, just have not posted anything. Bought some expensive components that take time to recover from. A blank PAMS head, that I then designed and has DelWest make me titanium intake valves, Inconel mnemonic stainless steel exhaust valves, also MoldStar 90 seats and guides. Had it assembled, and ports cleaned up for some nice flow numbers. Also purchased a Nismo 6 Speed Trans that was also strengthened and modified by HPI in Japan. I take some progress pics soon.
-
MONZTER changed their profile photo
-
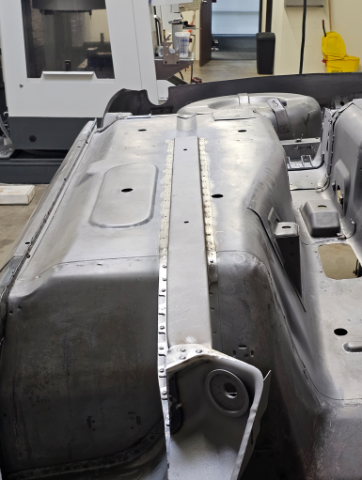
More pis of it finished up The bottom plate was beat up a bit and bent from floor jacks. So I took off the old one by drilling out the spot welds. I then drew up the shape and had a new one laser cut. The center plate that is welded to this plate, I re-made it as well, but out of 304 stainless steel. This way I can leave it a brushed stainless finish after powder coating and it is a good place to use a floor jack. I then spot welded on the larger plate in the original locations I then tigged the seam between the spot welds Then tigged on the center stainless plate Then blasted the entire cross member and powder coated it in a super black semi gloss powder coat. Powder coated the motor mounts as well I always first do a primer powder coat that is sandable I sand most off this off to fill the small blemeshes Then final coat Finally the brushed stainless plate for the floor jack Next up is getting a new transmission, then finishing the exhaust
-
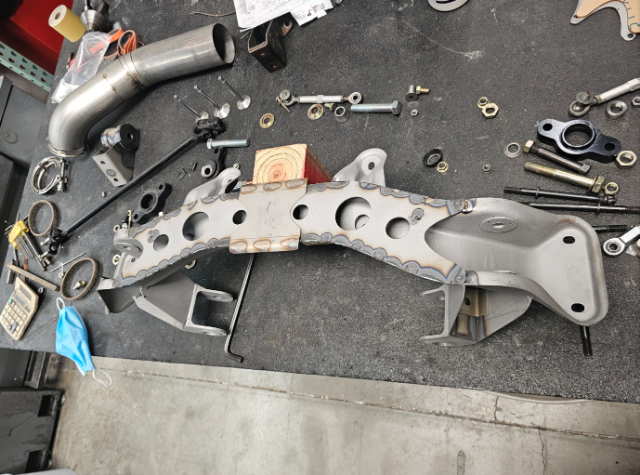
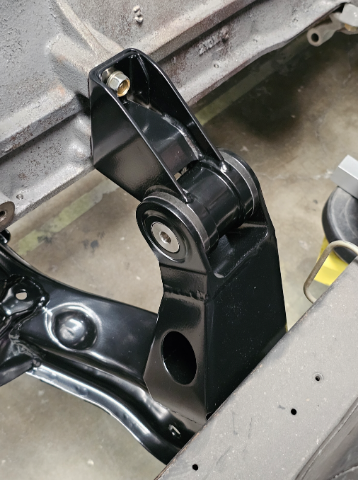
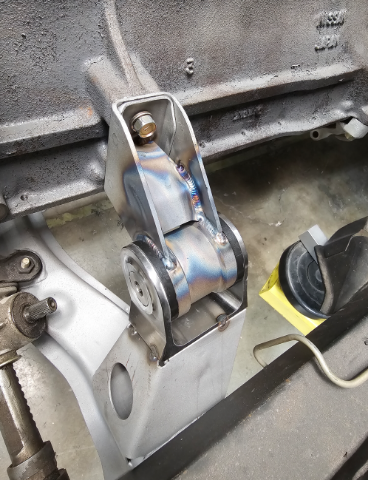
I finished up the front crossmember and motor mounts Started with a stock crossmember with the need for new engine mounting since I moved the engine in the chassis back about 1 inch. I extended and boxed in the existing upright Some grinding and blasting to clean it up 3 D printed mockup of a machined bracket I made to accept the moustache bar busings. I designed these years ago and have been in the NA car for 15 years. Worked well I machined this weld in bracket out of a solid chunk of steel because I wanted the details for the bolt holes and you could not do that with bent sheet metal. Stupid but fun. More soon
-
Thanks, I enjoy keeping up with your projects as well, nice work you are doing on the intakes. I machined this plenum years ago. Made from 2 halves and welded together. Hoping to one day run it.
-
No, scanner, I want one but not yet. Just did all the suspension and reverse engineering old school with calipers just measuring. It's all pretty simple stuff