

rsicard
-
Posts
889 -
Joined
-
Last visited
Content Type
Profiles
Forums
Blogs
Events
Gallery
Downloads
Store
Posts posted by rsicard
-
-
Yeah, I know it's an old thread, but the JTR radiator does fit well. I think your problem is that you dropped the JTR radiator mount down over the "frame" rails rather than mount it on the bottom of the rails. Easy mistake to make. I paid a shop a bundle of cash to mock up a SBC in my S30 using the early JTR kit. They couldn't close the hood, wanted to sell me a uber expensive aluminum radiator and spent some substantial time explaining that the JTR kit was S**t because it located the engine to one side and the radiator mount was too high. That three inches or so from the top of the frame rail to the bottom makes a difference.
G
Got to hand it to Zgeezer that he is correct. Never gave it a thought to use the lower JTR radiator bracket below the front frame rails. Temporarily clamped the bracket below the frame rails and but the JTR radiator in and just as Zgeezer has said it DOES FIT. Already have a Griffin Radiator being built with double row of 1.25" tubes in the core, whereas as the JTR radiator has only one row. The JTR radiator was used one the engine run-in stand as worked well at ambient temps of 75-85 degree F. It held 180 degrees as this is the thermostat that was installed. Yet with a AC condenser installed in front of it in the 240Z the JTR radiator may fall short of proper cooling, thus the order for a Griffin Radiator with double row 1.25" cooling tubes. That should cool adequately here in Arizona with the AC condenser in front of the radiator.
-
Yea I knew it would. I'm looking about a $2000 set up for a top end, and probably another 1000 when I upgrade the rods and pistons. and then more if I decide to bore... I was just hoping there was something I could do now before I rebuild the engine next year for like $400 just to give it a little more spirit
Summit Racing has a 383 Small Block Chev for $651. If all the machining is done, this is a good deal. At most further machining for near zero deck and fit the pistons. Knowing Summit Racing the block is sound.
-
Hi all...
I have decided to "Jump In" and see what happens...
I just sold the brand new L6 setup in my 240z and am jumping into the V8 swap club. This was "slightly" difficult choice since I was so close and the L6 drivetrain was all brand new and VERY nice! But, this was the long term plan anyway and I decided not to spend any more on the L6 setup just to have to do it all over again.
Quick summary of progress to date...
- New front suspension - All powdercoated or painted. New ST springs, Tokico blues, bushings, ball joints and tie rods.
- Rear Suspension - Freshly built R200 w/3:90's. All powdercoated or painted. New ST springs, Tokico blues, bushings, RT Diff mount, etc.
- Rear disc conversion complete. All stainless lines and new 15/16" master cylinder.
- Interior - Dash restoration in progress. New carpet kit, Prelude seats, nice audio system to install. Should be NICE!
What I have to put into the car...
- 1994 LT1 w/mild build. Stock bottom end, mild comp cam & Beehive's, light port/polish. 15k total on engine
- Hughes performance 4L60e - SOLID transmission!
- 2001 Z28 fuel tank - ready to go
- Almost all "engine and trans" based items - Harness, pcm, mounts, etc. Still need a few small things
What else to get...
- JTR kit - will order on Monday!
- Headers. Not sure if I will get coated or stainless
- Roll bar - just looking for a street bar of some sort initally
Next steps...
- Rip out current drivetrain - will be done by next weekend!
- Get everything for LT1 and other misc parts powdercoated - within 2 weeks
- Bolt in new engine/trans - 4-5 weeks out...
- Finish dash refurbishment and install
Then, I will keep going on the body work. ZG's are going on the car.
I hope to have this car running by the end of June. Painted and on the road by the end of July or mid-August. We'll see...

A few pics of progress to date. It is coming along well. The white on the dash is plastic primer. Will be gone and covered with SEM texture finish.
You will see me around this forum a LOT more going forward!
Thanks,
Tim
Just have to ask, what method/process was used to do such a good job on the Dash. Have to do one of these myself. The paint job shown is very good.
-
Yea I knew it would. I'm looking about a $2000 set up for a top end, and probably another 1000 when I upgrade the rods and pistons. and then more if I decide to bore... I was just hoping there was something I could do now before I rebuild the engine next year for like $400 just to give it a little more spirit
Just make sure that you start with a good foundation aka a good block. The good choices are a late manufactured single piece 350 block as it likely was CNC machined and is precise. The best choice is an aftermarket block and this costs $1500.00 and is the best foundation to start from. Scat cast 3.75 stroker crank is $200. Scat I beam rods are $300. SRP lightweight pistons with Metric rings are $600 and the best choice. As for cylinder heads the AFR heads cannot be beat but the price must be paid. Internally balance the rotating assembly and use neutral balance fluid damper and neutral balance flywheel.
-
I still am not understanding why it would be detrimental to mount the regulator closer to the rear of the car and reduce the length of return line. I do understand the need for the guage to be at the carb so you know what your pressures are going into your carb. I do understand that the bypass is much better and that fittings and lines are very important(thank you Grumpy, those are great posts for creating efficient system). I am just thinking that pressure coming out of the bypass regulator on the feed line should be the same near the regulator, as near the carb, and if the guage you are reading(and adjusting for) is at the carburetor, then why is it best to run equal length return and feed lines with regulator in engine bay. (moderators if this is too fuel related I apologize and understand if it is moved to more appropriate sub forum). This is related to my v8 swap, that is why I initially started here.
The friction and restriction of the fuel line between the rear mounted regulator and carb is NEVER ZERO. There is ALWAYS a drop in the feed line. Put the regulator and return near the tank and adjust the regulator for the proper pressure at the carb.
-
Well I am still looking for options as to testing the block before I go back out friday. I am going to have my dad bring him compression checker so we can test it, and i'll double check all earlier signs I checked. Thanks forr the help thus far and still looking forward to other's opinions. Maybe someone has some suggestions as to a real simple cheap way to get some more horses out of the engine without having to do much, just to get by this next year before I do some real work.
Get newer design cylinder heads and performance camshaft. More horsepower equals more money!!! Face this reality.
-
I haven't bought the engine yet. should I try to convince him to do this with me? other options?
Propose to the owner about draining checking the oil and if no moisture is found then change the filter and fill with oil that you have purchased. If the owner hesitates consider it as a sign that something major may be wrong. The other option is to purchase the engine explaining to the owner the reusable parts are the block if it passes inspection, pressure, crack, sonic testing and the magni-fluxing crankshaft. The purchase is a gamble. What is put into the block for machining and components will far outweigh the cost of the bare block. You decide.
-
Possibly this?
http://www.ford-truc...-motor-oil.html
I don't know, i'll make sure to ask the guy more questions about the oil color. Although, I doubt he is teribbly informed, doubt he even ever checked the oil in it. Honestly all he has to tell me is he got it, ended up not really using it, started it up every now and then, and now he is tired of it and cant get rid of it.
Do what was done in the link that you posted. Drain the oil, check for any sign of coolant, change the filter and put in new oil if no coolant detected. Then run it till it gets up to temperature and then 15 minutes beyond getting up to temperature. Shut it down come back in an hour and check the dipstick for oil color.
-
Well yea the ignition system was still hooked up, but what I was meaning is I had to splice it back together since the ignition switch was no longer present. Wish I had a picture availible of the oil color, but it looked like sculpting clay. It still seemed like the right consistency, not watery. There wasn't any sort of build up on the oil cap or the dip stick. I called the guy while he was at work and then followed him home from work, so I don't think he or one of his 3 daughters messed with the engine to make it appear better then it was. This is just a first time encounter for me with greyed oil. Everything seemed to check out fine. The engine is only $250 I pretty much have between now and friday to make a final descision as to whether or not I want it when I go to pull it (myself from the frame and trany) I get the complete engine, AC compressor/condensor, radiator, long tube headers, and any ammount of exaust I want with the manifolds. It's currently 3 inch dual, but nothing special, just rusty tube.
It just doesn't seem like a head gasket or broken jacket because normally there is milky build up on the cap and dipstick from what I've seen. However, please educate me further if this isn't the case.
Don't understand the comment about sculpting clay. Is the color grey or brown/tan? Ask the owner of the suburban what caused the oil to appear the color it is. Ask if it has been rebuilt at some point and how many miles are on the engine and since rebuild if applicable. There must be a reason for the off color oil.
-
And wouldn't the engine have had some sort of indicaator, like a miss or a slosh in one of the cylinders when running it? I ran it for 10 minutes from idle to about 4500 RPM several times and it acted like any good solid 350 i've ever looked at.
If you were able to run the 400 SBC then the ignition MUST have been working. Gave this situation further thought and there is a cooling system sealant that is powdered lead that is supposed to bunch up at the leak and stop same. Suspect this sealant was used and there is or was a cooling system leak into the lubrication system. Highly suspect there is a head gasket leak or at worst a hole in one water jackets of the cylinders to the crankcase. The only items of ANY VALUE are the block and crankshaft. The remainder will need to be replaced at rebuild provided the block is OK. The low cost cylinder heads with best performance for the price will be the Vortec Cylinder heads. Be careful, get cylinder heads at a reasonable cost that have been reconditioned or new. Get the block sonic tested FIRST if torn down BEFORE proceeding ANY FURTHER. The cylinder heads, camshaft, intake manifold and fuel control will dictate the amount of power generated. The more spent on cylinder heads, camshaft and induction system the more power generated.
-
My only hold back is the slightly greyed oil. he said it was SAE 30w, the oil looked like it should have high mileage as did the plugs, but the oil had kinda like a silty grey to it.Even after the engine churned it up some, still grey like. But there wasn't any appearance of rust oor resistance in the engine turning over. Everything seems perfect, everything was intact as is minus the ignition wiring and the heater core.
It looks as though you have found the one very important clue in the silty grey oil. Should be blacker than grey. Suspect a water leak in the block. Drain the oil from the pan and leave the oil plug out. If the radiator is still there, fill the cooling system with water and obtain a pressure pump and adapters for radiator neck. Pressurize the system and look for water leaks especially from the oil pan. Small Block Chev's of that generation can suffer from core shift when the block was cast. The 400 small block may have weak spots in the cylinder bores. The only way to truly know is complete dis-assembly and sonic test each bore for wall thickness. Should be approx 0.200" minimum.
-
Thanks everyone for the inputs so far.
riscard: that is just what I'm looking for and will start doing the research. What if I can get a reasonable 327 ($2100 fully put together)? Would you still get the 350?
Michael: You are correct in that US military have exemptions. I'm in the US military and have been stationed there twice (total of 5 years). All the car has to pass is safety test and lights, etc. I had two Nissan Skylines (GTS wished GTRs) shipped from Japan and drove them in Germany. Both sucked due to gear ratio, but that is another story. There is some awesome stretches of road in the former East Germany. You cannot compare the speed you can do in GE to AZ. I cruised 90-100 MPH in our Pathfinder. I got up to 150 MPH in a Audi Quattro TT. That was a blast. Overall you're right that it is hard to find a stretch that you can do 150+ MPH, but you can. AZ you do that speed and they'll take your car from you and you'll end up in jail.
I do want torque just not massive amounts of it like the 400 SBC has. Something reasonable as I'm not interested in going fast down a short stretch of road (drag racing). Maybe a 1 to 1 ratio? The gearing is something I've got to research as well. I'm not sure what I have right now.
Thanks again everyone.
Aside the issue of driving in Germany, finding a good 327 is getting difficult as they are much fewer in number than the 350. The same objectives can be achieved with the 350 and they are MUCH more plentiful and therefore CHEAPER and so are the parts for same. The reason for recommending the SRP professional pistons is their design, light weight and strength. With 6" rods the piston becomes lighter. Then the rotating assembly can be INTERNALLY balanced. Neutral balanced flywheel and front damper can be used. When it comes to dampers use the fluid dampers as they are the MOST effective.
Yes this is the more expensive path, but the results can be BULLET proof and every bit as effective as Gen III and IV small blocks. The cylinder heads, camshaft and intake dictate efficiency of the engine. Admittedly when designed for most power at 5000+ RPM, efficiency will be less at lower RPMs. This can be fixed by a less aggressive camshaft. By putting a 2 piece timing cover on making it much easier to swap out camshafts. Best to use a camshaft gear drive as their will be MUCH more accurate cam and distributor timing (less spark scatter) over the life of the engine. The SMALL down side is extra noise from the gear drive. With lighter weight reciprocating bottom end the engine will wind up quicker. When doing a 350 doing it right the first time yields more than satisfactory results. Doing it a second time is much more expensive. You decide.
These recommendations come from experience and extensive reading of David Vizard's books and Internet posts. Next to Smokey Yunick (Deceased), David Vizard is an expert on Engine Building. Look these two guys up and you will find a wealth of knowledge regarding engine builds.
-
Hi,
I have a two part question for the V8 SMEs (subject matter experts). First I have to provide the background info and my goals. Background: the car came with a stock (maybe slightly better heads) SBC 400, T5, and R200. The engine if I understand correctly was pushing 200-225 HP and around 300 lbs of torque. Due to the size of the tires (small) it would spin on 1st-3rd gear, so not too worried about the transmission at this time. Currently the car has been stripped down and media blasted. It needs a little work on the body in the usual places. The frame rails and body has been stiffened as well as a 6 point cage added. I paid too much for the car, but such is life. Goals: I'm in the military and hope to be station in Germany, so with that in mind I want a top end car. I'm not interested in drag racing it, but once or twice to see what it'll do. I might road race it if I have the time. I'd like to have a high RPM engine (top end in mind), with good HP and not huge amounts of torque. As an example say 375 HP with 300 lbs of torque. So as the 400 SBC is a high torque engine it is out as an option. As I have motor mounts for a SBC please don’t list the RB26 or any of the others. Also I don’t have a huge budget as the rest of the car will require a lot of work.
Questions:
1) Which engine is a better fit for what I wish (high RPM engine (top end in mind), with good HP and not huge amounts of torque) a 327 or 350?
2) What cam would I need in either to get this? (high RPM, high HP and not huge amounts of torque)
Thanks for your time.
Cody:
Retain the 400 block complete. The 327 will be costly to purchase. Buy a good 350 4 bolt main single piece rear seal block, bore it .030" put a SCAT 3.48" stroke forged crank. 6.125" SCAT forged I beam rods, SRP Professional pistons which are only 376 grams each (very light weight forged) for the bottom end. For the top end AFR-195 competition cylinder heads, an appropriate camshaft and good intake manifold and carb. The camshaft should be solid roller type, solid roller lifters and Comp Cams thick wall push-rods and 1.6 ratio rockers. The camshaft will be the most important as to where in the RPM range the peak horsepower and peak torque occur. With the camshaft solid rollers a more aggressive lift camshaft can be used and 7000 to 8000 RPM is doable. This camshaft can be such that the 350 will be somewhat mild below 5000 RPM and come on VERY strong above same, aka 327 like. Good around town and very good at the track.
I am in Tucson also and have built a stroked 350 similar to that described above. Can recommend suppliers and local machine shops.
-
Here is a better option for stub axles than the usual MMS drama >> Chrome molly stub axle thread
Your recommendation for another source of Chrome Moly Stub Axles have the same failure mode as the 27 spline 280Z Stub Axles. I worked with MMS on their BEEFY stub axles and we overcame this failure mode.
-
Ztogo:
Just noticed your writeup on the dash. Will use this extensively. THANKS!
Ztogo:
One important question. What was used for filler on the dash?
-
Ztogo:
You have done fantastic work on the 240Z. Everything is immaculate. You mentioned using something on the dash. Can you describe the process and materials used to restore the dash PLEASE. Keep up the good work and ESPECIALLY the good photos. Keep them coming. I also have a 240Z and wish to restore the dash. Also putting in a SBC engine and manual trans.
Ztogo:
Just noticed your writeup on the dash. Will use this extensively. THANKS!
-
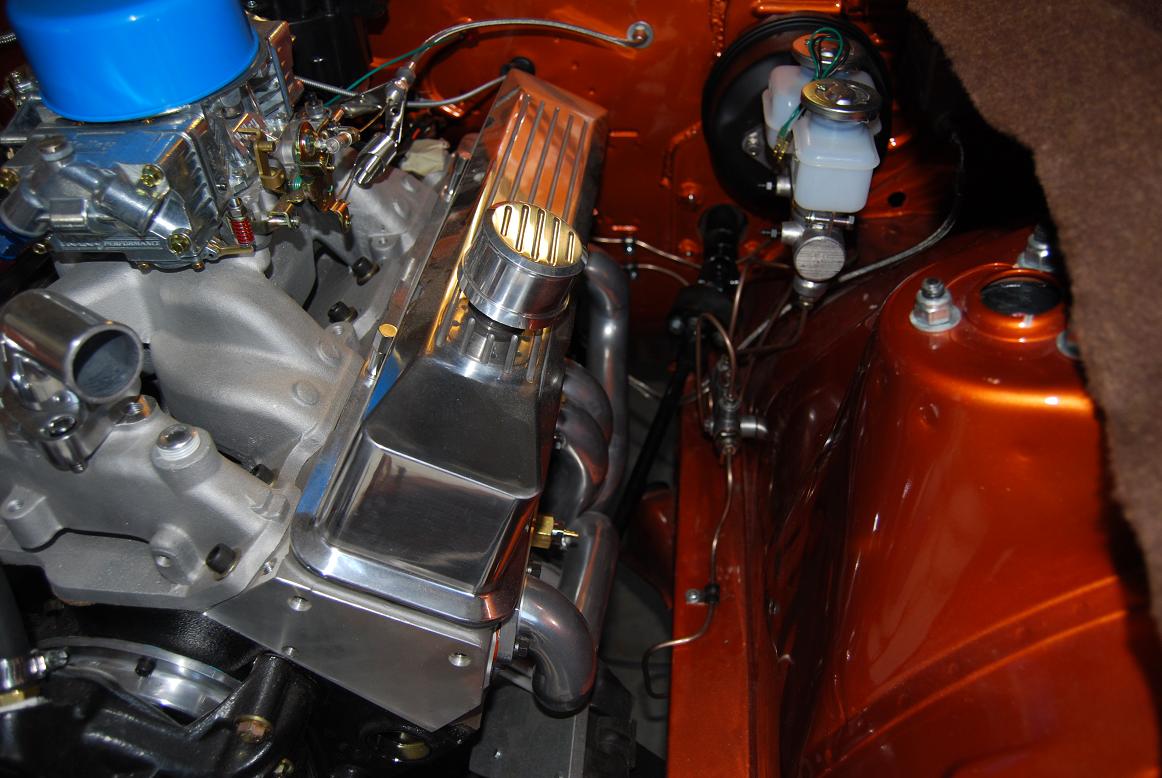
So, it's been a little while since an update. I had a couple of weeks where work was killing me, so I didn't have much time to work on the Z. Last weekend I was able to finish the brakes, all they need now is bleeding. The fuel lines are all 100% ran as well. I had to modify the right front brake line, as you can see from the pictures. Partly because I re-routed the line for aesthetic purposes, and partly because the header is so close to the stock location, I decided to avoid the 'hot' area and just go through the frame rail. I used some rubber grommets and sealed around them as well. Word to the wise - it's a pain to run these hard lines with the motor already in!
I also used a universal lokar emergency brake cable kit to fabricate a new E-brake for the car. I used the stock lever/pull system, but used the original line bracket location to bolt on a modified hangar. The location works perfectly with the r200 nose in the lowered RT style position. The cable housing ran very well to the 240sx caliper brackets, which I also modified to take the original E-brake bracket (the 240sx bracket was a little fat to work very well). It's nice being able to modify just about anything with a little bit of welding. Other than that, I spruced up the E-brake handle, which was sun bleached and pitted... I used the same texture material as on the dash to give it a new feel, just spraying closer to imitate a sort of leathery look, and painted with the same black trim paint. We will see how well it holds up.
Among other things, I have modded the heater blower motor for the honda motor, and started polishing and sealing all the latch hardware.
Other than that, I've been working on the dash wiring, which should be done soon (probably the biggest pain of this project so far, beside the spindle pins!). Once the dash wiring is complete and dash installed, all the other wiring will not take long, and after tying up the loose ends... maybe it will be time to fire it up!
Ztogo:
You have done fantastic work on the 240Z. Everything is immaculate. You mentioned using something on the dash. Can you describe the process and materials used to restore the dash PLEASE. Keep up the good work and ESPECIALLY the good photos. Keep them coming. I also have a 240Z and wish to restore the dash. Also putting in a SBC engine and manual trans.
-
Damn, my motor currently makes 700rwhp and will be making more soon. An extra $350 is painful. Any package price for getting all the options? hahaha
I'll decide which set I want when we get to the order phase. I may just sit with 1 3/4 and deal with the small power loss
Mistafosta:
What kind of setup makes 700 rwhp?
-
So.. I am thinking of downgrading the engine aspect of the build to a used stock LS1 w/ megasquirt 3 .. and go from there if I want more power, it's easy enough to add... Should make it easier on me, and provide a cheaper engine build. If my aim is 12-13 1/4 miles, I have a feeling the stock LS1 can get pretty close, or be nudged there with a little help.
What do y'all think?
PhaTTy:
The ONLY advantage a LSx has on the Gen I and II Small Block Chev is a factory stock lightweight aluminum block. The latest factory LSx cylinder heads have gone full circle back to rectangular intake ports (ala Gen I, II and BBC) from cathedral ports. With similar displacement the results are nearly the same between Gen I/II and III/IV. The LSx parts are more expensive than Gen I and II parts and the latter are more plentiful. Scrap that convertible notion and get an early 240Z that is in fairly good and compete condition and start from there. You won't regret it.
-
Got it on the pistons.. I'm not opposed to change.. Thanks for the rest of the info also.. I'm saving this all elsewhere for some day when I actually do build the engine. I am attached to this Z.. I definitely want a roadster.. topless Z.. so I'll beef up the stiffness as much as I can. I've seen a couple of other convertible and roadster Z's out there that handle more horsepower than I will be putting out. If a vette, viper, cobra, etc can run the drag topless (and they do.. I see it almost every week) , then I think it is safe to say that you can put enough structural integrity into the rest of the body to be able to handle it. If I do end up twisting the body or doing some major damage, then I figure I can always go grab another 240z -- they are fairly easy to find rust-free and in decent condition here in Arizona... apart from the body work, paint, and reinforcements.. the rest of the parts bolt on.. I've seen somebody swap the engine, drivetrain, rearend from one 240z to another very quickly before
I'm confident that I can reinforce the chassis decently. The roll cage that is already in the car is near identical to many of the cars that run the drag strip here locally. Most of those cars push upwards of 500hp and a good amount of them are unibody's .. Wish me luck and I'll do my best. Who knows.. maybe a 2nd 240z is in my future as well to compare it to
I REALLY APPRECIATE the comments and suggestions.. This is what I am looking for, and what makes this forum great.
PhaTTy:
Thanks for being OPEN minded to changes from others. For this project the surface has been scratched. Keep posting progress and asking questions. I have a 1971 240Z which weighed in at 2460 lbs with the original 6 cylinder engine and trans all in running condition. Want to keep the weight down. Suspension at all 4 corners have adj coil overs with Koni adj racing shocks. R180 differential replaced by R200 Clutch Limited Slip Diff (CLSD), half shafts replaced with CV types and Modern Motorsports BEEFY stub axles installed all to withstand 500+ ft lbs of torque.
SRP professional (light weight and STRONG) pistons used in 383 to achieve maximum squish and quench with .030" cometic head gasket. Forget Scat crank and Scat Forged I-beam rods used so the bottom end is all forged assembly all internally balanced. Neutral balance damper and flywheel used. T56 trans to go behind the 383. This 383 baselined after Dyno tested engines seen on AFR cyl head Web site. Exceeded all specs of the baseline configuration. T56 trans to get special treatment for weak spots. Working on EFI system at present time.
With 500+ HP and TQ, the horsepower to weight ratio is better than a new Corvette and maybe a Viper.
-
This Z is very rust free... minus some on the floor plans. I bought it because I actually wanted a convertible eventually -- so I think it fits my plans well. I can add stiffness to the body (or have somebody that has experience do it). My #1 priority on this build is to make sure the unibody is reinforced as much as possible and that bracing is installed wherever we can. Your engine recommendations are actually very close to what I had planned:
GM 4 bolt 350 block machined to 383 (possibly splayed.. is it necessary for this HP level?)
AFR 180 or 195 street eliminator heads
Victor Reinz head gaskets
Lunati Voodoo 60103 Cams
Lunati Voodoo Aluminum Roller Rockers
SCAT Pro Comp I-Beam Rods
ARP Wave-Loc Rod Bolt Kit
SCAT 9000 Pro Comp Stoker Crank
Hypereutectic Pistons (Speed Pro or Keith Black?)
Melling High Volume Oil Pump
Cloyes true roller timing kit
Clevite H-series Main and Rod Bearings
Comp Cams Magnum Push Rods
Thanks for the suggestions and your input. It's very helpful!
PhaTTy:
There was a considerable thought and experience put into the previous response. Hypereutectic Pistons are BRITTLE and HEAVY. Spend the extra money for the SRP Professional for 6 inch rods and get FORGED (Strong) LIGHTWEIGHT pistons. The Scat 6 inch rods will come with the appropriate ARP bolts. The cast Scat crank is good for 5000 RPM. Above that go with the Scat forged 3.75 stroker crank. Comp Cams has .105 inch wall (Thick Wall) push rods i.e. much less FLEX for more precise valve action. Forget the Cloyes true roller chain, go to Pete Jackson GEAR drive, i.e. less spark scatter translated to distributor. Use Big Block Oil Pump (more pump teeth, less induced spark scatter), attendant pickup and oil pan. Much consideration put into these aspects.
It is IMPOSSIBLE to regain the torsional stiffness and light weight of the original roof, A and C pillars. Get another good early 240Z!!! They come in at 2400 Lbs significantly lighter than others. Then properly cross-brace with roll-cage. Cannot emphasize this ENOUGH. Take it from one who is experienced in these matters.
Take these responses SERIOUSLY and the end product will be much BETTER.
-
Hey guys.. finally getting around to working on my project car (pics attached). I think I paid about $500 (or less) for the '73 240z , so I figure it was a decent deal.
Basically the car was going to be used for a track setup by the previous owner. I'm not sure where he was going with the convertible top, but I do like the bodywork, although it needs some repairing from fiberglass cracking, etc from being exposed to the Arizona sun for an extended period of time.
My overall plans: I would like the car to run a 12-13 second 1/4 mile when I do decide to drag it. I don't want anything to break or twist. I'm willing to put a few extra dollars into it to ensure that it does not have issues in the future.
Engine plans: ~440hp SBC 383 w/ JCI v8z kit - engine custom built by myself or my dad, or built my a competent engine builder. I'm planning on throwing a FAST EZ-EFI system (TBI) on it for fuel. I've considered a complete MPFI system, but it does complicate things and I've heard nothing but great things about the (quick) auto learning EZ-EFI setup.
Drivetrain plans: Built up 700R4 and a R200 Viscous LSD (Q45 3.54 ?)
Drivetrain / Suspension / brake plans: Option #1 - Arizona Z Car Track-Pak (Front/Rear -- 7600 $ wow) , Option #2 - Modern Motorsports Rear Adj Control Arms, Modern Motorsports R200 Mounting Package , Modern Motorsports Front/Rear 13" Brake Package , Option #3 - Techo Toy Tuning R200 Rear End Conversion Kit (http://www.technotoy...0-rear-end.html)
I would like your opinions on the above choices.. what would be best and easiest to implement. I would like to do much of the work myself, so the simpler for me, the better. I really like the Arizona Z Car Track-Pak, but it's friggin expensive.
So.. after that is all out of the way.. I need to know how to proceed with this car. My first though was to take it down somewhere and have it soda blasted (so it doesn't harm any existing fiberglass). I'd like to know what I am working with before I begin my first attempt at fiberglass repair and fabrication. Is this what you would do first?
I was planning on the following "order" for completing the car:
1. Remove dash and have someone soda blast everything we can
2. Repair any fiberglass that has cracks, needs filling in, fabrication for tail light installation
3. Primer it before anything starts rusting
4. Replace frame rails and floor boards
5. Primer floor boards -- Spray or Brush truck bedliner in engine bay and cabin floor of vehicle
[edit] 5a. - Reinforce chassis to prevent flexing or have someone else with 240z experience do it (Phoenix area has someone good).
6. Remove old rearend and install new rearend, suspension, and brake components
7. Replace front control arms, suspension, and brake components
8. Install transmission, driveline, and mounting components
9. Ensure steering components are bolted up and functional
10. Install engine and mounting components
11. Install headers and have an exhaust shop install the exhaust
12. Hook up heater components
13. Install new fiberglass + coated dash + gauges
Let me know how that looks, and if I am missing anything important. I want this done right the first time
Sorry for the lengthy post and might be over-thinking it, but I like being prepared and know what I am in for.
Thanks guys!
PhaTTY:
STOP!!! Slow down. I am going down this path and something can be learned by others experiences. You have only spent $500.00 which is a drop in the bucket compared with what you will spend on restoring/modifying a 240Z. Find a nearly rust free early 240Z that needs restoring and pay a fair (NOT EXCESSIVE) price for it. The purpose being that the roof and attendant structure provide a significant amount of STIFFNESS to the whole body. Then strip it and weld any questionable seams on the UniBody. Then reinforce the sub-frame with Bad Dog reinforcement sub-frame beef up kit. Then integrate a locally fabbed roll cage with adequate cross bracing to add further chassis stiffness.
Obtain David Vizard's latest book and go with a 350 cu in Generation 1 or 2 Small Block Chevrolet. The Gen 1 is cheaper for performance parts. The Gen 1 350 block is cheap and can be made into a 383 fairly cheap. Suggest using Scat Stroke Cast Crank, Rods and SRP Professional Pistons. These pistons are LIGHTWEIGHT and get the assembly INTERNALLY balanced. First find a decent block and get it cleaned and magnafluxed before using same. Then get the block machined near Zero Deck or .005" in the hold and line honed. Order Scat Rods with ARP-2000 rod bolts and then no worries.
DON'T cheap out on the cylinder heads. Go with AFR cylinder heads and if possible the competition model. They flow the best of all on the market. Forget Hydraulic Roller Lifters go to SOLID roller lifters and an aggressive Comp Cams solid roller camshaft. Hydraulic lifters give up lift for noise reduction. Use 1.6 or better ratio rocker arms. Try to get .600" or better HONEST lift at the valves to get it to BREATH properly.
Any questions so far???
-
I have thought these things out before actually picking out the parts to make up any of the engines combo's that have went thrugh my mind.
This engine I chose to keep it more along the lines of a nice performance steet motor over a tame race engine.
Once the fun wears off or get a wild hair to want more power or try somethign unique this motor will perform well enough.
Purchase David Vizard's latest book for ideas. It's too late now, yet when building the bottom end go to 383 cu in by spending another $200.00 for a cast stroker crank. Rods and (Professional SRP very lightweight) Pistons are nearly the same cost as already spent. Then invest in good cylinder heads AKA AFR 195 SBC heads. Spend the extra $500.00 and get the competition heads and you have the best bar none! Forget the Hyd cam and go to solid roller of about 240 - 250 duration at .050, 1.6 ratio rockers (honest good valve lift all the time) and a good intake and fuel system. Then 500+ streetable HP/TQ is well within reach.
-
sorry. I think that last diagram wasn't too helpful. Its a duraspark ignition system, HEI distributor. I think I might have screwed up the curcuit, and the coil might be getting 12v all the time instead of just on start up. I found a voltometer and I'll be testing a few of those things tonight.
The wiring diagrams are for different years of the Datsun. Need the year Datsun, VIN number and date of manufacture to determine the appropriate wiring diagram. Then you need to identify the wire colors used from the original Datsun wiring and where you connected them and for what purpose. In other words, you need someone with a VERY GOOD electronics/electrical and automotive background to advise you on the wiring and modifications to same. I have 40+ years experience in Aviation Electrical/Electronics and I still have difficulties with Datsun Wiring Diagrams. And I have a 1971 Datsun 240Z which will get a High Power modified V8 and all the weaknesses WILL be taken OUT of the Datsun Wiring after much research.


78 280Z LS3 Project
in Gen III & IV Chevy V8Z Tech Board
Posted
Alainburon:
When finished the 240Z will have a greater horsepower to weight ratio than a new Corvette. I also want a 240Z that is unique. Using a Gen I and started at a baseline of 500+ Hp/Tq and exceeded the baseline in valve lift (honest .600+), duration, solid vs hydraulic roller and fuel injection with 1000+ cfm throttle body.