Zetsaz
-
Posts
939 -
Joined
-
Last visited
-
Days Won
33
Content Type
Profiles
Forums
Blogs
Events
Gallery
Downloads
Store
Everything posted by Zetsaz
-

A musician's therapist (The $300 Z)
Zetsaz replied to Zetsaz's topic in S30 Series - 240z, 260z, 280z
Looks like plug welds are gonna be the way to go. Haven't been able to find anyone with a spot welder, and even the cheapest Harbor Freight ones are like $170. And I was really hoping not to have to drill or cut any of my shiny new panels :/ Updates to come with pics: Both rocker panels are fitted and ready for welding right now. Just need to fit the passenger dogleg. Once that's done I'll be working on the rear lower quarters. -
A musician's therapist (The $300 Z)
Zetsaz replied to Zetsaz's topic in S30 Series - 240z, 260z, 280z
Rockers are completely removed. And I definitely haven't been driving it, it's on jack stands and will stay there until the rockers and rocker ends are welded on -
A musician's therapist (The $300 Z)
Zetsaz replied to Zetsaz's topic in S30 Series - 240z, 260z, 280z
Latin American dad. Working on his own to support family from the time he was a teenager when his dad passed away. It's not like it's a surprise, but it's definitely frustrating a lot of the time haha. I need to look into getting a spot welder or borrowing one then. If not, I may weld it up whichever way we do it for now and spot weld it a bit down the road before painting. It's not like I'm driving it much and it definitely doesn't have enough power to start affecting the frame. I could be totally wrong of course. I know the rockers are structural, but I assume anything that has them welded pretty firmly to the rest of the car will work well enough for now on a car that makes maybe 120hp as is, and is barely going to be driven until another several months or even a year down the road. -
A musician's therapist (The $300 Z)
Zetsaz replied to Zetsaz's topic in S30 Series - 240z, 260z, 280z
Second question: Is there a legitimate reason NOT to just weld a long seam along the edges where the new rocker meets the old metal? The reason I ask if my father is the most infuriatingly stubborn man and he seems to think that would be better than spot welding it. -
A musician's therapist (The $300 Z)
Zetsaz replied to Zetsaz's topic in S30 Series - 240z, 260z, 280z
Awesome, thanks for the response! -
A musician's therapist (The $300 Z)
Zetsaz replied to Zetsaz's topic in S30 Series - 240z, 260z, 280z
SUPER IMPORTANT QUESTION: When putting on new rocker panels, do people generally just spot weld them on like the originals, or do they make a seam like on butt joints? I've been searching for hours and most of the pictures I've found are sparse to say the least and there's not much detail in the descriptions on how to get the whole job done. I'm almost done completely removing the driver side, but I'm still slightly confused by a couple things. -
A musician's therapist (The $300 Z)
Zetsaz replied to Zetsaz's topic in S30 Series - 240z, 260z, 280z
No pictures right now, but I've taken everything apart to prepare for metal work and hopefully sandblast this thing. There was way more bondo in some areas than I thought and it turned out to be more rust than I was hoping for, but the worst is in areas I already bought replacement panels for so I'm not too bummed. I'm gonna have to buy the lower panel for the passenger fender though because I had no idea it was pretty much just rust and bondo. Live and learn I guess. The project keeps getting to be more and more work than I expected just go the the shell in decent condition, but my fuel setup will be solid for pretty much any engine I choose to swap down the road (especially an LS engine), and the interior with few exceptions is pretty much done. Just gotta patch up this metal which is gonna be a pita. -
A musician's therapist (The $300 Z)
Zetsaz replied to Zetsaz's topic in S30 Series - 240z, 260z, 280z
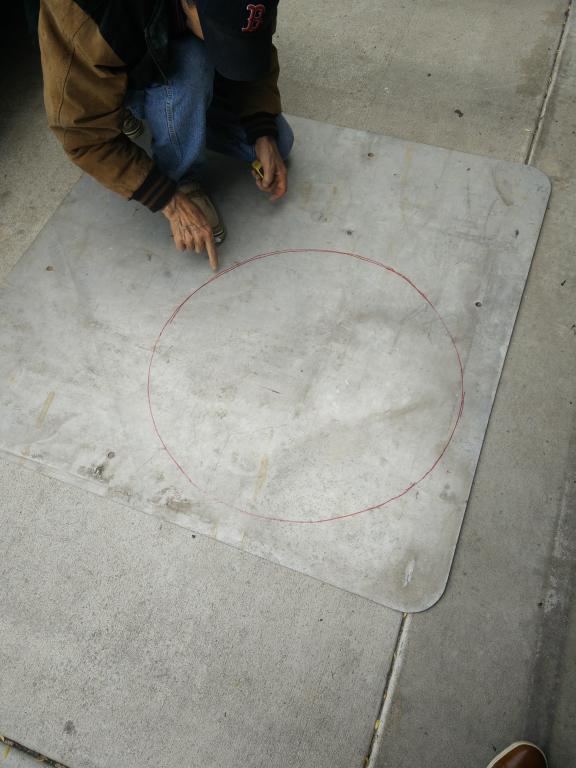
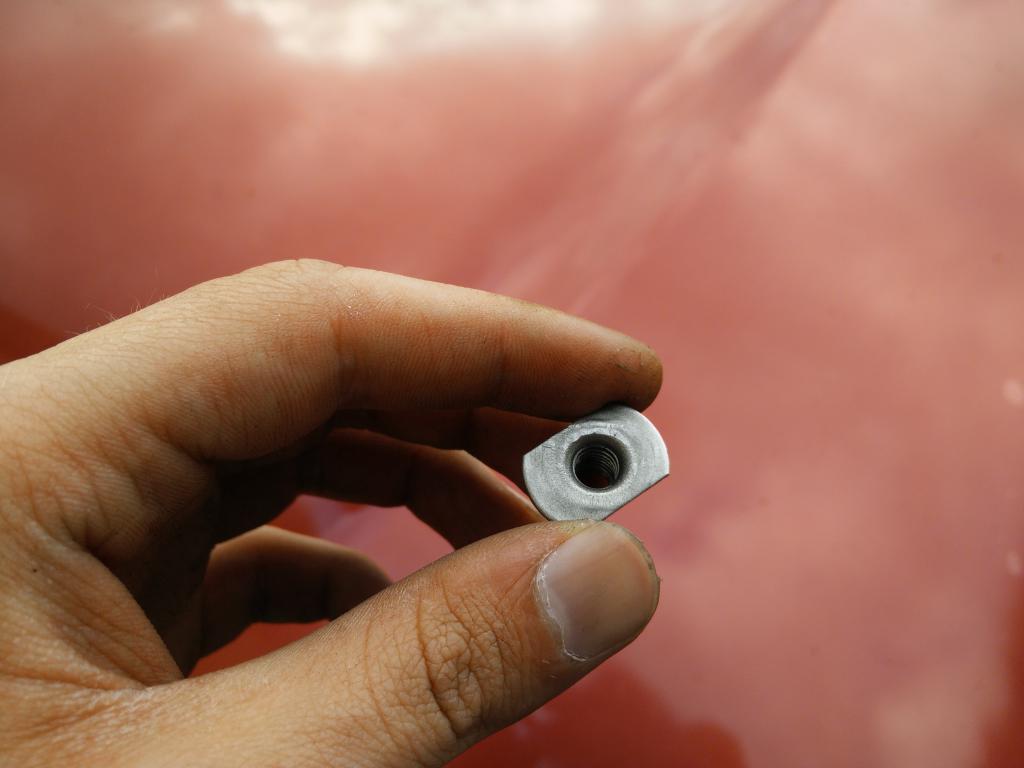
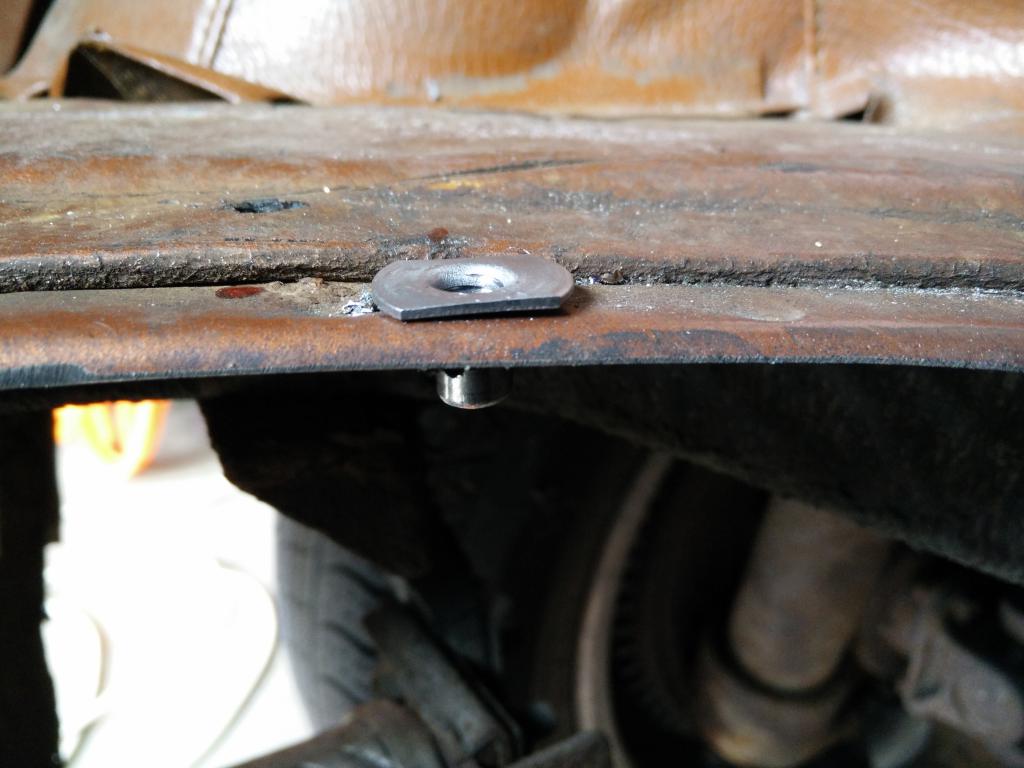
Haven't been posting much lately. Been trying to apply for full time jobs and I was in Oregon for a few days just recently checking out a job offer. Finally made a cover for the tank. Made from aluminum my dad got at the scrapyard. It's bolted around the sides so I can access anything I want on the tank or the rear end down the road. Welded the fancy little things you see around the circle so I could bolt the plate down. It works well enough for now Dad cutting the cover and a mockup Fancy schtuff Gives you an idea of placement pre-welded Aaaand, painted and bolted on (mostly, you get the idea) It's not perfect but it'll do for now.
-
A musician's therapist (The $300 Z)
Zetsaz replied to Zetsaz's topic in S30 Series - 240z, 260z, 280z
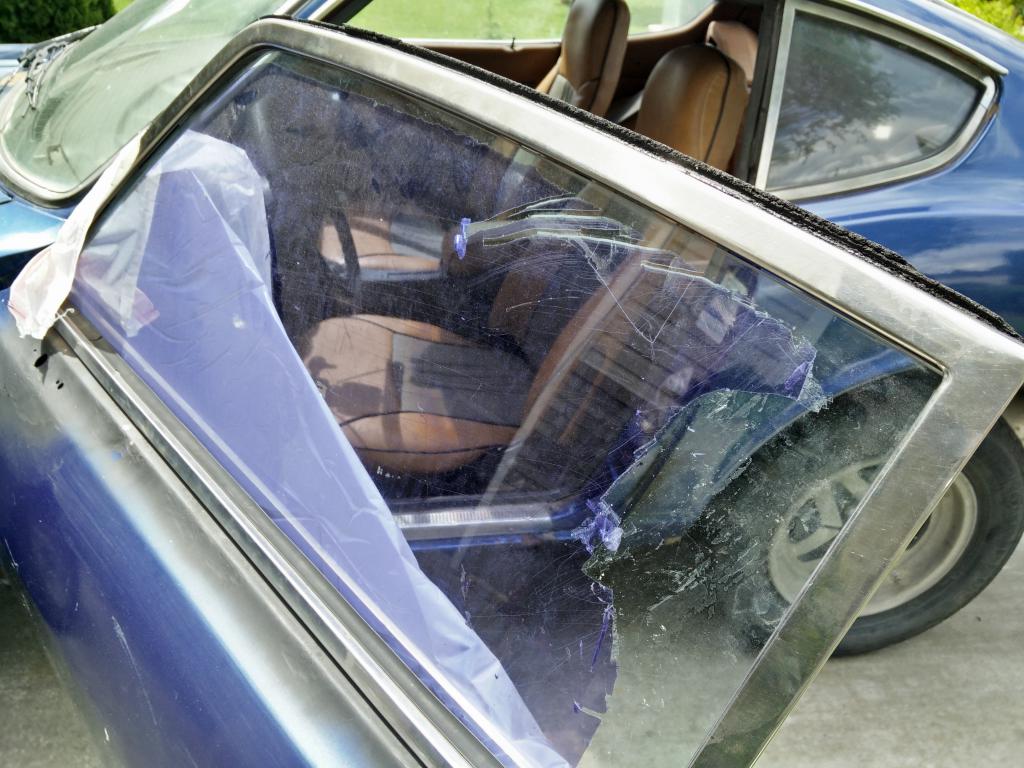
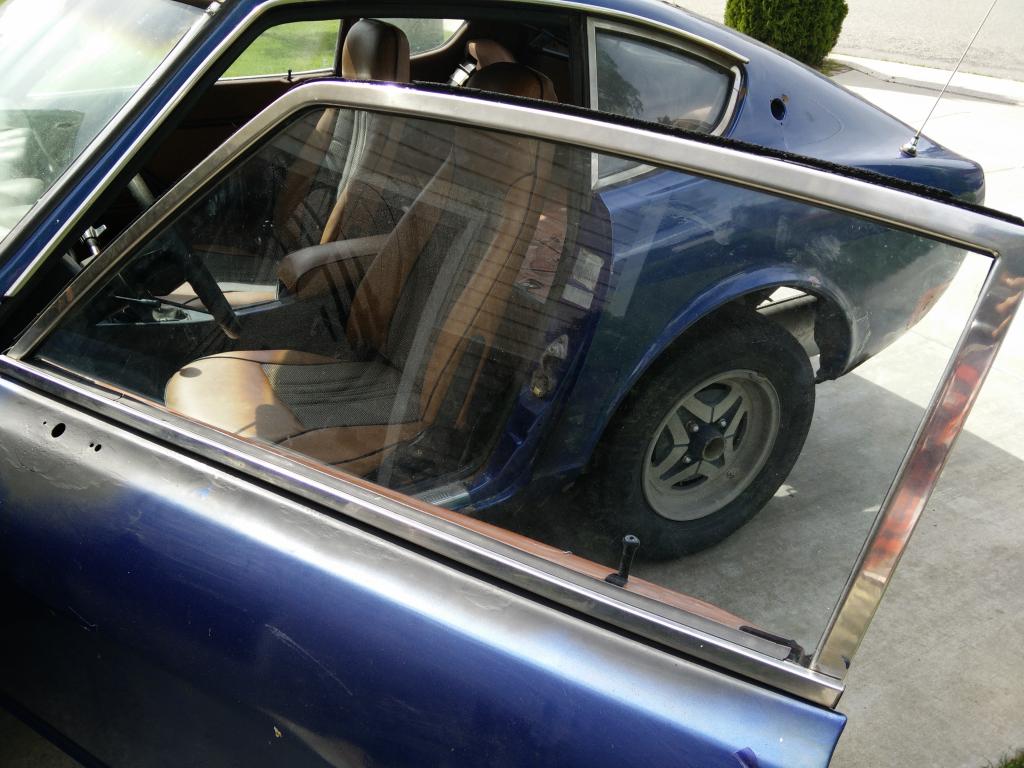
Been raining a lot here the last few days. Haven't done too much last weekend, but earlier I got the chance to clean up the glass, particularly the nasty tint that was left on the driver side window. Took a couple hours of scraping even after using a window film adhesive remover. Before (note that this is just a couple minutes after I had started. don't have a true "before" pic): After:
-
A musician's therapist (The $300 Z)
Zetsaz replied to Zetsaz's topic in S30 Series - 240z, 260z, 280z
Frankenstein lives: Obviously I haven't put everything back on yet. Threw the taillights back on super fast just so i didn't feel too ratty, but she moves! Still finishing the back piece for carpet. Not sure if I'll have that totally done tonight, but pics will come as soon as it's done and I've thrown them on for a test fit. -
A musician's therapist (The $300 Z)
Zetsaz replied to Zetsaz's topic in S30 Series - 240z, 260z, 280z
Didn't get a chance to get some pics or video of the car moving today because we've been getting some pretty good rain. I'll get something once it's sunny again. In the meantime I started cutting up the carpet that I bought over a year ago. It's all laid out and ready to go. center piece at the rear of the console was finished earlier. I'll have pics up in the morning when I finish the rest. -
A musician's therapist (The $300 Z)
Zetsaz replied to Zetsaz's topic in S30 Series - 240z, 260z, 280z
Thanks a lot! It's been a lot of hard work, but I'm excited to actually do something with it that'll make me money now haha -
A musician's therapist (The $300 Z)
Zetsaz replied to Zetsaz's topic in S30 Series - 240z, 260z, 280z
Major milestone in both life and in the Z car. I graduated from my university this weekend, but more importantly... I bled the clutch properly and the car shifts quite well right now. Pumped up the lousy tires for a test drive and it actually feels quite good! I'll have a video when I take another short spin around the neighborhood tomorrow. Time for metal work and paint stripping -
A musician's therapist (The $300 Z)
Zetsaz replied to Zetsaz's topic in S30 Series - 240z, 260z, 280z
I thought I had figured out the clutch, I was wrong. I think there's just not enough throw in the new clutch master cylinder. I realized that a lot of people actually have this problem so I swapped out the push rod from my old on into the new master cylinder. It's installed right now, but I haven't had a chance to bleed it. Only things left to get it moving is clutch bleeding and new tires. I got a battery for it this week so I don't have to jump start it. I'll have to replace the air flow meter boot soon. I have a plugged up one from a 78 on there right now, but it's torn up and the engine is running super rich. If anyone has alternatives for the AFM boot on a '76 I would greatly appreciate some suggestions... $50 for the one from MSA is money I could spend other places :/ -
A musician's therapist (The $300 Z)
Zetsaz replied to Zetsaz's topic in S30 Series - 240z, 260z, 280z
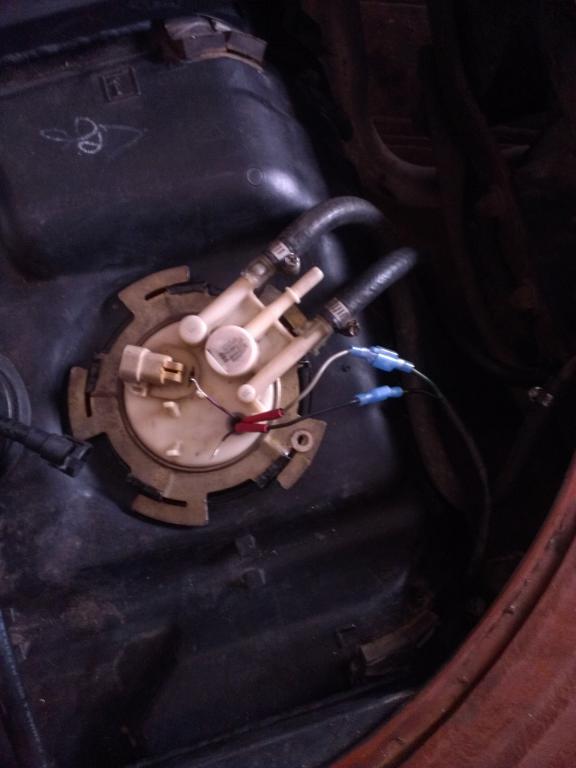
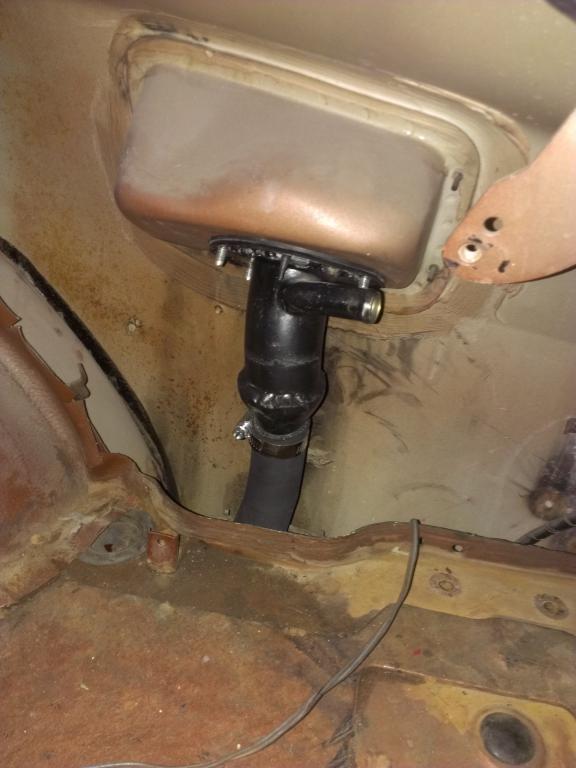
Used some test leads yesterday to check the Racetronix pump that came in the Camaro tank. It's working beautifully, the guy that last did the job did a terrible splicing job. I'm redoing wiring later today and seeing if the stock connectors on the pump assy aren't busted as well. If not, I removed the evap sensor and ran the wires through the hole. I'll do some more custom stuff to make that work with some quick disconnect cables. It's satisfying knowing that pump is working though, shouldn't have any pump issues for a long time even with an engine swap. Will update post with my final wiring when I get to it later tonight. Update: Pins on the pump assembly were busted or at least bent enough that the original connection wasn't making proper contact. Fed the wires through the hole where the evap pressure sensor used to be (since I can't use it anyway), and respliced them to some quick disconnect ends. Cut the hoses down to a more appropriate size too now that I know I'm using the internal pump and put the interior trim back over the filler. Looks much more complete than before, just need to make a cover for the spare wheel hole. With that, the fuel delivery is pretty much done. Will be wiring the sending unit next before I put the cover on. Won't be accurate until down the road when I get new gauges, but this will work for now.
-
A musician's therapist (The $300 Z)
Zetsaz replied to Zetsaz's topic in S30 Series - 240z, 260z, 280z
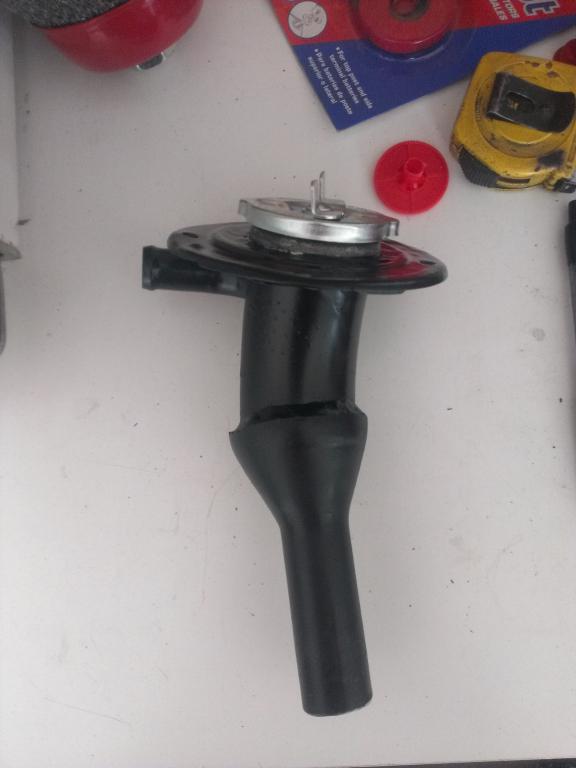
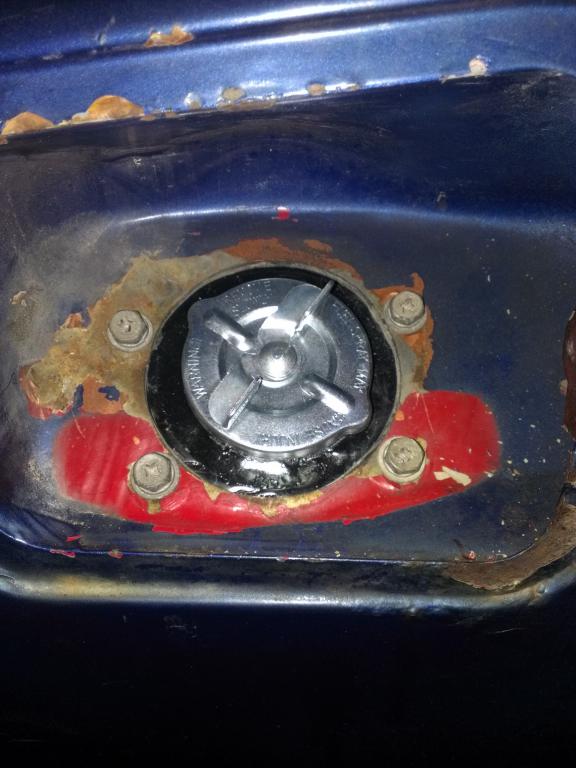
Here are some pics of the filler neck I made for the Z to keep it semi-oem looking. Looks like a frankenstein of a filler neck, but the welds are really well done where it counts (where the bottom of the camaro tank meets the top of the '78 filler) If you have a late model Z (77-78), this is actually not a bad option if you're going for the camaro tank. All it takes is cutting the top of the camaro neck, an inch or two off the bottom of the Datsun neck, and then joining them together. I cut the lower bend from the camaro filler, but I almost wish I'd figured out a way to angle the camaro piece towards the tank because right now the filler hose is in a really tight S bend to get the whole thing to work, but it's not bad so far. Here are a few not so great pictures from when I installed it after getting home from my last concert as an undergraduate trumpet player. Cap ended up a bit offset from center but I'm not too concerned about that. And yes the hole from the pipe at the top that would originally lead to the vapor tank will be plugged. Edit: Also... ignore the weird paint at the filler.... that will be fixed when the metal work is done and I start paint haha. Edit 2: There was a small kink in the hose from the tight S bend by the original opening in the car where the hose is routed. Solution: extra hose clamp did the trick
-
A musician's therapist (The $300 Z)
Zetsaz replied to Zetsaz's topic in S30 Series - 240z, 260z, 280z
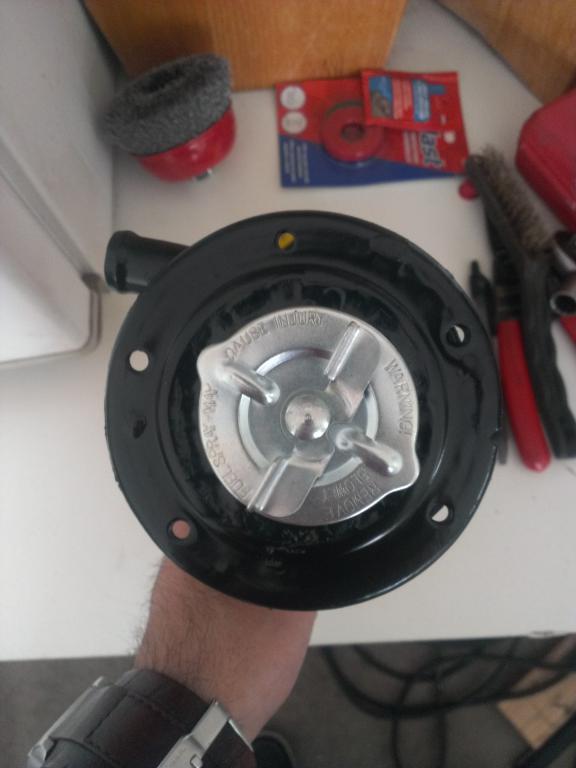
Finally got a semi-permanent solution for the filler neck going. Update in next post once it's installed and I have some pictures. It involves the top half of a late model filler neck, the rim from my original neck, and the lower half of the Camaro filler to narrow it down into the hose I'm using. Gotta cut off a couple inches on this hose and adjust the rim so it screws on properly. The upper portion will need to be cleaned up later for appearance sake and in case of spills but it'll work quite well for now. -
Work in progress: Pardon the crappy picture quality. I saved it from snapchat when I was sending the picture to my older brother haha. Still needs carpet and the driver door panel needs to be installed, but it'll all be taken apart at least one more time before metal work for rust repair and repaint.
-
A musician's therapist (The $300 Z)
Zetsaz replied to Zetsaz's topic in S30 Series - 240z, 260z, 280z
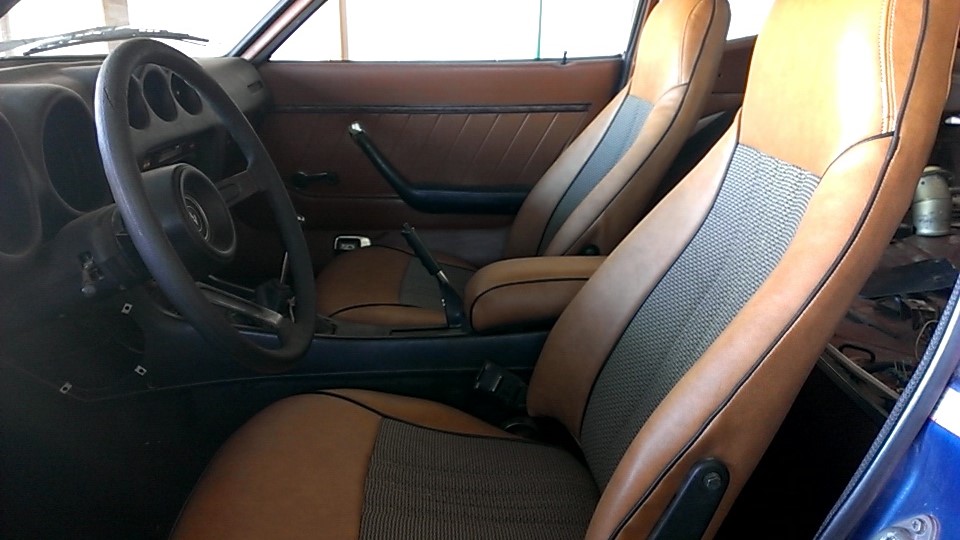
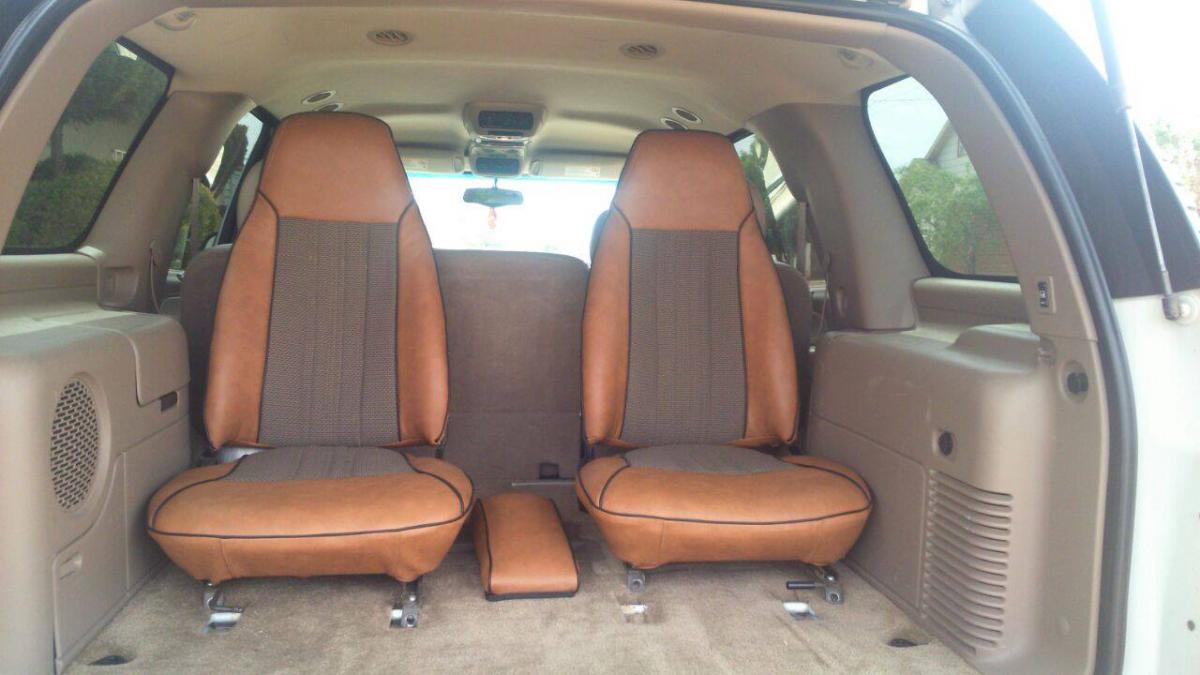
Dad got home at 2 in the morning yesterday. Got a chance to grab my seats and console lid to see how it all fit together. I'm pretty happy with the result. It almost looks like a proper interior now.
-
A musician's therapist (The $300 Z)
Zetsaz replied to Zetsaz's topic in S30 Series - 240z, 260z, 280z
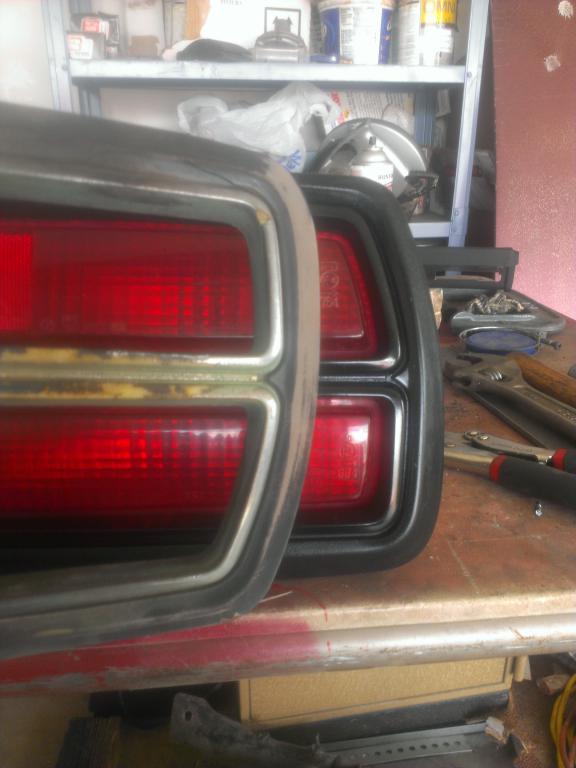
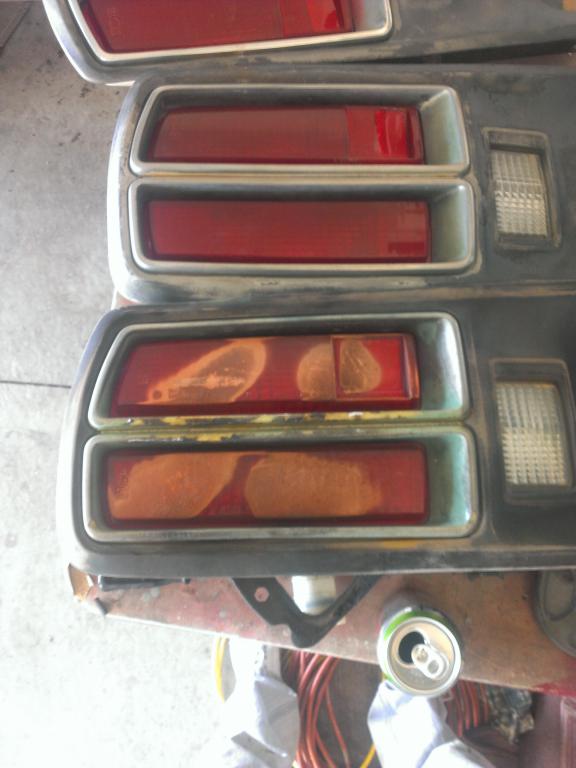
Minor update: I repainted the taillight panels last weekend. I still want to take them apart again to resand and recoat a couple spots that are still a bit rought rough but they look quite nice now compared to before. The bezel around the lights is a gloss black and the rest is a satin black.
-
Didn't think I'd get an answer so fast, thanks a lot!
-
A musician's therapist (The $300 Z)
Zetsaz replied to Zetsaz's topic in S30 Series - 240z, 260z, 280z
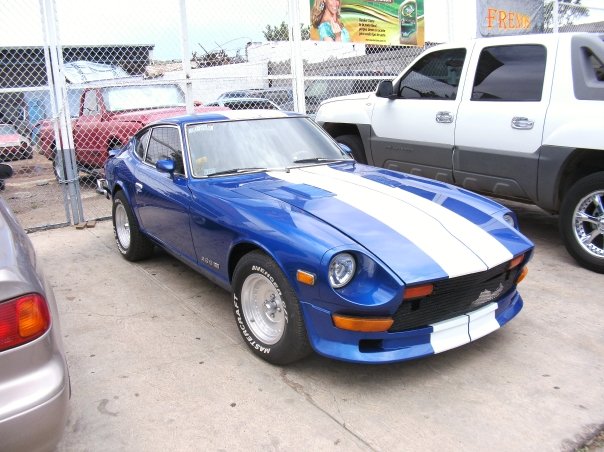
Weird random story: My dad's still in Mexico for another few days, I took this picture in the Summer of '09 which was the last time I was there. This was back when I only dreamed of a project car, but I thought the car looked pretty good. This is my dad next to the same car earlier today!
-
A musician's therapist (The $300 Z)
Zetsaz replied to Zetsaz's topic in S30 Series - 240z, 260z, 280z
No kidding! High quality labor at really great prices. I don't get how the stereotype of Mexicans working hard all the time, and having nice yards, and knowing how to work and cars and all that is somehow negative. I've been poked fun at sometimes for being Mexican and also enjoying car work, and I just think, "how is that a bad thing?!" Those are valuable skills But when friends need help with car problems they know who they're going to haha. Anyway, I figured I'd at least do some little things while my dad gets back next weekend to start on metal work, so I repainted the rear taillight trim. I'll have a picture up tomorrow when there's better lighting to take it in and see the side-by-side with the old ones. -
Anyone know where I might be able to find something like these? I've yet to find any sort of build thread on this guy's car, but I like the more modern look they have. Here's a video of the same car if that helps.
-
A musician's therapist (The $300 Z)
Zetsaz replied to Zetsaz's topic in S30 Series - 240z, 260z, 280z
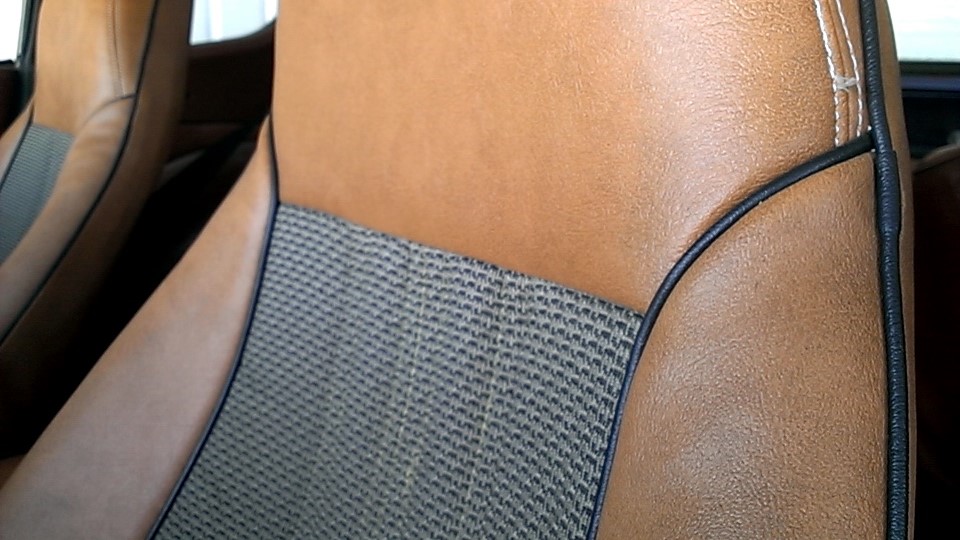
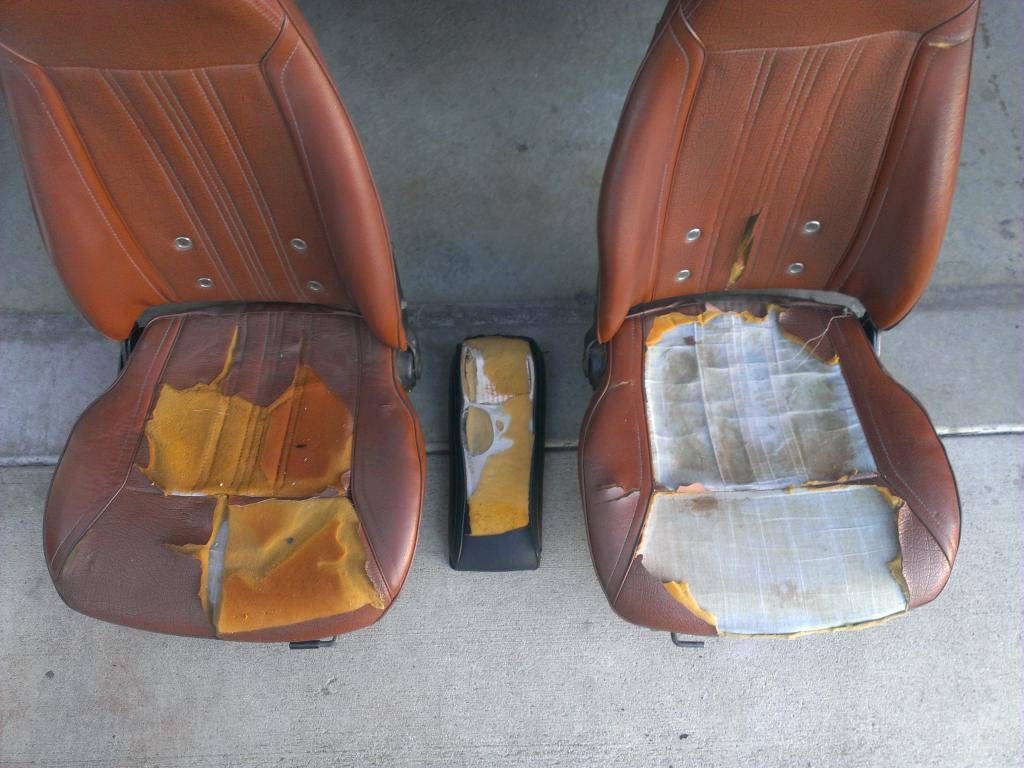
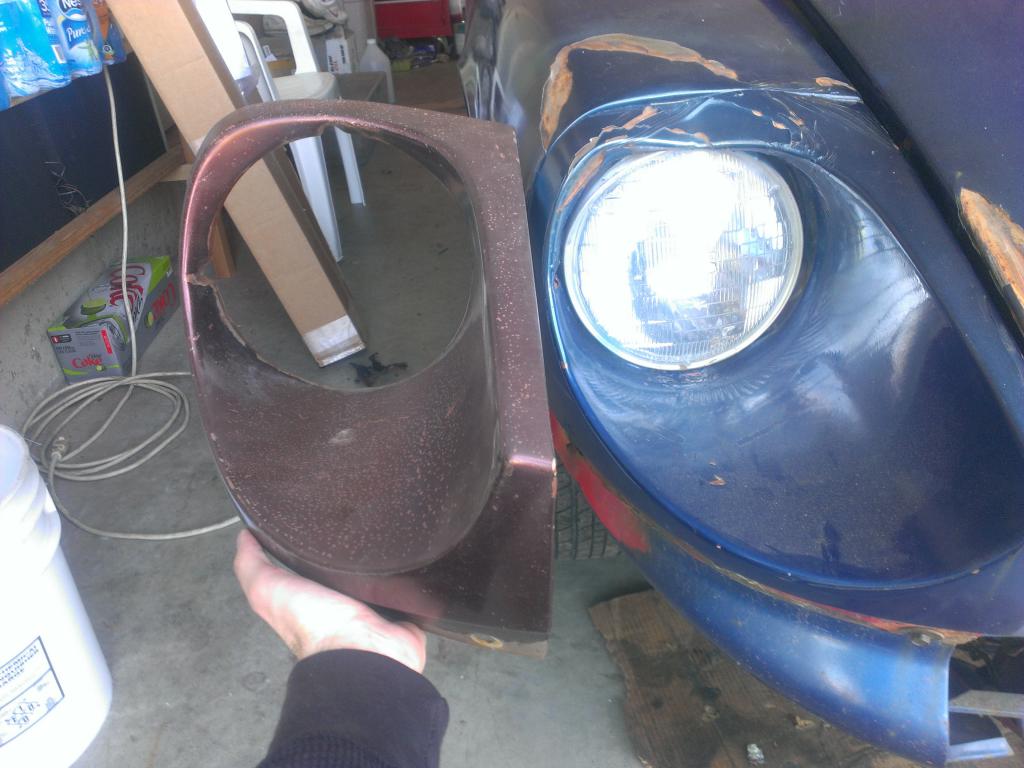
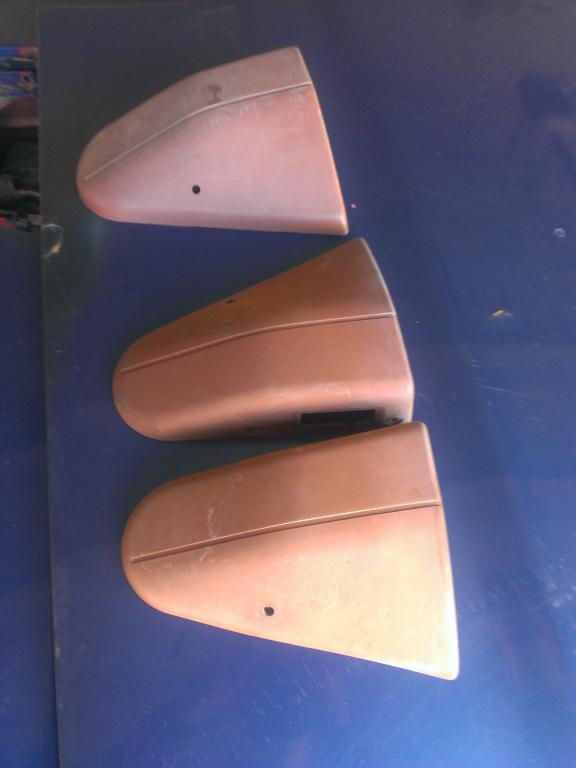
Semi-big update: My dad was on a trip to visit family in Mexico and decided to take the seats with him since re-upholstery is significantly cheaper there. Today my seats were finished and he picked them up. They're looking pretty sweet if I do say so myself. Not much has happened to the car itself, the last several weeks I've kinda considered and "acquisition phase." Lots of new parts purchased including some stuff from the junkyard: Seats reupholstered Old New Passenger headlight bucket at a steal from the junkyard (Old on was bent out of shape) Taillights sans burned plastic (Picture doesn't do the new ones justice) Both plastic seat-belt strut tower covers Top is the only one that was in when I bought the car... ... And it wasn't even the original color Fuel door (Lousy pic, but it shows how bad the original one was better) Louvered hood (also a steal, only $40. A few small dents should be no huge issue) I've also committed myself to do SOMETHING about my filler neck situation. Won't update on that until I actually finish it though, no empty promises to strangers Dad should be back in about a week and after that I'll be getting a start on making this thing move and getting the biggest rust issues resolved before my dad helps me sandblast the whole thing.