
Dragonfly
-
Posts
674 -
Joined
-
Last visited
-
Days Won
1
Content Type
Profiles
Forums
Blogs
Events
Gallery
Downloads
Store
Posts posted by Dragonfly
-
-
When I bought my CF hood and hatch from John C. he told me I should use a UNIBIT type drill bit for drilling the holes. It worked great and I was very happy with the outcome, I would think this would work just as well on fiberglass.
Dragonfly
-
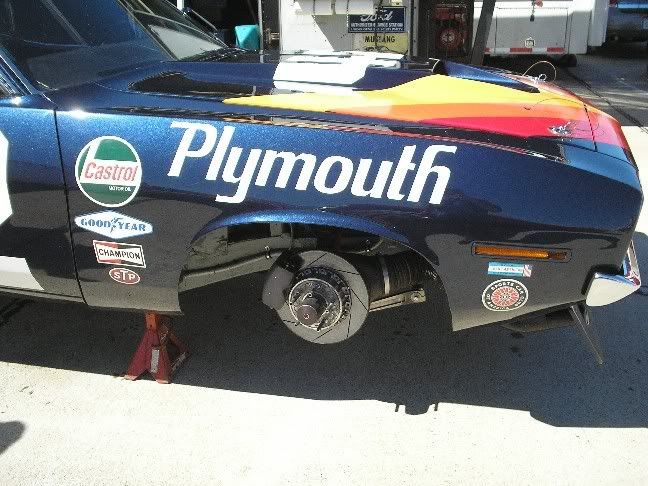
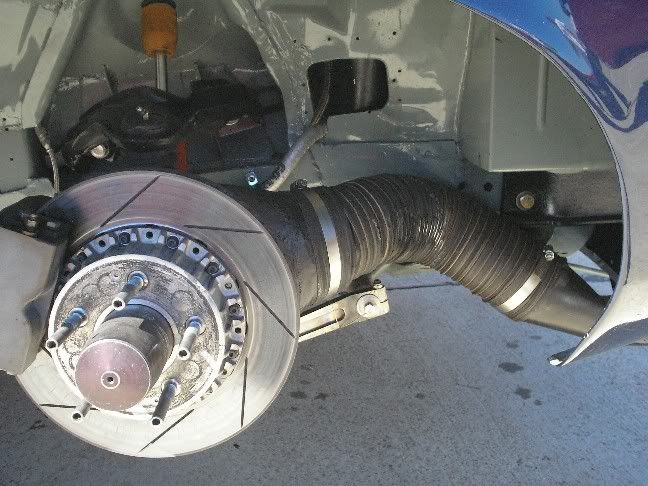
Here are some pics I took of the brake ducting on a vintage race car.

Not a Z but it should still give you some ideas about how to do the "other end" of your brake ducting.
Dragonfly
-
Dragonfly have you noticed any improvement in cooling/downforce?
I can not feel a difference in downforce but I can see that my hood no longer bulges up at triple digit speeds any more. The temp stays rock solid when moving (and air being pushed into the radiator) but when stopped or in nasty bumber to bumper traffic it will start to come up fairly quick because the opening for the air is so restricted. That is not a problem though because I have an electric fan... when I turn it on it pulls the temp back down to normal in less than a minute.
As a side note on the cooling I run a 3.0L stroker with 200 to 210 psi static pressure on each cylinder and at the same time I am running a 1" thick and slightly smaller than stock aluminum radiator (with a 2 speed fan). In the past I had heating issues but not anymore.
Dragonfly
-
Mine took forever to make the templates. Went through a dozen posterboards.
Welcome to my world, its hard to see in the pic but I used tons of tape and who knows how many slivers of cardboard to make my templates. Even doing it like that I still had to tweak and adjust the metal ones to get them predominantly how I wanted them.
Dragonfly
-
I noticed the pump/rack clearance problem. The exhaust/footwell doesn't seem to be a problem with my aftermarket headers. And I guess I should get a good balancer so I need to make room for that. Any pics on the rack fix? I got everything off the motor and trans. Tomorrow they're coming out seperatly but then again I don't want to damage the input shaft, so maybe I should take it out in one piece. Though the trans seems light enough for me to take out by my self. Is it wise to bench press a 5-speed out or will I damage the input shaft? I've benched heavy as heck automatics but those have torque converters that you unbolt first and bolt on last. Thanks.
Personal opinion here but for me it is easier to pull the transmission out first (i've done this many times by myself) then the engine out seperately, but before pulling the engine and trans apart from each other have your chains and cherry picker on the engine or an extra jack under the engine. When putting them back in if you are by yourself engine and trans attached then install, if you have a helper engine first then transmission.
When you pull the transmission the first thing to do is make sure absolutely everything is disconnected from it, then get a fairly large disposable rug (one that does not have rubber on the underside), put the rug under the transmission, put a good floor jack on top of the rug under the transmission, remove the bellhousing bolts, remove the trans mount bolts. Now the transmission should be held up by the jack and balanced by the shaft going into the clutch, lower the transmission a few inches letting the engine tilt down with it. When you have enough clearance to pull the transmission away from the engine without any thing hitting lock the engine in place with your cherry picker or extra floor jack, very carefully lower the jack under the transmission at the same time you pull the transmission back away from the engine. When they are fully seperated balance the transmission while lowering it the rest of the way down. Now lift the back of the transmission up untill the bellhousing supports the transmission and pull the jack out from under it, lower the transmission onto the carpet. Climb out from under the car, grab the carpet and slide it with the transmission on it out from under the car... wala you have pulled the transmission by yourself without having to bench press it, drop it, or throw your back out. Use the same procedure but in reverse to reinstall by yourself.
Dragonfly
-
Becuased you can get an even better 48/52 weight distribution.
I'm not going to discurage him from doing it, but I suspect that untill he gets into the same realm of driving that you are he will not be able to tell the difference. Kinda like the old "my car handles like its on rails" thing.
Also if someone would be so kind as to tell me what parts of the engine to hook the chains of my cherry picker to it would be helpful. Thanks.At the front of the engine by the #1 spark plug there should be a metal plate with hole in it that is bolted to the head, if the metal plate is not there you can use a bolt with washers into the head at the same point, that is where you hook up the front part of the chain. The rear part of the chain I personaly always bolted the chain to the rear most exhaust stud.
Dragonfly
-
Do a search for Speeder. Also be forewarned that to make it look good and work right it is going to take an increadable amount of work.
Dragonfly
-
Nope, 1/4" thick is definately sufficient. I tested this with washers.
I have S12+8 calipers and I shaved the vertical ridge off of the caliper face so a 1/4" spacer is all I need to keep my snowflakes from hitting the caliper.
I need wheel spacers, not hub spacers. I already have hub spacers from Modern Motorsports.
When I first read your post I also thought you meant hub spacers... Any way since that is not the case I don't see why those would not work. As far as the length of the wheel studs I would suggest that you put a wheel on with the washers you used for testing then using standard open ended wheel nuts tighten the wheel down, if you have less than 3 threads showing past the top of the nut your studs are to short, if you have 3 or more threads showing your good to go.
Dragonfly
-
I can understand the part about thinking that people may not realize what the Z looks like. Several years ago I drove my brothers 280Z through the sticks and back country of Oklahoma, Arkansas and Missouri, it was amazing how many compliments I got on my "Porsche" it truly was only a small amount of people who recognized the car as a Z.
But beyond that I think this guy is looking for a sucker in a big way, after reading the discription he had I would not have been willing to pay more than $1200 and then only if he actualy posted pictures of the car he wanted me to buy. Describing a car that is moderately rough then posting pictures of cars that are clean is the age old bait and switch. He is probably hoping that someone will send him a nonrefundable deposit before they ever see the real car.
Dragonfly
-
Other than a couple of race cars I am not aware of anyone pushing an L series engine back. I have to ask though... Why? With the L series engine the car is at almost a perfect 50/50 balance.
Dragonfly
-
If you take a closer look at ZR8ED's pictures you will notice that to the sides of the radiator he has pieces of metal (ends of the box) he is using them as his attachment points. I had the same thing on my old setup, the two pieces that make up the sides of the box have a 1/2" lip bent at 90*, then the lips have holes drilled in them and the are bolted at the bottom and the top of the box. The piece that you have made and are talking about (from what I can tell by what you wrote) is the top of the box it just extends past the sides thats all.
Here is a picture of the cardboard mock up I had for mine at one time.
This is what I ended up going with for the time being.
Dragonfly
-
I dont know $150 alot, I can deal with it.
Well today I cut out the upper piece that stretches from the top of the grill to above the radiator (like ZR8ED's). Fits good but I dont know how to mount it, any ideas?
I should have mentioned it in the post above but if you mention my name (Dragonfly or Miles) he will give you at least 10% off the listed price (that goes for anyone). With that kit you get the templates as well as all the hardware and the correct tension pressure catridges and of course full step by step instructions.
I'm going to have to go back and look at ZR8ED's pics again to see exactly what you have done, then I will probably toss my 2 cents out there for you.
Dragonfly
-
Anyone have an easy way of removing the tortion bars with the hood on? Im guessing it has to be when the hoods down.
EDIT- I ended up tieing them together and cutting one. Once I had that out I muscled out the other one. I never realized how heavy my hood is.
Yeah the hood is pretty heavy (about 45 lbs or so). Now that you have removed those torsion springs here is something you can use to replace them and still achieve your goals. http://store.zraceproducts.com/mountinghardwareparts.php#gasshock
Dragonfly
-
Is the stock Z slave a 3/4"?
Yes it is.
I am ruling out.. im definitly not over extending.. i tried all clutch positions im not moving far enoughHere is something else for you to try. Get under your car where you can see and reach the clutch slave. Pull the slave off then push the rod into the slave with you finger. If the rod is rock solid and will not push in your master is bad and needs to be replaced or you need to do some major adjusting of the clutch pedal inside the car (the adjusting rod for the pedal is pushing to deep into the master). If the rod pushes in with a slightly stiff but smooth travel all the way then your hydraulic system is fine and you need to check all your mechanical parts, the first being that the clutch fork with the slave installed is at a 90* angle (or slightly closer, acute angle) to the rod in the slave. If it is keep looking deeper, if it is greater than 90* then you need to check the collar that the throwout bearing sits on and check that the fork is not bent.
Dragonfly
-
It wasn't the battery cables. I replaced them, and it still just clicks. I'm guessing that it is the relay? I'm back to where I started. It's the relay or starter I'm guessing. I guess it could just be faulty wiring somewhere. I have no idea.
Any thoughts or ideas?
Since you were able to start the car by putting a screw driver across the bolts on the starter seliniod I would say that it is not your starter or the seliniod/relay. Did you try checking for the difference in voltage between the battery pos and neg then between the battery pos and where the neg wire connects to the engine? That difference is a valuble piece of information. Since you replaced the cables and it is still having the same problem the next thing to check is the chasis ground, it is a screw that goes into the fender under the hood just forward of the battery and almost straight across from the starter. You should see a large black wire screwed down to the inner fender, check that wire and junction to make sure it is clean and makes good contact. Also make sure you have a good ground wire running from the block to the firewall or fender.
After all that if you still can not correct the problem it is time to follow the links provided by COZY Z COLE, use a meter and start wringing out your wiring. Since you have virtualy no experiance at that you may want to find someone local who has a little more experiance and get them to help you out.
Dragonfly
-
big-phil sorry about hyjacking your post.
PrOxLaMuS© I just thought of something else. One of the problems I had with the disimalar sizes between the master and the slave cylinders was that when I would push the clutch pedal all the way to the floor (first and reverse) I was actualy over extending the throwout bearing into the pressure plate fingers and causing binding in the clutch assembly. With you having very similar problems to what I had I would suggest that you pull yours and take a look to make sure there has not been any binding.
Dragonfly
-
i hate my ACT full faced sprung clutch disc.
I have not been able to have it fully disengage for 1st/reverse ... even with a new master cylinder (3/4") and a 11/16" slave from a pathfinder.
hate it
I bet that makes for one very stiff clutch pedal... I am running a 6 puck spring hub with a Fidanza flywheel and a heavy duty pressure plate. I had the same problem as you discribed and I followed a similar route, my pedal was so stiff I actualy bent the pedal. After talking with an engineer at Willwood I bought one of their 3/4" clutch masters and a 3/4" stock Nissan slave put it all together and bled it, now it works perfect and does not feel like a full blown workout to drive.
Dragonfly
-
It is deffinately the kickdown switch for a former auto, I have owned about 4 automatic Z's and everyone of them had that, none of my manual Z's have had it. I recreated something similar to that in my current manual Z for mounting a WOT switch.
Dragonfly
-
He ran over a Z? Glad he got shot.
Well if it makes you feel any better a friend of mine used to work at the Texaco station a couple of blocks from where the whole thing started. By buddy Tony had just left work, started down the street in his Z31 when the tank came around the corner and started coming right at him, he threw the car in reverse went backwards about half a block then pulled a "Jim Rockford" (look up Rockford Files) aka a "J" turn and left that tank in the dust. He got home and started telling me about it while it was still being broadcast live on tv.
Any way at least one Z got away that day.
Dragonfly
-
Invest in a ohm/multi meter without it your just guessing.
Very true, you can get a reliable meter for about $40, you can get a cheap (aka worthless) meter for about $10, or you can get a good meter for about $90 and up. IMHO you should get a reliable meter.
I was thinking. Could it possibly just be that I need a new starter and/or selinoid? How can I check this?The reason I thought of this was because to start the car, we had to touch a flathead screwdriver to two screws on the starter/selinoid.
If that is true there is nothing wrong with your starter or starter selinoid. You checked it already by jumping the screws with a screw driver and starting the car.
So how do I find a bad ground? I'm pretty new to wiring. LOLMost likely the bad ground is caused by corrosion in your negative battery cable. The best way to find that out is to do this:
When you check the battery voltage check it in two places, first with a meter between the positive and negative terminals on the battery then between the positive terminal on the battery and the bottom of the negative wire where it connects to the engine block. If the battery reads less than 12.5 volts between the terminals take it and have it checked, if it reads between 12.5 and 14.5 its fine. The reading between the positive terminal and the bottom of the negative cable should be the same as the first reading, if it is more than .5 volt different buy new battery cables (both positive and negative) and test again after replacing them.If you want to do this with an absolute minimum of learning just buy new battery cables, put them on and drive away happy untill you find the next problem. Personaly I think that owning a car that is 37 years old means learn everything you can about it so it will never leave you stranded.
Dragonfly
-
A bad ACC relay is not going to prevent starting. I am no electrical genius, but I think it is a differnt circuit. I just started my car with out the relay attached. Check the battery and connections...
The only relay for the starter that I am aware of is on the starter. The problem that I very lightly skimmed in my first post on this thread about the relay in the 74' is not actualy that relay but is the interlock relay http://www.autozone.com/az/cds/en_us/0900823d/80/1d/1d/80/0900823d801d1d80/repairInfoPages.htm Fig #9 left hand side. The interlock relay not working correctly will not allow your car to start but if you were to bypass it and "hot wire" the relay on the starter you could start the car blah blah blah (the "blah blah blah" is so I don't have to type 30 more paragraphs to explain how and why).
Dragonfly
-
Fig#5 top right...accessory relay http://www.autozone.com/az/cds/en_us/0900823d/80/1d/1d/80/0900823d801d1d80/repairInfoPages.htm
LARRY
That link is great... I personaly do not know what year Mauisnow13's car is so I do not know how many and what relays are on that kick panel. What I do know is that the clicking sound being heard is the contacts inside the relay being pulled in and the later click is the contacts being released. I also know that when the car starts you normaly do not hear the relay because of the sound of the car starting, that is why I think it is a battery voltage issue and is probably caused by corrosion in the ground wire hence the advice given above. For the relay to make the clicking noise it has to be working (as far as the coil goes) although it is anyones guess as to the condition of the contacts inside the relay.
I personaly think that the relay has nothing to do with his problem but it always feels good to have a "suspect" in hand untill you find the real culprit and as long as I can send him on the path of the real culprit the relay can be a nice placebo until the problem is fixed (which I suspect is a bad ground caused by corrosion).
Dragonfly
-
Okee Dokee folks, I bought a 91 civic wiper motor yesterday, tore it apart, wrote down everything I needed to know, put it back together, wired up a relay and Vwohlaaa...... I SOLVED THE PARK PROBLEM.!!!
So I put the relay and the wiring into a Radio Shack Hobby Box and called it Mine.
Anyone interested?
Video of the motor parking after the switch is turned to off, several times.
Dave I like the way you boxed that up, it looks good. I see the motor that you got looks a little different than the one I got, but I don't remember what year the one I got came from all I know is it was an Acura.
Dragonfly
-
Its a very good chance that it is the battery being low or the battery ground being corroded to the point that you can not pull enough voltage to start the car. The relay you have pictured will click (usualy only once) when you turn the key to start, then when you release the key it will click again but with a lighter sound (almost a hollow sound). You have not said anywhere that I have seen what year your car is... the 74's had in my opinion an issue with that relay, but before you blame the relay check your battery voltage.
When you check the battery voltage check it in two places, first with a meter between the positive and negative terminals on the battery then between the positive terminal on the battery and the bottom of the negative wire where it connects to the engine block. If the battery reads less than 12.5 volts between the terminals take it and have it checked, if it reads between 12.5 and 14.5 its fine. The reading between the positive terminal and the bottom of the negative cable should be the same as the first reading, if it is more than .5 volt different buy new battery cables (both positive and negative) and test again after replacing them.
If after everything above is done and you still get the click (and the shop says your battery/charging system is fine) then you can look at changing the relay.
Dragonfly


What Drill Bits To Use For Fiberglass?
in Body Kits & Paint
Posted
Yeah thats the type that John suggested I use, and that is what I had in mind with my post above.
Dragonfly