
Dragonfly
-
Posts
674 -
Joined
-
Last visited
-
Days Won
1
Content Type
Profiles
Forums
Blogs
Events
Gallery
Downloads
Store
Posts posted by Dragonfly
-
-
Are you referring to using the threaded sleeve as a spacer? If so, I don't think it's thick enough to work as a spacer. The metal is extremely thin. If i could find a thicker aluminum sleeve to use as a spacer, then I think that would work just fine.
The existing ring doesn't interfere as far as clearance goes, but it is unsprung weight. I'll look at it, but I think it would be difficult to remove without a lot of cutting and grinding.
I have my old 240 strut tubes that I could install instead, but I don't know if it would be worth swapping them out.
You are right it would be a true pain to cut and grind off the old ring, enough so that if you decide to do that it may be less frustraiting to swap in the old 240 strut tubes but if it is not in the way leave it there and use a spacer with it.
As far as the aluminum piece goes I would suggest that you try to purchase a piece of tubing that is the same ID as the spring perch ring and about half the OD of the ring, have these spacers cut by someone with a fixture that can insure a straight cut and equal length. If you can not find aluminum tubing in the correct dimensions get a piece with the correct OD then have the ID drilled or cut. Remember measure twice cut once.
Dragonfly
-
I figured I would need to disassemble, but why would I need to remove the existing welded rings? The new one's would be welded on about an inch or two above the existing one's.
If I could get aluminum sleeve spacers an inch or two long that would rest on the existing welded rings that would be great.
There are a couple of reasons that I can think of for removing the existing ones. The first and predominant reason is clearance, you are trying to create as much of a safe clearance as possible for the tires you want to run, you may not want a piece of steel sticking out 1/4" to 1/2" from your strut tube.
Second reason: although it is not much that is pure unsprung weight there.
Third reason (hypothetical): car show observer: "wow you got a nice looking car but what is that ring on there for?"
Bartman: "umm well I changed my mind..."
Dragonfly
-
Paul, I am going to make some suggestions to you that are going to test your sanity, but first a little lead in so you will get an idea of what I am talking about first.
Most of the connectors on the 72' are opposites, what that means is that for example you have two connectors side by side and each one is a 3 wire connector, on the harness one connector is a female then the other is a male that way you can not make the connection wrong. Now using that knowledge most (but not all) of the connectors you are going to need are on your current all white harness that is in your car.
Now for the insane part… go to your local electrical supply house (try to find something one or two steps more industrial than Radio Shack) and get a good soldering iron, solder, flux and an assortment of pin removal tools (tell the desk man that you need to remove a variety of pins from automotive connectors). Making judicious use of your digital camera and your new box of paper labels (with strings on them) take pictures of absolutely everything then label absolutely everything (wiring in the car) then pull all the wiring out.
Lay the labeled white wires down next to their corresponding stock harness, copy all your labels and put the new labels on the stock harness. After that is done take more pictures of everything. Now find each connector on the white harness that will fit into a connector on the stock harness, label it with a new and unique label telling you were it will work. After you have done that with every connector available to you use your pin removal tools to remove the pins from the connector (do one at a time from beginning to end), unsolder the pins from the white wires, solder the pins to the bare wires that are on the car (a light connector as an example). Now you can install the pins into the connector making sure that each wire corresponds correctly with the wires in the harness connector.
All connectors that you were not able to fix in this manner you will have to find in a wrecking yard etc., by the time you are done with all the above you will be a master at wiring an early Z and you will not be intimidated whatsoever about an electrical gremlins in the future.
One last thing… on the spell checker, an easy way to do that is to write your response in word or some other similar program, run the spell checker than cut and paste into the post.
Dragonfly
-
I know this is not what you want to hear but I personaly feel that you would be far ahead to remove the old welded ring all together then weld on the new in the higher location, and yes you should dissassemble the strut assembly for any welding. A good friend of mine who races his Z (track only car) did not weld anything on his, he had a series of 6160-T6 aluminum sleeves machined to fit snugly over the strut tube then the threaded sleeve is set on top of that. That setup has worked for him reliably for a couple of years now.
I have always wondered if one could cut the top strut houses off of the strut tower and graft in about 2" of steel all the way around (an extension) then weld the top piece back on. Then you could move your collar and lower spring perch up the 2" to clear everything and you would not have to use such a small spring. Just a thought.I have thought about that and I don't see why it would not work but I also think that it will be a lot of work to make it truly correct and reliable.
Dragonfly
-
Very cool.
Dragonfly
-
That poor guy is going to have his work cut out for him on this one no matter how you look at it.
Dragonfly
-
From what I can tell is 1zcarfan has all the harnesses but doesn't have any of the connectors (on the ends of the wires) so even if he un-soldered all of the 16g white wires he would still have to solder the factory harnesses in. The unfortunate thing about this is that no one is going to hack up a harness to sell him only the connectors, plus each connector would have to be spliced into the existing wires which leads back to purchasing harnesses that have all the connectors in place. There are other ways to make this work but none of them are going to be easy or professional IMO. I do not know how Painless and the other after market system handle that problem but again that may be the best way to handle this unless alexideways can get a complete harnesses for a price that you are happy with.
Dragonfly
-
"but... Johny... down the street... he pierced his nose... and he said he used a fork..."
Fake or not it is tough trying to one up the piercing crowd.
Dragonfly
-
I'm open to suggestions...
I bought a '72 240 with an aborted rewire job. 98% of the wire is 16 gauge and it's ALL white!
I bought complete harnesses from front to rear and thought I had everything covered. WRONG... The genius that did the rewire cut all the connectors off and crimped or soldered everything back together. So, things like side marker lites, clearance lites, headlights, taillights, license plate lights, blower motor, wiper motor, steering column switches are now direct wired!!!
Anyone have a source of original connectors that's less expensive than a donor car???
Please don't flame me if you know of this being covered in another thread. A link or word/phrase to search for would be greatly appreciated.
Thanks,
Paul
Sounds like you are in a pretty tough spot there... I can think of two things for you to try and you are going to have to put out some money and time for either. The first would be to search the salvage yards for another 72' 240 and pull the entire harness from it (each and every wire and connection) than repair any damage that may have been done by PO's over the years, or do like one of my friends did and do searches on all the z car forums, ebay, craigslist etc. until you find a complete wiring harness for sale. I guess in reality there is a third option which may be the most realistic and that is to purchase an after market wiring kit and install that, that would provide you with the correct gage wires, proper labels and all the circuits you need plus a couple to grow into (and a new fuse block).
If the last suggestion sounds like something you might like to do look at the link a couple post above or do a search for "painless wiring", you will find there are several out there and they differ in price and options.
Dragonfly
-
He said the car cooled better. He didn't mention any aero differences...
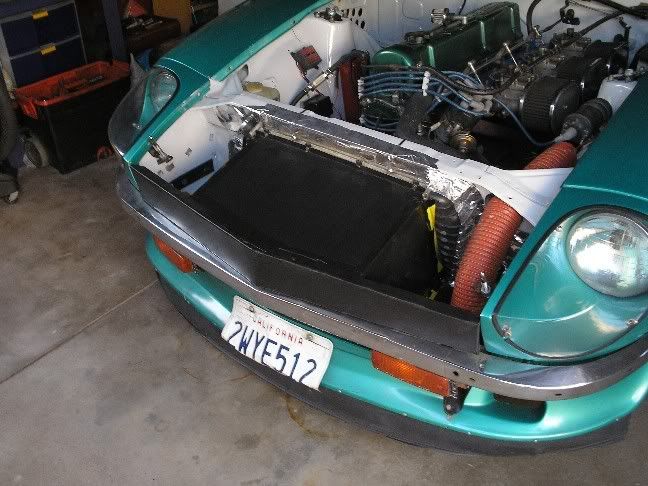
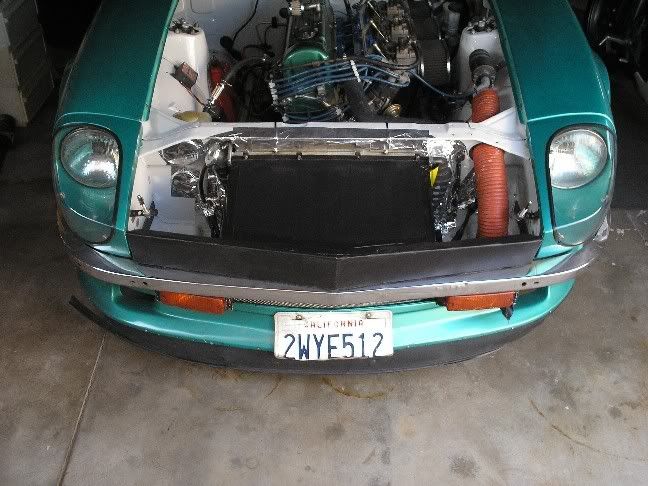
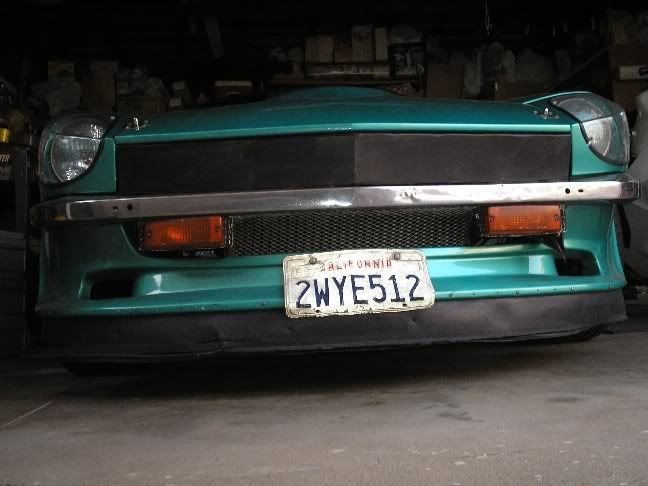
I can see why it cooled better... that is very similar to what I have done. The aero difference on mine is from the metal piece that I have between the bumper and the bottom of the hood. That piece combined with blocking all the openings at the front of the car that let air into the engine compartment has made an aero difference in that my CF hood no longer is bowed up in the middle due to under hood air trying to escape when at speed.
Dragonfly
-
perfect timming on this thread for me. Im about to install a Ezwiring Harness and have to re run all my wires to my fuel pump and so on. So minus the rope method any other tips? all my mechanical is up in place and Id rather not mess with it as it works fine (right now) Pass on the knowlage please !
Next tip... Make sure you have a grommet for each place where the wires pass through a hole. Do not use grommets from Harbor Freight they are crap and do not fit correctly, you can go to McMaster Carr and order good quality grommits that will fit.
#2) You will also want a piece of rope/line from your dome light. For ease of identification mark each piece with masking tape and a label.
#3) If you are not going to put the harness back in the same day you take it out get label tags and label EVERY connecter both on the harness and on piece disconnected from the harness. This is even more important on the connectors from one harness to another. On earlier 240's they did not have the nice colored connector blocks. The way I labeled mine was like this:
"Body Harness" "A" to dash harness, the corrosponding label "Dash Harness" "A" to body harness etc. It is also a good idea to take pictures as you go along for reference later, make sure you can see your labels in the pictures or the connection should still be intact and you can see each wire on both sides of the connection.
#4) Do a continuity test on each wire then create a schematic from that showing which wire does what in the harness.
#5) Do a visual inspection of the harness and repair/replace any damaged wires or connectors.
#6) If you remove the factory tape from the harness use a small tie wrap about every 6" of length to keep the wires bundled correctly, also tie wrap directly on each side of any wire that branches out of the harness. When you retape the harness you can cut the tie wraps off as you reach them with your tape.
Dragonfly
-
Wow, it's been a while since I posted this.
I have to try to remember to look at the date on the post... duh
Dragonfly
-
im just trying to find out if its an NA block or turbo block
The block is going to be the same, the difference is only in the parts i.e. dished pistons or flat top pistons. I agree that the best way to check is to put something through the spark plug hole to feel the top of the piston. The compression idea sounds good but your static compression is controlled just as much by cam design as by piston shape and if the cam has been changed or reground you could find yourself falsely believing the wrong thing.
Without documented history or a build sheet (spec sheet) on the motor you have to accept it as is or check and measure yourself.
Dragonfly
-
To the point.. When school calms down I plan on finding TDC and seeing if indeed the pulley is incorrect. But I'd like to put it off for a while if possible.. how urgent is this? Is there any risk of damage if the pulley is a little bit off, if I put off checking for a month or so? How long would it take for the pulley to actually come apart and wreck stuff at the front of the engine?
Thanks, again, sorry for the long post.
A lot of this depends on what the problem realy is. If for example the first mechanic to work on this had an adjustable timing light that was not working properly he could have easily thought that your timing marks were off, he then would have adjusted everything untill it passed. Now you have taken it to a different mechanic and he says it was off by 2* and made a 2* adjustment. IF that scenario is true then you have nothing to worry about, 2* is pretty minor in a stock street driven engine.
Now if the outer ring or the balancer is rotating on the inner hub of the balancer that means that the elastomer (rubber in your balancer) has seperated from the metal, if this is the case you will initailly notice that your timing marks will always be different each time it is checked. You may also notice a squeeling noise that sounds like a belt squeel even if your belts are tight, you may notice other auxilaries not working like they should (the balancer is not pulling the belts correctly). IF you find any of this to be the case you should park the car immidately and have it repaired where it is at or towed to a shop and repaired, by the time you see the above signs your are verrrrry close to doing fairly expensive damage. It would be your radiator that would recieve most of this damage as the balancer will most likely choose your radiator as its exit point.
Either way I would have a mechanic check it out looking specificaly to see if the elastomer has seperated, also ask to watch what he is doing so you can learn in the process.
Dragonfly
-
I'm also glad you found it and got it working right. I never intended to insnuate that you are incompotent, I just see a lot of people step in over their heads when working with the wiring in their cars. Most people are very intimdated by a large bundle af wires. The important thing is that you have the look you want and you learned something in the process.
Dragonfly
-
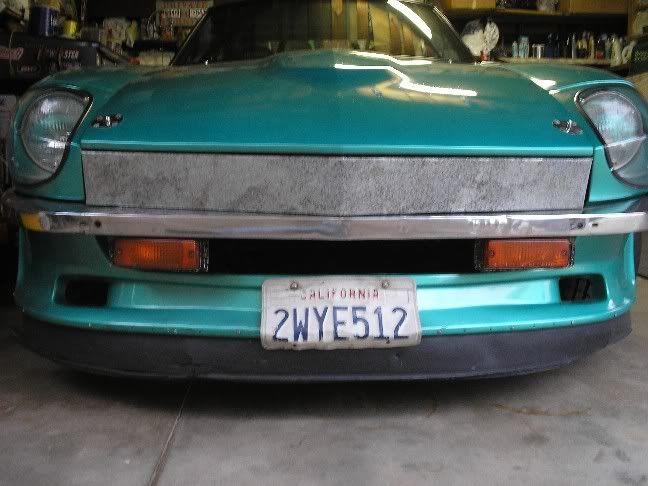
That is very similar to what guys run on the dry lakes and Bonneville for "Altered" classes. Miles, do you have a functional splash pan from the radiator support to the K-Member?
Yep... I've got the stock one with the holes in it toward the back. I have all the openings at the front sealed with aluminum tape.
With the effort you are expending, you may want to seriously consider segregating the airflow for your triples now that you have 'hood flex' under control. That 3" pipe should allow for plenty of cool air into the carbs, but they will make better use of it by sealing a flexible box against the hood, the inner fender well, and keeping all that cool air right at the mouths of the carbs.I've got that design in my head at this time and it will be added in and tested in steps as I continue on.
That box you made is probably similar to what will happen with my 'Shark Car' when it gets reworked. The Aero Testing confirmed what I thought, it's good to see people making use of the results in a concrete way!I am glad you like the work I am doing... my ego will get quite a boost if people actualy follow the design that I am working on. I will aslo copy anyone who makes any improvements on it.
Your spoiler ducts go directly to your brakes, right? I can't remember looking under there at MSA...I'm still lagging on that one, at this time they are still just open. I plan on running some ducting from those vents to the front brakes I just have not decided exactly how I want to set it up. I also have plans for modifying the inside of the fender wells and extending the airdam out to cover the outer edges of the tires when they are pointed straight ahead.
Dragonfly
-
I have quite a bit of experience with cars, except for electrical. I dont like doing it.
From reading that I think that you may have overstepped your capabilities.
However, I decided to shave my sidemarkers on the back of my 72 240z. How would I go about redoing the wiring to make sure everything still works like normal.You should have asked that question and understood the answer before taking on this project. You may have asked that question but if you did I did not see it and I don't think you understood what was needed to make everything work.
I did what I would have believed to be correct. Now, when I turn the left signal on, both tail lights blink slowly and dim. When I turn the right blinker on, nothing happens.I also just cut out the side marker wiring since it will never be used in this car again.Cutting out wires vs removing wires are two very different things. I suspect you may have crossed up your blinker circuit with your tail light circuit in your quest to clean up the wiring by removing what was not needed (or being used).
I know numerous people have done this before, and most likely with success.Did you actualy ask any of these people how they did it and if they had any problems?
I personaly went through my car and "re-wired" the factory wiring harness by removing the unused wires etc. it was a huge chore and I have a color wiring diagram of my car that is 3ft wide by 9ft long. I also spent months doing this and I tested everything outside of the car prior to wrapping all the wiring back up. Even with that I still had to chase some gremlins after everything was installed back into the car, most of the gremlins turned out to be grounding to chassis issues, while others turned out to be from re-using old connectors.
Fortunately for you the 72' 240Z body wiring harness is the simplest one in a z car that I am aware of. As long as you did not mess with the wires were they connect to the dash harnesses you should be able to buy another body wiring harness and try this again without so much use of the cutters.
Dragonfly
-
How well did they (blinkers) work before you removed the side marker lights? The side marker lights do not blink and should not affect the "blinking" of the lights BUT the side markers are a part of the ground loop for the chassis ground of the lights in the back of the car. Under most circumstances you would probably never notice anything different when the side marker lights are disconnected but if your chassis ground is less than ideal it can create strange problems with your lights.
I would recomend that you check your ground wires first then if you can not cure the problem with that then try what e_racer1999 said about using a resistor.
Dragonfly
-
my that looks amazing
notice differences in temperature drop or front end lift?
I took it up to about 120 for aprox. 15 sec and the car felt quite stable. Temp stayed normal (180*) at speed but raised a little when running through the gears with 7k shifts, using the fan as well as a constant speed brought the temp back to 180* about 25 to 30% faster than running at a steady speed with no fan running. In short yes I did notice a difference in temp drop. I do intend to do some more testing as the ambient temp increases and making longer runs in lower gears to get the rpms up but keep the speed lower.
The other thing of note is that I no longer have the hood flex that I had before. I am running John C's CF hood (pinned on each corner) and the hood used to flex at about 75 mph and as speed increased it would flex enough that I think it was letting under hood air out between the hood and fenders. Now I can not see any flex at all in the hood.
Dragonfly
-
To repair the factory system I got a estimate of 1100.00. I figured that if I was going to have to spend the money then I woud at least upgrade the system a little bit to get me to stop better. I hate to throw away money on the stock system when I know that I am going to go with bigger wheels and more HP in the near future.
I think that quote is a little steep... but then agian I have not seen your brakes and what needs to be done to get them back to 100% (stock). The rear brake kit from MMS will fit inside a 15" wheel and I personaly would just get some used 15" wheels and the MMS kit untill the time and money allow for the complete upgrade that you want. I also suspect you could pull this off for less than the $1100 that was estimated above.
As my personal disclaimer I am using the ZRaceProducts kit rather than the MMS kit for the brakes and it fits inside my 15" wheels. I do believe however that both kits have the exact same diameter requirements.
Dragonfy
-
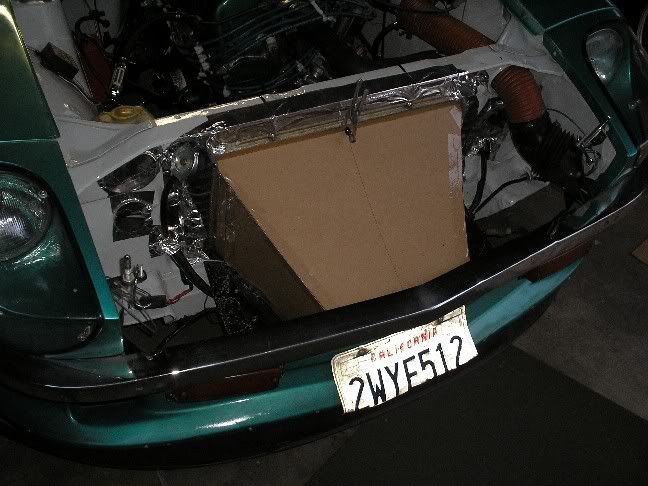
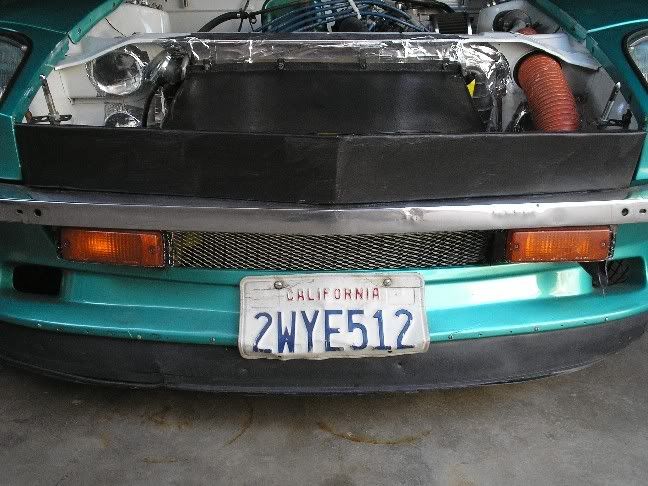
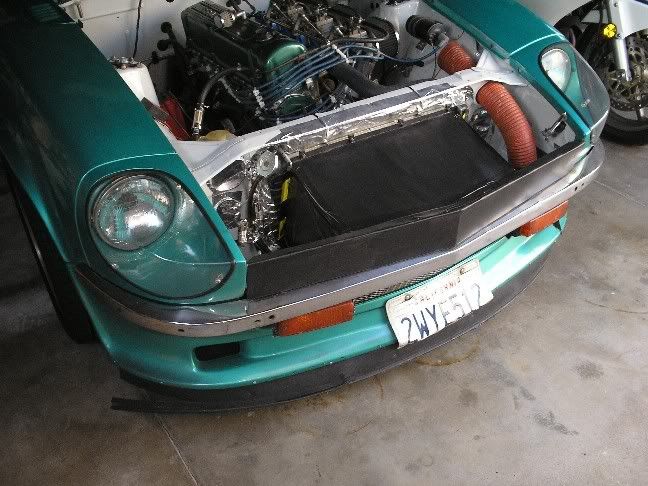
Some of you may remember my posting these pics in a different thread about air ducting and front end mods:

Well I built the cardboard part out of sheet metal to test it better and then use it to make fiberglass parts from. I found that it was not working they way I had hoped. Even though the opening acted like a vacuum when I would turn on the fan I noticed that I would start to overheat if I got aggressive with the car and turning on the fan did not help at all unless I was stopped. I took a piece of string and tied it to a stick then turned on the fan and started looking at how the air was moving through the "box" and the radiator, what I found was that the air would pull through the middle portion of the radiator very well but everywhere else inside the box the air would just swirl around and not get pulled through. I spent some time looking at the way my wifes 07' Camry was set up and realized that when they boxed the radiator they did not taper the box, instead they left it open with air able to enter the box from several places top to bottom at the front but everything else was sealed.
I have made a revision to my original box by opening it up considerably on the inside, it seems to have evened out the air flow quite a bit. I still have only the small (ish) opening in the front but at this point it seems to be working much better during my testing. I am going to be doing more testing and if needed I will be opening some holes up in the upper portion of my "upper air dam". Here are a few pics of how it looks now (this is sheetmetal and cardboard/tape for testing purposes).
Dragonfy
-
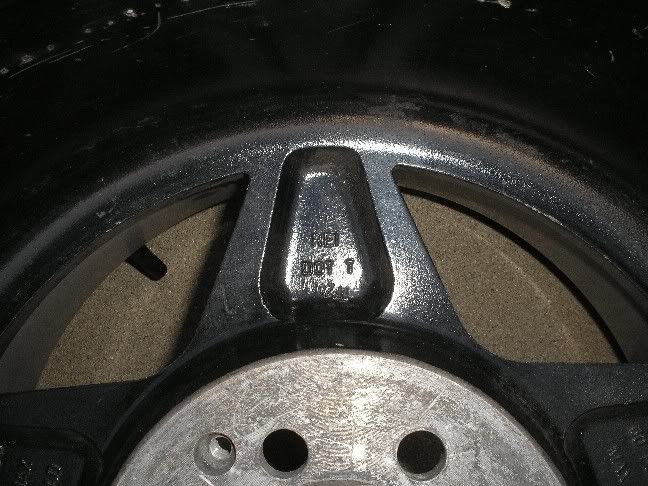
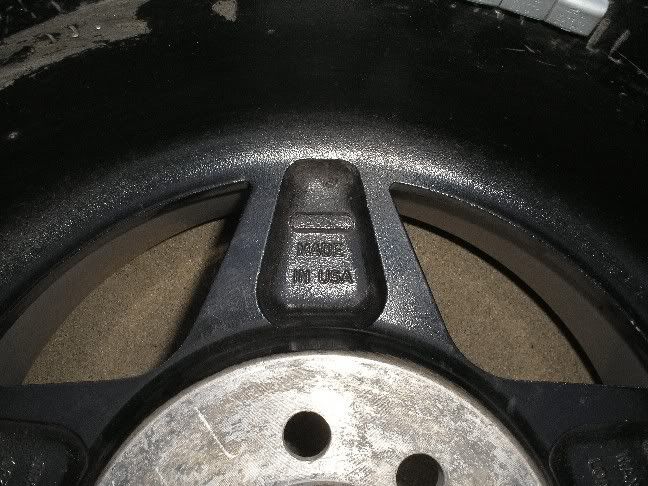
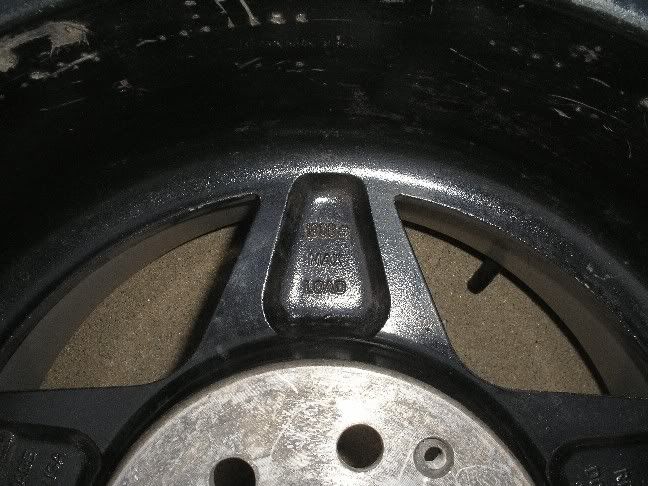
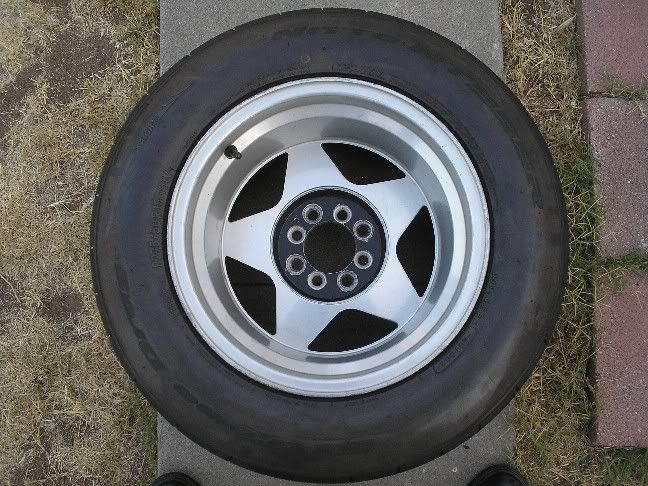
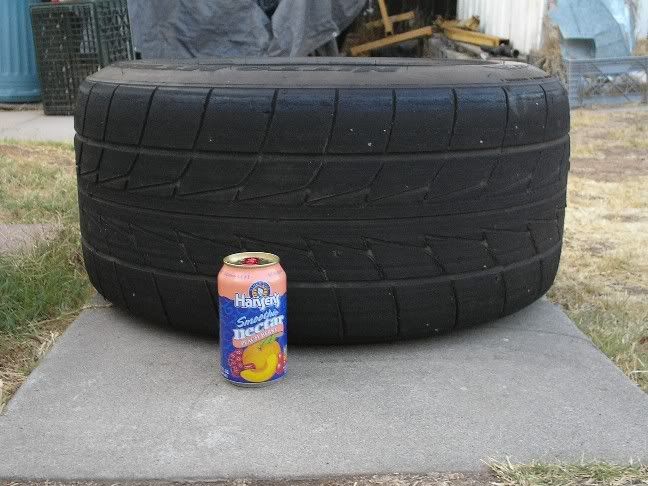
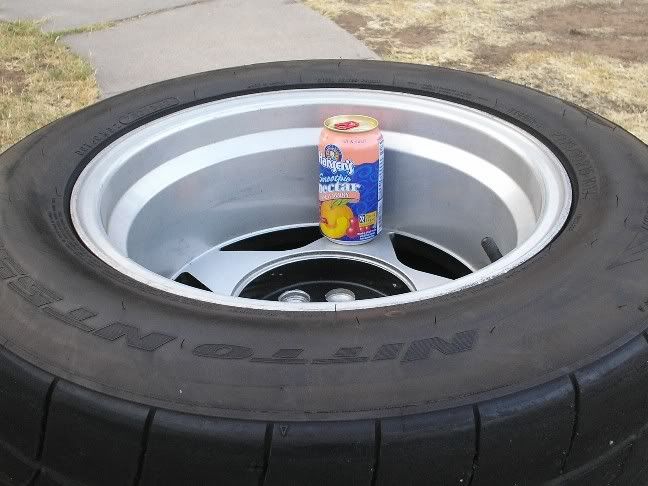
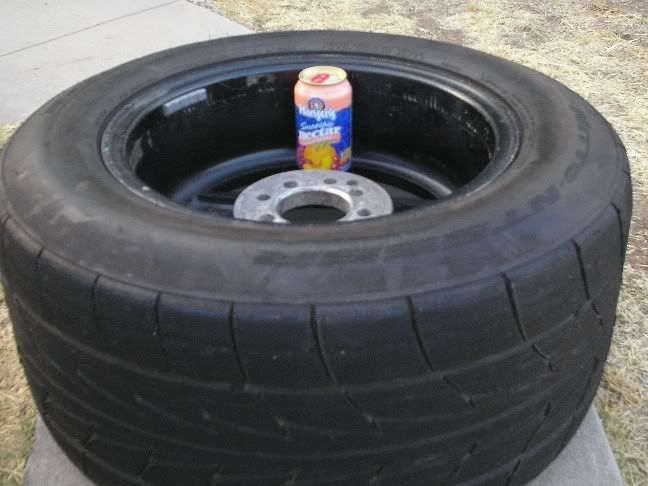
I went out and took a few pictures of my wheels, I don't know if these will help you or not but I think they came out good.
Back side:
The text on each of the spokes:
The front side:
How wide is a 275/50/15?
Dragonfly
-
I have been watching that on the news... it is almost beyond my comprehension. I just don't expect to see anything like that in the U.S. Glad you were not in the middle of it.
Dragonfly
-
I actualy incurage people to look under my car...
If I had the same concern that you stated in the begining of this thread I would put the car in the air and take a look at aeverything under the car. I have had (many many years ago) someone cut my brake lines for me and after that did not work he got under the hood and modified my engine (cost me a rebuild).
As far as cut out and kill switches are concerned I think it is a good idea and I use them. I believe that the best place to "hide" the switches are in plain sight... you should just disguise them so they do not look like cut out and kill switches. As an example of what I am talking about, I have a friend who's cigerette lighter is the kill switch, if the lighter is not pushed in (as if to heat the coils) the starting circuit is broken and the vehicle will not start. Use your imagination and come up with a good disguise for your switches and get an alarm to make some noise as well, even if no goes out to see what is going on it is hard to concentrate with that alarm going off in your ear. Oh yea you should IMO put the alarm horn inside the car where it will be hard to reach but make lots of noise in the car.
Dragonfly


Boring for stroker without a torque plate?
in Nissan L6 Forum
Posted
I have to agree with TonyD... you do not truly need a torque plate for overboring an L series engine. The two things that are most important in doing an overbore is the thickness of the cylinder walls and the distance from the cylinder to the head bolt. On an L series engine you have both good thickness and a lot of distance to the head bolts. Now if a shop has one and the price is the same go for it.
IMHO the benifets you would get from using a torque plate on a street driven/weekend warrior L series could be negated by filling up with gas from station "A" verses station "B". The whole torque plate deal is just like the E-31 head deal... because a racer who is bound by very strict rules found something that would give him a 1/100 sec advantage under ideal condtions over the next guy people suddenly think that is going to make a difference on their car, well its not, untold hours of seat time will make a difference.
Dragonfly