
lammbn
-
Posts
105 -
Joined
-
Last visited
Content Type
Profiles
Forums
Blogs
Events
Gallery
Downloads
Store
Everything posted by lammbn
-

-
-
good luck! keep us updated, i am very interested in seeing how this will turn out.
-

Yahoo Auction Japan: '77 Fairlady Z S31 Toyota 2000GT style
lammbn replied to S30TRBO's topic in Non Tech Board
Not too bad. i don't hate it but there is something weird i can't put my finger on. i can't imagine the man hours put into the body work on that thing! -
nevermind. a few minutes of a heat gun to the bottom of the transmission tunnel finally freed it up.
-
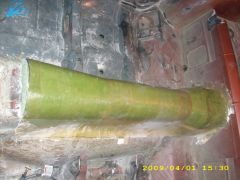
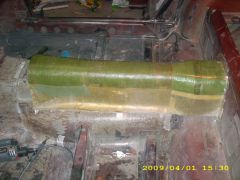
So i have been spending way too much time working on this custom fiberglass center console for my 78' 280z. one of the perks of being laid off without hope of getting a new job i guess. anyways as you can see in the pictures below i used a variant of the green floral foam method to shape the console then fiberglassed over it. it was difficult and i had to scrap it several times before i figured out the best way to evenly shape it all. But the problem now is that i hot glued all the foam down to the tranmssion tunnel and now i can't pull it off. i've pulled as hard as i dare without fear of breaking it. i have it all free from the sides of the tunnel thanks to all the tin foil i laid down before i glassed it all. does anybody with or without experience with this method of fiberglassing have any ideas how to get it off without breaking it? I'll post more pictures of the fabrication process when i finally figure out where i saved the rest of the pictures i've been taking for the last 3 weeks or so.
-
-
-
I still like it. I am going to see if I can source a tailgate localy to play with. It looks better than I thought and ended up about the size I thought it would be in my head, don't really see a need to make it fit between the tailights as long as it is centered on everything. BUT... I'm sure someone will have a nasty remark because i don't have the same style or tastes as them. Oh well, don't drive my car if you don't like it.
-
I thought about a coated header. problem is that i don't think it would drop the engine bay heat enough to justify the extra cost, even though it would fit in better with my ultra clean engine bay look. wrap cost way less, even if i have to redo the wrap at 50,000 miles. on my motorcycle it was the difference between roasting my leg 10" away from the pipe to being able to touch the header within 5 minutes of shutting it off. it has lasted very well for how exposed it is and keep in mind this will be a very pampered car. I'm more concerned about every degree of the air in the engine bay, i'm going to be running a port and polished MN47 head with high compression so the reason for the heat concerns is to do everything possible to fight knock. no matter how small, if it's within budget, i'll do it. and this is a big one. as for the moisture issue, my material sience professor said that the metal will slowly oxidize itself due to the metal getting so much hotter and gasses being infused into the metal easier, over time it will weaken the metal. moisture shouldn't be any worse of a problem than it is on exposed, uncoated headers. i do plan on running a light coat of high temp paint under the wrap to help combat any rust issues that may occur though.
-
Ok, so I've been thinking way ahead of the game as usual and have been thinking about my engine bay before i even have the car sandblasted. anyways, I'm planning on using a 6 into 1 or 2 header and I'm worried about reducing engine bay heat as much as i can and i think the cleanest way to get it to a minimum is with with header wrap like my motorcycle has. I've always heard that you don't want to wrap mild steel or alumanized steel headers due to the increased temps the metal will see because the heat cannot escape. the increased temp overtime and many heat cycles breaks the metal down and it will deteriorate very quickly. stainless steel seems to be the only reccomended material to wrap for any extended use (most this info i could only find related to motorcycles and the added fact that header wrap always has a warning to never use for other than racing use.) another benefit i've thought of is that it also helps with heating an O2 sensor placed farther down stream in the runner collector but after a few hours of searching i can't find stainless headers for sale anywhere and it seems they were only commonly made years ago in japan for quite a hefty price. i would be willing to pay more than standard headers of course, but not too much more than 500. Now this car is going to be a weekend/sunny day driver only, never in the winter or when there is excessive salt or sand on the roads. Is the time it takes a wrapped mild steel header to break down a reasonable amount of time that it would only need replaced every 100,000 miles or so? i think that would be acceptable to me for my particualar use of the car.
-
I'm thinking placement would be right below the current tailight recess on my car. have it look like its more on the bottom of a rear bumper like the mustang's do. then i'll proceed with my custom tailight panel i currently have planned. i think some people are thinking it would be up high where the tailights are. here is a quick example:
-
i like the idea! adds a custom touch that seems like it should be factory, even if the letters are body color, like the recessed letters on mustangs for example. example only. pretty inginious and so simple i'm suprised it hasn't been done 3 or 4 times by now. if you like it do it! might have call a few junk yards and see if they have any old datsun trucks i can steal a tailgate off now. I was planning on cutting out most the rear and shaving it with smooth sheet metal anyways.
-
i would think they would last much longer than that. not much to really break on a tube bender die. anyways from my extensive experience with harbor freight tools i've found that the less moving parts, and the less critical the job you need it for, the better off you are. i would never think of going somewhere else to buy a hammer, work gloves, air fittings, ect. can't go wrong with simple stuff!
-
cool. I was stuck at drill for the national guard all weekend and had no access the the outside world. But it looks like everybody got it figured out already, I'm happy about that. I'm not very good with this electronics stuff, just proficient enought to fake my way by on stuff like this and that. and thats why i'm a mechanical engineering major not an electrical!
-
Oh, also forgot. you might want to check this web site out. i found it about a year ago and it's what got me started on all the EGT work i've done. i installed a similar readout with a custom alarm circuit in my buddy's Jeep for coolant temp. his didn't have a guage just a warning light. a very good read. http://www.autospeed.com.au/cms/article.html?&A=0360
-
Ok. they made it way too hard to figure out something so simple as exactly what you can and can't do with an analog input signal. My wife really isn't so happy i'm spending so much time on the PC tonight. so what i figure is that you need at least 1700*F (~927*C) on your readout. but that gives you just under 10V output from the AD595 IC. so if you can drop that voltage by half across the scale then you should be able to use it with the brain. then its just a simple matter of using their program to double the voltage value read by the brain and then use their handy dandy included celsius to fahrenheit conversion factor already built in to the program and you should be golden. but because your dividing the voltage by two you are doubling the error factor of the chip to 6*C add that to the 4.88mV resolution of the brain and you get an error of about 10*C or 18*F i would guess. thats pretty high. only problem i see is that just adding a resistor to the output may not have the desired effect of cutting the voltage in half. i have no idea how the circuit inside the IC will affect the overall resistace over the spectrum and that just adds more room for error. but, like previously mentioned, if your only using this to measure the difference between the individual cylinders, not to get the exact temp of each, it should work fine. at least good enough to give you some warning before one of your cylinders goes too lean and burns down.
-
Ok, i've been quitetly following this project of yours for quite a while now and I've very impressed with the project! but now i have to ask a question. i just spent the last hour and a half looking into this fusion brain thing. its very interesting and i think it will solve my problem of how to get additional features into my Mini ITX computer I'm going to run in my car without going through the very limited options megasquirt offers. mainly the amount of sensors i want to feed into it has been the problem. also the lack of quality megatune offers. anyways, how are you planning on feeding the K-type thermocouples into the brain? i've been searching their fourm section like mad on MP3car.com but can't find much. i have some very elaborate schematics i drew and tested for an standalone, digital EGT sensor readout with built in alarms but i have to use the AD595 IC to process the data from the thermocouple. are you planning on building a complete second board to process the data from the thermocouples and then feed it into the brain in a 0-5v format? not hard to do once you figure it out but it's a little bit of work. sorry to take the thread off course.
-
Anybody built and air dam like this before?
lammbn replied to lammbn's topic in S30 Series - 240z, 260z, 280z
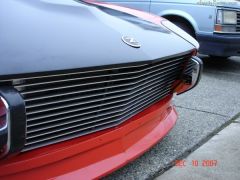
This is exactly what i'm trying to avoid by starting with an all metal frame. No flexing of the piece and no hours on end trying to fix it after every drive. That has been my worry of using an existing air dam as a base from the start. even with a plate sealing off the bottom of the air dam like i plan i don't think that it would stop flexing enough to not ruin the fiberglass or paint, even with flex addatives to each. Sorry no more pictures of that car. just saw the grill and it was exactly what i had in mind for mine and saved the one picture that showed the grill. -
Anybody built and air dam like this before?
lammbn replied to lammbn's topic in S30 Series - 240z, 260z, 280z
I think I understand. and yes that is the general look i'm going for. just a simple air dam that follows the hoodline to the point, but tucked back a little bit to allow the slant of the stock grill. I will be using a custom grill much like the stock one, just filling the whole opening horizontally and vertically with nice straight slats. much like this. I do plan on adding a few more curves to it to help accent it all better, definitly not anywhere as boxy as his. these cars have beautiful curves, no need to ruin that look by adding straight hard lines everywhere. but i am a big fan of the straight up and down style without any useless lips or molding. just follows my style of super clean. engine bay, interior, everything, no clutter. but i'm still not convinced that it will be easier to modify an existing dam and still get exactly whats in my head to come out. with an air dam i would have to stiffen it, work harder to shave it into the body under the headlight scoops, and i think it would end up being slightly heavier. here are a few more pictures that are some insperation for this in one way or another. -
-
-
-
Anybody built and air dam like this before?
lammbn replied to lammbn's topic in S30 Series - 240z, 260z, 280z
Thats the point. i want it all blended into the body so that it looks like one piece thats supposed to be there. i will also be shaving the headlight buckets in to match what his looks like. as far as modifying an old air dam that has been damaged or otherwise no longer needed i think that will cost more than what i was planning and may end up being slightly more difficult and less rigid. if i were to fiberglass it i would just do a quick and dirty one-off by directly glassing the frame, probably made out of aluminum angle, with light-weight smooth cloth until i had about a 4oz equivilent weight of glass on it. then apply a VERY thin layer of bondo and smooth out by hand with a sanding block. no need to waste a lot of money making a mold that i will only use once because your not so unique when everybody has an exact replica of yours. please ignore the irony that i'm tying to roughly copy someone else's... now as far as the opening, i think i like the look of it with larger vertical opening, and i forgot to mention that i will also be using this area to duct for my intake as well. probably about 1/4 of the vertical space, all the way across, will be for the intake. i know ram air has been proven to not be as effective as we are sometimes led to belive but i figure the less my engine has to work to suck air the more efficient it will be. -
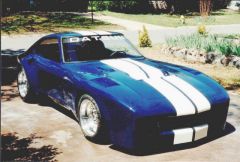
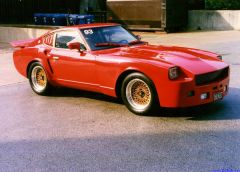
I was wondering if anybody has built and air dam that looks like this before? i know the hood ornaments are distracting but try to concentrate. it's obviously custom built, and yes i know its they guy from arizona Z's car. My main interest is just the method used to build it. i love the quick, clean, no nonsense look of the air dam, minus the flames for me. my two thoughts of how to do it are to build a frame in the right shape out of small, 1" or less, square tubing or angle iron and either: a) stick some thin sheet foam in the frame and fiberglass the front side. possibly the back too. a little more rigid than option "b". TIG weld some thin sheet metal to the front and go from there. possibly a little lighter than option "a" if thin enough metal was used but might be more prone to flex while driving without heavy supports. Also, three things that i would change for my car; i would round the bottom corners that sit right in front of the wheels. i would make the front opening a little larger by dropping the bottom inside edge a bit, this would be to better allow for ducting into the radiator if i did decide to keep the two round holes in the corners i would probably make them into functional brake ducts instead of lights.