PaulR
-
Posts
142 -
Joined
-
Last visited
Content Type
Profiles
Forums
Blogs
Events
Gallery
Downloads
Store
Everything posted by PaulR
-

240Z Remote Master Cylinder Reservoir
PaulR replied to PaulR's topic in Brakes, Wheels, Suspension and Chassis
I have bled the brakes and have a firm pedal, though I haven't road tested it yet. Note that my MC is quite a bit higher than the stock location, so that could be why I don't have the issue you're concened about. To be honest, I hadn't thought about that -
240Z Remote Master Cylinder Reservoir
PaulR replied to PaulR's topic in Brakes, Wheels, Suspension and Chassis
Thanks for the tip. Yes, I plan on adding shields and insulating wrap in a number of places... including the Master Cylinder. I have a ways to go yet before I fire it up. -
Hi Dave, I just posted this info in a new thread. See: http://forums.hybridz.org/showthread.php?t=141815 Paul
-
240Z Remote Master Cylinder Reservoir
PaulR posted a topic in Brakes, Wheels, Suspension and Chassis
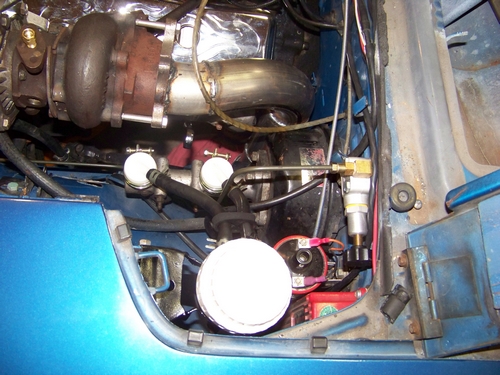
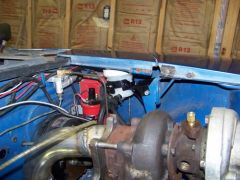
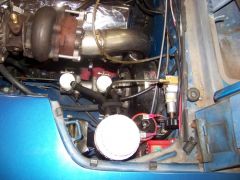
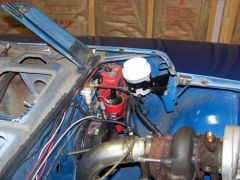
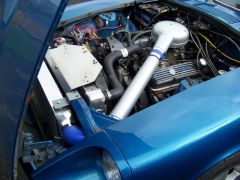
I had some inquiries about this on another post, so I thought I would post a separate summary of a mod I did to remote-mount my Master Cylinder (MC) reservoir. I needed to do this because the stock ones were going to interfere with one of the twin turbos I am mounting on my 350 Chevy V8 (more on this in a future post ) First I used "Tilton Remote Inlet Fittings" from Pegasus Racing: http://www.pegasusautoracing.com/productdetails.asp?RecID=1117 Turns out the Tilton MC reservoir flanges are the same diameter as the Z MC and these adapters fit perfectly They are only $3.80 each. (need 2) I also bought 2 new clamps, but the stock ones should work fine. You could also buy new reservoirs from Pegasus, but with a little looking around in the local Pull-A-Part I found a reservoir from a Mitsubishi Eclipse (also used in Mirages, and Gallant) would work even better. It has a large capacity, dual outlets and even the lines that came with it worked great after clipping about an inch or so off. This reservoir even has a low fluid level switch that could be wire up if you wanted to (didn't do that yet). I kept the bracket that Mitsubushi used to mount it to the firewall and "massaged" it a bit to mount it under the drivers side access panel. Hope this helps anyone else who might need to do the same. Paul
-
I like your idea of installing it where you can adjust it from inside. FYI, I installed mine near the master cylinder. I can adjust it by opening the access door on the drivers side. I disconnected the line that goes from the MC to the rear brakes and re-attached it to the output of the proportioning valve. I then installed a new, short line from the PV to the MC. I replaced the stock PV with a union that came with the kit from Flyin Miata.
-
I purchased the Flyin Miata Wilwood Proportioning Valve kit to install in my 240Z and it fit perfect. These adapters are the ones you need. I had found some other adapters from another source that I thought would work, but turns out they were for BUBBLE flares. Here is the email I got from them before I purchased: > -----Original Message----- > From: Richer, Paul > Sent: Monday, October 06, 2008 10:35 AM > To: Keith Tanner > Subject: Item Number: 14-76240 Complete adjustable brake > proportioning kit > > > Item Number: 14-76240 Complete adjustable brake proportioning kit > > I would like to install this kit in a Datsun 240Z and need > to verify that the metric adapters are for metric INVERTED > flare fittings (not bubble Flare). Is that correct? > > > > Best Regards, > > Paul Richer -----Original Message----- From: Keith Tanner Sent: Monday, October 06, 2008 9:57 AM To: Richer, Paul Subject: RE: Item Number: 14-76240 Complete adjustable brake proportioning kit Yes, with a 10x1 thread pitch. We can sell the parts individually if you don't need them all. Keith Tanner Flyin' Miata http://www.flyinmiata.com 1-800-FLY-MX5s (orders) 1-970-464-5600 (tech)
-
-
-
-
Nice and clean installation. Where did you get the new lines? I'm planning to do the same since I need more room for a turbo down pipe that gets close to the stock front brake line. PaulR
-
-

-
Fuel pump- Best and quitest.. please help!!
PaulR replied to love-my-V8-280Z's topic in Gen I & II Chevy V8 Tech Board
When I first installed a Holley "red" pump, it was real loud. I then mounted it to a bracket and mounted the bracket to the chassis using these isolators from McMaster Carr. Made a big difference (but I can still hear it) http://www.mcmaster.com/asp/enter.asp?pagenum=1218 -
I just bought a Hobart Handler 175 thru Harbour Freight for $549 2 weeks ago (free shipping and no sales tax)! I was going to get the 135 (110V) which was on sale for $469, but I figured since I had the 220 outlet already in the shop, I would go for the extra amps in case I ever need them. Looks like that sale is over since they now have it listed at $599. http://www.harborfreight.com/cpi/ctaf/Displayitem.taf?itemnumber=42338
-
I remember doing a lot of hammering to clearance the tunnel for the 700R4. Not just for the tranny, but also for the exhaust that runs down each side. And I had to make a little extra room for the dip-stick tube up near the top. I agree with Mark, plan on several trial fits to get things right. Paul
-
-
Thanks for the torque info! Another trivia question Is it a good idea to use a gasket sealer (like Permatex or RTV) on the cover gasket? When I went to remove the original cover, it was stuck really good! there didn't seem to be any evidence of sealer and I have no reason to believe it had ever been removed before, but I don't know for sure. BTW, have just completed the install of a NISMO LSD carrier into this diff. Hope to have it back on the road soon. Paul
-
Hi, Hoping someone has the torque specs handy for the 12mm ring-gear bolts used on the R200. I have a 280ZX manual that specs the 10mm ?? bolts at 43-51 ft-lb, but I assume the 12mm bolts are different. As usual, thanks in advance. Paul
-
My understanding is, yes, if you have an R200 case and gears, you can use a NISMO LSD carrier designed for your 10mm or 12mm ring gear. But, realize that getting the correct gear mesh and backlash is not a trivial matter. A good diff shop should be able to do the install for (from what I've heard) about $100. I'm adventurous, and plan to try it myself If your R200 is out of a 75 280Z, it is most likely a 10mm style ring gear. My R200 is from an 84 300ZXT and is definitly a 12mm. You can check by removing the rear cover to see if the bolt heads are 14mm hex (10mm bolt) or 17mm hex (12mm bolt) They also list this one for a 10mm R200 http://www.courtesyparts.com/Merchant2/merchant.mvc?Screen=CTGY&Store_Code=CP&Category_Code=z31_nismo_limitedslip Sorry, I don't know what the difference is. Probably should call them. OK, while I'm at it, the web site describes these LSD's as being set-up with approx 70 ft-lb break-away torque. How does this compare with an OEM '87-89 LSD. Is this a reasonable amount for a street driven car? Paul
-
Anyone using the LSD carrier from Nissan Motorsports (NISMO)? Courtesy Nissan lists it for $731.50 http://www.courtesyparts.com/Merchant2/merchant.mvc?Screen=PROD&Product_Code=38420-RS660_Z31&Category_Code=z31_nismo_limitedslip and has both a 10mm and 12mm version. With used LSD's going for $500 and up (I know they used to be around $300, but I've been watching eBay for several months and seen several go for over $600), seems like a better way to go, ie all new clutches & discs. Anyway, this is the route I plan to take. BTW, any good references on how to install one of these units would be appreciated Paul
-
Yes I am, 700R4, so shifter location was not an issue for me. Paul
-
I'm using something similar. It's a thick-walled steed tubing I found a local scrap yard. It measures approx .850 OD and .450 ID (.200 wall thickness) I simply band sawed 3 for each side and slid them over the bolts as I mount the set-back plates to the block. No need to weld them to the plates since they can't go anywhere once bolted into place. Been set-up that way for several years now. BTW, I modified the design of the set-back plates to give me another 1/2" of nominal set-back. I did this because I am using a small diameter (Late model, computer controlled HEI) distibutor, which is the limiting factor for set-back distance. 1/2" isn't much, but it was easy to do, so why not Paul
-
Another data point: I pulled an R200 from an '84 300ZX Turbo today and it had the 12mm bolts. I recently bought a NISMO LSD carrier and needed a 12mm style ring gear to work with it. The R200 I already had from a 280Z used the 10mm bolts. One caveat, this diff I just pulled at a local Pull-A-Part yard had some yellow paint marks (illegible) like those commonly found on used parts, so it may not have been an original. Paul
-
Hey Silicone Boy, any updates your TT installation? I picked up a set of those Corvette manifolds and really like the way they fit when mounted "up-side-down". Looks like you came up with a very neat solution. Did you have any trouble welding the turbo flange to the manifold? I'm not an expert on welding, but I thought welding to cast iron was difficult to do. BTW, I've also seen aftermarket replacement (bolt in) tube style headers for these manifolds. Hooker (pn 2061) and SLP (Part No.: 30056) both make them and sell for about $350 to $400. Quite a bit more expensive, but they may flow a little better and be easier to modify/weld. Keep up the good work! Paul
-
I thought it was a well written series of articles. I couldn't find the 2nd issue on-line either, so I ended up going to the Library to copy it from an issue they had on the shelf.