clocker
-
Posts
127 -
Joined
-
Last visited
-
Days Won
1


clocker's Achievements
")
Newbie (1/14)
1
Reputation
-
That's some very nice work- having grafted in a different dash myself, I can appreciate the endless details involved. I would say that the center console gauge panel is the least finished part, not that it looks bad but an OEM look would have some sort of bezel surrounding it.
-
No, we never even considered the original dash, that thing weighs a ton (as does the OEM HVAC unit). We used the 2nd gen dash and HVAC because they are cheap, readily available and suitably sized.. Thanks, "perfect" is a high bar to clear. It's been a while since I've posted but the Z has not been idle. We converted to a Holley style EFI system- it looks like a 4 barrel but is a self contained injection unit- and she's been in almost daily use since then. Unfortunately, my health took a dramatic turn for the worse and I have been unable to do anything car related till just very recently. Just as my condition started to improve, Sigfrid began pondering a move to Scotland, so the future of the Z is murky at best. I'm so far in medical debt that I can't make an offer to buy him out, so she'll probably get craigslisted soon. So sad.
-
Well, she survived the winter just fine and everything continues to work. The only real issues we've had are all carb related and we finally decided that this worn out old Holley just wasn't gonna cut it, so we got this: It's a FI Tech fuel injected throttle body with self contained ECU...https://www.summitracing.com/parts/FIF-30003. Install is set for Saturday, we've been gathering parts and prepping for the last few weeks...it should be pretty simple. We had to remove the headers to get an O2 sensor bung welded on and will have to replace the low pressure fuel pump and hose with high pressure stuff (we're hoping to use the stock RX7 pump that came in the tank I installed) but I hope she's running again by Sat. night. This will not only make her run better (hopefully) but more significantly, signals a commitment to the stock drivetrain, which we've always considered swapping out. With all that uncertainty removed, progress can logically continue. I hope.
-
Sigfrid spent some time yesterday changing the rake of the seatbase with spacers, we both felt the front was a little high and the rear too low. We couldn't go lower up front, so he added spacers in the back...and here's a top tip (useful even with stock seats) to make your life easier- Replace the rear mounting bolts with studs. Instead of fumbling around under the seat trying to fish bolts through the carpet, studs allow you to just drop the seat onto studs, install the front bolts (which are far more accessible) then run nuts down the studs and viola!-, Bob's your uncle. Granted, seats are not a commonly removed part but when you gotta, this little hardware mod comes in handy. Sadly, it snowed overnight, so the Z stayed home (his RX8 has new Blizzaks) and we still don't know how much-if at all- better these Miata chairs will be.
-
Well, "the summit" may be boring but at least we can sit in comfort now... Miata seats and man, we got a screamin deal...$50 for the pair. The black cloth is a much nicer and fits the interior design well and the slightly smaller size means we have full slider travel and better headroom. The seat mount points in our 280 are 13" apart, the mount points on the seat are 13 3/8" apart and frankly, it would have been easier if the difference had been greater but about 4 hours of fettling got them installed. Sadly it was late when we finished and our all black interior photographs poorly in the dark, so final pics will have to wait. Initial impressions are positive but a few commuting days will actually tell the tale.
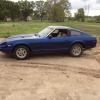
-
That's an interesting/clever solution, so thanks, Trevor. I had kinda fixated on my original idea and this got me thinking more creatively, so even if I don't use the concept, at least it made me think about it differently. I've spent time lately looking for seats to replace the Prelude units that Sigfrid just doesn't like. Hoping to set up some meets on Sat. to look at some Miata black cloth chairs and maybe some black leather S2000 seats. I've examined Miata parts before and they appear easy to mount- and most importantly, they'll fit (and I prefer cloth to leather) so they are my clear favorite but we can consider the Honda if S. insists. S. has been splitting commuting duties between the Z and his RX8. The 8 has snow tires, so it gets used when weather demands but the Z runs a few times a week at least. Mechanically, she's doing great, no real issues to address other than the increasing desire for a LSD. His only actionable complaint recently is the rear defrost grid either not working or (more likely) just broken and heating unevenly. Other than that, she's pretty adept at mimicking a "real" car. Mileage has been hovering in the 24mpg range, which I think is pretty good. Of most surprise to me is how well the Plastidip is aging. Originally planned as a stopgap before real paint, we didn't expect it to hold up as well as it has. Pretty sure Sigfrid would still prefer a normal, gloss finish but I'm totally enamored with the dip and would use it again without reservation. It's weird to realize that Ratchet is no longer a "project" as much as she's a car we're tinkering with. No more shelves full of parts to install and problems to solve...we've climbed the mountain and the summit is kinda...boring.
-
Audi S4 wheel. Horn buttons work and turn signals cancel.
-
Final part of the "Going Keyless" project complete. Almost... External lock cylinder was replaced with a Bulgin momentary switch which operates a popper solenoid to unlock the car. The battery has been fitted with a wireless cutoff switch, so a blip of the keyfob and the whole car is dead (except for the headunit which has a bypass so it doesn't lose settings all the time). Approach the locked car, hit the fob, car goes live- including the external buttons, which can now unlock the door. There is no ignition barrel either, so no keys required at all anymore. Why is it "almost" finished, you ask? Well, we realized that a failure of the battery cutoff means there's no way to get into the car (assuming it was locked) and that would be kinda dire, so we need a secret/hidden, external manual rear hatch release as a last chance option. We already have an interior cable release for the hatch and I'd like to maintain it's functionality as well, so it could get tricky, we'll see.
-
Progress has been fitful since the last update, but that's mainly due to the fact that Ratchet has been driven a lot and pretty much everything works. Most of our effort has gone towards chasing down the random creaks/rattles/glitches that only show up after some use and we've pretty much got her locked down finally. On my theoretical wish list is a revamp of the electrical system. It all works but I can see several methods to clean up the install and eliminate some unneeded complexity and we are contemplating a return to FI, but only with an aftermarket ECU, so that would be a big change anyway. More practically, we finally decided to enter the great unknown and attempt to revamp the doorpanels and create some way to dress the rear strut towers. We basically made up a technique to shape the panels, involving spray expandable foam, fiberglass, foam sheet and vinyl and after a few weekends came up with this: We're testing this out for fit and comfort before finishing the other side but it's looking pretty good so far. Not sure if any of the techniques will help with the strut towers, I can't believe there's no carpet cover option available...gluing vinyl is no longer an option since we sound dampened everything. Inspiration will strike eventually. A lot of Sigfrid's daily commute is on the freeway and the 4-speed transmission quickly became a problem, so the hunt for a 5-speed became a priority. Took a while but two weeks ago we found one and put it in this past weekend. We have no lift or trans jack, but even working on our backs in the garage, it only took about four hours. The short shifter from the 4-speed inexplicably does not fit the five speed (although it looks like it could be modified to work) and the stock 5-speed stick will not accept our nicely weighted Nismo knob, so a bit of finagling remains to be done. The Nismo knob is threaded for 10mm x 1.25 and the new stick is 8mm x 1.25, so I'm planning on screwing in a 8mm Helicoil to sleeve the knob down. Despite this irritating setback, we were able to test the car anyway and it was a revelation, night>day difference. Ratchet is much less frenetic at speed (we seem to have dropped 600 rpm or so at 75mph) and the synchros and new shift lever work much better than the older unit. In every way this was a decided upgrade and well worth the effort and money ( we got the trans for $340 and spent an additional $50-some bucks on seals and oil), she is much better for it. So, Ratchet is ready for cold weather and snow and we'll see how she fares in that environment.
-
Sorry, no idea. I never intended to use ANY of the stock wiring or devices, so I am unfamiliar with how the wiper is supposed to work originally. IIRC, a lot of the delay circuitry is actually in the Lexus switch and without it, I don't see how the Datsun switch could make it fully functional. @Greeko...not sure. I do know they're heavy and I've never cottoned to them much. I think Sigfrid got them from Tire Rack, but it's been so long I can't remember. Most of my car energy has been lavished on the RX7 this summer, but the Z has been running so well our neglect hasn't been an issue. We've spent a few weekends making minor tweaks and adjustments but haven't undertaken anything major until a few weeks ago when we decided to make doorpanels. Naturally, neither of us can sew and we have no real experience...so we made it up as we went along. We finally got the driver side finished enough to install (sorta): The overall look/feel is just what we wanted but we're still debating the final covering choices. We'll live with this for a while as the passenger side gets worked on (our process involved expandable insulating foam, fiberglass and spot putty) and see what we think. For the last year (basically, since the car became really usable) we've debated our drivetrain options and still can't decide. If nothing else, we need a five speed transmission...Sigfrid spends a lot of commute time on the highway and the overdrive would be less frenetic and better for fuel consumption. We sorta see the acquisition of a trans as a commitment to the stock engine and we're just not there yet. The decision will rest mostly with S. (because it's his money), so I've been tinkering with the idea of an electrical system revamp. Everything works but having done it once, I can see better ways to do it again and might make that a winter project. She's turning into a pretty sweet car though, I always look forward to seat time because it's so different from the Mazda.
-
Unscrew your brake light switch and see if it fits. Those things are like 2 bucks at Rock Auto.
-
Work has continued, albeit slowly. Installed a revamped gauge cluster- water and oil are VDOs under Miata dials and needles and to heighten the Christmassy effect, the small gauges got red needles... Fitted a BMW ebrake handle cover and snood...now the button needs attention: Finally fitted the Kia hatch release mechanism: And the headlight covers: She is functionally complete and runs beautifully. I'm in love.
-
The modded heater core was installed and is leak free, so my interior punchlist is down to three items. -Still need a hatch release lever/handle/knob/whatever. -Find a timed relay for the rear window defrost. Most of the wiring is in place (the Miata heater control panel has a switch for defrost), I just need the relay. -Get the turn signals to self cancel. For no particular reason, I started with #3. This will be the fifth attempt at the steering wheel>switchgear interface, which has proven to be far more finicky than expected. The problem is the geometry of the stock steering column...our shaft does not extend as far out of the column tube as the Lexus switchgear would like. It's difficult to explain but those two cancel pins must spin perfectly concentric to the steering column with only about 1.5mm clearance and the same tight confines in the switch cavity. If everything doesn't align properly, those pins either drag on the column or bind in the switch holder. The horn is easy and has always been functional. As Sigfrid resumes a normal work/family schedule, time for the car has become scarcer and we probably won't meet again till next weekend. Sad for the Z (which continues to run well in daily use) but good for me as my daily driver engine (1990 RX7 w/ 300k miles) finally decided to die. I have a backup engine about 60% ready to go, just need some more parts...and money.
-
Looks totally doable. Probably the simplest path is to start with an aftermarket adaptor hub (like a Momo). Depending on how you want the wheel to sit, you may use the new hub as is or if that puts the wheel too close, it may need modification (basically, removing the "crush zone" and using just the splined bottom section. Lathe access would be handy if that's the case. Don't see any reason the Lucas horn button couldn't be used.
-
As long as that center part unbolts, you're in pretty good shape. Can we see a pic of the wheel center with that part removed?