

ThomaZ
-
Posts
72 -
Joined
-
Last visited
-
Days Won
2
Content Type
Profiles
Forums
Blogs
Events
Gallery
Downloads
Store
Everything posted by ThomaZ
-
240Z vs 280Z gland nuts?
ThomaZ replied to JustinOlson's topic in Brakes, Wheels, Suspension and Chassis
I have a 280Z strut on the bench that I tried to measure, but my vernier calliper doesn’t reach down far enough. The threaded portion is 49.5mm (1.95â€). But further down the wall is thicker, I would guess 48mm inner diameter. -
Watanabe/Panasport Knockoffs deep dish!!!
ThomaZ replied to dsommer's topic in Brakes, Wheels, Suspension and Chassis
You can get the Panasport FS-16 in a 16x8, 4-4.5 bolt circle +20mm offset in a silver finish for $305.00 each. I ordered mine from Discount Tire in Renton, WA. Ask for Jas Burns, very friendly and helpful. The 16 x 8 Panasports FS is not on their homepage (the C8 is) The FS need to be special ordered but in my case the rims where in stock at Panasport in California so there was 3-5 business days shipment time. Got them early September this year. -
Good you pointed that out, zalomz! It is important to remember that the C8 are only for racing and it says so on Panasports homepage too. My 240Z is driven on the street so therefore I choose the FS design. Panasports homepage only list FS in 16â€x7†but they are available in 16â€x 8†also, but they need to be specially ordered.
-
Panasport offers their FS-16 in a 16x8, 4-4.5 bolt circle +20mm offset in a silver finish for $305.00 each. I ordered mine from Discount Tire in Renton, WA. Ask for Jas Burns, very friendly and helpful. The rims where in stock at Panasoprt in California so there was 3-5 business days shipment time. Order them last week so they should be in any day now. (You might wonder why someone from Sweden orders wheel in Renton, but I go to Seattle rather frequently on business trips so I will just pick them up next time)
-
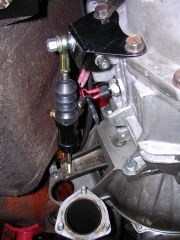
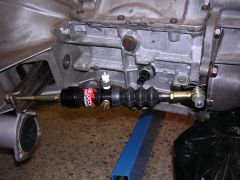
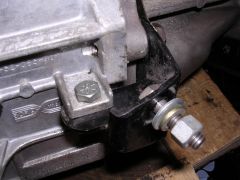
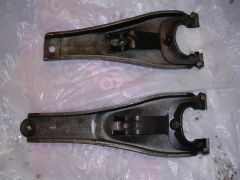
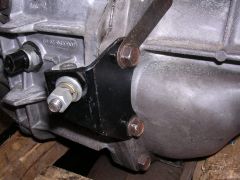
When I installed a CSB 350 together with a Borg-Warner T5 NWC gearbox in my 1972 240Z I followed the JTR manual almost to the letter. As recommended by members on this board I used an 7/8" master cylinder (MC) from Wilwood (WIL-260-6765 at Summit). It fits the hole pattern in the firewall without trimming. I installed an AN4 fitting (like Summit RUS-66042-1) and a custom-made steel braided hose down to the stock GM plastic slave cylinder (SC). The set up had several disadvantages. The connection to the plastic SC was fragile. I hade to hammer a bulge into the lower part of the fire wall to get sufficing clearance for the cutch arm. It was so difficult to bleed. I didn't get it to work well. The clutch disengaged, but just barely. The SC ended up very close to the down tub from the headers. I made an heat shield but it doubt it worked. After just 1000 kilometers (625 miles) the SC quite and dumped all the fluid out around the pushrods. I was reluctant to just reinstall a new plastic SC so I started to investigate an alternative; and bellow is what I ended up with. I used a SC with aluminum housing from Wilwood (WIL-260-1333 at Summit Racing). It is a pulling clutch SC so it needs a new mount and a modified clutch arm. The stock clutch arm was shorted and an a hole drilled in it for the push rod I fabricated a SC mount from 1/8" steel. I made some simple cardboard templates an the cut it out with a hack saw and bent it in a wise. It was then stick welded together. I made it to pick up on of the "ears" on the gearbox housing and two mounting bolts on the aft face of the gear box. It is a simple design and I hope the photos will aid if you wish to duplicate it. The stock nipple on the Wilwood SC was replace with an other AN4 nipple and I had a new steel braided hose made. It is 800 mm (31.5") long and has 90 degree bend on both ends. The rest of the photos shows the system installed. It works really well. It was simple to bleed and it disengages and engages distinctively. As can be seen from the photo it clears the firewall and the trans tunnel. It sits higher up in the trans tunnel an clears the exhaust tube with comfortable margin. The disadvantages is that you must remove the bell housing from the engine to be able to remove and install the clutch arm and the clutch arm is hard as nails to drill in! Use a drill press, top quality drill bits, work slowly and use cutting fluid. I have now put approx. 2000 km (1.250 miles) on it and it still works well, so I thought it would be something worthwhile sharing. Best regards ThomasZ
-
-
-
-
-
-
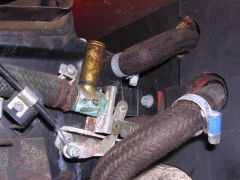
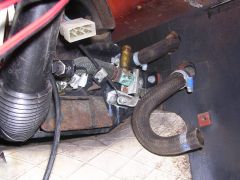
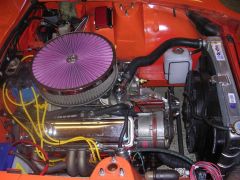
I had the same taught doing my V8 conversion. I use the stock heater, heater valve and fan. The problem I found was that the heater valve I located so close to the firewall. I have included links to some photos I took prior to disassemble my car. Please not that the hose coming through the lower hole curves up and goes on the brass fitting on the heater valve. The hose has been disconnected from the fitting on the photo. The hose coming through the upper hole goes directly on the heater element. Please note that the fan and fan housing is removed on the photos. I found no relay good way of moving the holes. Going inwards they would collide with the heater box. Going outward they would collide with the fan box. In the end I left them as stock. Here is a picture of my engine bay now. It is a bit cramped but it works. I have the engine in the JTR position.
-
-
-
-
How much does your Z weigh?
ThomaZ replied to Thumper's topic in Brakes, Wheels, Suspension and Chassis
240Z-72, Chevy SB 350, T5 gearbox, R200 diff. Radiator, water pump, and manifold in aluminium, 16lb flywheel. Full tank, tools, but no rear bumper or spare tire 2622lb (1180 kg) -
I just did the same job this winter. What I had problem finding was the foam the where bonded to the “flapping doors†inside the heater box. It’s a foam sheet but it also has a hard thin surface. After some search on the Internet it suddenly struck me that I was looking at the perfect replacement lying next to my computer. Mouse pads! A quick trip to the computer store and they had cheap pads in similar quality as the original foam. Two pads where enough to cover both doors on both sides. I used ordinary contact cement to bond them. So, when you stopped laughing you might give it a try!
-
I did it in three weeks. This was the fist time I tried something as big as an engine change, had only don ordinary repair work before. Things that made me succeed: I had spent almost two years sourcing parts, so I had everything on hand. For example; I did not only buy an electric fuel pump. I also got the fittings, fuel hoses, clamps, fuel lines, electrical connecters and wires before putting everything in a Ziploc bag and stored it. I followed the JTR manual almost down to the letter. I worked 10 to 12 hours a day for three weeks. I had one rest day. (Had some problem keeping motivation up in the end.) Things that took extra time: I spent almost 2.5 days on tiding up and repainting the engine compartment. I spent almost 1.5 days repairing rust in the battery area that was worse then I first expected. I spend 5 days (really!) on fabricating a dual custom exhaust system. I had purchased different bends and strait pipes and made everything from the header back to the muffler including an X-pipe in front of the diff. I am a beginner on welding and was learning as a vent. (After test-driving I found out it was too loud and had to redo it by installing an extra muffler!) An alternative had been towing the car to a muffler shop but I had no one I felt I could trust in the area. Bottom line: It’s doable in your time fram if you preplan and don’t have to spend a lot of time driving around getting parts while you should be working on the car. Good luck!
-
Hello Marcus, Was there anything wrong with the answer I gave Your question on the Swedish Lazzat forum three weeks ago? Actually I gave you the same advice as Tim: Get the JTR manual and start using the search function at HybridZ. Any question you might have is already answered here many times! Even tough I have been surfing around here almost daily for nearly four years I have not been posting much, because I have not needed to. The search function has almost always given me the answer and when ever I found an interesting thread I use the “Show printable version†under “Thread tools†and print it out. I have four full binders now with information that has been invaluable during my swap. There isn’t too many V8 Z-cars around in Sweden, I only know of one more except for my own; and that is Henrik’s “Mechanix Menace†http://www.cardomain.com/profile/chevyz240. I have also herd rumours of three others but never been able to locate the owners. One reason can be that Sweden’s “anti tamper laws†make it hard to get V8 Z-cars approved for road use. (mine is not but don’t tell anyone! )You might reconsider your use of a -78 as the emission laws make anything newer then -74 even harder to get approved. As I said before you are welcome to browse my photo album and you can also PM me if you any specific questions. Best regards ThomaZ
-
I have a rather mild 355 with a T5 gearbox and R200 diff in my -72 240Z. I went for a 2 ¼†dual system mostly because the JTR manual recommended 2 ¼â€. I used Summit block hugging headers, Speedway down pipes #910-13385, and two Magnaflow mufflers. Both are two-in-two-out with #11378 in front of the diff and the longer #11385 at the stock location in the rear. The rest of the system I fabricated from strait pipes and 90 degree bends. It took much longer time then expected mainly because I am a beginner in welding and it was the first time I made my own exhaust. In my fist setup I had an X-pipe in front of the diff and only the rear muffler but that was too loud for street use, so I replaced the X-pipe with an extra muffler. It was a tight fit in the transmission tunnel I actually had to hammer some clearances for it. But nothing scrapes when going over speed bumps and I am pleased with the present sound. There are pics of both setups in my photo album under “Engine change†ThomaZ
-
A friend of mine gave me the part numbers he used in his conversion. He has the Camaro radiator and the 350 CSB in the JTR position. Both hoses are to long and need to be trimmed. Upper hose ECR21183 = NAPA NBH7893 Lower hose ECR20981 = NAPA NBH7716 Maybe something worth checking in to….I have the JTR setup but a Griffin radiator and the upper one fitted well, and the lower on was very close but I finally had to go for a universal one…
-
If you want to avoid drilling in the SC you can make an adapter from an AN-fitting (can also be found at Summit). However it requires that you have access to a late. A friend made one for my T5 SC. You can see it in my photoalbum; go in under Datsun240Z-72, picture #37 and #43. The benefit is that then you can use a standard hydraulic line with AN-couplings, easy to find and a hydraulic shop can make one in just the right length for your set up. This mod has worked well for me.
-
Pro topline heads- Know anything about them?
ThomaZ replied to ZROSSA's topic in Gen I & II Chevy V8 Tech Board
Chevy High Performance Magazine tested a tested a pair of Pro Topline iron 180cc heads in their February 2004 issue on a CSB 383. For flow numbers and dyno chart go to this link: http://www.chevyhiperformance.com/techarticles/148_0402_small/index.html -
Hej Peter, According to Bob Waars book â€How to hotrod and race your Datsun†page 149 the 240Z European spring rates (Stage 1) are 100 lbs front and 112 lbs rear. Those spring rates are said to be an approximate 21 % increase in front and 11% increase in the rear over the U.S. spring rates. The book further states that the 240Z European spring rates (Stage 2) are 122 lbs front and 140 lbs rear. This has been discussed before; a search on “spring rates†brought up 168 hits…. Here are some you might want to take a look at: http://forums.hybridz.org/showthread.php?t=97786&highlight=spring+rate http://forums.hybridz.org/showthread.php?t=94060&highlight=spring+rate http://forums.hybridz.org/showthread.php?t=90109&highlight=spring+rate http://forums.hybridz.org/showthread.php?t=87210&highlight=spring+rate Best regards ThomaZ
-
I might depend on the alternator design. My CSB had a Boch alternator on it which came from an -80 Audi/VW. It has an internal regulator. When connecting the #2 wire direct to the battery per the JTR manual page 9-5 the battery was drained over night. Checking with an amp meter I had 2.7 Amps going from the battery with everything shot off. It dropped to zero as soon as I pulled out the #2 wire from the alternator. My car electrician says I must wire the #2 wire over the ignition lock and that I have not destroyed the alternator. The car is in winter storage now so I haven’t rewired it yet and can’t confirm if his right. ThomaZ
-
I did it in three weeks. This was the fist time I tried something as big as an engine change, had only don ordinary repair work before. Things that made me succeed: I had spent almost two years sourcing parts, so I had everything on hand. For example; I did not only buy an electric fuel pump. I also got the fittings, fuel hoses, clamps, fuel lines, electrical connecters and wires before putting everything in a Ziploc bag and stored it. I followed the JTR manual almost down to the letter. I worked 10 to 12 hours a day for three weeks. I had one rest day. (Had some problem keeping motivation up in the end.) Things that took extra time: I spent almost 2.5 days on tiding up and repainting the engine compartment. I spent almost 1.5 days repairing rust in the battery area that was worse then I first expected. I spend 5 days (really!) on fabricating a dual custom exhaust system. I had purchased different bends and strait pipes and made everything from the header back to the muffler including an X-pipe in front of the diff. I am a beginner on welding and was learning as a vent. An alternative had been towing the car to a muffler shop but I had no one I felt I could trust in the area. Bottom line: It’s doable in three weeks if you preplan and don’t have to spend a lot of time driving around getting parts while you should be working on the car. Good luck!
