richie2619
-
Posts
82 -
Joined
-
Last visited
Content Type
Profiles
Forums
Blogs
Events
Gallery
Downloads
Store
Everything posted by richie2619
-
Could you tell me more about the MML stub axles?
-
Techno Toy Tunning Front LCA
richie2619 replied to EvilC's topic in Brakes, Wheels, Suspension and Chassis
I guess that's why the AZC control arms are forked at the wheel end. No material to be removed! -
Techno Toy Tunning Front LCA
richie2619 replied to EvilC's topic in Brakes, Wheels, Suspension and Chassis
I haven't read all the posts. My questionsi are: does AZC advertise this as a bolt-on mod? Have they offered a solution? It seems like one hell of an oversight (lack of product testing), and total disregard of customer satisfaction. Was there a spacer needed between the hub and rotor? Have they modified a caliper bracket for proper rotor to caliper alignment? I'm no genius but this seems like elementary stuff for a company than supposedly manufactures "racing" components! I'll get off of my soap box now. -
Coilovers without sectioning strut tubes.
richie2619 replied to richie2619's topic in Brakes, Wheels, Suspension and Chassis
Sorry I took so long to come back to this topic. Replacing the rubber top hats will lower the car about 1 1/2 inches. So to keep my current stance, (1 1/2" drop with ST springs), I would raise the coilovers the meet the the stance I currently have, thereby "increasing" wheel travel and "reducing" bump steer. My plan is to convert my front control arms to be adjustable, have the camber plates positioned outward while using the control arm adjusters on the alignment rack. This way I'll have room for negative camber on track days. Out back I plan to use t3 control arms to correct camber AND toe. Same applies to camber plates adjusted about 3/4 of the way outward. -
Coilovers without sectioning strut tubes.
richie2619 replied to richie2619's topic in Brakes, Wheels, Suspension and Chassis
-
I'm a chickensh*t. When I think of cost of replacing glass, I'll just call the pros. They replaced the windshield in my wife's car for $187. I'm too much of a gorilla when it comes to that stuff!
-
Get it?
-
I'm pretty sure I'll never weld anything that big either. 110v machines are pretty flexible but sheet metal welds are where they shine. I wanted the 220v machine because they really shine in the 1/8 to 1/4 range and that fits right into the structural stuff I'll be welding. BTW. My Lincoln showed up yesterday and it's a Cadillac! Snort!
-
I was taught by a man who's welds looked like a machine had done the job. He told me that the versatility of a higher amperage machine would enable me a lot more flexibility. I used a Millermatic 252 in our shop, before moving to field work and I didn't realize how many poor quality welders there were on the market. The one thing I did get right, is ordering a unit that I won't out grow for a long time. Again, I thank everyone's input.
-
Thank you all for your input. I've sent an email to cancel my order. I will follow up in the morning with a phone call. There's a Lincoln Power Mig 180C on sale at AirGas outlet and will be placing my order as soon as my acct has been reimbursed. I sincerely thank you all for scaring me off of this purchase. I think I'll sleep better knowing I have a Lincoln in my garage!
-
Well, it's on it's way. I've read a lot of positive reviews. I'll have 30 days to work the piss out of it, (as per their money back policy) and in tend to do just that. When you said you found one just like the Eastwood, were you talking about the 135? I haven't seen ANY 220v welders, by ANY manufacturers, that were under $500!
-
Well, after reading the thread on HF welders, I started looking around on the web. The more I read about 110v machines, the more I knew I needed a more powerful one. I have a reasonable amount of skill, (thanks to my profession), so I feel pretty good about any fab work that I'll be doing on my car. So I just pulled the trigger and ordered, Eastwood's MIG-175, 220v welder. Just got back from Home Depot, the hardware to install the new plug and I'll have it ready by the time my new stuff comes in. Looking forward to running some beads and sharing my findings. Wish me luck!
-
Those are very valid points. Definitely some other options to look at.
-
Those are very valid points. Definitely some other options to look at.
-
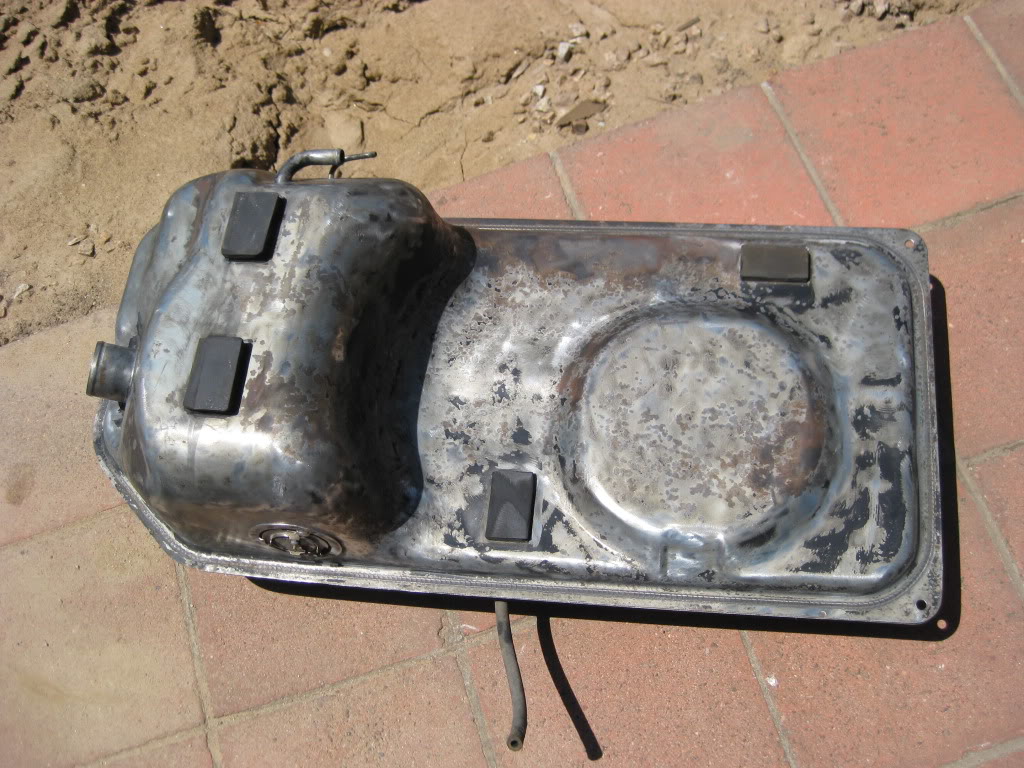
I'm going to keep researching this but here's what I remember. The tanks are nearly the same width but the hump on the Mustang tank is narrow enough, that it can be centered in the car. He had to make a new filler hose, that connected the factory opening to the new tank. There wasn't a lot of room, horizontally but there was a lot vertically. He used a couple of cheap, summit-brand, turbo mufflers and turned them on end. He also took two Z cross members, cut one just to the right differential mount and one just to the left of it. welded the two together so he had matching exhaust cut outs. Brand new repro mustang tanks (with fuel pump and float-sending unit), are half the price of a reconditioned Datsun tank! Good luck to anyone who's interested. Let us know what you find. Rich
-
I met a gentleman back in 2001, when I 1st pieced together my JTR installation. He owned a hot-rod/fab shop and he was driving his V8-Z. He did all of his own work, without the benefit of a kit and he really got my attention. (I had absolutely no welding experience at that time!) Anyway, what really grabbed me, was that he had mufflers on BOTH sides of his gas tank. (Much like a C-3 Corvette). He told me it was from a mustang and it was an easier adjustment to center it in the car. I'm not comfortable with the idea of fueling my car in the space that I'll be occupying, so I'm really not interested in mounting a fuel cell that I have to open the hatch to fill. It was a long time ago and I have no idea how to find this man and I've never seen another car set up that way. Has anyone here heard of, or tried this installation? My garage is almost set up to go to work. (My lovely new bride still has a lot of stuff that's on it's way to storage!) LOL! And I'm ready to bring my car back to life! P.S. Check the similarities in these tanks!

-
Ok, now I understand how tech toy tune rear control arms work. Thanks for the link.
-
That's a great looking piece. It looks like you unbolt the rod-end, make your necessary camber adjustment and lock it down with the jamb nut when you're done.. Correct?
-
Thank you brother!
-
I've seen some pics on Google where people have cut the in-board end off their control arms and made them adjustable, using heim joints. The stock units seem very well built and the ones I saw looked pretty damn good. Anyone here done this?
-
Coilovers without sectioning strut tubes.
richie2619 replied to richie2619's topic in Brakes, Wheels, Suspension and Chassis
Chuckle! Mike (Mikelly) gave me some great info... Thanks Rebekah -
Coilovers without sectioning strut tubes.
richie2619 replied to richie2619's topic in Brakes, Wheels, Suspension and Chassis
I used the eccentric (aluminum delrin) bushings to correct rear camber and up front, I lowered the cross member with the JTR kit. I relocated the control arm mounting points and used bump-steer spacers to correct proper geometry. I'm not happy with the eccentric bushings because the delrin is very thin and prone to breaking. (3 sets now). I guess the next thing to research is, where to locate the spring perches to the right height! -
Coilovers without sectioning strut tubes.
richie2619 replied to richie2619's topic in Brakes, Wheels, Suspension and Chassis
Nice! -
Would it be feasible to weld on threaded sleeves without cutting the tubes? I currently have "Suspension Techniques" springs (1 1/2" drop) and I love the way my car sets. So I figure suspension travel is ok with my stock length Tokicos. I'm not interested in (slamming my car in the weeds) but I've haven't seen anyone do this. All I want, is to lose the big rubber hats and the big diameter spring perch and add a camber kit. I know I have to be rid of the stock spring perch, to fit the tires I want. '
-
Yes, I opened a case file with the shipper. If it is repairable, I'm going to ask them for the cost. Thank you