

Oddmanout84
-
Posts
658 -
Joined
-
Last visited
Content Type
Profiles
Forums
Blogs
Events
Gallery
Downloads
Store
Posts posted by Oddmanout84
-
-
I got 6 in one of my storage container. In California. Sorry, I'm a hoarder.
I'll be waiting with anticipation and a DVR recorder for the day they show your collection on that tv show.
-
Yeah. That wet

Lmfao!
-
California.
+1
The southwest is a land of plenty when it comes to junkyards, where they seem to hold onto things longer and not crush 20+ year old cars like here in the northeast. Better condition too. That being said, you'd be surprised what turns up if you poke around.
-
You guys are making this hard! Lol. My usual anal-retentive self is at war with my desire to get this thing back on the road so I can enjoy the summer driving.
Tony- Yes, I'm new to the world of magnaflux but I understood that it required a magnet. I just thought maybe the kits came with a small electromagnet and the "dye" in the aerosol cans had some sort of ferrous particles in it. I was wrong. And you're right, I should just get it professionally inspected instead of trying to do it myself.
Upon cleaning and further inspection with the block still in the car, I discovered the cylinder walls of especially #3 and #4 are pitted pretty bad near the top (but below top of stroke). Bad enough to catch a fingernail. Could be because the motor had sat for 4 years in a garage, but regardless the buildup of carbon and oil sludge looks like the rings have lost a lot of oil control. Perhaps I'm going to far in this respect but I figure now since I SHOULD be inspecting the crankshaft, maybe I should just get the whole block out and bore .020 over and get some matching ITM pistons. I wanted to do that at some point anyway.
-
Thanks guys for all the info. I do know that the woodruff keys are only there for indexing the damper on the crank, and that the bolt/washer combo is whats really clamping it on there with friction. I'd LIKE to think that this engine was built correctly. The guy who made it around 2000(who's also a member of this site) seemed to know his stuff, and put most of his work on this engine into blueprinting the bottom end and using clevite bearings. He seemed to have really good attention to detail with what he did. But we're all human, and I should really pursue this further. Before the motor went into the car I DID crack open the oil pan and valve cover to inspect and check torques. However, that's not going to find possible spider cracks. I have two spare L28 cranks that I could theoretically use, but I'm not even sure that THOSE don't have hairline cracks either. I poked around the internet for magnaflux inspections and even found a few do-it-yourself kits that include the dye and sometimes a blacklite. Would it be worth it to do my own inspection or should I just find a machine shop that can professionally do it for me? Usually, I like to do things myself and can't see this as being over my head, but I could be wrong. Its certainly something important enough to make sure its done right.
Otherwise, there's an airport nearby which should have some sort of A&P shop with capability for magnaflux inspection.
-
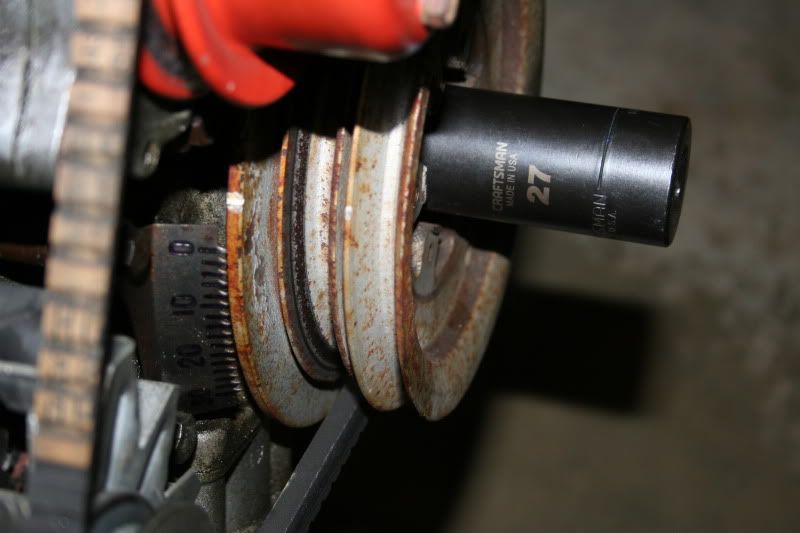
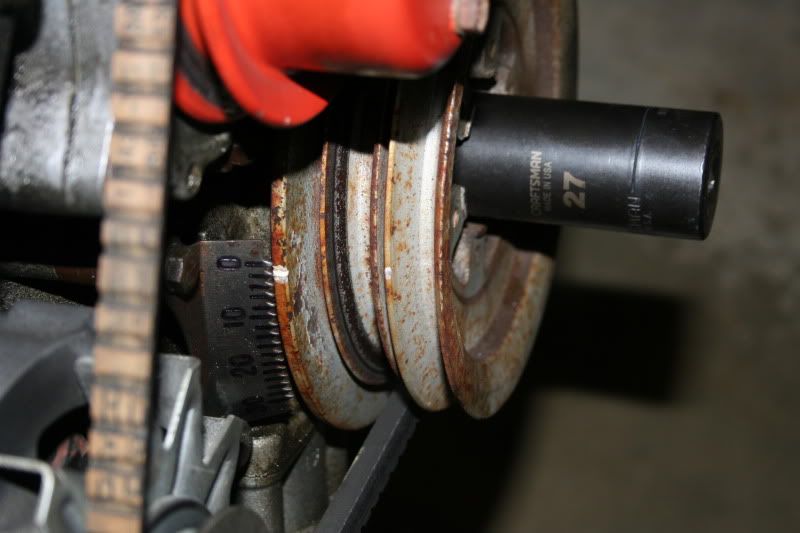
Started out as an intermittent rattle. Found a crank pulley bolt that had backed off, cracked and worn crank pulley, worn woodruff keyway, timing chain guide worn to the metal, combustion chambers covered in hard and flaky deposits. I've had this motor for less than a year, and its a very low-time motor (>6000 miles).
Life is pain.
-
I don't trust autozone to have the Japanese timing kit.
So I got it from motorsport.
Here's the guide:
-
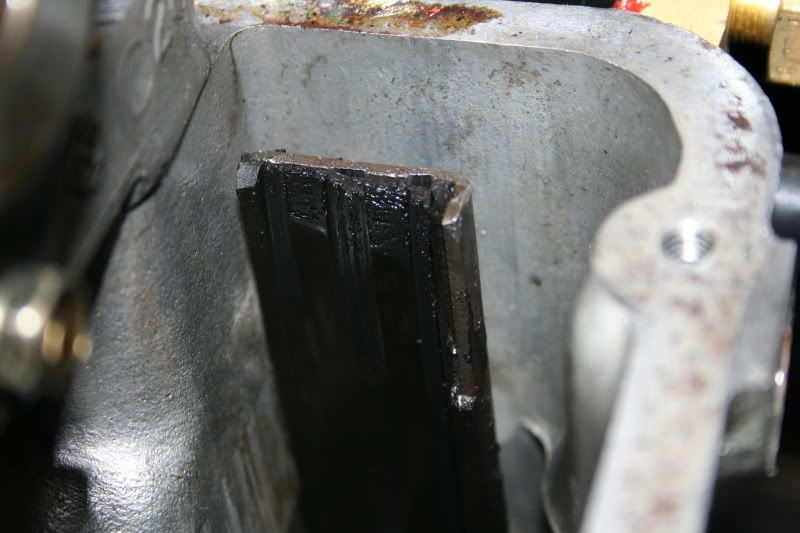
The oil pump/dizzy drive gear didn't want to come out, had to file down the ridge that was formed on the crank.
Other than that, it looks like a shim and a bit of JB weld may fix this for now...
-
Dunno. From that link it looks like the 280z vinyl is cheaper. Why would you want the 240 set? The tranny tunnel? I have a 240 vinyl set that I got used for free, and it fit. Granted, I didn't use the tranny tunnel piece. Everything else worked just fine though with minor modifications (just had to cut 2 bolt holes for the 280z shock tower mounted seatbelts).
Edit: I can't see why the tranny tunnel piece wouldn't fit as well, I just didn't use it because mine is freshly carpeted already.
-
Hey dude. Guess who's still trying to connect the MSD to your old setup.
-
I'd just as soon be anal retentive and add the 10 micron as a "last chance" filter just before the injectors.
-
The sad thing is, this motor only has about 5000 miles on it since its previous owner rebuilt it.
-
Time to acquire tools my friend. Maybe find a Harbor Freight. My dad bought an engine hoist for like $80.
My point is, that crank snout is dead. And if it saw a lot of miles and some higher RPM's with that bad key, bearings may be dead too.
Yeah, I've been looking to get a hoist for quite some time. But now was not supposed to be the time.
LOL, been their done that.
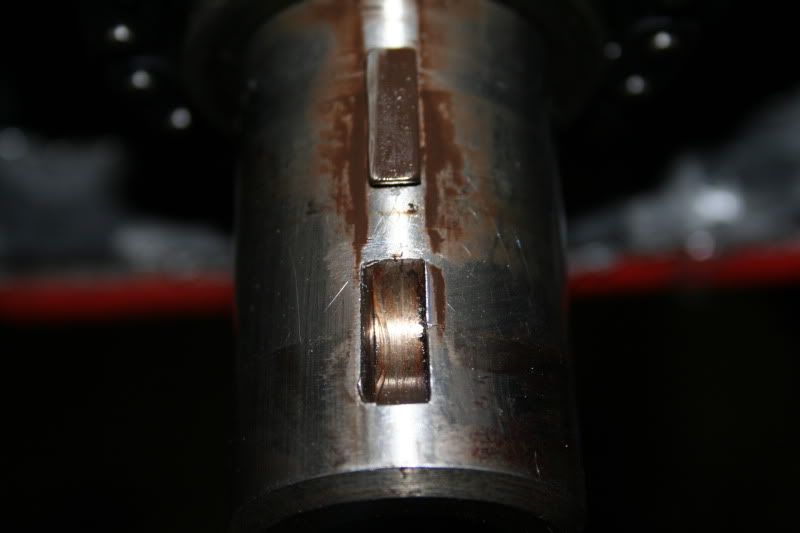
Now, the crank was so much harder that it was not an issue. I can not see your crank keyway very well.
My damage was an installation problem that haunted me for some time untill.......
Yeah, its really hard to see the slot in the crank. Its not absolutely terrible, but it seems widened a bit due to the wear. Thanks for the responses, guys. Its a bit early to tell, but I imagine I should be able to see it better when I remove the timing cover. Hopefully its as simple as putting in a shim or locktite... but I dunno...
-
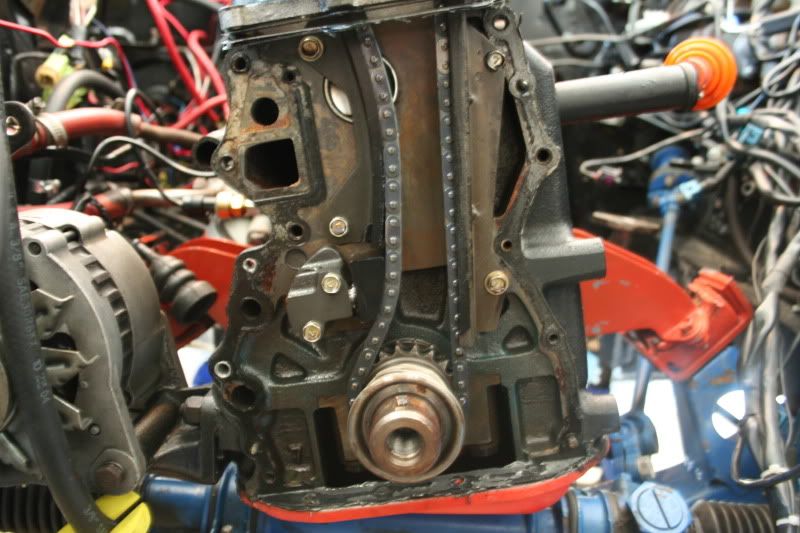
So it started with my last thread here about finding my timing chain guides worn. While taking the engine and everything around it apart, I found this:
The crank pulley rotates several degrees independent of the crankshaft. So being upset already at finding other things, I pulled it off to see what was going on. This is what I found next:
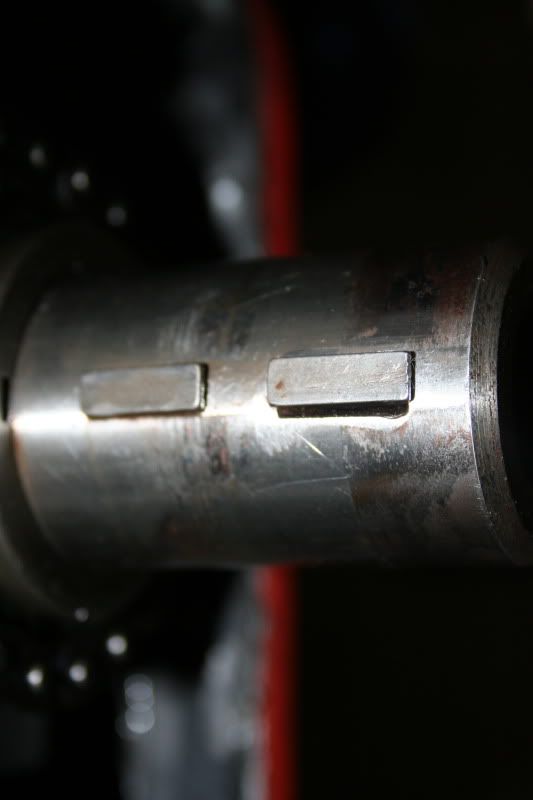
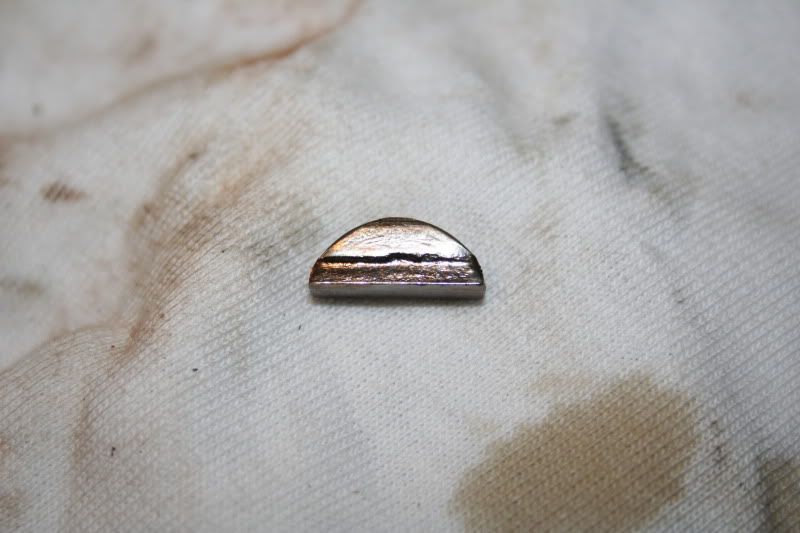
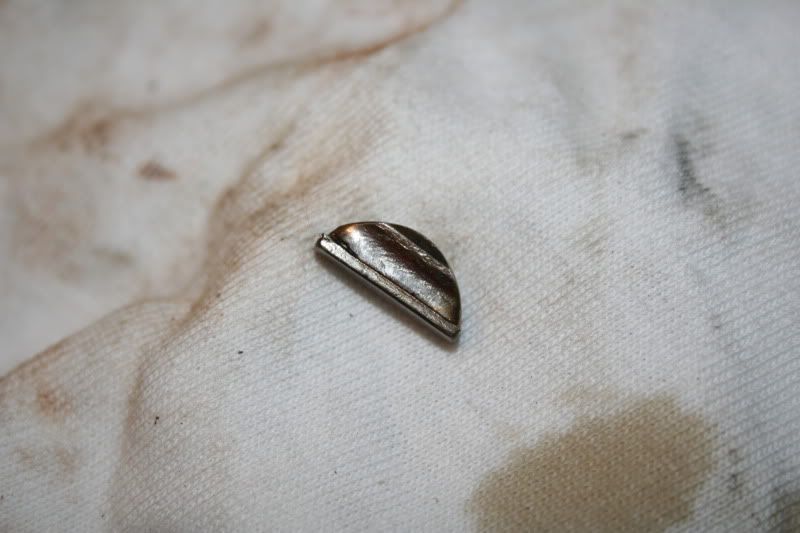
The crank pulley is visibly cracked, but it doesn't end there. On the crank the woodruff key was sitting loosely in its slot. It slid out easily with my fingers.
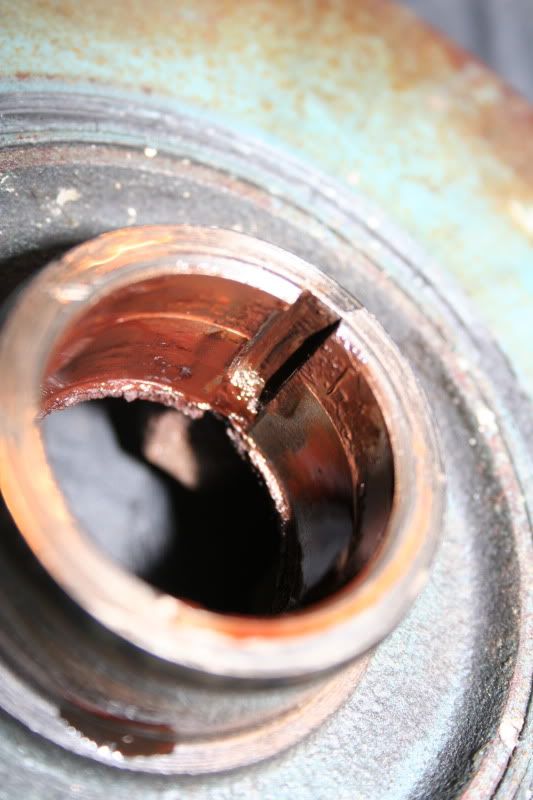
As you can easily see, the woodruff key looks like its been wobbling back and forth for a long time. I have a spare L28ET crankshaft sitting on my workbench, so I pried off another key to see if the wear extended to the crankshaft slot. It did. The key fits easily into the slot and wobbles around. The slot is larger than what it should be. Not good. I don't know how this has happened, but the bolt was tightly on the crank when I installed the motor. Now its not.
Is my crank screwed? Do I have to pull my crank and install another one? I'm already in the pit in terms of money that I didn't want to spend this month, but this looks to be yet another thing that's going to se me back. I don't even have an engine hoist here, as the nearest friend I have with one is 200 miles away and I have no means of getting it without a car to drive. If anyone has input, it'd sure be appreciated...
-
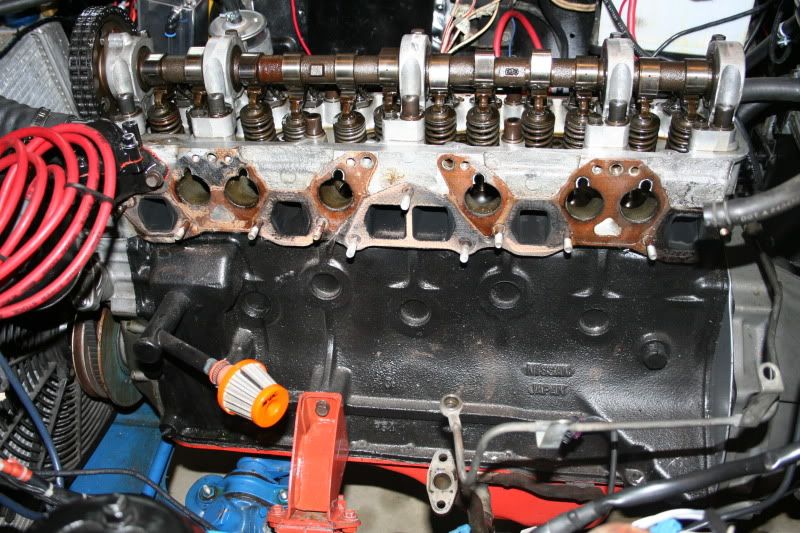
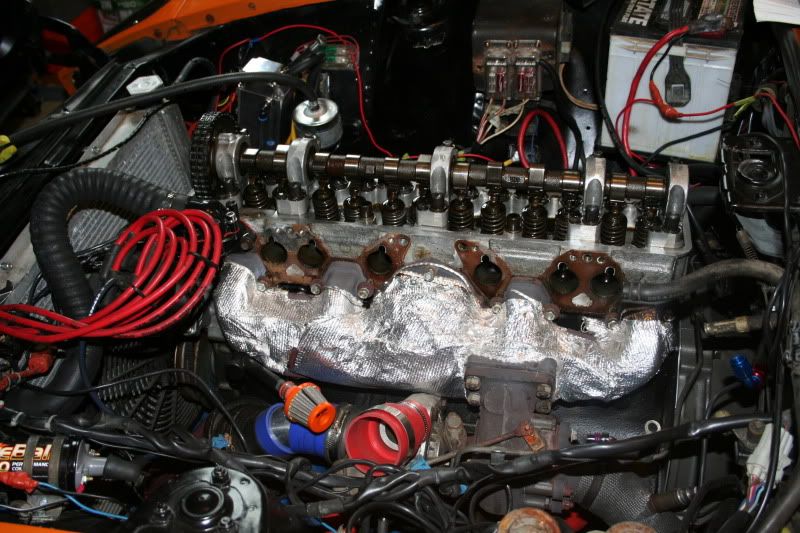
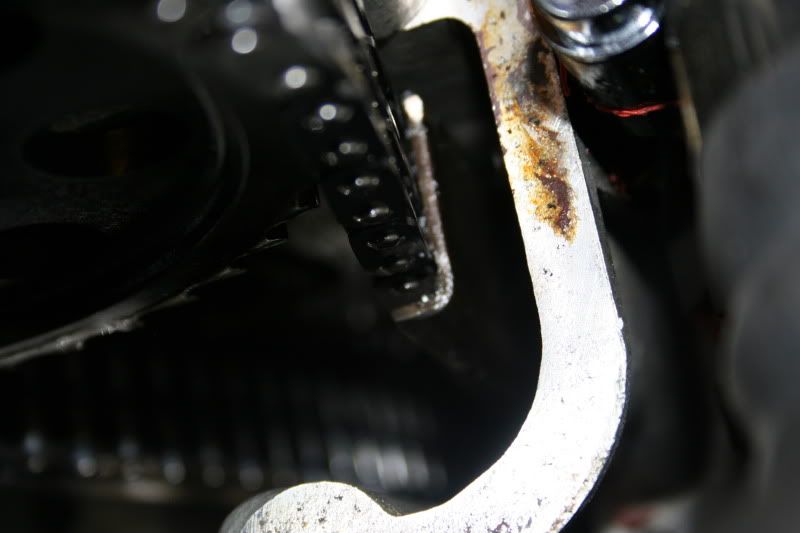
So for a while now (since about mid winter when I replaced my clutch is when I first noticed) I'd been hearing a strange rattling sound from within my motor. Usually it just did it while it was cold, then the sound lessened and went away once it heated up to running temps. Now since last Friday its been doing it at all temperatures. I went to a Car/Food/Beer meet over the weekend and started the motor up so I could get some others to lend their opinions. Even a Datsun vet with more experience than years in my life could not pinpoint the noise with my stethoscope, however someone remarked that it sort of sounded like timing chain noise. So when I got home I popped the valve cover to check everything. This is what I've found so far.
Its difficult to see, but that guide on the left "tight" side of the motor looks to be worn all the way through the friction coating to the metal. This would explain the noise. What it doesn't quite explain is that this motor only has about 5000 miles on it since it was rebuilt. This seems quite excessive for that low amount of mileage. You also can't see it, but the tight side chain guide has a slight curve to it. Looking at the guide I recently pulled from another L28ET, I can see that its perfectly straight. Is there a difference between the timing chain guides over the years? Possibly this being the guide meant for and earlier L24 or L26?
I wasn't the one who rebuilt the motor, I was lucky enough to get it from a friend who pulled it out of a car that used to frequent Limerock and Watkins Glen. I've talked to the guy who used to own the motor, but he doesn't remember everything about what he did to the motor since it was around 10 years ago. I've done minimal work to it, only checking torque on the essential bolts and studs before it was installed. Everything else I've done has been on exterior ancillary components.
If anyone has any input about what could have caused this at such low mileage (incorrect timing, incorrect parts, etc.) I'd appreciate it. I'm currently taking the motor apart and trying to avoid removing the oil pan (if possible) since I recently put in new synthetic.
-
I'm running an A1000 pump on my LS1 swapped car as well.
My setup is:
Stock tank => -10AN supply to pump =>-8AN feed to Aeromotive filter => -8AN feed to Aeromotive regulator in engine bay => -6AN to rail. -6AN return to tank. All stainless braided lines.
Pump is a tad loud to some people, but its quieter than the Holley Red carb fuel pump the car had on it for the I6 and I personally don't mind it.
Janaka if I may ask, how did you connect the -10 line to the stock tank? Did you use a flaring tool on the stock pickup line out of the tank or did you just solder the stock lines shut and weld in some AN fittings? There seems to be waaay too much of a size disparity between the stock feed line and -10 line to safely clamp the hose down and keep it from leaking.
-
Is painting urethane a pointless pursuit? It seems to me the flex in the piece would just crack the paint all over.
I painted my urethane airdam over a year ago, no stress cracks or anything yet. Used single stage urethane paint just the same as the rest of the car, but before I sprayed it I cleaned the airdam multiple times with denatured alcohol, then sprayed it with a few coats of adhesion promoter before primer. And yes, I've also removed the airdam a few times since then. I was careful, and tried not to flex it too much, but it still did a little. Still no cracks. Never mixed in any flex agent.
Edit: If ONLY they made urethane ZG flares, I'd buy them in a heartbeat. I already have a rock chip out of my rear passenger side from the tire slinging a pebble.
-
Completely love it. I've also been following the other install threads. Since you said you need to calibrate the speedometer, I'm assuming you didn't get the GPS type? Is there any reason why you didn't (I was thinking about getting the GPS but I keep having this dumb idea of it suddenly going "lost satellite reception" or something lol).
EDIT: The color was the regular blue right? I noticed there is a Cobalt Blue also.
Yep, its the regular blue. I went back and forth between it and cobalt but eventually went with this blue. I just wish I saw an example of the cobalt, I'm sure its still bright enough. Its not the GPS speedo, because that one doesn't have the turn signal and highbeam indicator. Without it, I was afraid that I would be a perpetual offender of blinding people.
-
Very nice i was looking at there gps speedo yesterday. I wanna do it but i dont wanna pull the dash:(
Don't be scared, its easy. Just a few bolts then unplug the three connectors for the loom. Removing the steering wheel from the column makes it a lot easier too...
-
Ok, so this is just another Speedhut install, nothing special compared to the previous ones. I'd like to put out a huge thanks to KTM and Ezzzzzzz (correct # of z's?), the installs they documented were what I used to get mine in. Yes, I got the blue reverse glow with the red pointer just like everyone else, but its the only color combo I really liked.
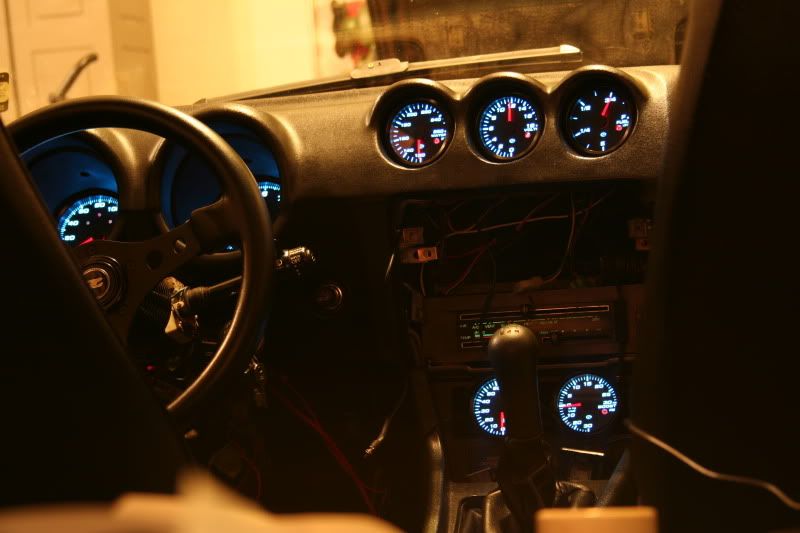
I'm still not *technically* done yet, the daisy chain wires supplied were too short for me to use gauges in my A pillar, so I temp relocated them to my radio slot which doesn't work anyway. I still have yet to calibrate the speedometer and fuel gauges. I'm not exactly sure at the polarity of the 240sx speed sensor I'm using, even with the wiring diagrams from all years of the FSMs. It has a black and a green wire, but the only indication which I'm not even sure of is a + sign on the plug where the black wire goes in and a - sign where the green is... weird. I hate it when manufacturers make ground wires anything but black. I'll have to do some further testing. The fuel gauge I'm not entirely sure of, as the speedhut gauge comes with a signal and ground wire, but it doesn't look like the stock gauge had a ground wire going to the sender so I only connected the new signal wire (as per speedhut instructions).
-
gmac708, that's one nice setup you got there. Where did you get the SS -8 fuel lines? I've been searching summit and so far I've only seen 3/8 at the largest for stainless.
QUOTES: "So basically what I'm asking is am I about to do anything stupid? Am I out of my mind to think that I should try running it before I replace the lines with stainless?"
I'm not sure exactly what you are asking. The new Aeromotive parts you have ordered are top quality. If you are asking will the original line not burst under to new pump's pressure, perhaps, but I doubt it. You are on the correct track and if you are really concerned about the old lines, keep your can on the jack stands for a few more weeks until you are able to get the other parts needed. It's a whole lot easier to do the job the correct way first. By the way, the Aeromotive pump is a noisy beast. Trust me, you will know when it's running!
Oh yes, I've seen videos of the noise it makes. I have several ideas for rubber isolators that will hopefully reduce the noise somewhat. That pump is huge too, much bigger than I thought it was going to be. I guess I wasn't clear with my questions, but my main concerns were that the pump (being much larger and more powerful) was going to be strained trying to push a greater amount of fuel through the stock-sized lines and possibly burn itself out. I definitely know now that I will be waiting until I have the rest of my setup before the pump itself is installed, though. The -8 barb fittings are simply way too large to fit the stock lines, and I'm afraid that I'll make a fiery mess of myself if I try to cheat and get one-size-up EFI line from the local store and try to slip it over my stock hard lines. That said, I'm not terribly worried about my stock EFI soft lines bursting, I replaced them less than a year ago.
-
Thanks, guys.
I appreciate the clarification, Pallnet. I was under the impression that NO orders would be received. Gimme a week or so and I may order one. I had been talking with someone else about purchasing his fuel rail with supra injectors but I don't really like the idea of cutting/swapping my current connectors on my haltech harness because they're very new and in good working order. I would rather use Rx7 type injectors.
-
Well, recently I began to have (what seemed to be) fuel starvation issues on my L28ET. The engine one day about three weeks ago just decided it couldn't hold idle, and then wouldn't start at all. The fuel pump was louder with the key in the IGN position, no pressure at the rail. Then the next day, I got fuel pressure at the rail, but a loud whine from the (stock) pressure regulator, and fuel began to leak from both the regulator fittings and at the fuel filter. So, both were removed, and the tank was dropped. Brown fuel came out of the return line. So with the tank pulled I remembered I had a POR-15 sealer kit from over a year ago. The damage wasn't as bad as I thought it would be, only a couple tiny patches of rust in the tank. I treated the tank, and the liner is setting up inside as I type, and should be ready for fuel by Thursday.
I also have the stock 280z pump out. Surprisingly, its lasted 30 years, and even ran the turbo motor without a single leaning issue (mostly stock zxT setup, 10-13lbs max). I was hoping the little thimble strainer in the inlet side would tell me a story, but I didn't find much debris. That and I completely destroyed it trying to pull it out, as carefully as I may have tried. I'm willing to bet the pump is still good for a little while longer, but I still ordered a replacement.
On its way to my door is an Aeromotive A1000, A1000-6 FPR, 2 Summit -8 steel mesh filters (40 and 100 micron) and the associated AN barb fittings to connect it all to my current plumbing. Now, I had planned to replace all the lines with -8 feed and -6 return, as well as replacing the associated hard lines under the chassis with matching sized lines. Unfortunately, all that stainless braided line and the fuel cell I had planned will have to wait at least a month due to budget concerns. The current EFI hose and hard lines *seem* to be of comparable size, so I was going to try hooking the new setup to them and see if the car will run.
So basically what I'm asking is am I about to do anything stupid. Yes, because I am dumb I fell for the shiny Aeromotive and bought a pump (purportedly) capable of supporting a 1000hp car when I myself never plan to go beyond 350-400. I'm running stock 280zxT injectors currently, but plan to replace them with larger ones sometime soon. The new pump is going to be mounted in the stock location as low as possible, with the 100 micron filter between it and the tank, and the 40 micron before the fuel rail.
Am I out of my mind to think that I should try running it before I replace the lines with stainless? I don't have the little Aeromotive fuel pump speed control so I know its going to run balls to the wall whenever the car is on. If someone knows that I'm going to overheat and cavitate the new pump on my stock '78 280z lines, please let me know. I know Big_Phil used to run one on his beast, and it looked like he was running similar to stock lines in the video but I wasn't sure. Yes, I have been lurking on this subject for weeks in the forum, but because I didn't find everything, it makes me wonder.
If anyone has any useful info to put my mind at ease (or otherwise), thanks in advance.
If I'm asking a stupid question to which the answer is right in front of my face or buried under 10 years of posts, please let me know. I'm still learning...
-Chris
-
Check the orientation of that in-line valve that comes with the BOV. Shaped like a disc. It only goes one way.


Cracked crank pulley, worn woodruff keys, crank
in Nissan L6 Forum
Posted
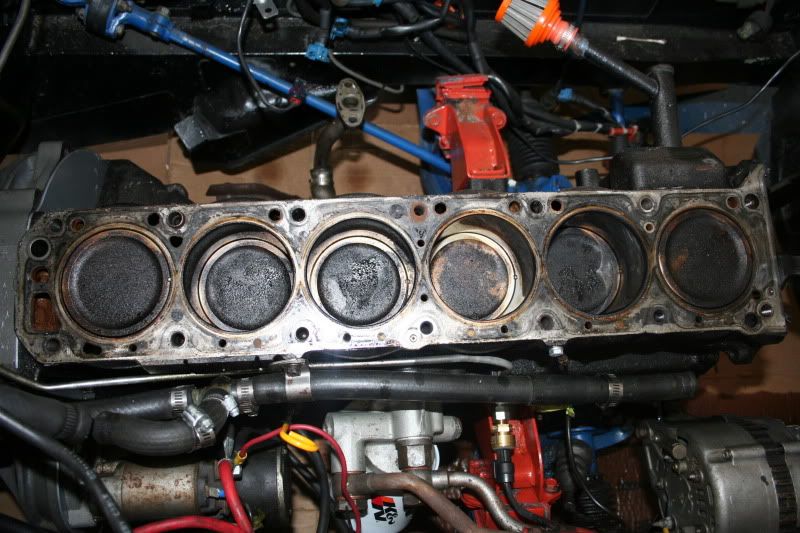
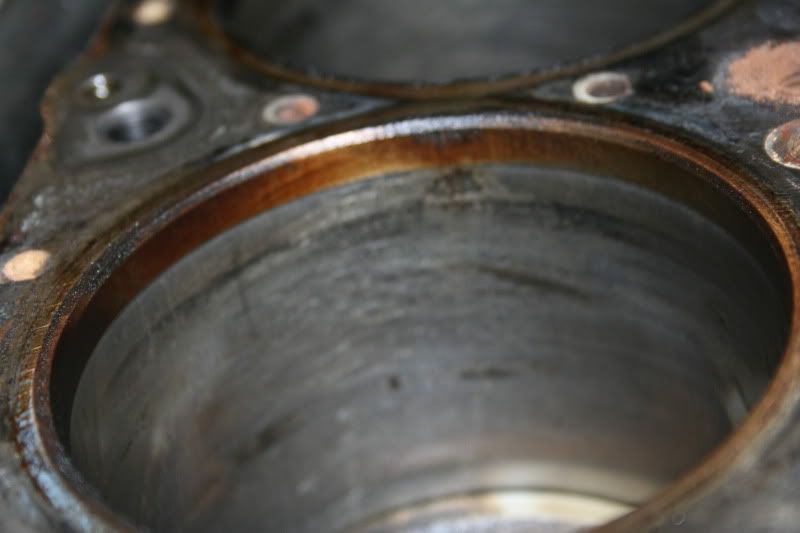
Well, I finally have the block completely torn down. Here are my findings:
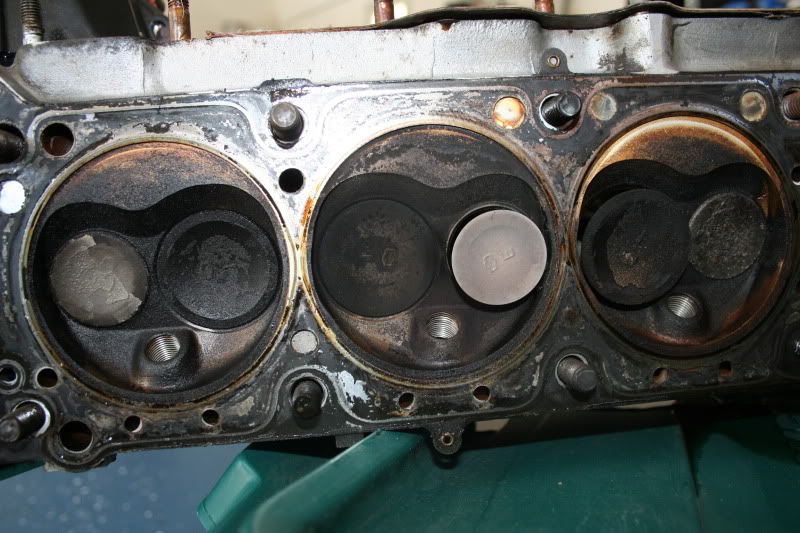
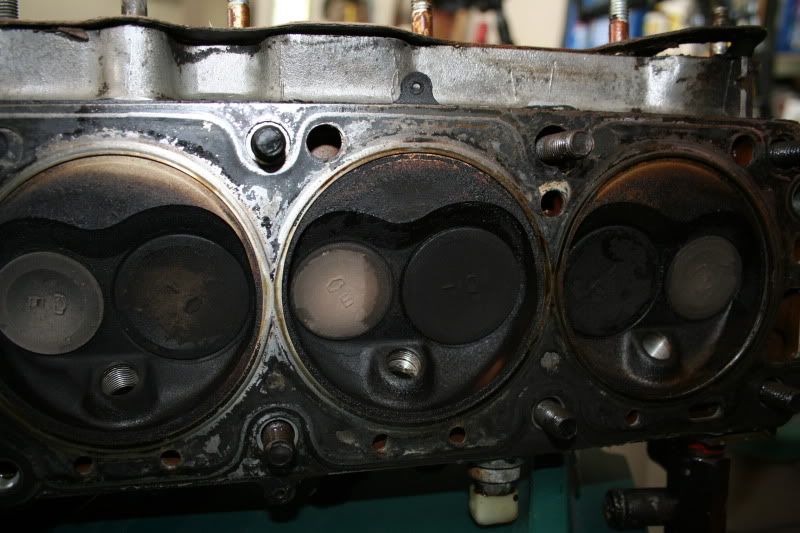
Two of my cylinders have pitting in them like this (#3 and #4)from where some moisture presumably accumulated while the engine sat in my friends garage for the four years before I bought it. This was not visible until the head was removed. Hopefully a .020 overbore will fix it, and I have .020 oversized pistons on the way.
The multi layer steel head gasket looks like it was leaking between a coolant passage and cylinder #2. Bought an OEM composite gasket to fix, hopefully the fact that it blocks off coolant passages isn't going to cause any issues (have seen varying opinions on the forums).
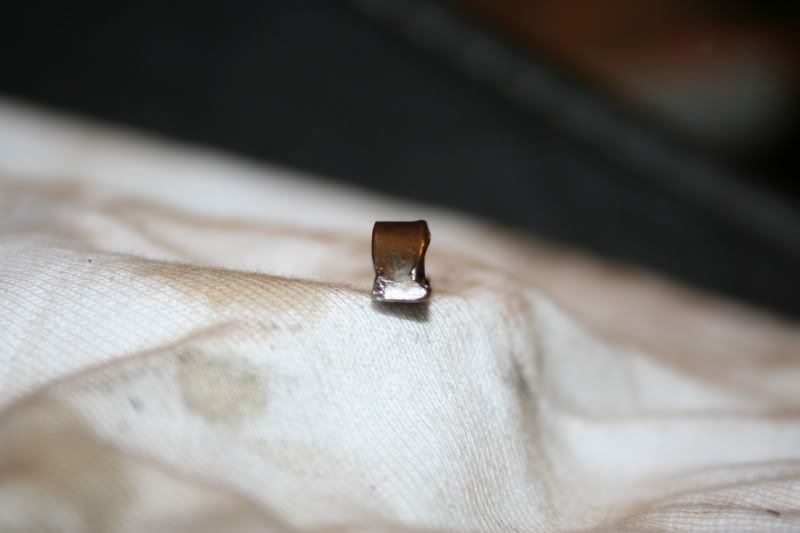
I've now torn down 3 L28's within the past couple months. These are the crank pulley bolts. All are shown in the same condition as when they were pulled.
On the far left is the bolt from my original L28E, its obviously shorter, never gave me any problems. The middle bolt is from my spare L28ET. The far right bolt is from my current L28ET, which I just pulled. Unlike the others, it has a lock washer installed. I've been informed that lock washers are actually detrimental in some situations, like on exhaust bolts, in which they act like springs and can actually loosen the fasteners they're meant to lock. In the case of this one, I'm willing to bet it also prevented the actual torque on the bolt from equaling the indicated torque on the wrench.
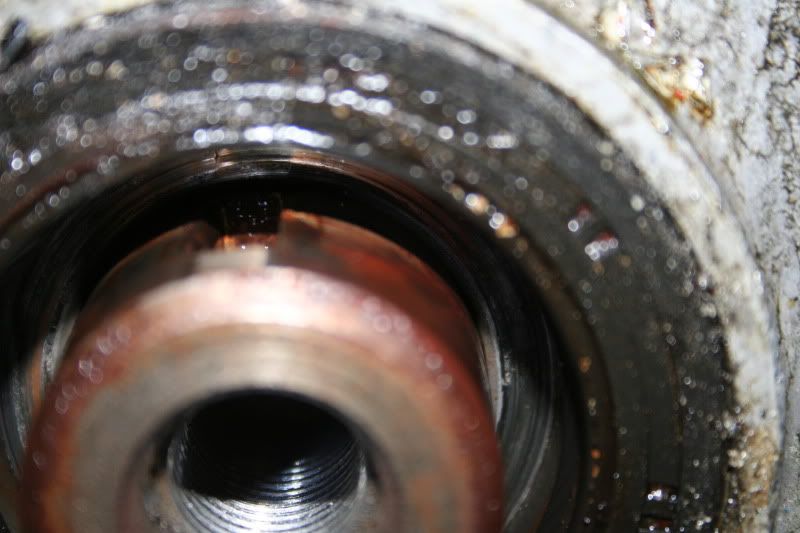
And the crème de la crème was discovered when I removed the oil pan and began inspection and disassembly. My crank could be moved laterally in the block over 1mm. You can guess where this is going.
Thrust bearing front face:
Thrust bearing rear face:
Crankshaft:
I'm willing to bet the crank is toast. Its gouged pretty well. I don't think I'm even going to bother with a magnaflux, lol. I'll save that for one of my spares... This movement could very well explain the premature timing chain guide wear I posted in another thread in this section. Before someone says it, no, I'm not a clutch rider. I learned to put the box in neutral at every stop with my first car. The clutch that's in there now is a circular sprung RPS which isn't much stiffer than stock.
I'd like to thank everyone who convinced me to be anal retentive on this one. If I had just gone with a quick fix based on outside appearances, it could have ended a lot worse. Luckily, it looks like I'm down and out the previous parts mentioned, a set of Clevite bearings, and everything else I have spares of. I'll be getting the conrods checked too to make sure they're not bent. I know this stuff isn't groundbreaking or anything new, but I figured I'd document it anyway for people to look at. More pictures available upon request.