HusseinHolland
-
Posts
48 -
Joined
-
Last visited
-
Days Won
3
Content Type
Profiles
Forums
Blogs
Events
Gallery
Downloads
Store
Everything posted by HusseinHolland
-
I have not - I'm behind an entire drivetrain conversion - still have to put this in my Volvo, and now I'm moving 200+ miles upstate, so probably 2 years before I get to the 350Z into 280Z conversion.

-
280z driveshaft u joints irreplaceable???
HusseinHolland replied to nissanboy85's topic in S30 Series - 240z, 260z, 280z
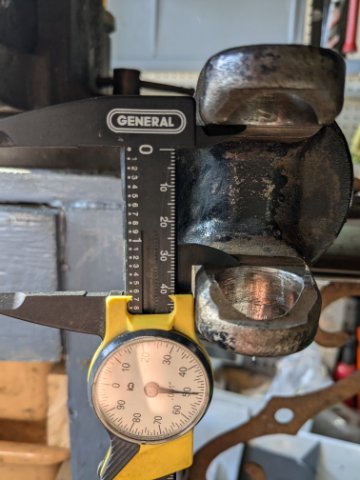
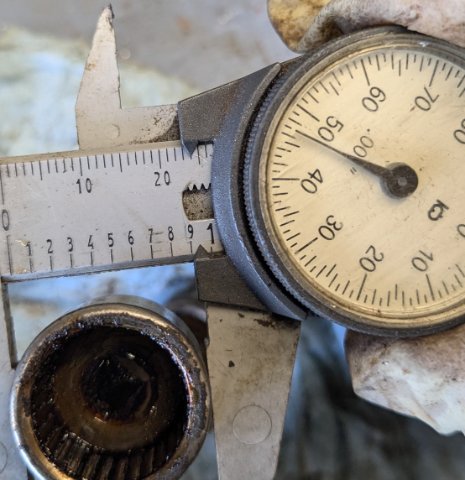
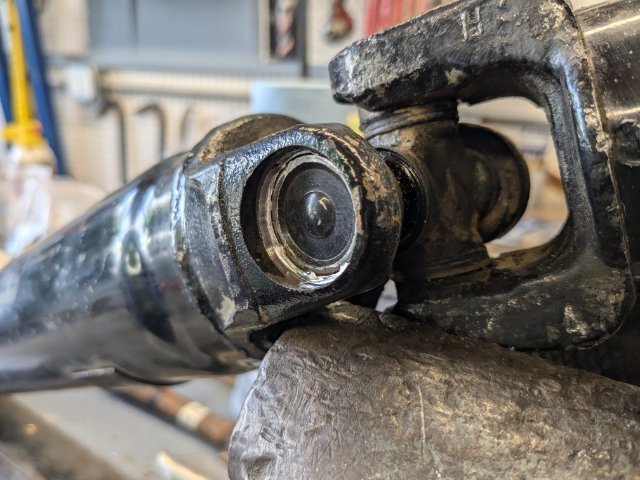
Just to add to this, my 75 has .947" bearing caps, and 1.65" land spacing on the yokes. Based on that, TUS-11a (430-11a) is what Jason at Driveline1 in Columbus Ohio recommended. I had previously purchased the 430-10s, and a 1501 X from RockAuto, neither of which were the right size for my 75. I had to grind out the stakes to remove the Ujoint
-
A friend has a set of NOS 240Z frame rails for sale - in Rockland County, NY. I think he's asking a pretty penny for them though.
-
@Tank Following your lead on this for the VQ35DE/CD009 conversion in my 75 280Z. Yours looks great - I assume you are still enjoying it. Few questions - did you figure out why the cooling system was difficult to bleed (I saw you noted it only cleared after some high-PRM use)? Does the conversion need a catch can (did you keep the factory crankcase breather setup as well)? Do you feel the Kinetix plenum made a noticeable difference? I'm on the fence as to whether to add that to the parts list. I've read you can port the lower intake to alleviate some of the design flaw? Did you consider using the 350Z rear axle? the '06 parts car I have is complete, so I'm considering it, however there is much documentation on bracing the short nose rear axle in place of the long nose that I can find. I can fabricate, I just need visual guides.
-
This tool (Amazon sale) Comes with the male snaps (and others for complete installs)
-
1/4" Skrim coated foam (left over from a Volvo headliner job years ago) faux leather padded sleeve. Velcro fastening
-
Added the pass side belt reel retainer. I;m going to make a padded cover for the brace Daytime pic with headrest. New leather for the seats has the same green stitching. I also went with a dark grey inset for the perforated panels. Not sure it's dark enough though. Seems more like a medium grey to me. Pics later
-
Got back from Baltimore yesterday afternoon, so back on the seat install today. Had to do some more pounding on the tunnel. Metal only stretched so far, then it split, about 3" wide, a couple inches above the seat crossmember. flange tore where the black paint is on the tunnel. dynamat after paint after that, I welded the rail adaptors - tacked in place, then removed to stitch plug for stock seat belt bolt hole seat belt outer seat belt inner , also added snaps in the carpet for the leather handbrake cover Driver's side, rear attachment sill spacing - just clears the seat belt Seat will be re-upholstered, just not today pass seat out to install cushion, harness routing Headrest cushions have to be stripped to fit the new leather covers, the original covers are glued to the foam added the support bracket with two nuts to the driver's side of the strut brace. Have to do the pass side tomorrow, ran out of daylight
-
I used the Kia motor on my 75 280Z w/ non-factory AC. I can't say having the excess gap made any difference - there is sufficient volume at the ducts with any speed. I'm using a Volvo fan (5) speed resistor, so my lowest speed is lower than stock, enough to gently circulate either heat or cooling in moderate NY temps (above 35ºF) though.
-
Anyone have a recommendation for a cheap 6 bolt steering hub adapter?
HusseinHolland replied to kaibiagi's topic in Interior
@kaibiagi Here ya go: AliExpress https://www.aliexpress.us/item/2251832415159376 I bought it to fit a Nardi wheel. Works for Mom, Nardi & Personal worked just fine - for me it was a stop-gap until I fixed a vintage Datsun wheel
-
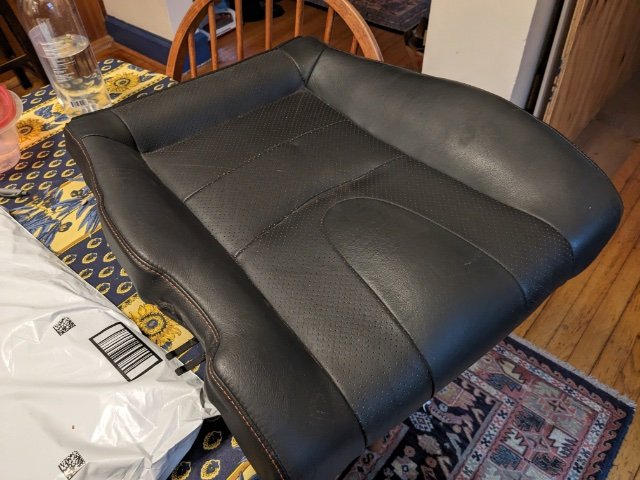
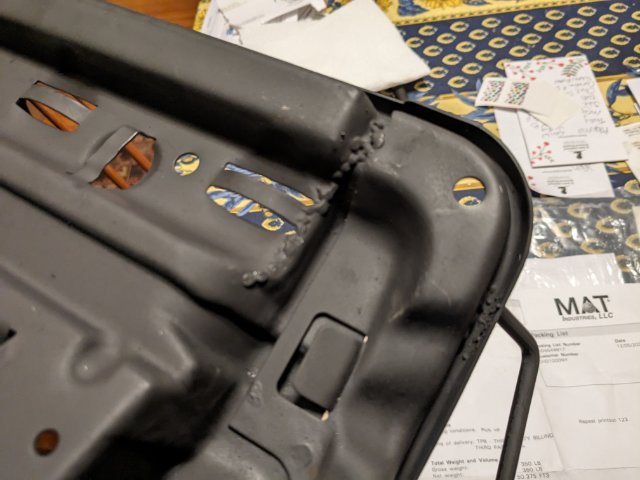
Back in the 350Z seats into the 280Z. Seat belt reel will (hopefully) be relocated to strut tower, like the later 77-78 280. Welded the rails I made to the 350Z rails, Checking that the seat was level to the car before tack welding. Used an weld mat to protect the interior. Removed to finish the welds. Wired the passenger seat (fore/aft only). Have to wire the seat heater Looks good here I didn't seam weld these. There is a plastic guide rail inside that may (did) survive some heat, wouldn't trust it to survive a bead, especially on top Test fit after welding to check for distortion /displacement due to welding, all good sits level with no wobble in the rails Testing wiring for seat fore/aft. I bought used 350z heater switches, however it will be easier (I hope) to rewire the seat grids to the aftermarket relay & switches I already have in place Full forward setting Seat sits substantially lower than stock height. Furthest possible recline in full rear position Wesco reel will hopefully go here. Does not feel like there is a metal plate under the cover, which may actually make it easier A beating was in order. Not really happy about pummelling the perfectly good and clean tunnel, so I was gentle at first & used a mallet & block of wood to gently invert the bulge. Problem is that there is a major panel overlap seam in the way, forward of the inner seat belt mount, rearward of the stock rear cross member/seat support. Had to break out the large dead blow to reshape that. After the "gentle" mallet work Beating administered. Cleanup & paint to come, on the underside also. Edit - that is glue on the inner forward seat cross member , not Rust! Now the seat can be made level without lifting the sill side Side note - I guess Nissan wanted to build in the rusting process that was mostly resolved on the outside (compared to classic Z's anyway Seat cushion controls clear the sill Inside clearance matches the pas side Slight problem in that the rail spacing is not even left to right - I have to make a wider rail conversion for this side. Fortunately a 2" "U" channel will take up the gap. I don't want to simply cut & offset the bolt down points relative to the rail. Started on the wider inner seat rail . Need to weld it up, however the basic element is ready to move forward
-
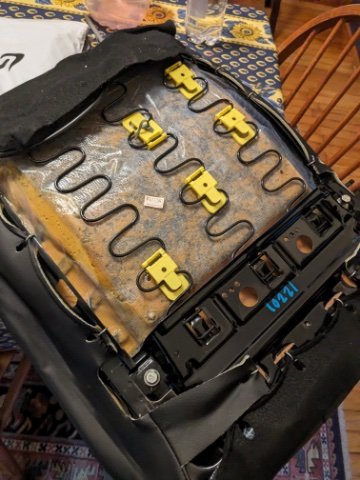
Replacement cushion (2007) came - looks better than the auction indicated. Cushion & seat heater in great shape. Frame is also painted, I=unlike my 2006 version.
-
Took the drivers cushion apart. Foam is pretty screwed, not sure if I can actually repair this wire bolster weld was torn Fixed that aspect
-
Thanks for documenting yours - it has been most helpful. Being a new Datsun owner, I'm always surprised at the constant revisions to things on these - I didn't notice at first that the 240Z seat mounting cross frames are quite different! Did you take any pics of the Wesco belt mounting, or is it self evident? I'm wondering if they still have the neck choking effect of the stock belts - but I'm 5 6", so they may not be an issue for you.
-
Had a few hours today, so I filled the pie cuts & added reinforcing washers on the PS rails. Cut the 2 DS rails & started welding them also - looked back to check that the DS was the same setup welded a bead on the backside where I had bent the plate tools for cleanup Added a rib across the top side of the bend also
-
Took the seat power & heater wiring out of the 350Z Couple of issues. I neglected to mark the fore/aft setting of the outer rail before I cut off the standoffs, and observe the stock rake of the cushion in the 350Z. What I have found is that the 350Z rails sit precisely outboard of the 1/8" 1.5"x.5" C channel rails I'm making. Figure it's significantly more rigid than flat stock. I'll possibly add cross braces of C channel. I'll tack the 350Z rails to these first, after I fill-weld the cuts. doesn't look like the seat cushion / base will hit anywhere at this drop though Have to figure out if I can dismantle the rails to allow for welding the new with the existing. Don't want to melt the plastic guide inserts. Clearances Recliner is up against the 280Z belt reel guide, without the protective cover. Probably won't be keeping the stock belts. I'll leave the trim off until I figure that out. up against the ledge, pretty much tangs for retaining outer cover have to be removed, hits the cross frame Placement. As far back as it can sit, cushion is still further forward than the driver's seat Like this, it sits lower than the stock seat cushion , feels comfortable as is.
-
280Z track mounting differs - putting this here so I don't forget - I may make rails/ brackets to match the 280Z rail location rather than use the stock rail.
-
Took the seats out of the 350Z today, and moved the car into her (my mother) backyard, out of the way for her winter driveway access Have to cut a section of the harness for each seat tomorrow Power, heater & SRS broke the pass seat switch, bent the bracket - seat was behind the car & I backed into it Thankfully, I didn't damage the seat itself Cut off the rail standoffs 2 rivets & 2 spot welds for each leg Assuming these elements are for crash protection - I may want to add them back Put some paint on the ground-down areas, to protect it for now
-
Diff Mount to fit 350Z R200 Short Nose in 75 280Z?
HusseinHolland replied to HusseinHolland's topic in Nissan V6 Forum
Thanks NewZed / Zed Head I think if indeed my ring & pinion only has normal wear pattern, the MFactory diff would be my preferred choice. I took a look around at Subaru R180 installs, and that alone requires a bunch of additional parts to make it fit, according to the threads on it . I already have an MFactory LSD & Ring & Pinion setup in my JDM Honda drivetrain (in My Fiat X1/9), so I'm familiar with the quality of their parts. -
Diff Mount to fit 350Z R200 Short Nose in 75 280Z?
HusseinHolland replied to HusseinHolland's topic in Nissan V6 Forum
Thank you both for your input. I did not know these diffs were known to be noisy. In my case, it's not due to worn suspension or the diff mounts, as all that I have replaced since I got the car. The noise is much the same as it was with all worn out stuff, just no clunks any more, in that regards. -
Diff Mount to fit 350Z R200 Short Nose in 75 280Z?
HusseinHolland replied to HusseinHolland's topic in Nissan V6 Forum
I think you missed what I said - mine has gear whine, not bearing noise. The only way to fix gear whine is to replace the worn ring & pinion. Once that wear pattern is established, you really can't 'adjust' it away. So, not much point considering a LSD for my existing diff. I do have the long nose diff. Since I have a good working LSD diff in the 350Z, to me it makes more sense to try to fit that, than to buy a used R200 long nose & rebuild that. I'm never racing this thing, so I don't see the VLSD being an issue in that regard. I will have to investigate the axle flange issue, since I would like to keep the speed sensors intact. -
Diff Mount to fit 350Z R200 Short Nose in 75 280Z?
HusseinHolland replied to HusseinHolland's topic in Nissan V6 Forum
Many thanks for the link & pic. It is most helpful to see how others have tried to resolve it. The home made version looks very practical in terms of containing the diff's desire to arc upward under load. The TechnoToy design looks like it would be easier to create, but no counter hold from above. The problem is my diff has 250K on it, and the gear whine is pretty bad. I don't see the point in putting an LSD in it. I did also search months ago for a LSD that would work in the long nose - I don't recall finding a clear solution for that. Is there a specific LSD that you recommend? I haven't looked into new ring & pinion options. Since I already have the 350Z diff, and I'm not planning on going much over stock HP, I didn't see the viscous design being much of a concern. As an aside, Volvo used a viscous clutch setup in their early AWD's, and that actually held more than 2x stock HP in practice. Is there a known flaw with the Nissan LSD design? -
I read in the pinned V6 conversion thread that "You'd have to use a Ron Tyler (RT) type mount to install a short nosed R200." Not having much success searching for any examples where anyone has actually done this. I'd like to use the LSD R200 from my '06 350Z parts car as part of the drivetrain conversion. I emailed TenchoVersions about the one they list https://www.technoversions.com/DiffMount.html TIA
-
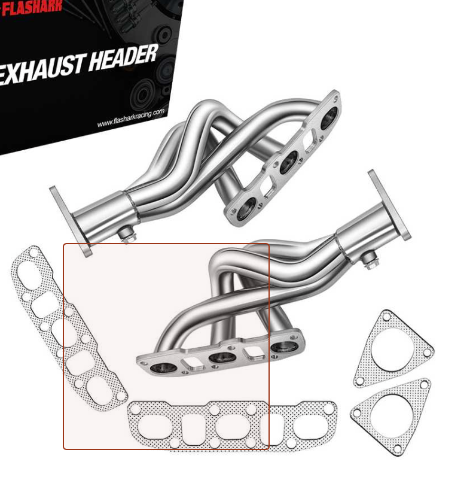
Hey, as long as it's sound & doesn't leak. I bought (cheap) headers for a 370Z, after reading they work after the outlet is modded to point in the needed direction
-
New 280Z owner. Looking into alternative Nissan Drivetrains.
HusseinHolland replied to HusseinHolland's topic in Drivetrain
To wrap this one up, I bought a 2006 350Z manual donor car back int he summer. I'll work on the conversion in a year or so, once I'm done with the V8 conversion