
Vintage-TechZ
-
Posts
328 -
Joined
-
Last visited
-
Days Won
1
Content Type
Profiles
Forums
Blogs
Events
Gallery
Downloads
Store
Posts posted by Vintage-TechZ
-
-
I'm looking for a l28et full swap wiling to pick up anywhere in SoCal thanks
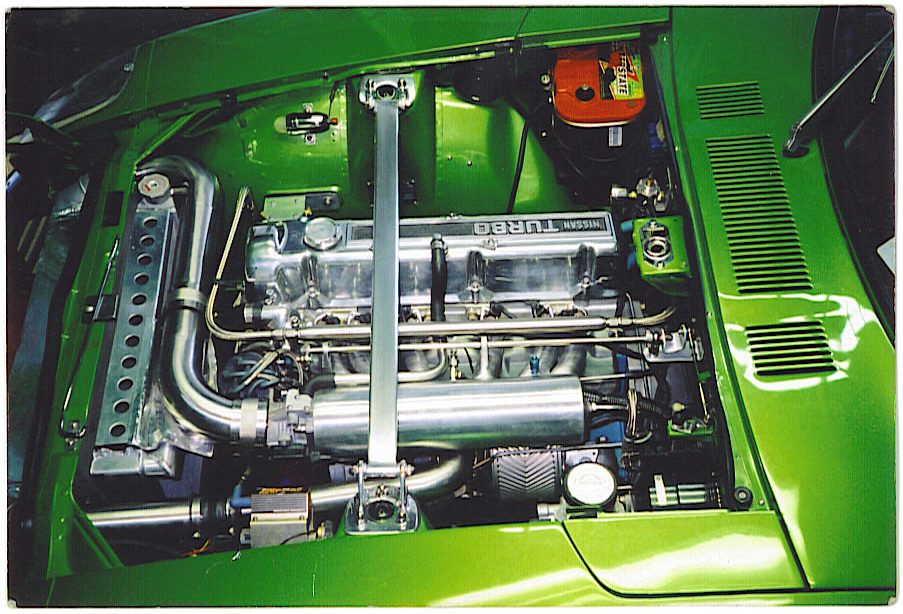
What is your budget for this ? I live in Laguna Beach and have a recently re-built L28et , balance selected rods w/light prep,with special prepped head w/higher compression-( port matched,un-shrouded valves,3-angle valve grind). Polished turbo valve cover, high capacity oil pan, Custom aluminum high volume Intake manifold, ceramic 2k exhaust manifold w/custom stainless downpipe. Turbo is a Garrett T3/T4 also new. Tial 44mm wastegate. I am considering the sale of it all due to space constraints and having a full RB26dett and drivetrain. I just began to lay wires for a MegaSquirt v3.
You'd only have to source an inter-cooler and associated piping and a blow-off valve . Saving you MUCHo time to get to this point,believe me !
-Vinny

-
I used to work with a guy who was big into sailboating. He said the boating mag did a story on corrosion prevention and found WD40 to be the best. Thats what I use.
For about 20 years I've relied on WELD THROUGH COATING for backside protection. Its a zinc based coating which bubbles up when heated red hot and permeates the voids and covers the oxidized metal where the welds are placed.....then cools and hardens. The spray is applied on the backside of patch panels and also on the interior if you can reach it. Let it set-up.....then weld. Works great.
-
....I'm crying I'm laughing so hard,lol.
-
Hey guys. It's on eBay again as of today. Please tell anyone you can about it. Thanks!
Jerrod....looks like this auction made its way around the Net ! I had friends from around the globe pointing links back to it from every car genre',lol.
Way to restore and kudo's to your marketing !!
Loved the build quality for sure .
Cheers,Vinny
-
Resurrecting this thread... Vinny, are you still out there and if so, looking for some clarification on this process... do you have any pictures or diagrams on creating this flange? I like your idea but I am confused on the strip... are you saying to make the top of the strip stick out above the marked line, in a sense 'flaring' the edge out, and then grind it down flat to create a smooth edge that is flush with the body?
Let me explain it this way.....
1)-Be sure and fit the body part (air dam etc.) as best you can by grinding,sanding etc. before you begin anything. Look at areas like the fender well to bumper cover zones...make them fit evenly and as perfectly as you like.
2)-Use aluminum tape thats 3" wide (available at all hardware stores for duct work)
3)-Place this tape against the painted area on your car that the body kit part will rest against or currently near.
4)-If you plan on using material such as rubber,double stick 3M tape or anything of the sort...remember that this stuff will add or displace thickness. So place these things on the aluminum tape and add another layer of alum tape to removal easier later and leave you with the best flush fit.
5)-It may be wise to lay more than one strip of tape or at least add more Masking type tape to protect your good finish on the body.(whether you use aluminum or Masking autobdy tape)-Polyester resin sticks to the paint,not to the tapes.
6) By laying neatly cut strips of fiberglass cloth (wetted) along the taped area that you've previously marked as the line where the bumper cover meets the body...about 3 layers in all will do, you've created the flange that will be later fiberglased to your cover permanently.
7)-Once the flange has cured...(DO NOT YET REMOVE IT)...re-fit the cover securely in place .
8)-working from underneath and above...fill the voids and gaps between the body and body part with more wetted strips of cloth until the full seam is secure. Use an 'L' folded cloth technique along the seam and let cure.
9)-You should be able to remove the whole part now from the car and finish bodyworking the part to perfection and no longer find the need to graft or stare at gaps once its all back together and painted.
10-I highly recommend using at LEAST a bicycle inner-tube cut rubber as a seal between the car and the part...both for friction avoidance and water and grit. Not to mention expansion/contraction guaranteed to eventually cause rust.
11)- The end result will be bumper covers etc. that will fit like they should have from the Mfr. in the first place.
Cheers,Vinny
-
Paulo.....you might want to consider using a stick of PVC 1" or a 1"x1" lumber to screw to the width span when shipping .If your part is jigged correctly...you should be able to use the dam to fender bolt hole divots to attach with self tapping screws.
Or...in the mean time,look up U-line dot coms website for an endless list of cardboard boxes that can be ordered in bulk to fit your needs.....but I'd still brace the airdams with a span bar like afore mentioned.
Cheers,Vinny
-
Looks great Phil ! What a great feeling having come so far. I'm seeing blacked out trim and bumpers in my minds eye for later.
Cheers,Vinny
-
That wouldn't work, the mirror itself would be facing the wrong direction. I'm sure you can find some after market roadster mirrors similar to the 240Z mirrors that have both a right and a left side.
Lets dispel this non fitting rumor. I've run mine this way over 20 years !I've done this to the 240,s.260,s 280;s etc.
I won't drive a car without both mirrors...just too used to them for safety.They of course aren't an amplified image like later model cars.....but since the housing is stamped thin stainless steel, one could get around this with some delecate glass grinding and swapping !
Cheers,Vinny
-
Yes. Thanks again for the hook up. I am loving the car. I have been driving it quite a bit lately. I installed a set of 15" Panasports with new kuhmos and I installed a factory tach and a Momo Steering wheel too.
What an awesome experience for you guys ! Such a cool story/trip too.SO envious and happy for you.Not to mention what a nice dime to drive.Major congrats!
Vinny
-
..............You can do it Clint, one piece at a time.An hour or so a week if you get the time.The flairs look great....so does the red.
Don't despair now, not after all of this.
Vinny
-
Without pictures, I can only guess your damage extent. But usually...if there is substantial alium. removed, Heliarc welding can backfill. Then you'll need to reshape with air and hand tools until proper. Next will be lots of reduction sanding up to 2500-3000 grit wet n dry sandpapers.
High speed directional polishing to finalize .
Best of luck, Vinny
-
You can always install the black ZG's you have....even color match them later if you like to try that.
Later on I can always use the Nismo zg flare molds and make a set of red/blk hybrid CF flares for it if you end up liking the red but want to be different ? Then , if you STILL decide to bond/graft the other flares on ...the ZG bolt holes will be gone.
Options for you.
.........Vinny
-
I'm not sure what to say Keith. I was preoccupied the other day when I missed your call,sorry about that.
I'll tell my boss about your RB-Z and see if he was serious about considering one.
Glad to hear your job situation is on the upsweep though !
My best.........Vinny
-
Believe me Bart......go to the best hardware store and pick up a bar of copper at least an eighth inch thick and grind the proper surface shape needed...eg:curve or flat ?
I used epoxy to adhese the copper to a rare earth magnet flush to the inner piece. This way it can be reused and you don't have to screw with holding it. The rare earth magnet won't move if your mig wire taps it on start-up.
Be sure and have a soaking wet paper towel next to you to immediatly cool the area after you nail it. Don't worry about rusting....the HO2 will evaporate dry.Warpage will be then avoided.Set your welder to a low voltage setting and don't forget to clean the walls of the holes with a bastard fine file.
Best regards...............Vinny
-
My wife might like the teddy bears, however I dont think they would look right under her 05 Magnum RT..
Brakes are taken care of. Very large 4piston and disc conversion in the back. Just a little history for the people that don't know my project. I am trying to the best of my ability not to skimp on any aspect of this car. Let's just say that I could have bought a nice German car for what I have spent of this so far.. Don't tell the wife.
It's not that I am looking for ultra-modern wheels just something other than the norm or the standard 3 piece wheels everyone seems to go to. I like the idea of the ones that the one of you in a later post mentioned and maybe i will look for some of the more elusive JDM wheels mentioned.
Keep them comming I would love to see everyones likes or dislikes.
Jeff
Jeff, I can't recall you mentioning your cars paint color choice......this can have a big effect on your wheel choice pleasing your eye. I know when I was swapping wheels with my Green Turbo car....I thought I'd never be happy. I put on several types and sizes until finding what fit the look.
Its DEFINATLY a personal task."To each his own"....as the saying goes.
I do picture your car looking sexy with a set of Watanabe 16" 2-piece wheels from Japan. Also known as RS-8's since they were bought out. SSR I believe ?
Anyway....you could procure a used set for 450-700.00$ and then disasemble and polish the lips (annodized currently) then sand blast and respray the centers in a color of your choice . Usually they are a dark grey single stage that lifts and crazes with Japans salt air.
The 16's are pretty common......but you will need a slight spacer with their offset, although they are 4-bolt on our bolt centers.(stock that is)....mine is 5-lug these days.....and runs 17" Veilsides.
Best of luck.........Vinny
-
Certainly not as nice as Daves, but here's some Autumn pix I took this year while walking for introspect.Man is Oregan pretty in those pix.
(
)(
)(
)(
)(
)(
)5.0 Mpixel Sony Cybershot....now broken,arrgh.Digital cameras are not robust like the old SLR's or yestur-year.
...........Vinny
-
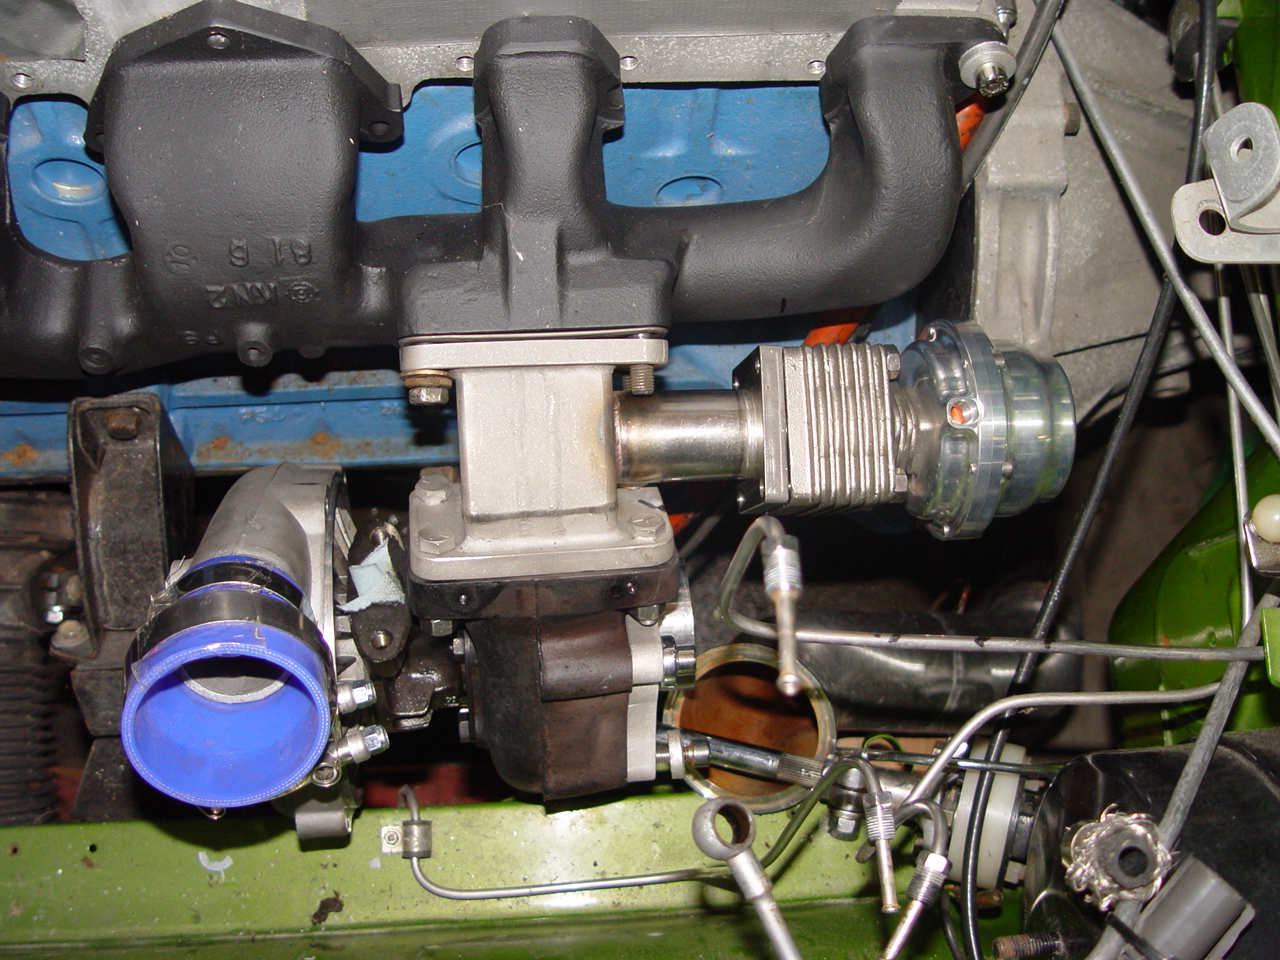
Turbo heads have square ports. You'd have to get some thick walled ells and port the crap out of it to match up...
That porting would be best left to the metal from a half inch stainless flange. Square transitioning into the round I.D. of the weld el.Works great . I usually mill a shallow instep onto the flange so the pipe/tube slip fits inward just abit.
..........Vinny 8)
-
Sweet! Perhaps my vehicle will be in the pictures as well!
Damn Brian ! You really busted a hump to get that all put back together on such short notice. Great effort !
I wished I could have been there to see it all happen. I'm sure Kenny from RB Motorsport was a great help speaking fluent Japanese. Keith ?.......did you hold the sun umbrellas ?? lol.
.................Vinny
-
Joel said:
I have one of his CF air dams. I think mine is beautiful! He sells them on Ebay, which is how I found mine.:end:
I give anybody an A+ for getting anything finished, particularly "on time",unlike myself.
But am I the only one seeing the complete uneven weave of the CF ?I welcome him to our Z car environment, but he'll need to spend more time on laying up the weave correctly before he can claim what he does in his Ebay auctions. Something to the tune of " best quality" or something like this.
I don't mean to come across harsh, just real.I spent a great deal of time and money getting my weaves to come out straight and in line up correctly into my molds before touting a comment like that .
If I catch flack from pointing this out, then it tells me several things about our audience and their "eye for details".
Oh well, get em' while its hot !
..............Vinny 8)
-
I'm suprised none of you guys caught this... he spelled "engineered" wrong! I'll let him know
EDIT: Just came up with this craptacular image in microsoft paint. Is this what some of you might want instead of the red Z with our slogan on it? Our software on the site would not host this image' date=' so I had to host it on Digistash.com, so obviously "Digistash.com" will not be there. I just lack the skills and software to make better images. [b']Also, would you guys want a white background or light grey? What color border?[/b]
I would think if the cloth background is grey, then the word "HYBRID" could be outlined in black and filled with a silver thread that "fades away" so to speak.AS it appears now.
In fact ,black border/frame as well as the red Z" being bordered in black will make all the wording stand out crisply and look great ! IMHO.
...........Vinny
-
I hope I'm not be ing a "part pooper" when I say that I've become pretty fond of the current header logo used at the top of the forum page......minus the car background graphic for a clean patch. Even if the whole thing would be surrounded by a "square-round" rectangle of background cloth that holds the "engineered to be feared" copy.
Red "Z", with silver "HYBRID"......yellow or white background.......maybe even a light grey.??
just thoughts........Vinny 8)
-
Vinny' date=' I am glad to hear you have actually seen my hood and can appreciate that they are made to "standard". I am not sure who's hood you saw, I only hope it is the one I actually sell. You are also correct that I did no "performance" evaluation of the scoop placement I choose aesthetics over function since I have more horsepower than I can get to the ground as it is.
I am disappointed you named your hood the name of my L6 car though. : )[/quote']
Hi Robert, ....please don't get me wrong about your hood. I think it looks great too ! I really do. In fact I'm really glad your crew made them for several reasons. One being selfish in that it removed some pressures from anxious hood buyers on me.As I mentioned earlier...I actually have convinced several hood buyers to go with yours due to their needs and timeframes. I would always rather see a fellow HB-z'er get the order than just some retailer on the outside.
The name "Warrior" was adopted due to the fact that the first one of us to have this design on his Z was Marcus ( Pounds909) and since he was in the military currently....I thought it appropriate as a way to remember several things including the period.
I'm certain you'll have many more yet to sell due to your exellent turn around ability using your friends shop and the fact that your hood is "DONE,DONE", lol.,wheras mine is staring at me in the last stage I had to leave it in during travel schedules and the house move.
I also would like to mention that our hood designs are different enough from each other that we should both be able to share the markets with no concerns, really.
The benifit of the designed "COOLING" functions of the Warrior hood isn't to get horsepower to the ground,but rather to prolong the life and function of the horsepower maker...items IN the engine bay.
quote:Sonomaz
Do you have a link to pictures of the final product? I'm interested in aquireing one.
Paul
Hi Paul,
The pictures I have of the Warrior hood are for "In house" use only at the moment. But I will post up pix of it by Spring I estimate.Thanks for your interest !
Vinny 8)
-
If you want one delivered to your door within 10 days or so just let me know. If opening the front scoop is an issue that can be included at no extra charge. I choose to have them built closed to allow the customer the choice of openings. I also promise you the surface is as good as any other product that exists. I worked with some of the best fiberglass and fabricators to create my hood and worked very hard to keep the price reasonable but the quality exceptional. Shipped to your door (lower 48 states) for $500.
I'll be happy to discuss my product and the customers needs with anyone that is interested. If my product won't suit your needs I don't want you to buy it. I have seen to many people buy something they wanted only to get frustrated trying to make it work.
Or Yes....as 280zone mentions,and as I have also done to initial inqueries, buy his. I have had his hood in my hands and it is well made to standard.
The main difference in the Warrior as opposed to his hood is ours doesent have raw cut edges,rather I built the mold to utilize a "Rolled edge" which looks more like a factory edge and needs no further attention .
Also the Warriors front scoop is wider and also has more intake area for flow allowed. Another point is that the scoop leading inlet edge is 5" further forward making good use of the pressure in that zone.
One more stand out in designs was the cowl panel body lines still flow into the S30 bulge lines in a seamless transition.
There were many of my friends that asked me if they should wait for the Warrior and I did indeed tell them to buy the 280zone hood if they wanted one right now. Thats the beauty of having choices finally for our Z's.
Besides, we never seem to have any problems reselling a Z related aftermarket item....if one chooses to change something .
..........Cheers, Vinny
-
Austin, Be sure and use Halogen lights to see better for the cutting and sanding stages. Have the lights high enough off the ground and across from you so as to light the area in which you service.
Florescant lights can be used later as a swirl indicator for the lighter surface imperfections.
Since your quite new at this.......your EYE will mature in what its looking for and at.Therefore the lighting will bring the imperfections to view and decisions can be made for which steps you'll want to take to eliminate the sanding scratches etc.
You'll find that at this point....its important to know how judge the marks as whether they need 1500 grit or whatever in order to clean up whats been missed.For example.....looking at a area, is the deepest scratch in that area going to come out with ( ??grit??). Try not to waste time with grits which are too light to remove the worst areas of scratches.
In hind site........you'll find that doing the grits very carefully in full stages and squeegeeing the surface using plenty of water and inspecting each square inch .....and repositioning the lights correctly will manage you a much more perfect result. However doing it OVER.......can be what it is........a drawn out pain.
Tenacity will win out.
Looking good........best of luck,Vinny

 ....I'm crying I'm laughing so hard,lol.


 )
) )
) )
) )
) )
) )
)

LSx s30 Longtube group buy thread
in Gen III & IV Chevy V8Z Tech Board
Posted
I was back in Mo. over Christmas and saw these in series...WOW, VERY nice. You guys will be so stocked to get these at your door !