Mikelly
-
Posts
6292 -
Joined
-
Last visited
-
Days Won
21
Content Type
Profiles
Forums
Blogs
Events
Gallery
Downloads
Store
Everything posted by Mikelly
-
"1 step forward"... The axle centers are a tad to long for my Arizona Zcar cromoly rear control arms... I'm going to have to get the new centers long before we see any test runs... is the part number I will need to order... It is 5/8ths inch shorter than the current centers spec'ed for the build on the IRS.
-
Heads up for anyone going with an adjustable control arm... The center section for the axle is to LONG and will need a shorter section. I see the only option is a 15 5/8th which will probably put me where I need to be for adjustment, but it will be close. http://www.mooreparts.com/11608-AC525202-930/ Anyone needing new 16 1/4 units, I'll be replacing mine when the new ones come in... I'll let them go for $50 off when they are pulled...
-
So today the plan is to go ahead and mount up the trans support brace for good, and then fabricate plates to weld in and add strength to the areas where the brace used to sit for the TKO600. This list is getting ever shorter... Install CV axles, fill diff with LSD Friction modifier (4 oz) and diff fluid (3.6 Q). Make shifter enclosure panel. for console (I have some cool little composite panel for this.) Bleed rear brakes Bleed Clutch Resolve leak in front brake union below Master Cylinder Fabricate heat barrier to protect master cylinder from header heat And of course I need to have the driveshaft made to proper length. Some how the one i have is shorte, which is totally baffling. The TKO was a shorter gearbox. The T56 is a longer gearbox. I guess the bellhousing on the T56 was a lot shallower than that of the TKO600. Anyway, I'll be selling the existing unit since I won't be using it. Mike
-
Played hooky today from work and got the T56 mounted up to the motor. Had a few tense moments when the transmission initially wouldn't rotate or shift gears... I Poured some Royal Purple thru it and it magically started working... go figure... Driveline sits very straight and pretty flush under the car... Def. going to need a longer driveshaft! Probably will need to clearance the trans cooler fitting up high on the right side as the line rubs a smidgen: Driver side is fine:
-
Been playing on dynos for well over a decade. You know how I use dynos? I use them to help tune, then I use them to simulate running on the track and the guys I work with tune the ECU to respond and compress time between certain RPM ranges. Beyond all that, Dyno numbers are entertaining to the same people who pick their "mods" based on the STAGE kits sold by vendors. I'll know exactly how fast my car is by the laptimes I can turn and the segments I overlay from truly fast cars and my own data... Dynos are the most overly hyped tools used in the industry and when people stop racing them and stop buying based on advertised numbers, the industry will likely DIE! Love-Hate.
-
N808405-S100 is the part number for the axle nuts!
-
Truckin' right along... Just clearanced the Quicktime bellhousing.. it is a very TIGHT fit with the two sections of bolt ring removed. Should have the transmission in by the weekend!!
-
Did that... They sent me some that are NOT the correct ones...
-
To add a little more perspective to the comment about reprogramming the ecu, on my previous power plant we spend about 14 runs on the dyno tuning the 2000-6000 rpm acceleration between gears, simulating sections on one of the tracks I frequent. We managed to trim SECONDS off the time the motor spun up and down between that rpm range. Put that into perspective on a roadrace course where you're constantly running thru the rev range...
-
I got them from Rockaute and they were the cheapest on the list... Didn't come with them... I tore the boxes apart looking for them. Guess I'll go to the dealership and grap some.
-
Anybody have a ready source for the Axle Nuts on the Ford F150 axles??? I cant find them to save my life...
-
I got the transmission completed today, and rebuilt the driveshaft with the correct ends. Then I went ahead and reinstalled the flywheel, clutch and pressure plate, measured the depth for the hydraulic release bearing and mounted it up, plumbed it, and I am close to reinstalling everything back into the car.
-
Probably not. My goal is getting track time in and getting my time trial license so I can run the ultimate track car challenge if possible. Mike
-
Thanks Man! I posted some of the info on the T56 build in the Drivetrain section. Hopefully that will help some! Mike
-
There are some specialty tools I have used: Kent More J-39441-10 Kent More J-39441-20 Kent More J-39441-30 ATD Tools 3056 Bar Type Puller/Bearing Separator set I also used some channel steel on my 2 jaw gear puller to lengthen it enough to pull off the stock 5/6 gear main cluster. You can buy that at lowes/homedepot... I used a white plastic 6 ft. long table and just kept things reasonably clean. When not working on the trans, I covered everything in a plastic trash bag. Take your time, take lots of pics, video tape it if you can, and just be patient. Transmissions aren't that hard. I'm sure I'll have to pull this thing apart again, but to me, this was important to build myself for a change. So if you're thinking "Can I build one myself?" I say sure you can. Here's the down side... If you're replacing the mainshaft and replacing some gears, you'll spend about $1200 total on that list of parts above. Add the cost of the tools, and you might be getting close to shipping yours off to the pros to rebuild. It boils down to what you are trying to achieve. I wanted to refresh my skills on building one, along with my Ford 8.8 rear, so I toughed it out instead of stroking checks.
-
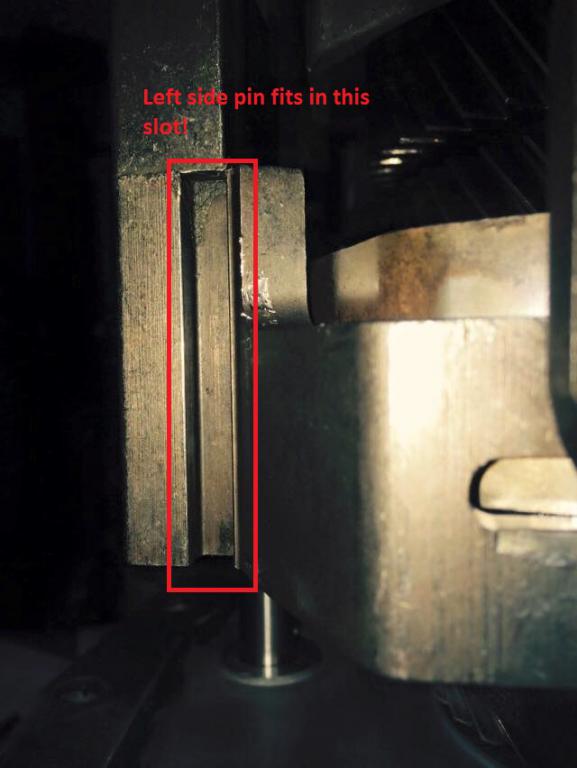
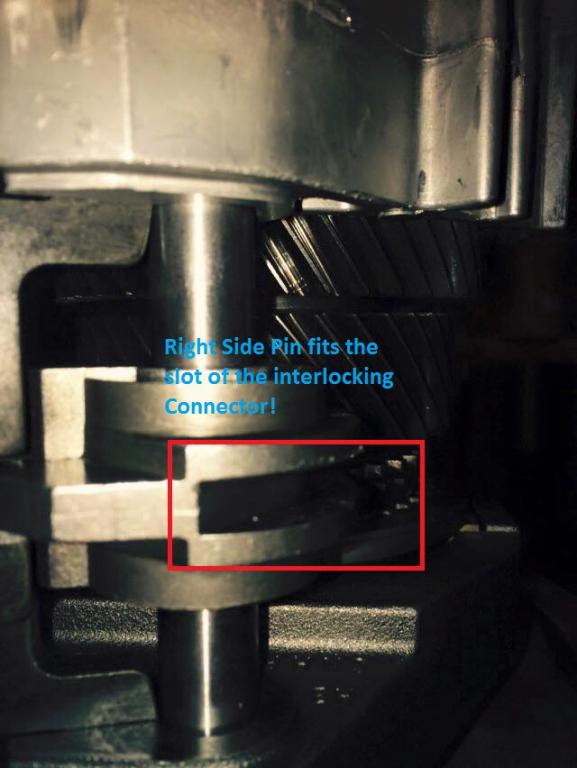
So I'm posting my T56 build because there are a few things I had to sort that simply were not explained in articles elsewhere on the interwebs. I started with a T56 out of a 2001 Camaro that a friend of mine had and sold me for what ended up being $600. I did some research and found that if I wanted to improve some of the gearing, I would have to upgrade some important bits, mainly the the main shaft and both sets of 5/6 gears. After much discussion with several NASA racers and some who build these transmissions, sharing of info on my specific car/gearing/tire sizes, it was decided to go with the bits and pieces I chose. I went with the guys at the Gearbox.com for a couple of reasons... First and foremost, they have direct first hand experience using the T56 on VIR and in several platforms. They also understood my concerns pretty well. There is opinion on every subject, but before you smartest kids in the room chime in, my money is spent, my decisions are made, and I chose to make the decisions based on those who do, not those who type... So what did the team at the Gearbox advise? well... Carbon kevlar synchros Upgraded Blockers Solid Billet Keys in all 6 gears Upgraded 3/4 shifter fork and bronze pads Upgraded Mainshaft, and upgraded-changed 5/6 gears The Basic overhaul set. There is a ton of info over on LS1tech.com but there are a few articles online that helped me a lot... along with the manual: http://www.thirdshiftstudios.com/T56manual.pdf http://para.noid.org/~lj/T56/T56.htm http://ls1tech.com/forums/manual-transmission/925032-t56-rebuild-how-write-up.html http://www.hotrod.com/how-to/transmission-drivetrain/0603phr-tremec-t56-transmission/ http://www.techcessive.com/tech/t56/t56.php And here is where I couldn't find any reference when rebuilding the trans... The pins that center the case need to be fitted into the two key slots, which is why it is important to get the shift rails properly set when setting the transmission back up. Common sense, but without visual aid it's a bit of a pain in the arse...So I figured I would provide the images attached... hope this helps... the orientation of the case pins is when looking at them with the case bellhousing down and you looking from the TOP of the transmission. Realistically you could rebuild the trans in a day (and I recommend it). I picked away at it and spent a lot of time trying to clean the case parts, as they were filthy. I also had some health issues with my back and couldn't pick the trans up for about 5 weeks, so... It took longer than expected. I will add info on the plumbing for my cooler bits as I get that portion setup later on. Mike

- 1 reply
-
- 1
-

-
My Dream LS7GTZ.......project underway
Mikelly replied to cobramatt's topic in S30 Series - 240z, 260z, 280z
Having had a 2:01 lap ride around VIR in the old version, I can't wait to see the new version... I look forward to future updates, Matt. Good to see you back on the Zcar build! Mike -
This afternoon I managed to plumb the rear brakes and install the axle seals on the differential. We are getting some nasty weather this weekend thru Monday so I will have some time to wrench the car and wrap up the transmission rebuild and maybe get it into the car.
-
Major, nay, HUGE hurdle overcome this evening... Sorted the guide pins/shift rails on the T56 and rebuilt 2/3rds of the transmission this evening... I need to press the last gear in place, clean up the tail shaft, install the stacks for 5/6 counter and reverse, and reinstall the case and this puppy is back together... from there, it is back in the car.. Once that is done, I will do a string alignment, and get this friggin monster off to tuning and ready for some shakedowns in February at Shenandoah speedway or Summit Point...
-
Having mounted up the differential and all the parts, minus the axles, I gotta say, I am AMAZED at how well all the parts fit in the space... The 8.8 is the natural swap for this setup... So stoked to be getting so much closer to the car making its trackday debute for 2015!!
-
This afternoon I decided to do a few more things in the shop... since I am making decent progress.... So I went ahead and pulled the clutch kit, took my slide hammer and removed the TKO pilot bearing and installed the T56 pilot bearing and the scattershield plate. I will get the clutch kit installed in the next day or two... Then its back to the T56 and wrapping it up...
-
The suspension uprigth and hub assembly finally mounted up... Hard to see from here, but I'm guessing I'm at well over 4 degrees negative camber on the rear with the settings maxed... Maybe 5 degrees...
-
Got the mustache bar orientation properly aligned and mounted, and mounted the differential. Note about the lower portion of the front mount. My buddy that picked the diff up for me didn't retain the hardware so I cut that lower piece flush and then used a very thick harmonic balancer washer as a spacer. It was perfect diameter to the bolt. In this pic you can see how the differential sits compared to the other components. This picture shows the front mount. This picture shows the front mount pickup point. This picture shows the mustache bar assembly mounted in place. This shows the tools used in bolting the diff to Mustache bar. This shows how the diff sits in the chassis from behind the car.
-
Keith, I believe it is an optical illusion caused by the angle the picture was taken at. When you see them in person, the strut appears centered in the housing.
-
I will post pics of the rear diff mounted up tomorrow hopefully. Mike