jtburf
-
Posts
113 -
Joined
-
Last visited
Content Type
Profiles
Forums
Blogs
Events
Gallery
Downloads
Store
Everything posted by jtburf
-
Jerry, I have the spindle pin puller built and will also be doing the tank work this weekend. Do you want me to simply mail a completed puller to you? I will be posting pictures of straps as I go. John
-
Jerry, Bear with me I had a very busy weekend and now bronchitis, we should be working on it this week/weekend. John
-
Just an update, I'm dealing with the same type issues on a 1975 280Z my sending unit was in very bad shape after a lot of searching I found a guy semi local who does these units (He outsources them actually) but for 185.00 they will recondition your old sending unit, the process takes about 2 weeks. I dropped off mine yesterday and forgot to take pictures but I will post them when I pick it up. Here is his info. http://www.donhart.com/default.htm Hope it helps. John
-
Corrrect on all these smaller torches it is a good habit to simply unscrew the bottles, on larger bottles simply close the valve. Sorry for any confusion... John
-
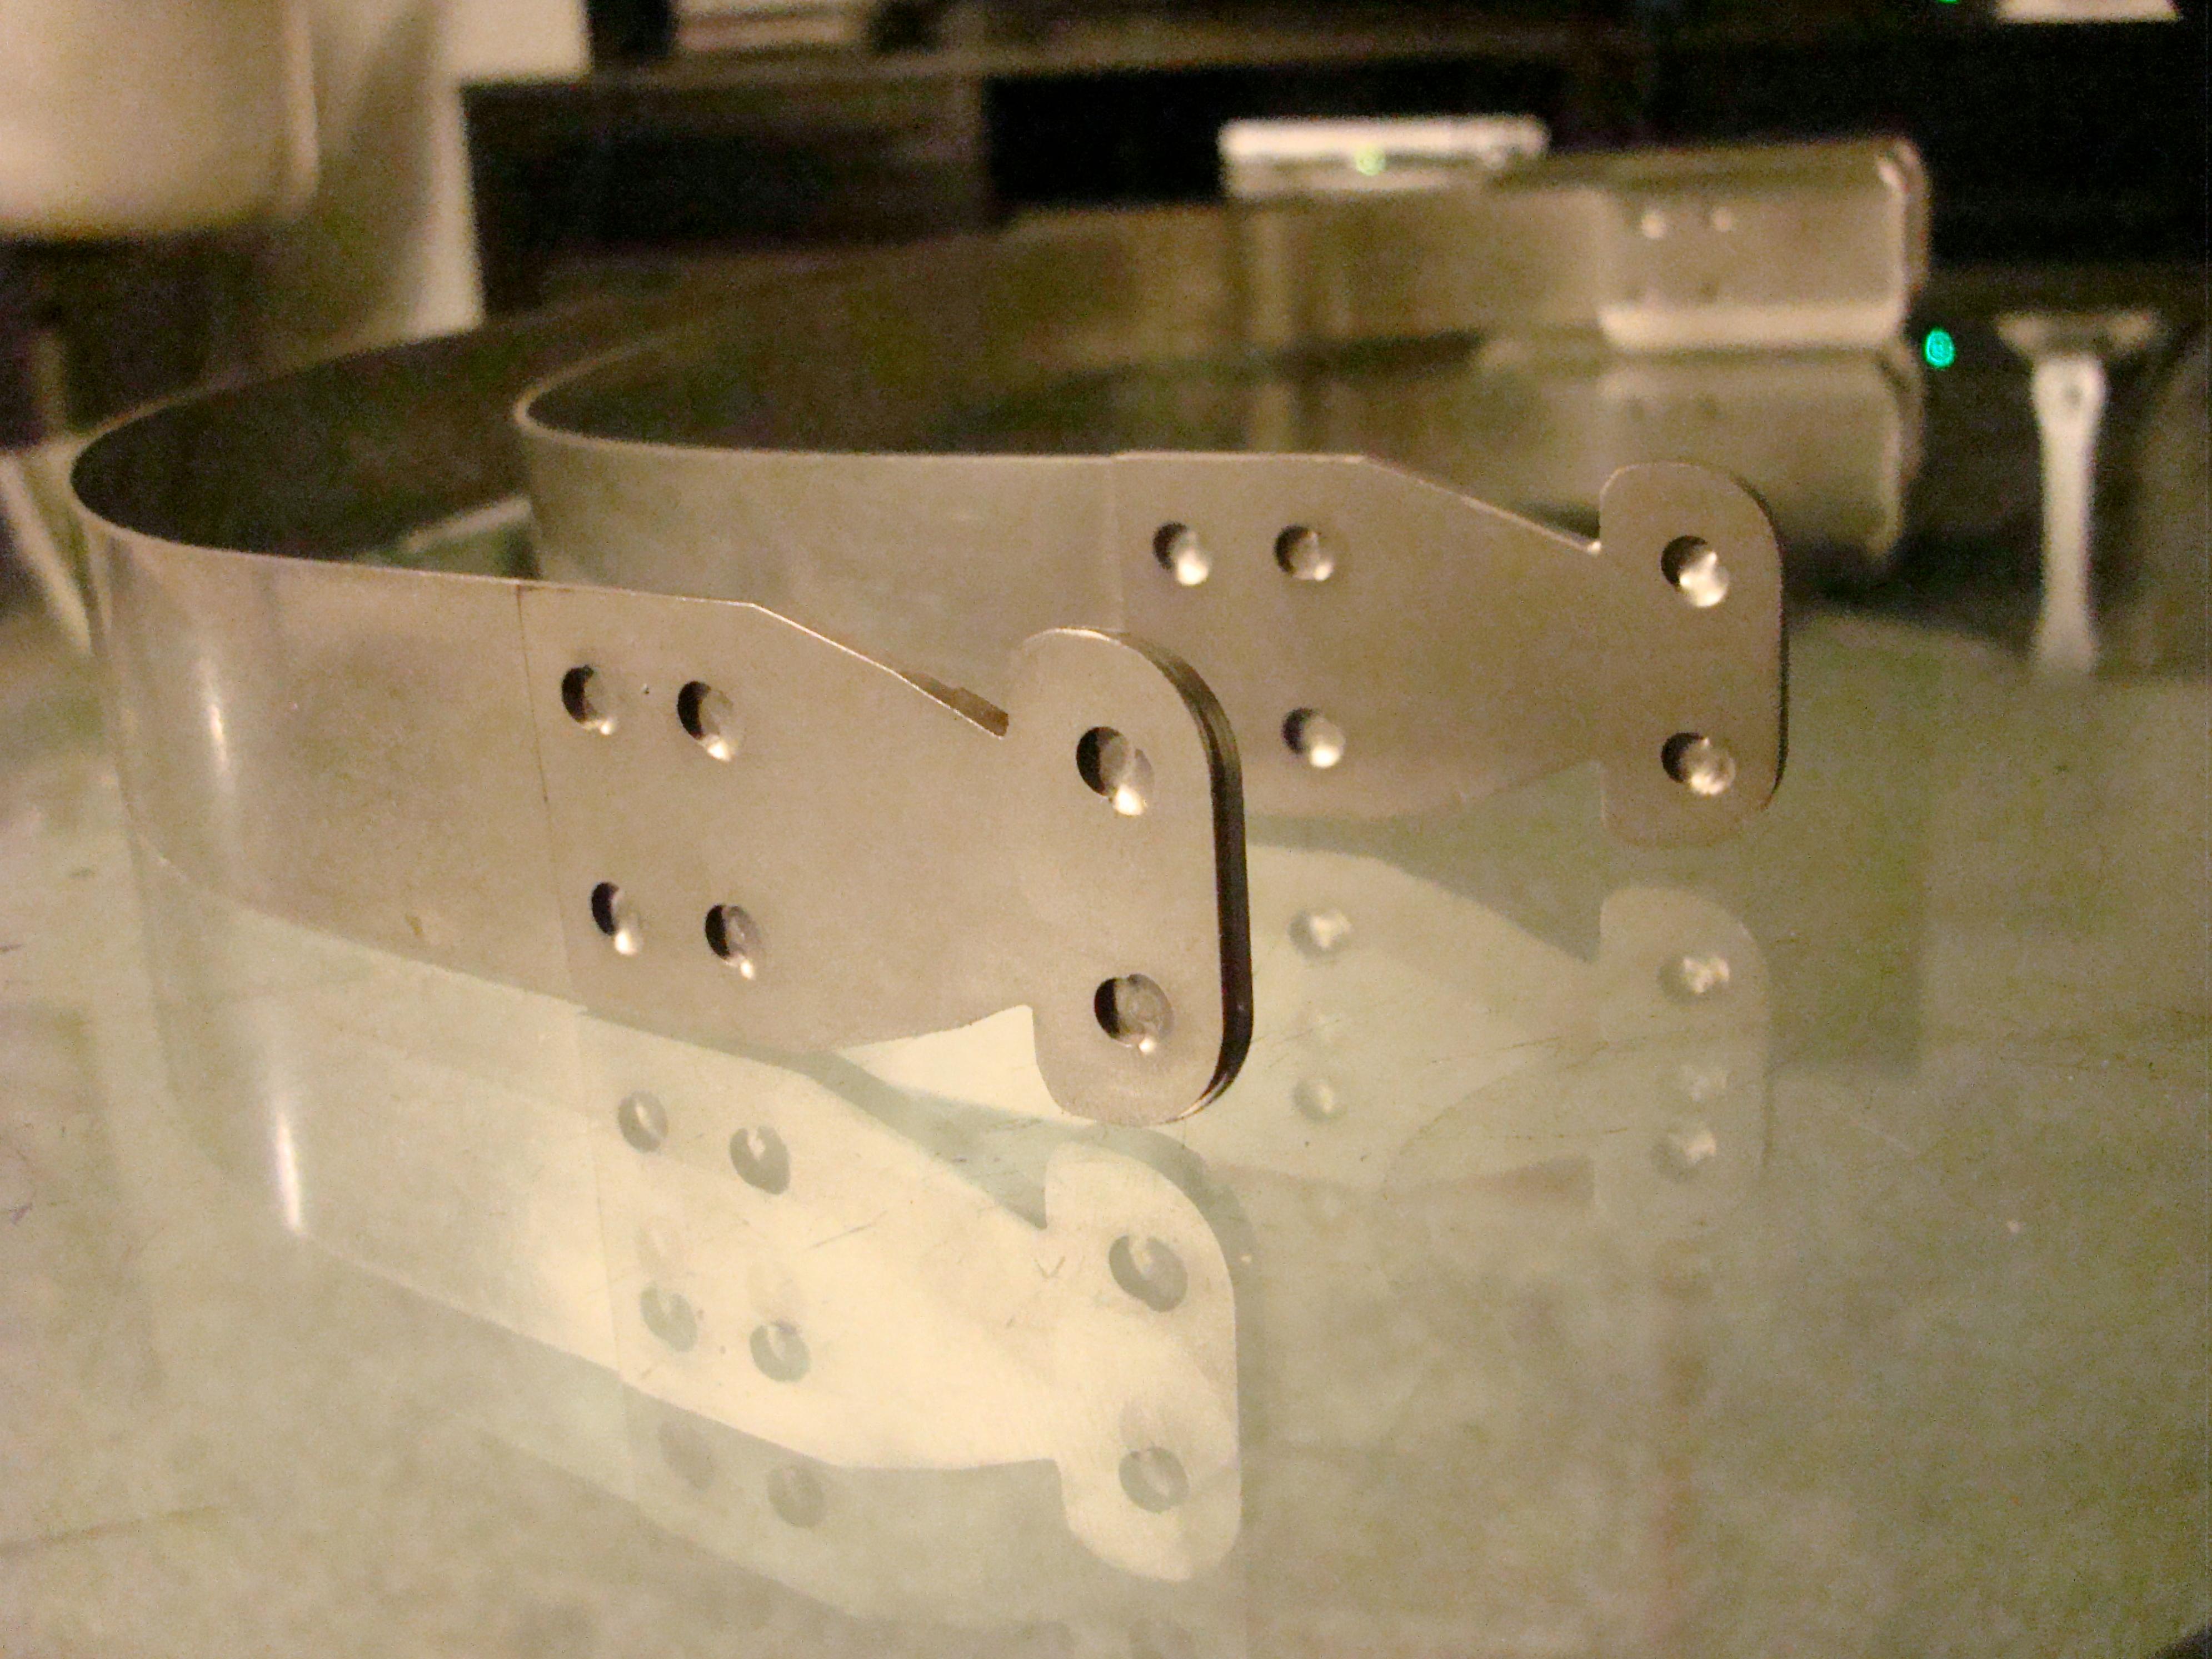
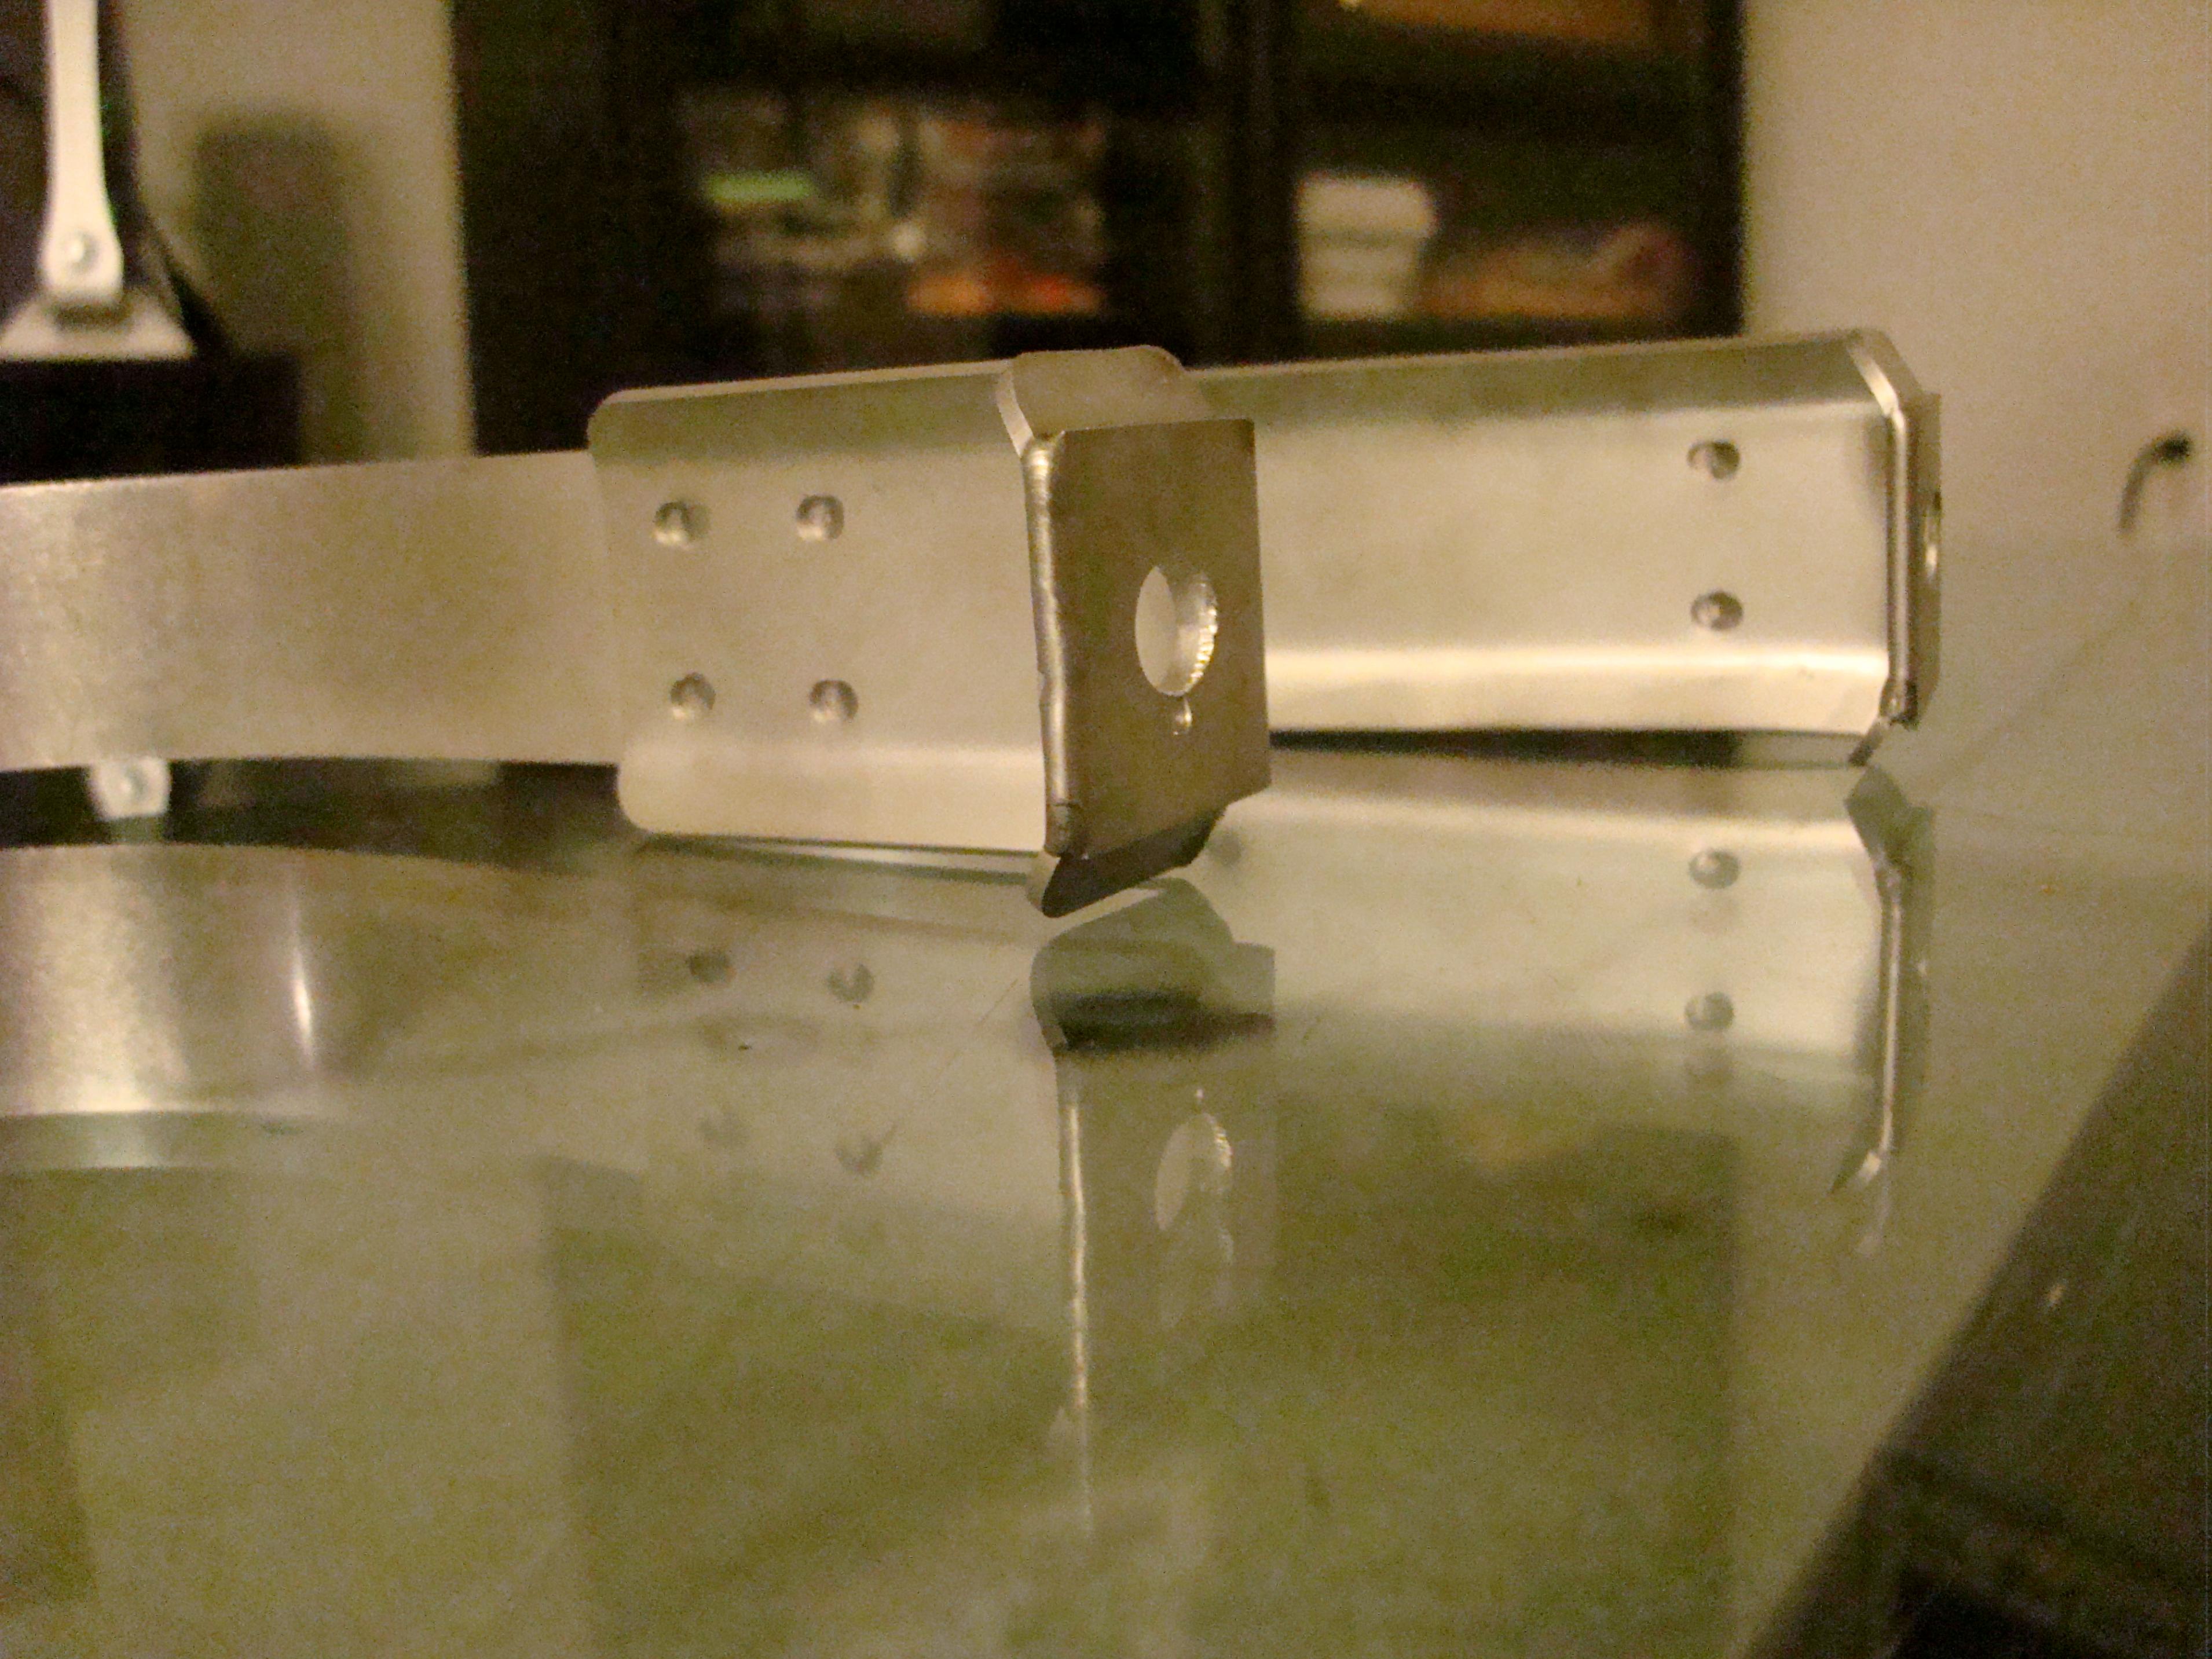
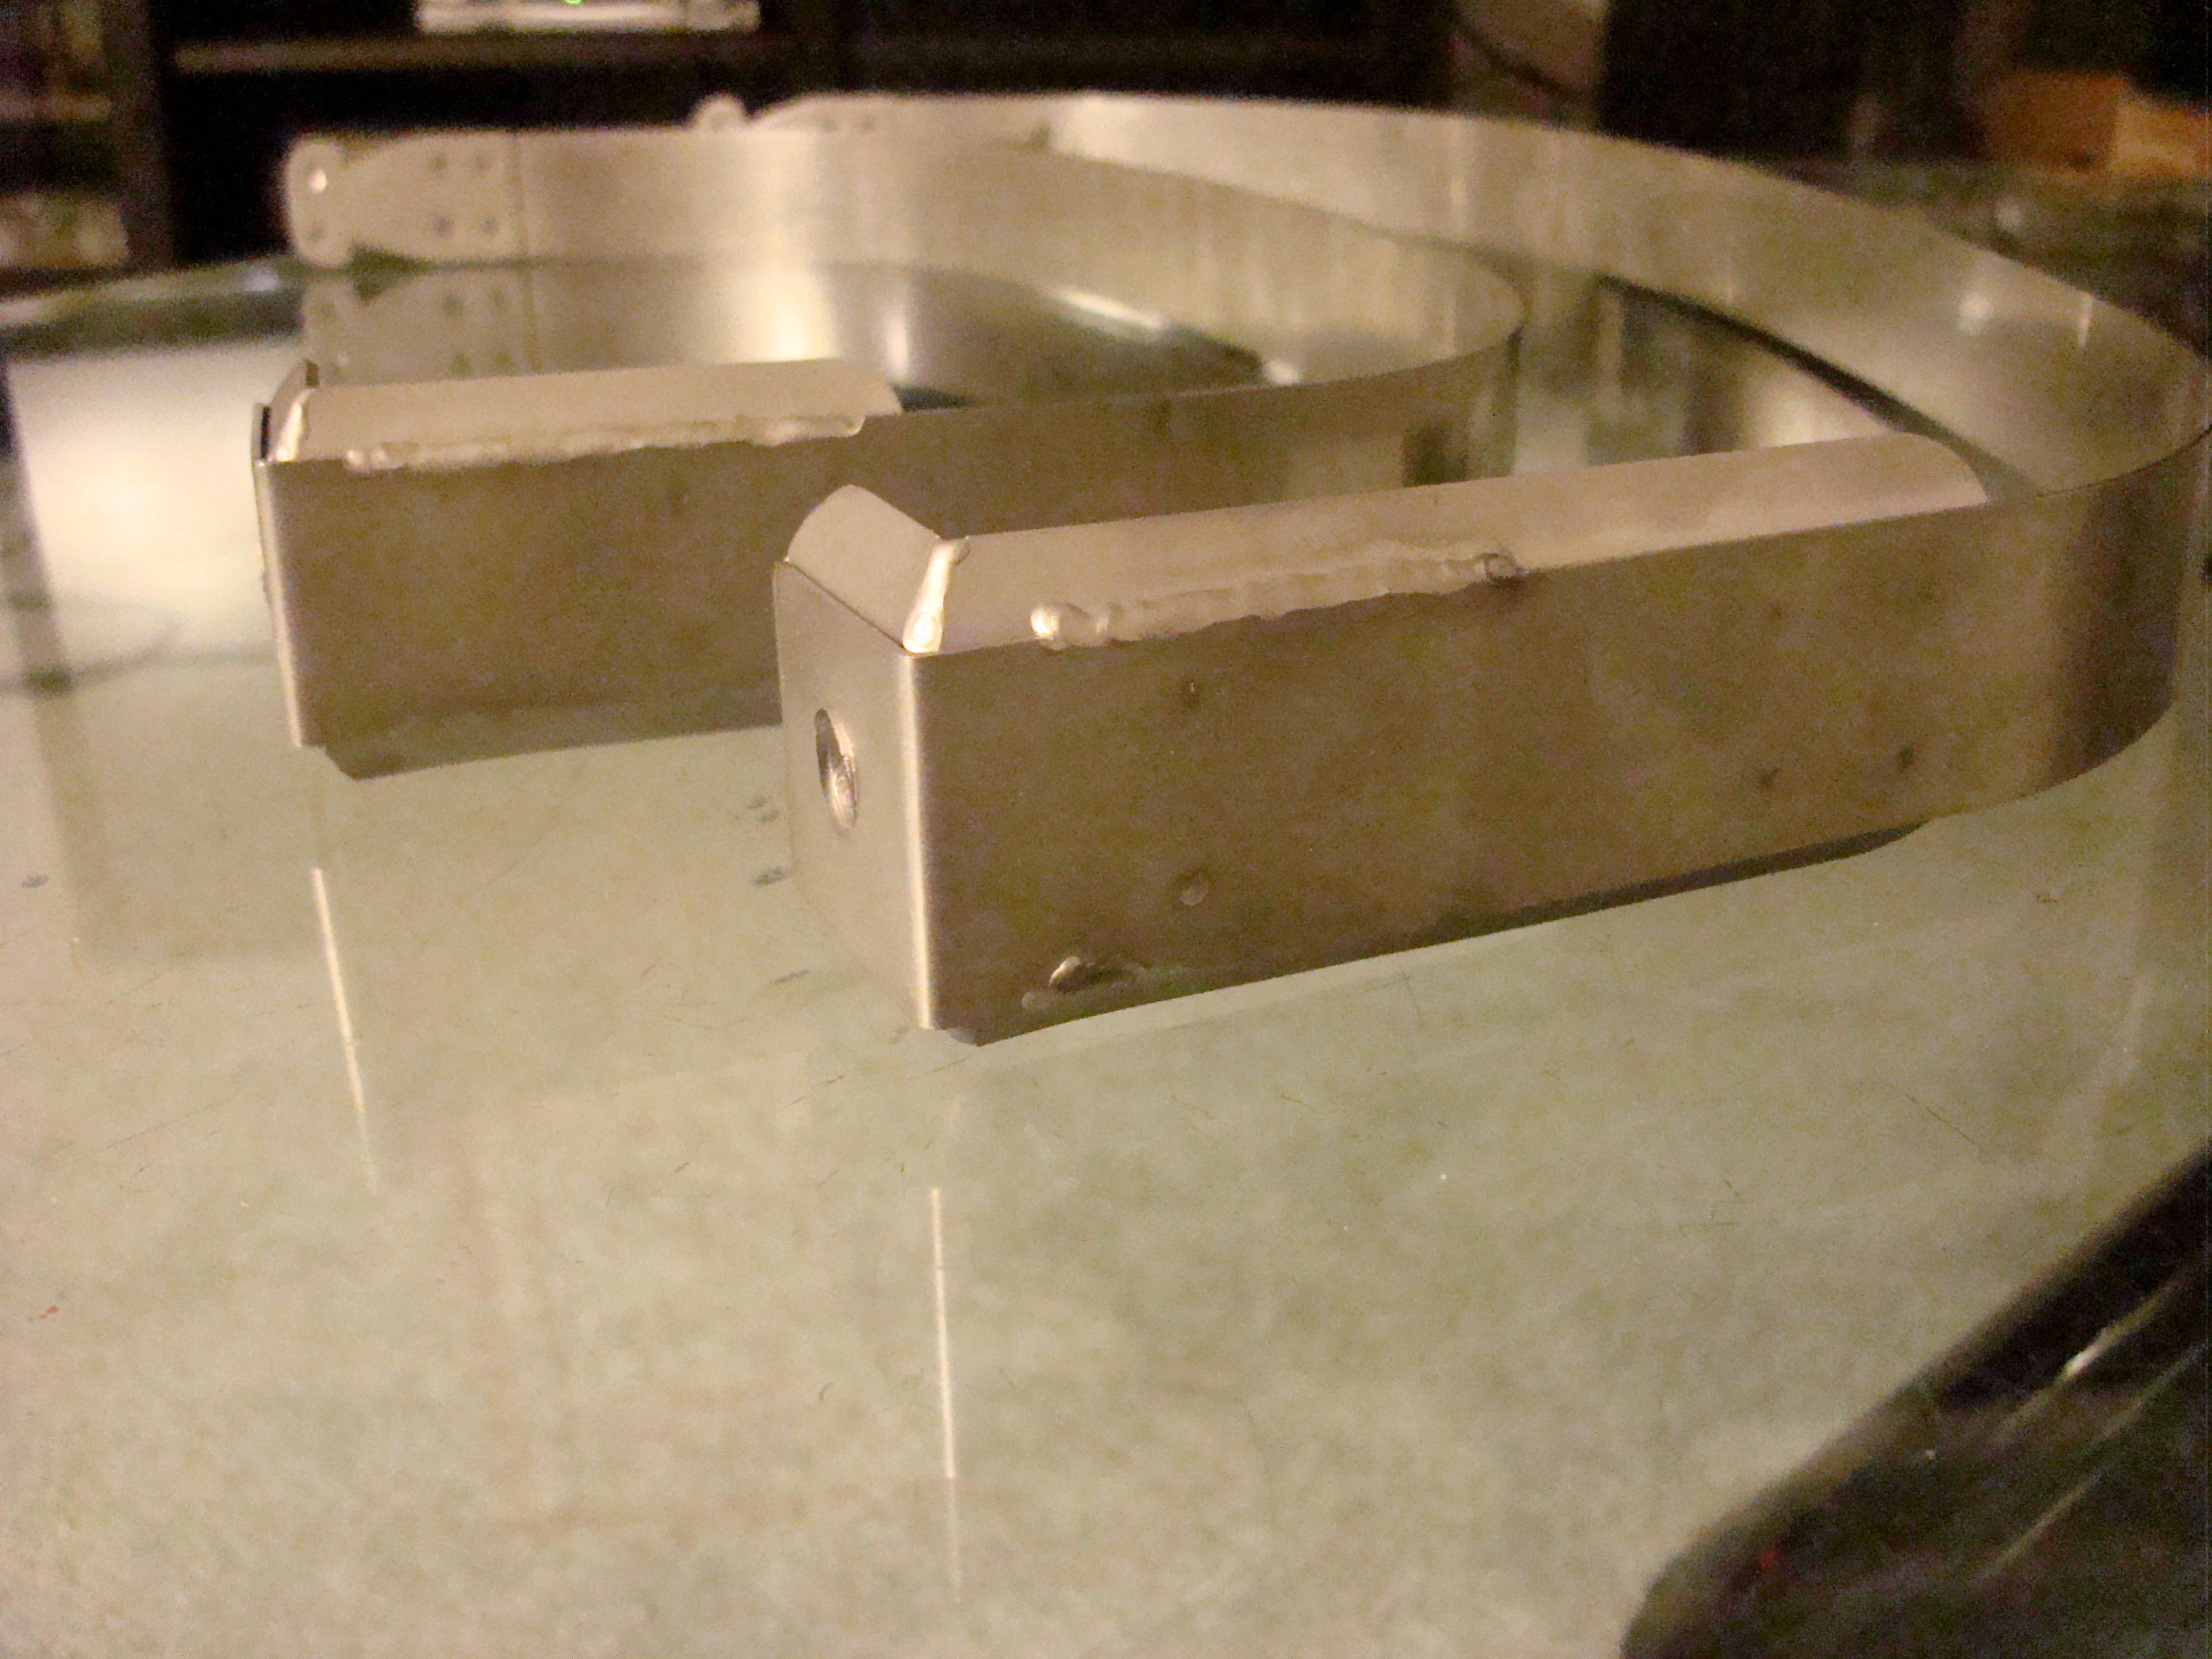
Tank strap update: Well who among us does not love getting packages related to our restore projects? Yesterday the postmaster left me the most impressive package yet, you guessed it... My Stainless Tanks straps... All I can say is WOW excellent craftsmanship, and solid welds will insure the tank stays where it is supposed to be!!! Please bear with me as I plan to soak the tank in caustic soda this week and the repaint it before I return it to the underside but I had to post some early pictures... Jerry I will test fit before hand so you know about the sizes and can continue production. Again I’m very impressed with the straps!!! But after looking at Jerrys car I guess I should not be shocked!

-
Ok just an update, I have a meeting wedensday morning with one of my former shop supervisors about assisting me in tapping the all thread so I will have info then about delivery. John
-
Thanks guys, I'm considering a 2 part epoxy...However we will have to see what the otherhalf choses... John
-
Negligence, Get yourself some 3 ton jack stands and a 3 ton floorjack, Harbour Freight, or Northern Tool are good places if you have one close. you can raise the car very highand it will be stable so you can safely work under it. I just purchased this sand blaster attachment from Home Depot and it works well for 10.00. http://www.homedepot.com/webapp/wcs/stores/servlet/ProductDisplay?id=100008764&jspStoreDir=hdus&catalogId=10053&marketID=401&productId=100008764&locStoreNum=8125&langId=-1&linktype=product&storeId=10051&ddkey=THDSiteMap Close Window [/b]:openFeatureFlex('http://fp.vendaria.com/vpop/VpopViewer.html?uid=100008764&iid=AddpfzvImumvmKvJJIIKfwKILumLKv&bg=FFFFFF&nm=BZOpener&err=0&title=&pf=t&fr=t','','587','632',true,false,false,false,false,false);"] You simply insert the pipe end into a bag or container of Media (Play Sand) and go to town... I do suggest you buy a shoulder hood, as the sand gets everywhere... Hope it helps. John
-
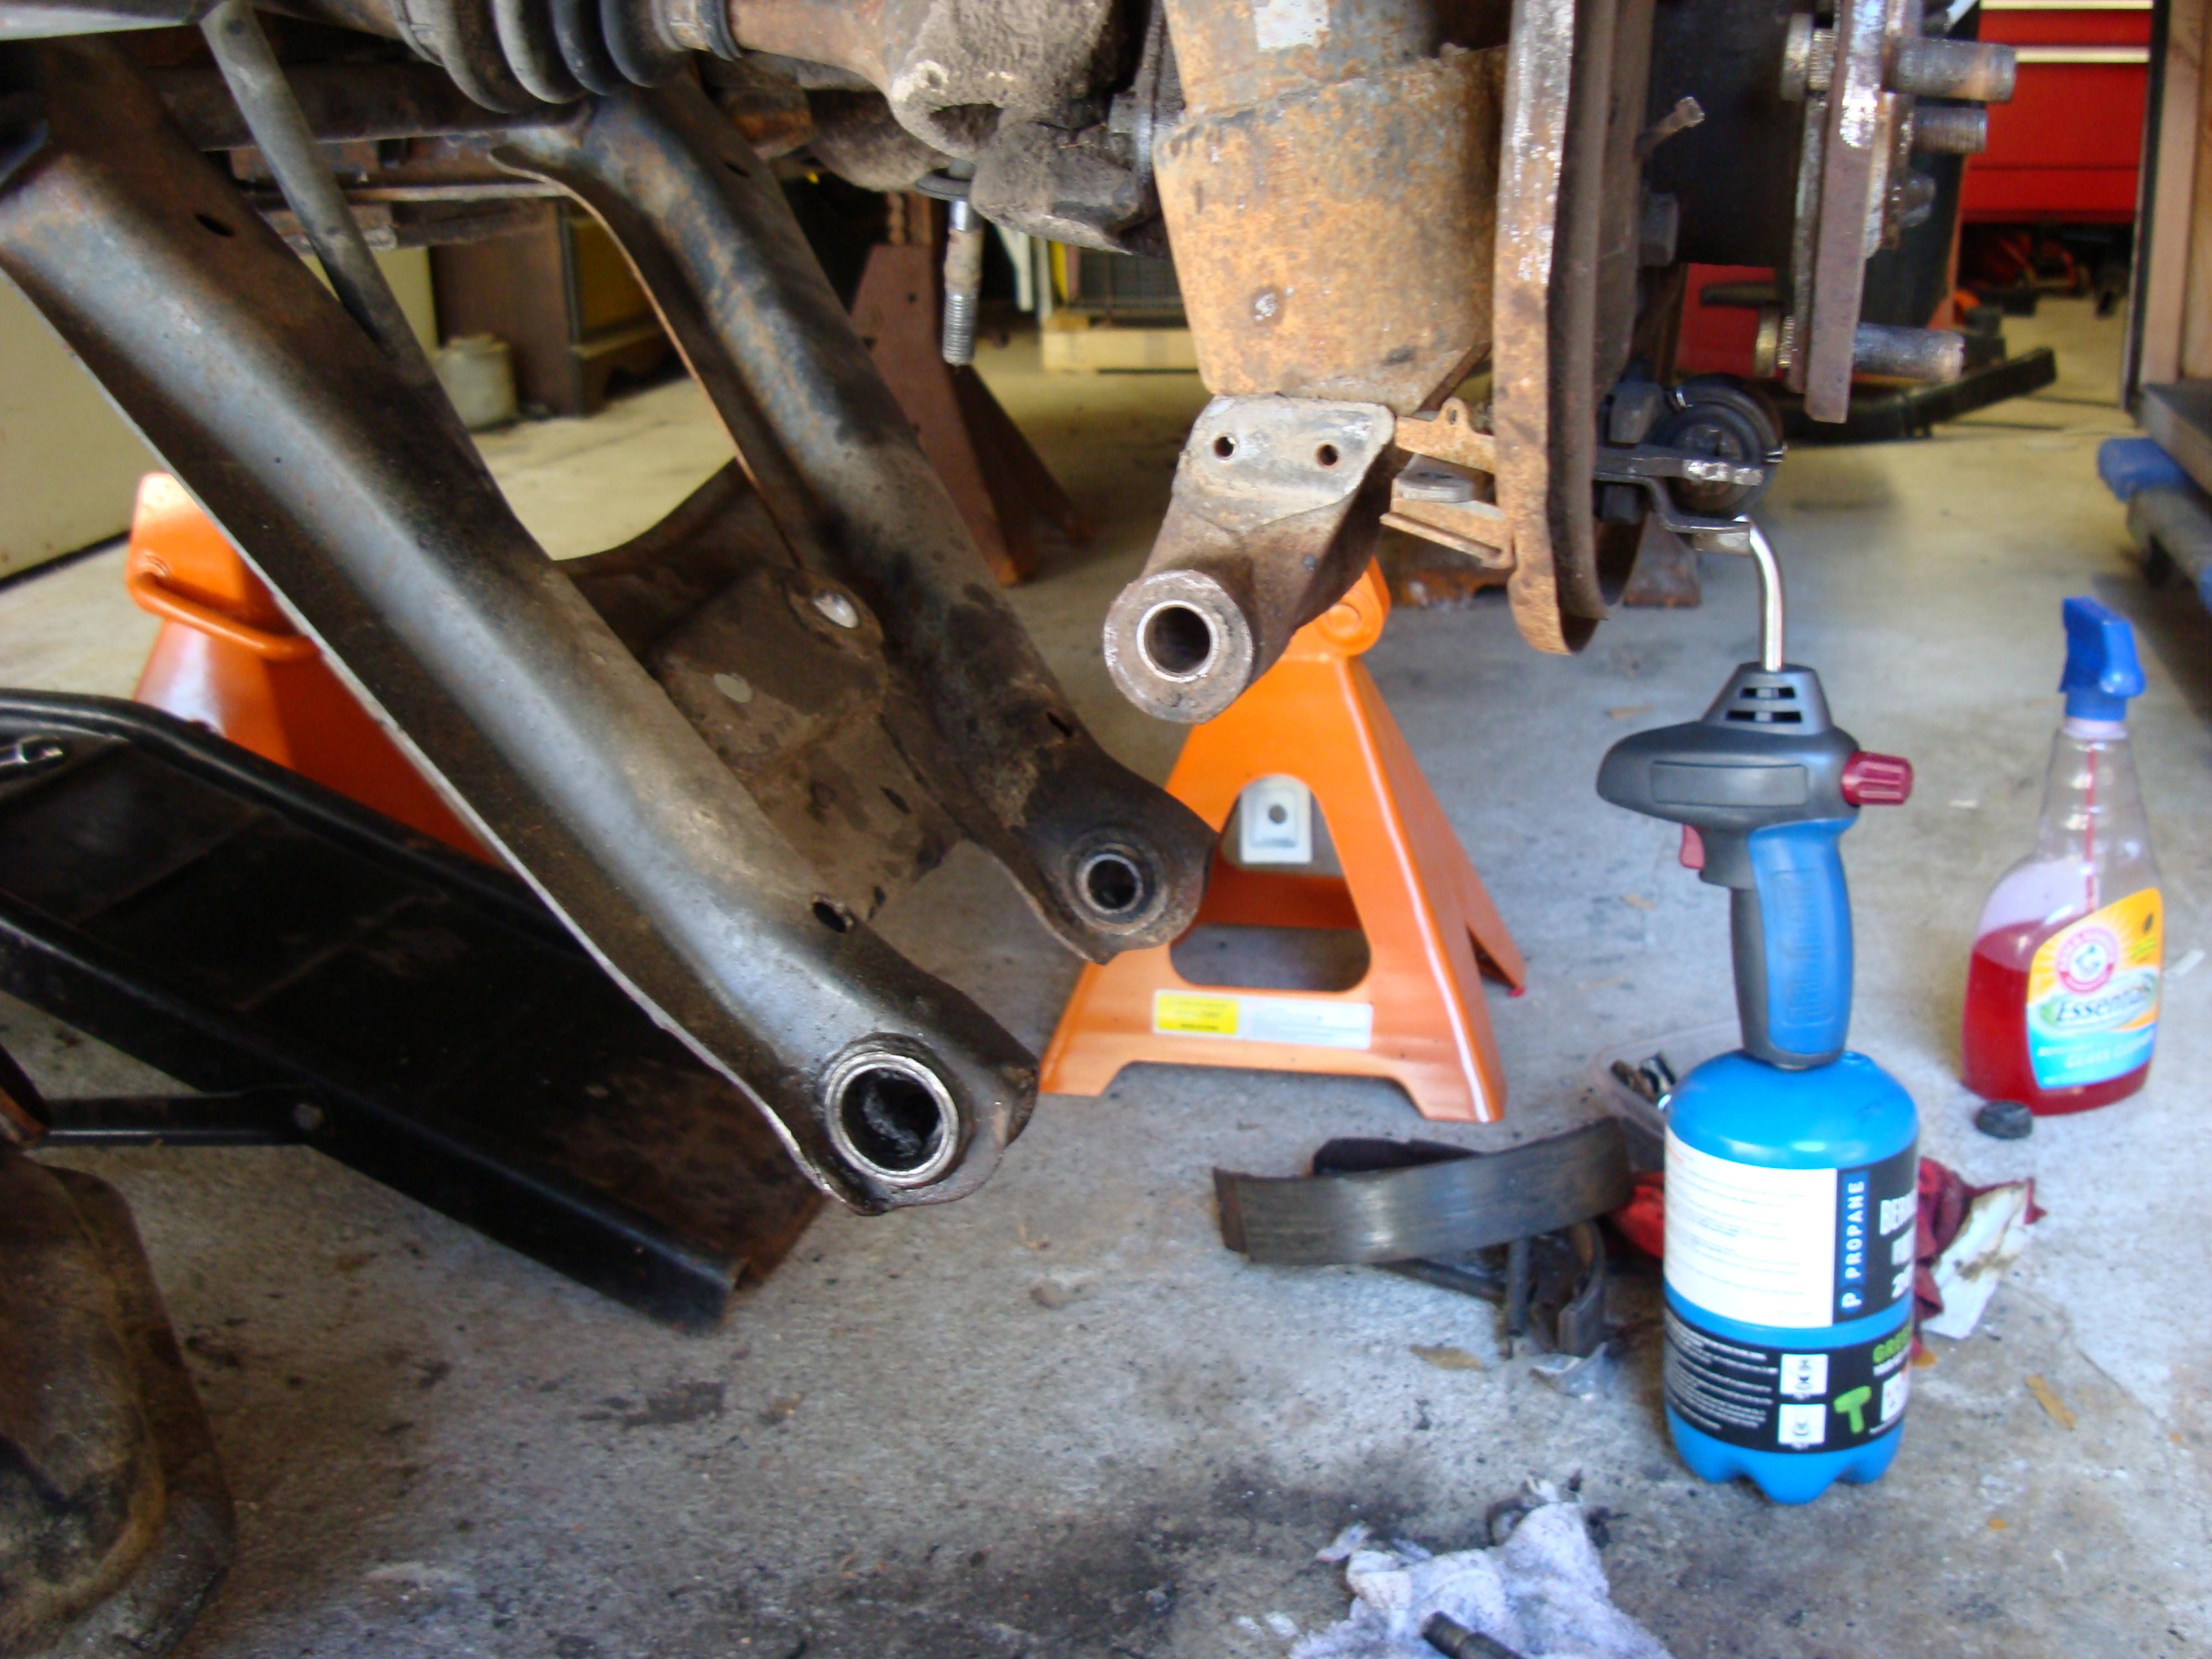
Well we dropped the diff yesterday and started on the bushing replacement. Removal went fairly easy it takes a little longer when your working with a partner (son) my method of attack is do half of the process while showing him how to do the other half. We are replacing all bushings, all three seals on the diff, and diff cover will be pulled to check the pinion. I'm thinking about sand blasting the diff and painting it. Any body know if you need high temp paint? I've attached a couple images for your viewing pleasure. In addition I plan to install zerts on the LCA's just as an added measure.... Thanks for looking John
-
What about a piece about 6"X6" of the driver side rear fender infront of the tire, very bottom corner, also any chance you have a grill? Email or PM jtburf@swbell.net Thanks John
-
suspension removal issue... HELP!?
jtburf replied to vertebraille's topic in Brakes, Wheels, Suspension and Chassis
Simply run the nut back up (tighten) and make sure the threads have not been mushroomed. If they have you need to file them or shorten the bolt with a hacksaw.... Hope this helps. John -
Ok I will get some numbers together, I'm just over off 249/Cypresswood. John
-
Let me gather all the materials, I'm going to have one of my old shops drill and tap both ends of the all thread next week, I will post up some nice pictures and get one up to you. John
-
Update, Since we were having some struggles removing the second pin (broke the 3/8- 16 All thread) so I decided to go bigger. Yesterday I purchased a 1' section of 3/4-10 all thread,3/4" nuts and large 3/4" washers and bingo the pin pulled very easy this way. My idea is to build pins and the outer body of the tool a little cheaper than previously listed. Due to the size of the parts shipping would need to be through USPS. Here is the bill of materials 2-3/4-10 allthread 1' long 1-3/4" water pipe 1-3/4 coupling 1-3/4-11 nut 2-3/4 flat washer The reason i going to two all threads is because when the 3/4" nut was to deep for our impact socket to grab we simply used a sawzall to cut the excess all thread off. Basically we impacted the pin out and every two inches we shortened the all thread. Let me know if you would be interested in one of these. Sorry no pictures yesterday but the process was no different than eariler pictures. John
-
One of the keys to remember is do not rely on the valves to completely seal off, always unscrew the bottles when in storage. John
-
ncfisher, We found a impact works well, however this weekend because of a lost washer we devloped tool issues...lol will be correcting that soon. cygnusx1, Log splitter idea sounds neat, I will venture to assume you plan on doing this with the whole Lower Control Arm and Strut assembly off the car?... If not, I see clearance issues!!! Keep us posted I would like to see the setup. Rossman, Seabrook, heck I drive through there all the time I have some very good friends in Shoreacres, I plan to re-design the tool to make it a little more solid and cure the issues between the nut and shoulder washer. If I can tweak the puller I will look at getting it shipped from user to user with out my involvement... Thanks again, John
-
Jerry, Enjoyed the call, will install and show a full documentation of the process, fit and finish!!! Thanks again, John
-
Congrats, Your off to a great start keep us posted!!!! John
-
Thanks, Read the PM but cannot reply for 30 mins... keep me in the loop. Thanks John
-
Jerry, What is the status, I need to get these coming. Thanks, John
-
I guess there are two schools of thought on this, if your looking for lite weight product that will not scuff of speed then maybe the bedliner type material would not be the best choice. If your looking to provide a nice undercoating that holds up over time (my goal) along with some sound damping properties then use it. It's my plan of attack in an effort to prevent long term rust return and sound damping. Thanks for the input. John
-
Anybody ever tried the spray on bed liner that they put in truck beds? They make some that is self install... http://www.repaintsupply.com/pd-als-liner-truck-bed-coating.cfm http://www.youtube.com/watch?v=PMKkD_bJAIU&feature=player_embedded John
-
Good deal. Keep us posted Thanks, John
-
Just an update, we welded the washers to the pipe this afternoon granted its not my best weld but it holds! Started working on drivers side and now the assistant is doing the work so at his request no blunt force trama to the spindle pin... yep 2 all threads broke so far...lol... I'm betting he will allow some slight tapping with a sledge ASAP!!!! I will keep on posting on this thread as we go... It is after all his car and a father son project! I did discover for those having issues removing the break drum on an older car send the lugs back towards the axel and it will help in pulling the drum!!! Besides what kind of dad would I be if he did not get a full disk upgrade!!!! John
-
Well since we could not get the spindle pin puller back in circluation so I opted to build one for myself, I will end up building a rigid version here shortly and possibly make it a loaner type tool. Materials needed 2- 3/8-16 coupling nut ( drill and tap one end M12-1.25) 1- 3/4" ID large washer 1- 5/8 Hardened washer 1- 1/2 Hardened washer 1- 3/8-16 all thread 12" long 1- 1" ID pipe 10" long 1- propane tourch What I did was drill and tap one coupling nut 1/2 way through with the metric M12-1.25 tap, and then proceeded to tightened it on the rear section of the spindle pin. Followed by threading the 12" long all thread in the open end of the coupling nut. I then applied a nice coat of grease to the all thread, followed by sliding the pipe over the all thread mateing it to the lower control arm, then I arranged the washers from largest to smallest and finally the threading on the last coupling nut. Hand tighten as firmly as possible, and start to apply pressure with a 9/16ths wrench (note I did break 2 all threads before using heat). With the assistance of a helper have one person constantly apply heat to the cast iron control arm section while the other person continually tightens the coupling nut (I ended up using a small pipe wrench as it allowed a ratchet type action). I found the application of heat worked best at breaking the pin free, although I did apply frequent blunt force blows from a 3# short handled sledge...lol Pictures do not actually show step by step process I will document the drivers side removal better. Thanks for looking, John