
ARZ_
-
Posts
157 -
Joined
-
Last visited
Content Type
Profiles
Forums
Blogs
Events
Gallery
Downloads
Store
Everything posted by ARZ_
-
Back to the point. I went for a ride in Cliftons car when he still had the Supra intercooler and the CT26 and it was fast. At that point it was the fastest Z I had ever been in. Even old school V8 swaps didnt feel as drivable and polished as the 7MGTE swap felt. I believe the 7M does have its problems but if you keep this motor below 18 psi with the proper mods and safe tuning you will be well into 400 RWHP and WAY faster than many other street cars. I agree if you can get the 7MGTE for cheap I would do it. Since you are getting the donor from someone doing a complete 2JZ swap you should get the harness and ECU and that will save you some money. Also I agree, very few stock transmissions are known to handle this kind of HP. At the latest SILV 08 (Supras Invade Las Vegas) We witnessed a 7M with R154 put down 990 RWHP. Show me an L motor with any trans, that has done that. If your goals are less than 500 WHP then I say this might be your cheapest route. I hope Clifton doesn't take this personally, but I think Clifton is jaded about this motor because he has had a few problems with it. In all honesty, Clifton has had a safe tune for a long time and holds this motor to an unrealistic reliability standard, because the L motor is so reliable and stout. I know Clifton has seen well over 32 psi on his 7M and at one point saw 39 PSI on the dyno. I hope the VQ is reliable for him and dosent cost him too much to make it reliable, but I think you would be hard pressed to put 32+ PSI to any motor and get the same reliability out of it Clifton has. His car and mine are no trailer queens or Dyno showoffs. Both of us regularly drive the pi$$ out of them and all summer he runs his at 26-28 (I think) and all winter he is well into the 30 PSI range, as far as I know he runs his at 32 psi when its cool out. but not 100% sure. Obviously he will need less boost to get to the same HP with a VQ, and I cant wait to see how it goes for him, and will offer any help he needs, but usually he never needs help.
-
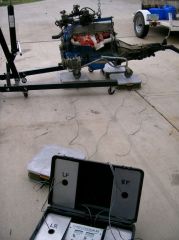
These are longacre scales, and were re calibrated just months before these photos were taken. I reset the scales before weighing each motor and trans. This is a complete L28, N42 with 81 ZX 5 speed and steel flywheel and full accessory drive with 71 SU carbs, this is the way I ran this powertrain in my car. This is a Complete 1987 7MGTE engine and R154 trans with Turbo and full accessory drive.
-
Yes the latest one gets HORRIBLE gas mileage. Dollar for dollar the equivalent Gas vehicle cost less to drive. The EPA's requirement to decrease emissions, forces them to install a catalytic converter of sorts and this cat doesn't get hot enough, so every few minutes the ECU dumps extra fuel in the exhaust to make the cat hot enough to continue its operation of DECREASING emissions. Sounds ridiculously but it is very true. I have 1 friend recently sold his 2006 Dodge, and sold it to buy a Duramax. Several friends that desert race and obviously tow to Mexico, Western AZ and So cal and all agree the Duramax is the best ON road. There were over 10 Ford (chase vehicles) on the side of the road, all had lost the same Trans sensor/TCM component. Realizing these guys were driving/Towing THE HELL OUT of the truck. Again all Dodge trucks (I had experience with) over 100K had needed a Flexplate, and more than 50% needed their auto transmission replaced.
-
SERIOUSLY!?!? Install a power adder chip and see if you don't change your mind. All comments below reference Diesel powered versions, of each manufacturer. I have a few friends that switched from the Dodge Cummins (Automatic's 90's and 2000's) to the Chevy Duramax and they were way happier with Chevy, towing or not. All the Ford guys I know are diehard and have not switched. I have had the opportunity to drive all 3 models in towing and not towing, on many long (6hrs +) trips and I would say the Ford (2006) was the most planted. It went exactly where you pointed it, the steering was very positive (make sure you dont get the leaf spring front models) . The Dodge (90's model) worked great but went thru brake pads in less than 18K miles every time Also every one I knew had lost a tranmission or 2 and a Flexplate in every one of their Dodge Diesels. The Chevy Duramax drove the best unloaded and still very well loaded, had crazy power when loaded, and had the best brakes, of them all. One friend put over 100K HARD miles, on the same STOCK brake pads, they are expensive pads but well worth it. I love the tow haul mode for helping with the brakes while towing, (I think they all "big 3" do that now) as early as 2002 GM came out with the Tow haul mode for the Diesels, others are a few years behind. When it came to off road exploring the Chevy was the least competent, due to the IFS. But 99% of your use is on the street and for towing I would go Duramax every day. All of the vehicles I drove with and without a power adder chip, in my opinion none but the early Dodges suffered drivability issues with the chip added, and all got better gas mileage with chip, none seemed to compromise the engine longevity, the Dodge gave up transmissions faster, with more power. YES the new Dodge gets WAY worse gas mileage than earlier Dodge Diesel versions, its VERY SAD. The Duramax got the best, and there is no disputing that the Allison transmission is better than any other. Stop into a transmission shop and ask them your question about what Truck you should tow with.
-
Pulled .84 G's acceleration according to I phone with G calculator.
ARZ_ replied to ARZ_'s topic in Miscellaneous Tech
The dude that went for a ride in my car had this program on his Iphone, and it seemed to work pretty cool. http://www.dynolicious.com/ -
I found a few more photos of interest. I suck at drag racing but here's a slip from my first time ever. Here is the Dyno sheet it made 487 on the previous Dyno pull but the tack lead fell off so it didn't record torque. Me at an Autocross event.
-
Pulled .84 G's acceleration according to I phone with G calculator.
ARZ_ replied to ARZ_'s topic in Miscellaneous Tech
We are not talking cornering. OK the Veryon has 1000 HP and weighs 4100 lbs my car weighs 2500 and makes 487 to the wheels that's over 550 to the crank. C&D Nov. '05...says the 1/4 mile time is 10.8 @ 140mph, I did 11.7 @125 my first time drag racing my car with the same slippery tires in that video. and I had to back pedal (let off the gas twice in 3rd gear on that run) How far off do you think I am?!?!? Its a coilover setup from Arizona Z car with a 3:70 CLSD. I have an aluminum flywheel, aluminum drive shaft and aluminum front hubs and 17-18 lbs wheels all around, the front tires are CRAZY light 245/40/17 hoosier R/6's the rears are 275/45/17 Mickey Thompson ET street radials. MT claims they weigh 28lbs per tire. This car is CRAZY fast with these tires, it flat out PLANTS your A$$ in the seat in second gear. Here's a video of it with marginal older tires. 70mph tire cleaning, look closely at the tires. http://www.arizonaperformance.com/parts_photos/Videos/tire_cleaning.wmv -
Clifton had been bugging me to try his stickey tires and I was worried, about them rubbing, so I held off for a while, then he suggested just raising the coilovers 3-4 revolutions. I finally got off my butt and did it last night, HOLY CR@P they are AWESOME. If you have problems hooking up on the street in your street car, then these are the tires for you. They are Mickey Thompson Street E/T's Holy mother these things are amazing. I am still breaking them loose at the top of the gear in second but you can tell they are still gripping quite well. I gave a couple of people from work a ride and they were quite blown away. As was I, in my first pull from the bottom of second gear. One of the guys had an I phone and after we had done a couple of launches, he said, OH WAIT I have a G meter on my phone. I said, your kidding, we pulled over and he explained it and reset it and the light turned green and we got back on the freeway, and we recorded a .84 acceleration and I hammered the brakes, and we recorded .87 Braking, I could have gone harder on the brakes but there was no need. Not sure if anyone has used this program or if they knew how accurate it was. It was just as level as he could make it in between his legs as we accelerated.
-
Yea I have that same Challenger lift in my garage, and I love it. It works great, but for really low cars (my other Z, and customers cars) I have to drive them up on 2x6's I have had my Suburban and Sequoia on it too. I saw this site the other day http://www.ezcarlift.com/ and I would have completely discounted it except that my friend said it worked great and all you needed was a drill motor. Its portable (if you need that) its light weight and it looks like its pretty adjustable. You might need blocks to pick up the pinch welds on the bottom of the rockers to lift an old school Z Grumpyvette: I saw your sig, LOL, when I can roast the tires from 60+ I need new tires. LOL. 70mph tire cleaning, look closely at the tires. http://www.arizonaperformance.com/parts_photos/Videos/tire_cleaning.wmv http://www.arizonaperformance.com/parts_photos/Videos/another_70mph.wmv sorry for the hyjack, now back to the topic. I couldnt tell if you were actually looking for a lift or just asking for opinions.
-
After all the research I did about breaking in a motor I couldn't find anything that that anyone agreed on with any reliability other than "Drive it hard and change the oil early". Like always I had a ton of things to do at the last minute, so I fired it up and drove it hard to go find the parts for my AC and to get it charged. I cant remember all the stuff that happened but this West Coast National event wasnt without its drama either. I didn't even get out of phoenix before I had a mechanical, its all documented here, in this post. http://forums.hybridz.org/showthread.php?t=121584 Also I found a couple of other threads that I forgot to add to the first or second post. Viper vs. Z http://forums.hybridz.org/showthread.php?t=101362 TT Viper vs. Z http://www.supramania.com/forums/showthread.php?p=632353#post632353 Again I didnt take any photos of it rolling out of the garage, but as you can see we made it to MSA West Coast Nationals 2007. I think Clifton was changing his left and right tires because last year he used up his front right tire. He was correct to do so as I used the hell out of my front right tire too. Finally I get to attend a show, the line was more than a mile long getting to the show. This car had a ton of modifications. Sorry I couldn't bear to photograph it. and something no Z car should be without, a lift with a bearing so you can spin the car around.. Some of the show favorites. I didn't expect to be the highest HP car at the show, but with Clifton on my left and Chucks TT V8 on my right it kinda stole some of my thunder. LOL. Here is the failed silicone transition hose. I can only guess that it had been expanding like a balloon the entire time it was installed previously. When I installed the new one at Driftmotion I wrapped it tightly with fiberglass exhaust insulation. I have been up to 24 psi or so many times, and it seems to be doing fine.
-
Now it is assembly time. I bought stainless steel brake lines and had all the hardware plated and put it all back together as carefully as possible. Its so hard to assemble stuff like this where both parts are so shiny and you don't want to scratch either part. I designed some billet Swaybar mounts, because the ones that come in all the kits look like crap. My clutch pedal was wallerd out. So I welded a little spherical bearing in its place. I installed some chaffing grommet around the hole that the Air filter was to go thru. Here designed a billet Intercooler mount, I still needed to bend it to fit properly. Yea that's right. bend the BILLET part, you'll see later.
-
If I wanted to make it to the 2007 MSA show, I was going to have to hurry. It was March just a little more than a month to go before the show in Anaheim. Since I was going to rebuild the motor right I decided to do a few more things I always wanted to do. I installed JE forged pistons and Eagle Rods, and plastigauged the motor. Toyota has a unique way of documenting the exact bore of each bearing and of documenting each journal. Using the pair of numbers you add those together and purchase the proper bearing with proper thickness. Checked each bore and each journal as best we could and a few were different so we documented it properly. We installed the bearings and Plastigauged each one and they were right on .0017 -.0018 for each. The numbers crossed out there were the old numbers notice I documented the proper numbers on the other side next to each journal. Here we checked the thrust bearing, PERFECT!!! Installed a crank scraper. Installed trap doors around the sump in the oil pan I had a few motor doo dads polished, and all the fasteners and brackets sandblasted and plated. I made a temporary paint booth and it worked great. If I had to do it again I would only use one fan. Once I started painting I stayed in the booth until I was done painting. I left the fan on all night and there was very little dirt in the paint when I was done. All the photos where it looks like dirt are actually just a glare from the flash.
-
I just skimmed it real quick and I couldn't find it either, I thought I saw that skimming it earlier. OK.
-
Reserving this post for more photos, 7
-
Reserving this post for more photos, 6
-
Reserving this post for more photos, 5
-
Reserving this post for more photos, 4
-
Reserving this post for more photos, 3
-
Later that week I installed the stuff to turn the boost up and boy did that make a difference. I started turning up the boost and it was amazing the difference between 10~13psi and 15psi. Over the course of the next few months I had installed an H2O/methanol system and kept raising the boost. It seemed like 17-18psi depending on the temperature, was the new limit of the boost without detonation, without the H20/methanol. I didn't have injectors for much more than 23psi so I left it at about 20-21psi for a while. Clifton had devised a system that worked great and had a safety to cut the boost if the methanol shut off or ran out. We both had a few problems making it work properly so he ditched the safety, I figured if Clifton wasn't worried then I probably shouldn't be. I drove it trouble free for the rest of the summer and fall. I attended a few SCCA Autocross events and it did well but the courses were always so small that Miata's were always a tad faster. In early December 2005 I took a friend for a ride I did a 2nd, 3rd, and 4th gear pull all felt good, then at the top if 4th gear, smoke came out of the hood and I knew in an instant something was wrong. I babied it all the way home, but it was no use, the damage was already done. They always say a failure is never caused by ONE problem. This time it was caused by several failures. The fact that I bypassed the safety shut-off and my methanol tank was a little low, that combined with the fact that had the sump on the front of the tank must have run the tank dry. I leaned it out and broke a piston or 2 As soon as I broke my motor Clifton went to work finding the problem. This kinda bummed me out so I let the car sit a while knowing I wanted to make it to MSA 2006 I had plenty of time to rebuild motor #3. Since the other 2 motors were used junkyard motors I wanted to find the best way to seat the rings of the new motor. Funds were tight and I had other things going so I let it sit for a while. When I tore the motor down the cylinder walls looked fine no scoring but the crosshatch was kinda worn and had done several successful in-car rebuilds so I decided to use a stone hone to put the cross hatching back. I pulled the crank and bearings and washed the cylinders down with brake cleaner and all went as planned. In my research to confirm the best (most successful) method of seating the rings I searched and searched. You can find as many opinions as sites you read. Seems no one really agrees on ONE method but the theory of the Moto man engine break-in secrets, seemed like it had some merit. Even other turbo engine builders seemed to agree on the "Run it hard" method of breaking it IN (obviously) after warming it up. I finished it just in time for an up coming autocross I ran out and did my initial break-in and was very disappointed that it smoked more than I wanted. I did a compression test and it looked good. I did a leak down and 3 cylinders were above 96% I was AMAZED, I haven't done a ton of leakdown tests but that number sounded incredible, unfortunately the other 3 weren't so hot. One was mid 80s but the other 2 were mid and low 70%. It was odd that the good and bad cylinders had no correlation to the 2 broken pistons. I should have run the motor longer to see if the leakdown numbers improved but I was so disappointed that I just let it sit until I could do it at a machinist. I had finished in time to make it to MSA West Coast Nationals 2006, but I was so disappointed I didn't want to go without being able to go in my car. Again the car sat for a long time as I didn't rush the rebuild. Clifton returned from MSA and decided on a full paint job and color change. He had never been a fan of Orange. He threw himself into the paint job and full body work and it came out AWESOME!!! After having the engine out so many times I decided if I was ever going to do it right I had to start NOW before the motor went back in. Here's some photos of Clifton's car before and after. Sorry I dont have any shots of it without my car in them. BEFORE AFTER I made the decision to paint the entire front of the car from the inside first. I really didn't start until early 07 but I didn't want to put a shiney new motor into an old cracking paint job engine compartment. I wanted to do it RIGHT!!! Below are the photos I took of the full restoration of the front end from the inside. Fortunately I found a lift for my garage between the last motor build and this one. The front of the car was very light if I pushed up at all the front end would lift with only about 70-80 lbs of pressure. Luckily I ended up with an early 1971 car that didn't have all that factory rust proofing. Oddly enough all that stuff under the fenders had a real thick coating of something that did a pretty decent job of rust prevention. It was weird stuff to sand, it was very thick and would load up the paper very easily. The Sway bar connections looked weak so I welded doublers under them. Straight frame rails Yea!!! The doubler at the TC rod had a slight amount of rust, so I repaired it Removed the throttle linkage Removed the factory Clutch line retainer I relocated the Clutch line retainer to the drivers side. My friend gave me the idea to make the battery tray replaceable and so I decided to powdercoat it. EXcellent idea HUH?!?! Also this way I can remove it if I ever need to. Clifton had an almost NEW condition battery tray he gave me from a donor car, he had sitting around. I welded doublers on to the out side of the skin so they wouldn't crack the sheet metal when fastened down. Here it is with the doublers welded on to it.
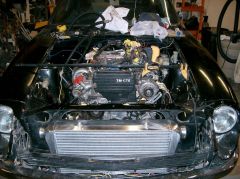
-
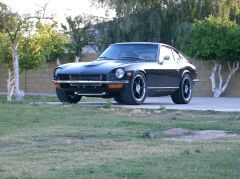
I decided to post a build thread to post a bunch of the photos of the work on my 71 240Z. I have owned this car since 1989-90 I restored it to the best of my ability back then with an L28 and 5 speed and 16 inch Rikens. When I finished restoring it I was still in school and I told my Girlfriend she could drive it if she paid for full coverage insurance. Sounds ill advised, but I trust her more than myself. I had to marry her to get the car back, thru life changes and location changes we never considered selling the car but due to electrical problems the car sat for almost 10 years. I never really wanted to put it back on the road until I could do it properly. PROPERLY = fuel injection and a turbo. Clifton had come across a 7MGTE and it was the perfect swap, it ran great it passed emissions and the AC worked great. He said the initial swap took him 6 weeks, I had a bit more I wanted to modify and I am definitely slower than him, it took me 6 months to get mine running. He was always of the opinion "minimize the down time, get it back on the road as soon as possible". This philosophy has served him well, but as long as I was going to do it RIGHT and since my car wasn't running anyways I could keep making it faster before it ever ran. I would have a hard time talking my wife into taking an already running car apart just to make it faster. I never counted on breaking it so many times and being able to make it faster then. Clifton had found a complete drivetrain for me and I got it from him late in 2004, the race was on to try to get it on the road before MSA West Coast Nationals 2005. Take a look at all the mods I did and I think you will agree that I did get quite a bit done after work and weekends. I will try to document what I have done since 2004, as always the car is still a work in progress, but many things are as good as they are going to get. Here, what it looked like in 2005 when I rolled it out of the garage, just before the 2005 West Coast Nationals. This is my avatar photo Heres what the engine compartment looked like for a while until I polished a bunch of stuff and made Billet Cam covers and Intercooler brackets. I dont have any real BEFORE photos so I will just explain a where it was and where I was going with it. As I said it was just sitting for almost a decade waiting for a good reason to put it back together. Where it WAS: It was a good condition 1971 with an L28 with Headers and 71 SU carbs, a ZX 5 speed, 16 inch Riken's, Koni's and Coil springs, Camber bushings, Swaybars, Hella H4's, Z31 seats, air conditioning and a chromed flush front bumper. Other than that I think it was pretty stock. Where it was going to BE: I had the 7MGTE, a Garret 60-1 T4, a huge Ebay Intercooler, 3 inch Aluminum plumbing for the IC, 3 inch Stainless for the Exhaust, the Supra Trans, the stock clutch, Aluminum drive shaft, Z31 LSD, Walbro fuel pump with the Supra fuel tank baffling installed in the stock Z tank with all non required plumbing removed. Stainless steel brake lines, old big sway bar from ST and a custom billet Swaybar mounts that I made, rear camber plates I made to accept the AZC Struts. Arizona Z Car goodies all over: Front Brakes, with 5 lug aluminum hub. Rear Brakes, with 5 lug kit. Full Coilovers kit on all four corners. Front Billet Control arms. Rear Cromemolly rear control arms. Rear Billet Mustache bar. Rear Dog leg support. Front Camber plates. There are a ton of other doo dads that I havent listed but will on a full mod list later. If I can find an original photo I will post it. Other than that might as well get to the swap and all the mods. I tend not to photograph NON progress, as it kinda scares me. Im sorry I dont have any photos of the original L motor in the engine compartment or a big hole where a motor should be. Most people have asked how I made the motor mounts. To be honest this was one of the easiest parts of the whole swap. I have a lot of experience fabricating Rock Crawlers and stuff like that, so this part was easy. The hardest part was trying to keep everything light enough as Rock Crawlers and Desert racing vehicles are usually subject to jumps and serious impacts. Heres the motor mounts, and how I positioned the motor. I have since powder coated them, if I find a photo of them powder coated I will post it. Notice under the pan is a VERY thick piece of steel. I used a 3/4 inch piece of steel to space the motor up. I rested it on the Steering and this spaced the oil pan 3/4" up. This ended up being perfect, as the stock motor mounts sagged about 1/4" inch on the stock rubber. Here's the kind of deconstruction that scares me. Clifton was a huge help, he came over and sorted the few wires that the ECU needed and showed me how to do it and then it was back to the mess. I had to punch a hole for the Supra ECU an this was the best place to do it. Now on to the front camber plate install. You will notice several of these same photos on AZC installation for these camber plates, but if I had it to do again I would have mounted them flush to keep them from interfering with the hood. Also he has changed the design since then, so you shouldn't have problems with this. Now for the Exhaust. I used 3 inch diameter Mandrel bent Stainless Steel. I started at the turbine outlet and fit each piece with 3 small tacks at each intersection then went back and TIG'ed the rest of it together. It came out AWESOME in my opinion. I am very pleased with result, except I wish it was quieter. I made an adapter to adapt the Toyota (unique) Turbo bolt pattern to the Garret T4 turbine inlet pattern also I hung the 38mm WG off the bottom it all worked out great. I ran the Nitto 555 Drag radials until I was well over 350 RWHP. They werent good for much over 400 for me. After I finished with that mechanical stuff I had to clean the bottom of the car and prep it for all the new parts. You cant put new parts on a dirty car!!!!!! I took the the top off of the Supra Tank and took the fuel tank baffle out of the Supra and installed it in the factory 240Z tank. Along with the fuel pump hanger and bulkhead connections I could assure it was at least as good as the Factory Supra setup. Now for the Intercooler and plumbing For the Radiator fan I found a Ford Thunderbird turbo coupe with an 18 inch fan. I planned to build a fan shroud but I never needed it even in the summer with the AC running, the gauge never went above 215 unless I was idling forever and even then thats all the higher it went. It has 2 speeds I use low speed in the winter and high speed in the summer, it works great, Since I was upgrading the Turbo and the wheels I was able to sell these items to fund the new go-fast parts. this is the Supra Turbo I sold, CT26. They do pretty good up to 350 RWHP or so, I knew I wanted more so I sold it. These were 16x7 Rikens with a PERFECT offset, and obviously very desirable, I got a very decent amount from these. I really liked them but all the newer tires with current race technology were focusing on 17 inch size and I really liked the look of the bigger 5 spokes. Heres what I ended up going with. 5 Zigen 17x9 x35mm offset for the rear and 17x8 x 25mm(or 15mm I cant remember) for the front. I know I would like the fronts to stick out a bit more, but was able to use the suspension to get a little closer. I wouldn't recommend being too aggressive with moving the suspension out. Remember the 2X the diameter rule. Finally I got to install some brakes, and stuff. I have had the car assembled so long I wanted to to a proper build thread but I also wanted all to know its not finished. I had to decide if this was going to be a chronological narrative or a continuous build thread. So I decided to add all the information I could to get the car and photos to the point that they are today. After adding all you saw in the photos above I assembled it just in time to make it to my first West Coast Nationals in 2005 KINDA!!!! After rushing and rushing for 6 months all culminated in this story. http://www.supraforums.com/forum/showthread.php?t=278283 Also found here, and I posted some of the mods I had to do to complete the swap. http://forums.hybridz.org/showthread.php?t=100647 On that second junk yard motor I installed a metal head gasket along with the ARP head studs. I drove it all summer and fall the electrical fan that I had modified failed. I had to buy a new fan from the dealer and install it in my custom bracket. The AC that I had charged the day before I left for MSA had leaked out. Turns out it was just a shaft seal and after I replaced that it worked ever since, except for the electrical troubles I had. The ONE time I pay someone to work on the car they screw it up. They (a local mechanic) were supposed to charge the AC and tell me where the leak is. I called them at the end of the day and they said they had an electrical fire in the dash board of my car. I just about $hit myself and raced down there. They said they couldn't find the problem and weren't going to charge me. WOW WHAT A NICE GESTURE!!! Turns out it was not a fire but it did burn up the shortest harness in the entire car. If you ever had any experience with this harness its the Blower motor harness, its about 4-5 wires and goes from the fan speed selector to the AC "on" switch and over to the resistors for the fan. Turns out the old inline fuse holder going to that aftermarket (dealer installed) AC on switch has a spring in it to make contact with each end of the glass fuse. When you assemble it you put the spring in it then slide the wire thru and the little brass contact rests on top of the spring, the wire end gets connected to what ever. Somehow the wire was put in first and the spring on top and the crimped end of the wire hung out of the fuse folder and grounded against the metal temp sender for the AC unit, See photo below. Also the headlights weren't up to par and the fuses always seemed hot with the bright lights on. I installed relays for the headlights and they were a ton brighter. I forgot that back in the day I had put Hella H4's in with 65w low beams and 130w high beams, DOH!!! Cant believe I didnt have problems earlier with the headlights. Hell maybe that was the problem back when I parked the car in 1995. There was a Dyno Day at Intense Motorsports in Chandler and I finally got a chance to check it. It made 335 at the rear wheels on a Dynojet. The current setup was set to 10 PSI and the Turbo flowed so much that the boost would creep to 13 psi. Many people argued with me about what boost creep was. When you have a stock turbo and turn the boost up the spring on the waste gate isnt strong enough and at the top of the rpms (high load) the boost will creep down from what it would hold previously. When you have a bigger turbo and you try to keep the boost lower (in my case 10 PSI) the wastegate had no problems at the lower rpms but when the rpms and load increased so did the boost and wastegate was not big enough to keep the boost down below 10 psi and since the WG was as open as it could get, the boost would increase in 3rd 4th and 5th gear to about 13 psi. Once I started to turn the boost up it held solid at any boost level set above 14 psi. After the Dyno event I got to run a supercharged 350Z it had amazing response, almost NO turbo lag, but even at that my car would still reel him in, once we got into 3rd gear.
-
-

-
-
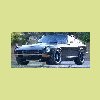
 This is the photo in my Avatar
 -
Yea I have been meaning to create a gallery. Thanks, Its kinda hard to find many photos of my car unless you go way back in my earlier posts, and even then I have tons more from motor builds and engine swaps and painting and repair. I remember seeing a photo of that red car pullin a wheelie in one of those motivational type posters that said, R200?!? YES Its strong enough. I didnt know that link I posted wouldnt work, This is the thread I was talking about. http://forums.hybridz.org/showthread.php?t=114798&highlight=LSD+install JMortensen's right it wasnt hard to find at all, maybe I shouldnt have taken pity.