
Miles
-
Posts
2374 -
Joined
-
Last visited
-
Days Won
29
Content Type
Profiles
Forums
Blogs
Events
Gallery
Downloads
Store
Posts posted by Miles
-
-
Do you mean this?

-
You sure you bought 280zx rotors?
-
What is the diameter of the rotor you have? Measure it!
-
-
-
Looks like we can post new threads in the FAQ, but replying to the thread is not allowed.
Someone should contact the OP and have him post his question in the brake section.
-
Seems to be an ongoing problem dating back to 2017
-
Same thread. Same problem.
I was going to post this:
-
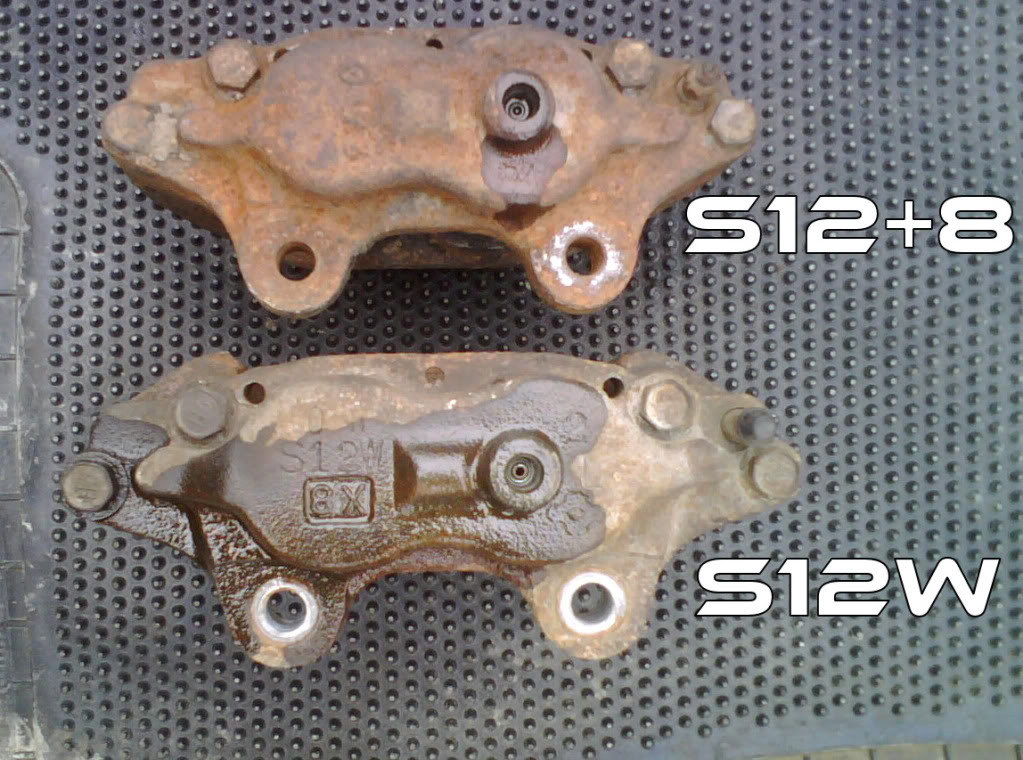
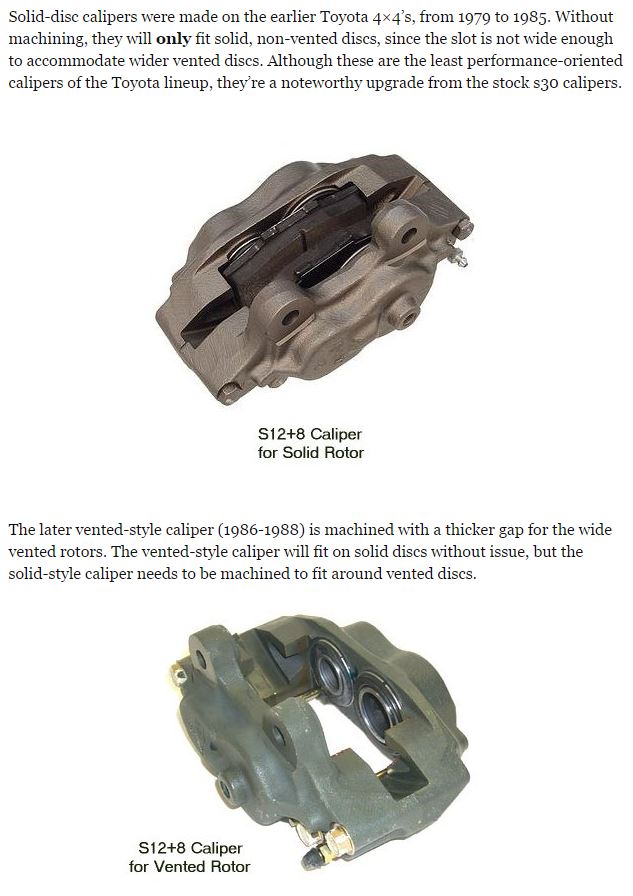
Some years Toyota S12 + 8 calipers (solid rotor application) were modified (wider slot) for vented rotors. The S12 + 8 caliper has two 43mm pistons and two 34mm pistons.
-
I see that a proportioning valve (PV) came up again.. It always seems to.
1. All of the Toyota swaps result in front bias (nominal 60% front - 40% rear). A proportioning valve reduces pressure to the rear brakes so adding a proportioning valve to the rear would make no sense.
2. Never install a proportioning valve on the front brakes.
4. Never add a proportioning valve to a brake system that has a stock PV installed.
Many people who do these brake swaps are often disappointed with the results. Mostly because the brakes on your car were designed as a system by the manufacturer. That is, the calipers, wheel cylinders, master cylinder, pads, shoes and proportioning valve all were selected to work together. When you change one component, you create a domino effect such that you then end up needing to change the MC because the pedal is too stiff or the pedal is too long and hits the floor or adding a larger diameter booster to deal with a stiff pedal etc. etc. In the end the brake system performance actually degrades.
In the brake section there are many discussions about brake balance calculations. Suggest you study those threads.
Again, if you feel strongly compelled to swap parts, leave the drums alone, and install the Toyota solid disk calipers on the front and run Carbotech pads and shoes. Rebuild the rest of the stock brake system. And then quit. You will notice a bit more front bias the first time you apply the brakes.
Otherwise leave it stock and install Carbotech pads and shoes.
If you are not sure if a modification will pass German law, ask an inspector.
BTW: There are two styles of the vented Toyota calipers. One with four 43mm pistons and the other one has two 43mm pistons and two 34mm pistons (same caliper as the solid caliper, but the slot was machined wider for the vented rotor.
-
German laws have come up before when discussing Z car modifications.
So we know, what do German laws allow you to do?
-
Many many many "how to" posts on gauges on HybridZ and Classiczcars.com. Search "gauges" or "autometer" or "Speedhut". There are complete write-ups on Hybridz and on the web.
-
Inspect the threads on the bleeder and in the caliper. Replacement bleeders are available.
-
Keep the brakes stock with SS braided brake lines and Carbotech pads.
If you can't resist doing an "upgrade" then install SS braided brake lines and the Toyota 4x4 pickup solid rotor calipers with Carbotech pads and a 15/16 in. master cylinder. And then don't do anything else.
If you do the Toyota caliper swap, use generic A/N SS braided brake lines with A/N to metric adaptors to connect to the caliper. This allows you to go to any speed shop and buy generic A/N lines and not have to special order custom brake lines. It also avoids having the re-bend the stock 240Z "S" shaped brake line that goes from the hose to the caliper.
-
The letter on the spacer has to match the letter stamped on the hub casting. Assuming that the casting is original, look around the hub casting (see picture). Once you have the correct spacer, assemble the spacers and bearings per the FSM for the year strut you have.
-
Fumes inside car have nothing to do with running rich. Replace the hatch seal and seals around tail lights.
If you can find it, use an original Nissan hatch seal. The after market hatch seals don't fit well. MSA may have original Nissan hatch seals.
-
1. Better a bit too rich then too lean.
2. Once the SU carb is set up and the car is running ok, leave the carbs alone.
3. If you plan to rebuild the carbs use quality Z Therapy rebuild kits.
-
-
On 02/07/2018 at 11:28 PM, munters said:
Onether point. The bigger the mc the more force needed for the same pressure. Why did you go with a 1inch mc and stock brakes?
WIth stock brakes, a 1 in. MC is expected to make the pedal hard to push. Replace the 1 in. MC with the stock 7/8 in. MC and your brakes will be fine.
-
 1
1
-
-
1. Download a Factory Service Manual (FSM). Should be available several places at HybridZ. It explains how to work on a Z car.
2. Follow the instructions in the FSM
http://www.nicoclub.com/archives/2-write-ups-on-tuning-su-carbs.html
This video is for British SU carbs, but basically the same procedure. Also, make sure that the needle moves freely in the seat as you move the float up and down.
-
-
2 hours ago, 5 Star Rising said:
I went through the ignition system already, timing, new distributor, new coil, got rid of the points, went electronic ignition, same issue. How can I make the carbs run rich with the choke open all the way? Seems like it is not getting enough fuel. Follow the directions given in the ZTherapy video. What you are doing over and over and over again is not going to get the result that you want. Diagnose and fix the carbs.
Runs better when I choke it and cut the air consumtion in half thus balancing the air fuel mixture better. As soon as I open the choke all the way it seems like the carbs are getting way more air than fuel. Would raising the float levels so that the fuel almost pours out the top of the nozzles help richen the mixture? It backfires out of both carbs when I Rev it and the choke is fully open. Doesn't really back fire when I pull the choke back a bit.
I have both carbs set to maximum rich settings and it doesnt seem like it is enough fuel.
-
-
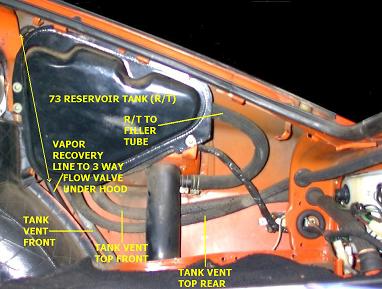
Note that the tank has a bulge on top. When the tank is filled air becomes trapped in that bulge if there is no way for it to escape. If the air can't escape then the gas tank will not be able to be filled all the way. Think of inverting a glass and submerging it in a sink filled with water. The air stays trapped in the glass.
Also note that gasoline expands when it gets hot in the summer.
In the early 70s the US required that automakers had to capture hydrocarbon fumes/vapors escaping the fuel system. The tank and all of those hoses make up a vapor recovery system.
The purpose of the vapor tank and those hoses was to capture the fumes and pass them through a carbon filter and suck them back into the engine to be burned (see your FSM). It also serves as a vapor expansion tank.
It is designed as a closed system. The stock gas cap is not vented.
The vapor tank collects gas vapor and serves as an expansion tank. As the gas in the tank expands it pushes the fumes/air into the vapor tank.
So the reason you connect hose 8 to the filler pipe is so air trapped in the top bulge has somewhere to go as the tank is filled and/or gets pushed out by expanding gas on a hot day. I used fuel injection hose to connect the tank bulge to the filler pipe.
So when filling the tank or gas expands on a hot day where will that air go when the vapor tanks is removed? The air wiil escape through a 1/16in to 3/32in drill hole ("breather hole") you make in the gas cap.
Do not top off your tank after removing the hoses and the vapor tank because on a hot day gas will expand and will be pushed up into the filler pipe and escape around the gas cap and through the small "breather" hole. Just fill until the hose shuts off.
Note that the vacuum switch on the inner fender probably is corroded and plugged up. Every one of those I inspected was completely plugged.
If you do remove the hoses, you will have to weld or braze all of the tubes on the gas tank closed. Do not just plug the tubes. Think collision.
Of course if you plan on getting the engine swap certified by the California DMV you can't make any of these changes.
Recommend that you search the forums for more information before you do any modifications. There are many many posts on this exact subject.


Tension Rod T/C Kit gauge measurement
in Brakes, Wheels, Suspension and Chassis
Posted
Call the manufacturer.