
Miles
-
Posts
2374 -
Joined
-
Last visited
-
Days Won
29
Content Type
Profiles
Forums
Blogs
Events
Gallery
Downloads
Store
Posts posted by Miles
-
-
Go to the Ztherapy web site. Open the Videos link and buy the video ZTV09 "just SUs" http://www.ztherapy.com/
The video explains how SU carbs work and how to repair and tune them properly. You must understand how SU carbs work in order to troubleshoot and tune them. Watch the video several times until you understand how the SU works and the tuning procedures.
Also, there are dozens of "How To" tune/repair SU carbs write ups on the internet.
Study the video. All of the answers are there.
-
I do have a question. I have searched this site and not found the full answer. There are three fuel lines coming from the rear of the car. I believe the smaller one is a vent line from the tank, and the other two feed fuel and then return what is not needed (as FI systems like to do). To clean up the engine compartment a little more, I am thinking of eliminating one of those lines. My engine will mount a carb--a new, still-in-the-box Holley 650 that came with the car, so I won't need the return. If that's a bad idea, please tell me. And could I vent the tank back in the rear and bring only a single line to the engine compartment? That would really tidy things up. Is that done?
For a carbed engine all you need is the fuel line. Trace the return and vent lines back to the gas tank and mark the tubes that they connect to. Any tubes not used on the gas tank will have to be brazed or welded closed.
You can also eliminate the vent tank and all of the hose connections to the gas tank. If you eliminate the vent tank, you will need to drill a 3/32" dia hole in the gas cap to vent the gas tank as it empties out. There are several threads on this throughout the forum.
Keep at least one of the vent tubes on top of the tank bulge and run a hose to the gas filler hose nipple. This allows air to escape while filling the tank to the top of the bulge.
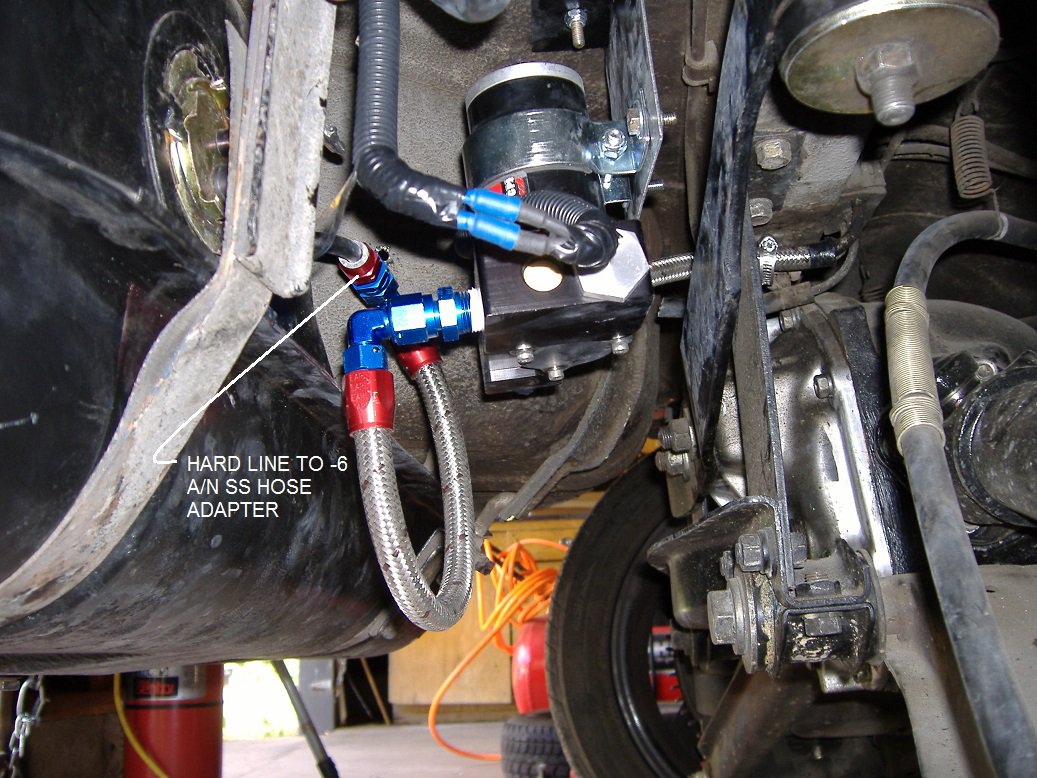
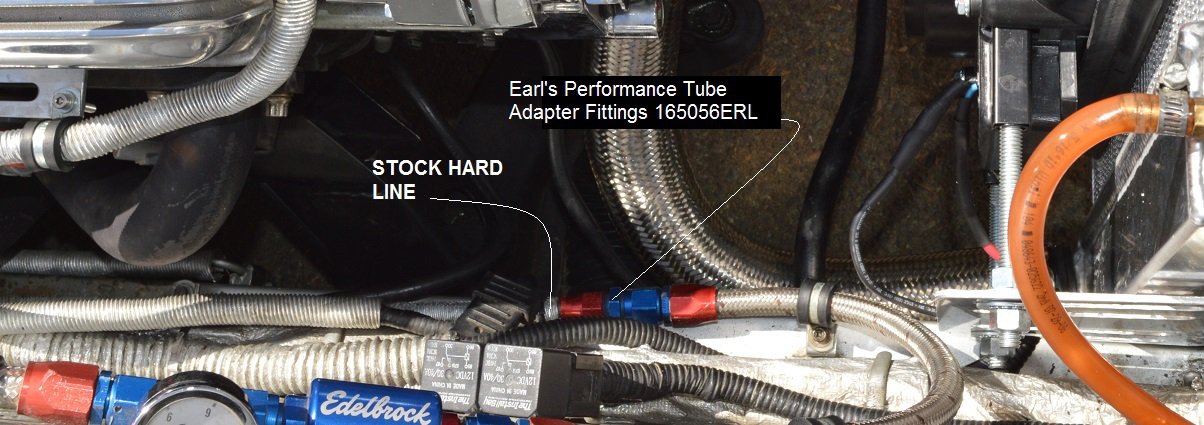
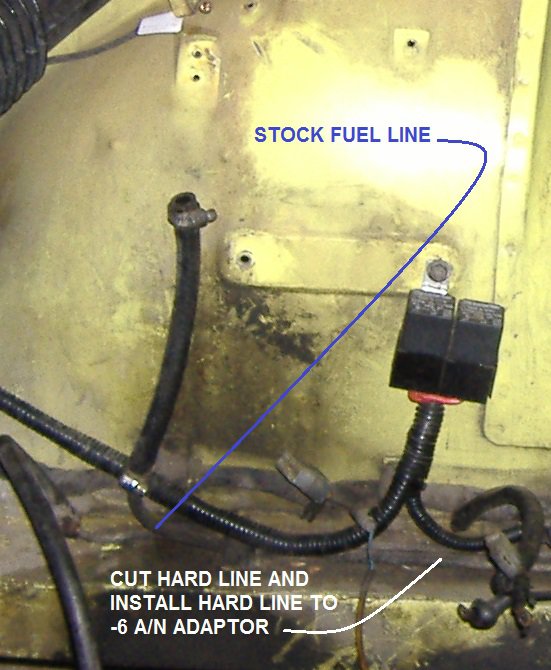
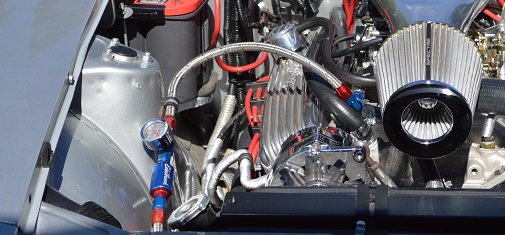
Attached are pictures of my 240Z fuel Lines. I haven't had any heat related problems, but I did run the fuel line the electrical harness through thermal protective sleeves on the passenger side near the headers.
Since you will have to drop the tank to modify the various hose connections, you might as well install a new fuel gauge sending unit.

-
2 hours ago, wingwalker said:
Miles, again, thank you. This list is perfect. I'll test it against the 280Z wires and the schematic I have for it. This'll keep me out of trouble.
Note 280Z wire color for the oil pressure safety switch: http://forums.hybridz.org/topic/110528-jtr-bookwiring-issues/
Per JTR pg 13-2:
"If you are using the HEI distributor, the easiest way to wire the fuel pump for cranking conditions is to connect the Green-White (240Z) or black-blue (260Z/280z) wire to the fuel pump wiring."
-
Suggest that you make a wire list such as in the attached example. The wire list is for a 72 240Z. Confirm your 280Z wiring functions.
If you are unfamiliar with the ignition/starter wire functions, test each wire with a volt meter while turning the ignition switch to each position on the switch.
Note that the green-white wire was originally wired to the ballast resister on the 240Z. Check if this applies to the 280Z. This wire provided direct 12v to the distributor when the starter activated. Attach this wire to the output side of the oil pressure safety switch to run the fuel pump during cranking. This wire energizes at the beginning of the START position on the ignition switch and turns off when the key is released. If you test it with a volt meter, you will see that it energizes just before the starter begins to crank and de-energizes when the key is released to the ignition position of the switch. This is useful to energize the fuel pump while cranking and to fill the fill the fuel system when the car has sat for some time on carbed engines.
The diagram in the JTR manual (7th ed) incorrectly shows connecting a jumper wire (black-yellow) from the starter S terminal to the output side of the safety switch. Do not attach the starter wire (black-yellow) to the OUTPUT side of the oil pressure safety switch. If you do, the starter will continue to crank once the oil pressure pressure safety switch closes. JTR warns of this in section 13-2 of the manual.
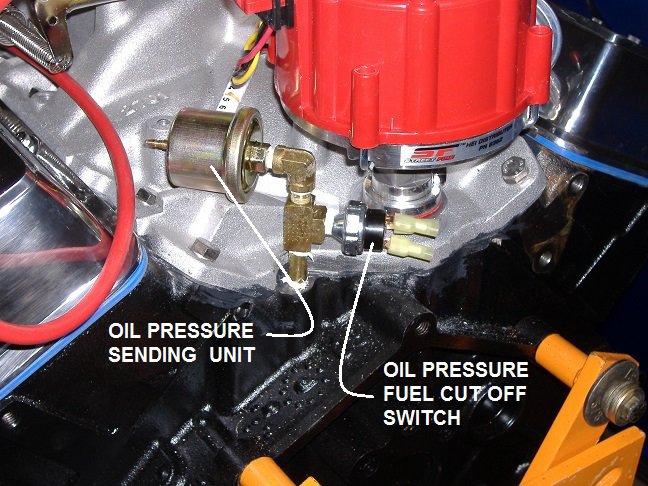
I tested the oil pressure safety switch before installing the engine. It closes almost instantly when the oil pump starts turning. No problems after nine years. To avoid burning/straining/overloading the switch wire the output to a fuel pump relay. No problems after nine years.
-
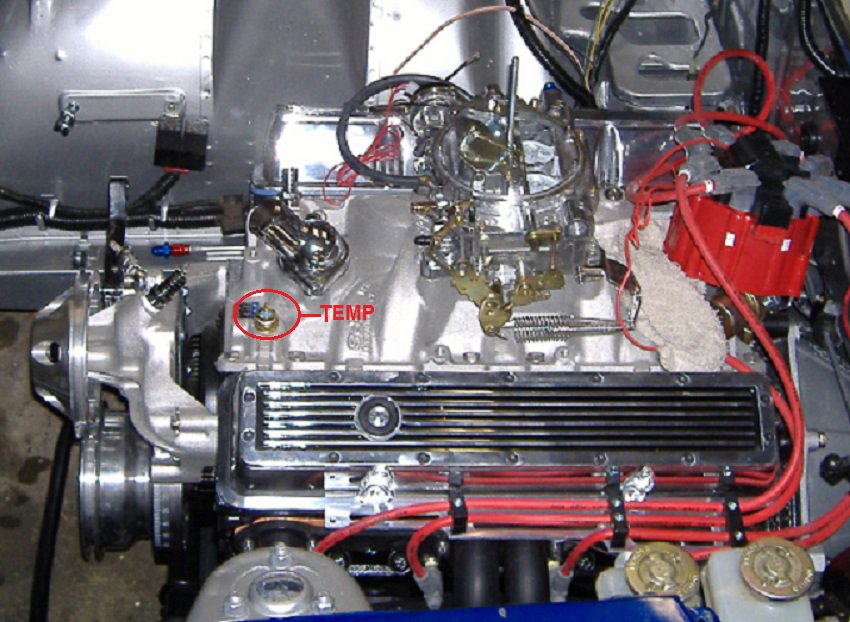
With the stock temperature gauge you have to use the original stock temp sensor with an adapter that screws into the manifold. If you use a temp sensor from a different car, the temp gauge will not read correctly. Same with the oil pressure sensor.
MSA and JTR both sell the temp sensor adapter. MSA sells the temp and oil pressure sensors. So just buy everything from MSA. The plumbing for the oil pressure sensor and safety switch is all 1/8 in. NPT you can get at the local hardware store.
My 240Z did not have a fuel pump relay, so I installed a Painless fuel pump relay kit and ran the safety switch to the trigger side of the relay.
On the 240Z there is an unused green fuel pump wire above the passenger kick panel. The wire was intended for an electric fuel pump and terminates near the gas tank. Your 280Z may already be wired for an electric fuel pump. If not, Nissan may have also installed the green wire in the 280Zs as well.
Note that the JTR manual is a little confusing on how to wire the oil pressure safety switch. PM me if you have questions.
-
Note that "A" is next to the return outlet.
The answer is "A" because it is in the stream of water returning to the radiator from both sides of the engine.
Also, it appears that you have already installed the temp sender in the correct location.
The oil pressure sensor installs next to the distributor.
-
Year? 240Z 260Z?
Carb? EFI?
Soot or oil on plugs?
-
Search HybridZ for " L31"'
I got 8 pages in response. May be something there or you could PM the member.
-
If you go the Painless route, some HybridZ members have documented how to wire the turn signal/light combination switch. I was considering this for my first 240Z project in which the POV had cut up the engine bay wiring. I was able to repair the wiring so didn't go Painless. Other wiring kits have been documented as well.
-
Random thoughts:
- Talk to a technician at Summit. The Summit techs have solved some problems during by build.
- Shimming might be a solution, but be aware that shimming the engine will reduce hood clearance.
- Note that the MSA trans mount allows for more flexibility for adjusting driveshaft angle because the mount fits up inside the driveshaft tunnel so you can can move the trans tail shaft several inches up/down to get the correct angle. Driveshaft angle is a simple, but critical issue when doing Z car engine swaps.
- The MSA engine mounts place the engine lower than the Scarab mounts, but not as low as the JTR install.
- I have done two MSA installs. My second install using MSA engine mounts had a clearance problem with the steering shaft. The driver's side mount touched the steering shaft and the shaft touched the exhaust header collector. Both cars were 72 240Zs. I suspect that the MSA driver's side mount bolt holes were mis-drilled allowing the mount to twist towards the engine.
- Engine-hood clearance issues - raise the bridge or lower the river.
-
-
2 hours ago, wingwalker said:
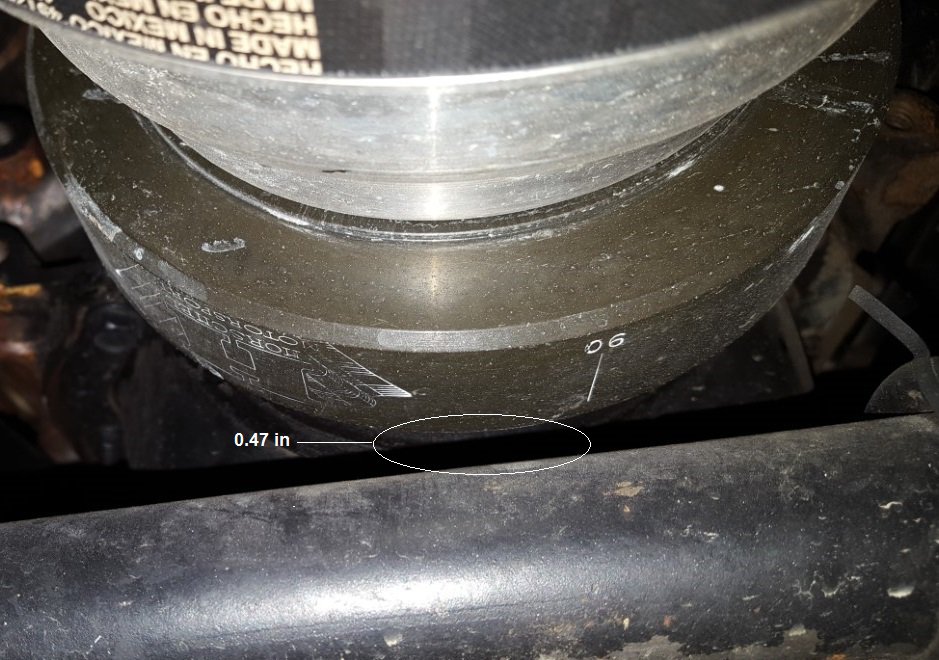
Miles, thank you. The damper you have won't work on my engine. It will fit small blocks to 1995, and mine is later, when they changed the engine and began calling it a Vortec. Very few dampers seem to be available for that engine. But it if rhw MSA kitt allows it to sit higher, perhaps whatever clearance issue there is will still accommodate the 8-inch now on my engine. If you have a chance and can photograph around your damper where clearance might be an issue, I'd greatly appreciate it. The difference between a 7.25, which JTR says is max and my 8-inch is only 3/4 inch on the diameter--which on each side is only 3/8 inch. Seems like a difference that could be solved with shims using the JTR kit. But the MSA might solve it without any issues, and that would be great.
Note: This is a common problem. Search HybridZ , hotrod and chevy blogs.
Damper to steering rack spacing with 6.25 inch damper and MSA engine install is 0.47 inch. An 8 inch damper will not work with the MSA install.
-
So, here is the question: will the MSA kit allow me to keep the 8-inch damper? And will it drop the engine a bit lower to solve the hood issue?
I installed a SBC 350 in two 240Z projects using the MSA kit. The MSA kit sits a bit higher and forward than the JTR kit.
Here is the 6.25in damper I am using. Look at the the application tab and see if will work for you.
https://www.summitracing.com/parts/flu-620101
Tomorrow I will take some measurements and pictures and post them here.
-
And your plan is......................
-
35 minutes ago, NewZed said:
It's very often the bleed valve orientation. A bad booster won't cause the pedal to go to the floor. You either have bad seals in the MC, air in the hydraulic lines, or a mechanical misadjustment.
The standard test for air in the lines is to see if the pedal will "pump up". Pump the pedal quickly several times and see if the pedal gets higher.
On Maxima and 240SX calipers you have to make sure that the bleed valves are pointing straight up to get all of the air out. You can unbolt one side of the caliper and point the bleeder up. You must block the pistons from moving or you will blow them out of the cylinders when you step on the brake.
-
Does the pedal have long travel and the the brakes come on suddenly?
Did you adjust the booster push rod that pushes on the MC piston? If it is too short you will have a long pedal. If it is too long it will cause the brakes to lock up after a few pumps of the pedal.
Suggest you research the following HybridZ topics before doing anything more:
- Booster reaction disk falling out. There is a specific write up on the in the brake or FAQ sections. It is under (next to) your post in the brake FAQ.
- How to bench bleed a master cylinder.
- Brake booster push rod adjustment.
-
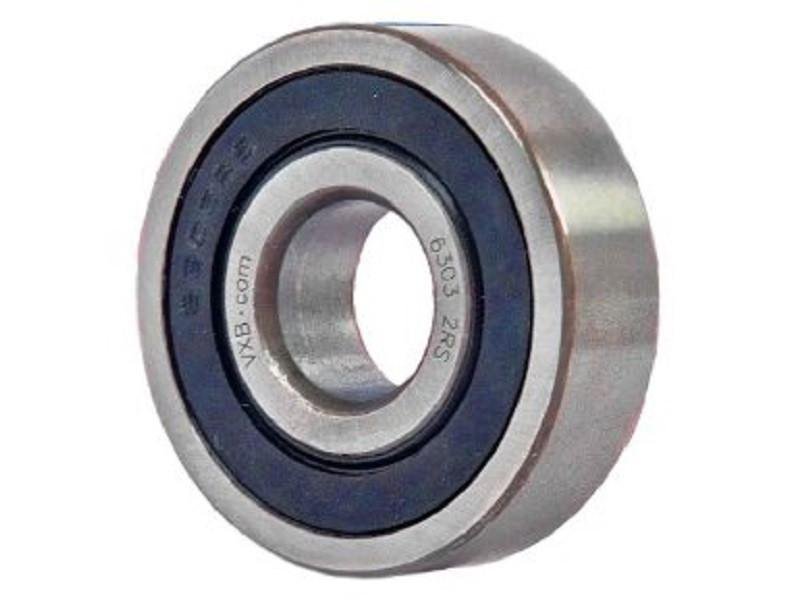
There has seemed to be some confusion over different pilot bearing types. There are basically two styles as indicated in the attached pictures. One is a bushing and the other is a bearing. Both styles can be a PITA to remove.
-
Your stated goal is for a driver and not a project car. So look for a driver that runs and drives reliably.
If you want a 280zx try to find a cream puff that someone else has put money into. Otherwise you will be buying a money pit.
If you can't do some of the work yourself, the project will become very expensive.
Modern mechanics don't know how to work on 38 year old cars.
You may have to travel some to find a 280zx that requires minimum repair/replacement. Shipping is an option for out of town cars.
-
The car is 35 years old. What is your budget for restoration and repair? Do you have the skills to do the repairs?
-
34 minutes ago, seattlejester said:
Also just wanted to say, I really appreciate you guys.
I asked on the specific make forum because I figured they might know off the bat, wasn't nearly the case. Maybe I'm one of the first ever to have blown out the seal making me seem like an insane person.
TYpical car stuff. Post your solution.
-
Try this blind hole bearing removal tool.
-
-
-

350 sbc muncie m20
in Gen I & II Chevy V8 Tech Board
Posted · Edited by Miles
It comes down to your vision of how the car will be built and used.
Built two 240Z 350 SBC projects with 1989 Camaro WC T5 transmissions. First 240Z was built in 2001 for my teenage son. Car is still on the road. Second car built nine years ago. Daily driver. No problems.
Also, the T5 fits well in the car with the shifter close to the stock position.
Suggest that you spend a few weeks reviewing HybridZ threads on transmissions and purchase the JTR 240Z V8 installation manual. Many answers there.