

BARACU
-
Posts
64 -
Joined
-
Last visited
Content Type
Profiles
Forums
Blogs
Events
Gallery
Downloads
Store
Everything posted by BARACU
-
-
DAVE: Car took me about 9 to 10 months to complete. However, a substantial part of that time, was spent working on it FULL time, some days 12 -14 hrs! I'm very fortunate to be at that stage in my life where I can devote that kind of time to my hobby! AL TREVOR:I started with a rust free,structurally sound car. For reinforcement, I welded in a 3/16" x 5" plate along the inner sill from the firewall back to the seat belt pockets. This was welded along the entire floor and at the top to the inner sill. I then capped it off with another 1+" wide plate welded to the vertical plate and the top of the sill. This essentially gave me an angle iron support , but one that was also welded inside. I then ran a diagonal from the top of this support to plates welded to the shock towers ,then tied the shock towers together. I built a jig that attached to the upper hinge mount on the front door frame and ran back to the rear door jamb and attached a dial indicator to this to measure deflection of the door jambs under stress. I then , very unscientifically, jumped up and down on the center of the sill to measure deflection. With the roof , still on the car and no reinforcements, I measured an average of .020" deflection. I then did my reinforcements and removed the roof . I measured .018" . I, honestly, don't know how this will hold up with torsional stress, but I think I'll be OK. I had discussed this with our resident expert on reinforcement (thanks, Pete) and he felt I should be fine. The car is not going to be raced or subjected to anything other than normal driving. Plus, all the reinforcement was designed to be virtually unnoticeable in the car. AL
-
-
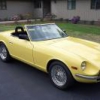
Thought I'd post some pics of my latest Z project. I started with a rust free green Z and ended up with this. Literally every part of the car was rebuilt,refurbished or replaced. Engine compartment was "sanitized", fuel injection removed and replaced with SU's. I had a set of Dayton Wire wheels made in 16x7 with correct offset and bolt pattern. NOS 240 bumpers and NOS door panels.I did all the work, with the exception of engine machine work , in my home garage. AL http://s56.photobucket.com/albums/g186/BARACU/
-
Dave: Finished up the lower grill today. The 240 grill, that I had laying around, worked perfectly. I transferred the brackets from the 280 lower grill to the 240 grill, did some trimming and welding and made two L brackets to attach with the upper brackets on the 240 grill to the frame. I was going to make up a screen to attach to the radiator to keep the bugs out, but I like your idea of putting it directly behind the grill better. AL

-
Dave; I just took a pic of the rear bumper bracket. It was shot looking straight up at it from underneath. IIR, i had to drill one of the holes and tap it . For the front grill, the lower two bar grill doesn't even come close to filling the hole. With some modifications, the 240 grill fills up the entire space. I should have it finished tomorrow. I'll take some pictures for you. Yesterday was the first time the RoadZter moved under it's own power out of the garage. I took some quick photos for the insurance company. it seems like it was 9 months of he**, building this car. Except for the engine machine work, I did every bit of it myself, including paint, in my garage. AL
-
Dave; I just did the same thing on the 280RoadZter that I'm building. The 240bumper fits perfectly using the 240 bracket with some bending and drilling , as you're doing. For the rear bumpers, I had to fabricate a new bracket. It's basically a "H " shape, with one flat leg attaching to the rear valance mount and the other leg to the bracket on the bumper. I thought I had pictures of the bracket, but apparently I don't. if you need some dimension, I can measure it for you. With the 240 bumper on the front, I found that there's a considerable gap between the lower valance and the bumper, that gives an unfinished look. I'm modifying a 240 grill to fill in that space. BTW, we were next to one another at the national in Syracuse, last year.I have the red V8 280. AL
-
 I put some small pieces of hose over the studs, to protect the threads sticking out of the top hat. Put a long screwdriver or bar between two of the studs, hold the screwdriver to keep the strut insulator hat from turning , then just loosen the nut. Same goes for installing it. AL
 -
Was there EVER a 240-260-280 Convertable kit? Please dont flame me >_>
BARACU replied to 240ZR's topic in Body Kits & Paint
I'm in the process of finishing a 280Z RoadZter now. No top ,but with an operating trunk lid, fabricated from the hatch. Shaved latch button with an electric solenoid and trunk latch from a 280ZX. Shaved door locks , 240 bumpers and Dayton wire wheels. Rebuilt L28 engine with polished SU carbs and intake and another one of my "wireless" engine compartments. I'll be posting some pics in the near future. A perfect car for NorthEastern Pennsylvania (hehe)! AL -
I ordered carpeting from this place. http://www.auto-interior.com/datsun1.html#280Z,. I haven't installed it yet, but it looks to be a very good quality and even with shipping, the price is considerably less than elsewhere. Most likely it's the same carpet that everyone else sells. AL
-
I "slottted" the bottom of the fresh air vent boot,so the harness exits unseen, under the boot . The harness runs in pretty much the stock location, except it is in front of the radiator support instead of on top. With the hood and everything else in place , it's hardly noticeable. On the 76 "RoadZter" I'm building now, I did it the same way,except I ran the wiring harness in front of the rad support in black wire loom casing and wrapped it with heavy black tape for a neater look. AL
-
throttle linkage help needed
BARACU replied to The Rototiller's topic in Gen I & II Chevy V8 Tech Board
-
throttle linkage help needed
BARACU replied to The Rototiller's topic in Gen I & II Chevy V8 Tech Board
Here's a link to a pic of how I did it with a Lokar cable, bracket . I used the original bell crank off the accelerator pedal. http://www.pbase.com/baracu/image/18617643/large AL -
VinH: So you were the one with the Roadster! I'm in the process of building a 76. A number of people asked me if I saw the ZX outside at the show and I hadn't. Don't know how I could have missed it, but I spent most of my time inside. I had the red 280 with the V8 in it. I'm up in Scranton, so we should get together sometime when there's a meet down your way. AL
-
Doug: I spoke to John about 3 weeks ago, for rails as you describe, for my Roadster project. While they don't currently make them, he said they should be able to fabricate them. He mentioned a month or so lead time.If you haven't spoken to him recently, you may want to try again. Let me know. AL
-
Try John at Baddogparts. I'n not sure of the thickness of his rails, but he may be able to fabricate what you want. Al http://www.baddogparts.com/
-
Dan: At the International Z Car show in New Hampshire last year, a "exec" from Nissan was examining my car. He would look at the V8 and then at the "350Z" badging on the fender, look at the V8 , look at the badging. He finally asked me if it was my car, to which I replied "Yes". He then sarcasticly said, " That's a pretty liberal interpretation of a 350Z". I looked him right in the eye and very politely said " What would you like me to call it? Let's see.... I have 350 Cubic Inches, I have 350 Horsepower...... I think I have a REAL 350 Z. If you ask me , I think YOUR interpretation of a 350 Z is pretty liberal". He then turned on his heels and stomped away! hehe BTW, I missed Nissan's Gold Cup award by 3 points...scored 287 out of 300, just missing the 290 cutoff. No way were they giving it to a Hybrid! AL
-
Kevin: I found that my temperature gauge on my 75 Z was reading almost 25* too high with the Datsun sending unit. Which makes me wonder how many "overheating problems" are really malfunctioning sending units or gauges. The gauge has an adjustment on the back to move the needle. To calibrate the gauge you need a pot of water, accurate thermometer and propane torch. Place the sending unit with sending wire attached in the water with the thermometer (I wired the probe on the thermometer and sending unit together to keep them in the same plane). As you heat the water with the torch,watch the temperature registered on the thermometer and temp gauge and adjust the gauge accordingly. I found the needle sweep on my gauge to be linear. At 1/4 sweep it registers around 155*, at half sweep it's 185*, etc. You can maintain a constant water temperature by adjusting the flame on the torch. I started to have problems with the adaptor bushing ,for the Datsun sending unit in the SBC. I bought a regular Chevy sending unit and just screwed it directly in, and just readjusted the gauge. AL
-
Not to argue with Mike, who literally "wrote the book", but I used a stock Chevy sending unit on my conversion. I recalibrated the Z Temperature gauge to match the Chevy sending unit. AL
-
Juan: Thanks for the compliment! I think I'll be keeping this one for a while! great meeting you there! Z Rex: After I had read your post, I thought that was you. Another funny story on judging: I happened to be standing there when they judged my engine compartment. Judge says "Aha, i found a place to deduct a point!" . When I got the judging sheets back, he deducted for a tiny scratch where the hood safety latch hit the bracket. 99/100 pts in engine compartment. hehe) Are you going to the show in Harrisburg ,Pa this Saturday? AL
-
Z REX: I was at the Jersey show on Sunday. I'm sure we spoke at some point. Wish I knew you were a regular in here. I had the red 280 with the V8 ( only one there ). AL
-
Stolen 280ZX update - testimonials urgently required!
BARACU replied to Modern Motorsports Ltd's topic in Non Tech Board
Ross: I assume you still have the info and appraisal that I had sent you. If not, let me know! Good Luck!!!!....AL -
The prep processs involves removing all dirt, oils and dried dyes form the leather, opening up the pores allowing the dyes to penetrate into the leather.I think it would be difficult to not allow the dye to get under any tape. If the seams are just sewn together, the dyes may blend into one another and not give you a clean line. If the seams are separated with a vinyl "piping", you may be able to mask off the piping and get decent results. I would clean and prep the entire seat and do the black section first. After that has dried, I would try the other color. If the results are not good, you can always dye the entire seat black. You can also call "leatherique" and discuss this with them, they should be of some help. AL
-
I used the kit from Leatherique to dye my leather seats from Burgundy to black. They came out great. The company makes an excellent product. The key to getting a good job is in the preparation of the leather. Preparation of the leather is the key to good results and takes the longest time, so don't rush it. I worked on my seats for almost a week, on and off, letting the solutions work as per the instructions. Scariest part was wet sanding the leather with 400 grit paper and their solution. Yes, WET SANDING!!!!! The company offers a discount to car club members, I believe I paid around $125 for the kit, last year. The kit had a quart of several different chemicals, which is enough to do several seats. I propbably only used a few ounces of the actual dye. Good Luck, AL
-
Simple Question about heater hoses...
BARACU replied to utvolman99's topic in Gen I & II Chevy V8 Tech Board
Long heater hoses with a 90* bend at the end should be readily available from a local parts store. Sorry, I don't have the part number on the ones that I used. but they fit perfectly and rest alongside the valve cover. ALhttp://www.pbase.com/image/25639761
.jpg)
.jpg)
.jpg)
.jpg)
.jpg)
.jpg)