Teekass
-
Posts
203 -
Joined
-
Last visited
Content Type
Profiles
Forums
Blogs
Events
Gallery
Downloads
Store
Everything posted by Teekass
-
I've searched, and only found complaints of header/oil pan clearance problems with block hugger headers. I'm getting Super Comps, and want to use a at least a 7-qt oil pan. Possibly the MIL-31900 http://store.summitracing.com/partdetail.asp?autofilter=1&part=MIL%2D31900&N=700+0&autoview=sku My question is what 7+ pan are you guys running with the Super Comps, and do you have any clearance problems? Oh yeah, the car will be a street/strip type....straight line only. So I don't need any lateral G type baffles. Thanks alot, Chris
-
Sarting and engine without exhaust
Teekass replied to Forces's topic in Gen I & II Chevy V8 Tech Board
I've also had exhaust valves crack when running uncapped headers....mostly the zoomie style (Schoenfeld) http://www.schoenfeldheaders.com/zoomie.htm .....but since you are using a header with a collector, there is an easy fix......PLUG the collectors when you shut down the engine......something as crude as a welders glove will work fine. Is it a must that you do it? Probaly not, but it's pretty cheap insurance. -
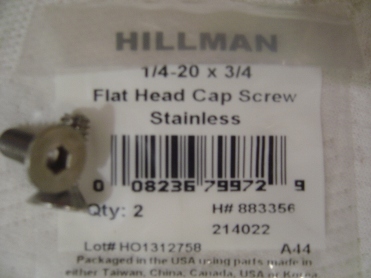
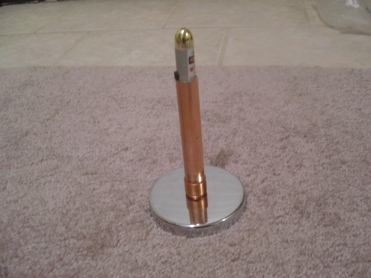
Sorry to reinvent the wheel, but I had trouble finding the 9/16" and 19/32" brass tubes mentioned in Top Fuel ZX's post, so I thought I'd post how I did it. Basically I used the same magnets that Top Fuel ZX used, with Keychain Laser Pointers from Office Depot placed inside 3/4" copper pipe. They fit inside the pipe very well, and actually hold the button down (to turn it on) when it is inserted into the pipe. I secured the pipe to the magnets by first screwing a 3/4" copper cap to the magnet, and then slid the pipe into the cap. I chose to sweat (or solder) the pipe to the cap, to keep it from moving, but I'm sure epoxy would work also. I had to make 3 stops: http://forums.hybridz.org/attachment.php?attachmentid=1896&stc=1&d=1166487215 Ace Hardware: 1 - Magnet Source model 07223 magnet 1 - Magnet Source model 07222 magnet http://forums.hybridz.org/attachment.php?attachmentid=1897&stc=1&d=1166488437 Office Depot: 2 - "Keychain Laser Pointers" http://forums.hybridz.org/attachment.php?attachmentid=1898&stc=1&d=1166488502 Lowes: 1 (pkg of 2) - 1/4"-20 x 3/4" flat head cap screw #214022 http://forums.hybridz.org/attachment.php?attachmentid=1899&stc=1&d=1166488597 2 - 1/4"-20 lock nuts 2 - 3/4" copper tubing caps (solder type) might want to buy some extras if you dont have a drill press since its a little difficult to drill the exact center by hand. http://forums.hybridz.org/attachment.php?attachmentid=1900&stc=1&d=1166488913 1 - stick of 3/4" Type M copper pipe. There are 2 types of copper pipe....Type L and Type M. The outside diameter is the same, but they have a different wall thickness (I'm pretty sure Type M is the thicker of the two). So the different wall thickness translates to slightly different inside diameters. I would recommend taking the lasers with you, and test fit them to get the fit you want. ----------------------------------------------------------------------- I started by center punching the 3/4" copper caps, then drilled a pilot hole. I increased about 2 drill sizes each time until I got a 1/4" hole in the caps. http://forums.hybridz.org/attachment.php?attachmentid=1901&stc=1&d=1166491362 Next I used a 7/16" nut driver and an allen wrench to secure the caps to the magnets. http://forums.hybridz.org/attachment.php?attachmentid=1902&stc=1&d=1166491630 After that, I cut a 4" piece of 3/4" copper pipe (using a pipe cutter) http://forums.hybridz.org/attachment.php?attachmentid=1903&stc=1&d=1166491788 and slid it into the cap. Epoxy could be used before sliding the pipe into the cap, but I chose to submerge the magnets in water (to prevent heating the glue that holds the magnets to the frame) and solder them. http://forums.hybridz.org/attachment.php?attachmentid=1904&stc=1&d=1166491941 Laser placed halfway into the pipe: http://forums.hybridz.org/attachment.php?attachmentid=1905&stc=1&d=1166492188 Laser placed all the way into the pipe: http://forums.hybridz.org/attachment.php?attachmentid=1906&stc=1&d=1166492204 To make them "true" I placed them on a LEVELED wood table, then drew an outline of the magnet on the table (to keep it in the same spot as I rotate it). I marked the laser dot on the ceiling, then turned the magnet 90 degrees, 180 degrees, 270 degrees etc. and noticed the movement of the dot on the ceiling. There is a little room between the laser and the inside of the pipe to shim the laser until it is true (I used aluminum foil). The reason I made the pipe a little long (4") was to give me more leverage in case I needed to bend the pipe to make it true (but it wasn't needed). Chris

-
Interesting. Sounds like a good idea. Any problem with the control arm part of the crossmember?
-
Hey thanks alot, So the diff is no longer fastened to the crossmember? I'll be using motor plates (because I want full length headers) so my engine wont be as low as the JTR setup. I hope the new lower front diff position wont cause me any problems. Hey, cool Rockingham pic by the way. Thanks again, Chris
-
Are those of you that are using the Ron Tyler mount still using the factory lateral mount bar that goes under the differential? All but one of the pictures I've seen show the final mount WITHOUT the lower cross member installed. Secondly, are you using a solid diff mount or a factory type diff insulator for the bottom mount? My impression from my reading is that Ron Tylers mount provides upward movement support using a poly insulated mount (taking advantage of the vibration dampening), so common sense would say to use the factory type mount insulator for the bottom mount also (as opposed to a solid one). Thanks in advance, Chris
-
Great, thanks. I'm sure your engine makes more HP than mine....and it looks like you've got the "spray" on top of that, so if you haven't twisted the rails, hopefully I won't either. Now if I can just finish paying for all the Christmas gifts for my kids, I could buy some parts for myself . Chris
-
Thanks for the pics John. I'm gonna show my lack of knowledge here, but oh well, here goes.....Are those the factory frame rails (where the motor plate tabs are welded), or ones that you installed? My factory rails are in really good shape (as far as rust), I just have no idea if they are strong enough. Thanks again, Chris
-
Well said Michael, Thats very similar to the point I was trying to make, I just assumed he was trying to "break into" the world of V8's, and if that was the case, find a mentor and go with whatever they know the best.
-
Mike, I found these at Summit. They look pretty similar to the front plates John used (I couldn't find any on Jeg's website). http://store.summitracing.com/partdetail.asp?part=CEE%2D4006&N=700+%2D122792+115&autoview=sku
-
Hey thanks alot John, I see the picture you mentioned. Very nice installation. Did you fasten the front motor plate to the original mounts, or do you have new frame rails? If you get a chance, could you post a picture of the "tab" you made to secure the front motor plate to the car (and the mid plate if possible). Looks like the front plates are pretty close to being right over the tie rods, is that about right? Sorry to bother you with this, but I dont have the equipment to do alot of fabrication, and am trying to determine how difficult it is to use the motor plates like you did.....I would much rather have them though! Thanks again, Oh yeah, disregard the email I sent via your web site link. I wasn't sure how often you get on this board, so I sent you an email also.
-
Hey BuZy, Do you run the Hooker Super Comp headers? Thats definitely the header I want, and was under the impression that you have to run the hooker block huggers with the MSA kit. If you do have the Super Comps, do you have plenty of header to ground clearance.....I read somewhere that if you use the MSA kit and run Hooker Super Comps, you end up with like 3 inches of header to ground clearance. Thanks for the info,
-
Hey JNJ, I guess you have the Scarab/Hooker mounts....if so, are you happy with them? I really want to run the Super Comps, as my small block makes around 500hp. I've been considering the MSA mounts, and the Hooker mounts. Seems like the more I read, the more undecided I am. I worry about header ground clearance with the MSA kit and Hooker Super Comps, but I worry about front of engine/radiator clearance with the Hooker kit (since a 6-71 blower might be in the future). It will be a weekend street/strip kinda car.....not a daily driver. Any help is greatly appreciated. Thank alot, Chris
-
zman, Sorry for the humor...on a more serious note. Based on your question, I assume you dont have much experience with V8's or V8 swaps....I TRUELY APOLOGIZE if you are experienced in this area, I'm just making an assumption based on your question and trying to add something useful to this thread. If you're a little shaky in this area, what I would suggest is trying to find a nearby friend, relative, acquaintance, etc, that knows about hot-rods, engine swaps, V8's etc. and go with the manufacturer they're comfortable with. He/she will already know the querks of whatever manufacturer they pick, and it will make the swap and tuning way easier (might cost ya some beers though ) . Although I'm partial to the gen 1 SBC (because of racing parts availability) I think you'll be pleased with whatever you put in your Z......unless you get one of those old 348 big block truck motors or something, lol. If finding someone nearby to help is not an option, I would say start with a carbureted sbc and an HEI distributor. They're easy to learn and pretty cheap....so you can save your money for an LS2 .
-
It all depends on what you want out of it.... If you are looking for sheer power, I would say, something like this: If you're more concerned with fuel economy....something like this might be a better choice: Oh wait, thats a v-twin, not a V8...........guess you could use 4 of them.
-
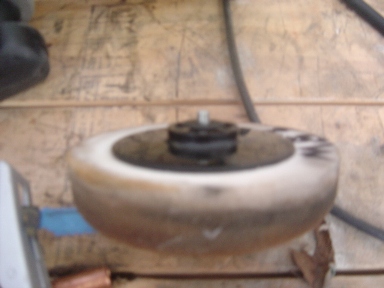
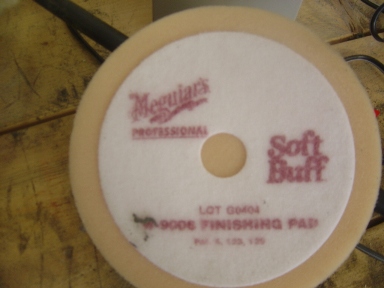
Ryan, I used 2 different pads, one for the M83 polish and another one for the wax....however, they were both made of foam. I used the foam pad included in the Porter Cable kit (white colored) for the M83 and I bought a Meguairs W-9006 foam pad for the wax (beige colored). http://yhst-69137106204828.stores.yahoo.net/meg231.html I would recommend getting something like the 3M "Hook-It" #05776 pad http://www.azautobodysupply.com/3mhodipa056i.html that you see below. It has velcro on the bottom of it, so all you have to do is tear off the polish pad, and stick on the wax pad, or sandpaper or whatever else you want to use......rather than having to unscrew the entire wheel each time. (Obviously you have to get the velcro backed foam pad or sandpaper to use the Hook-It setup). It's a little bit more expensive at first, but by the time you buy a couple of the foam pads with the velcro on the back (as opposed to the whole assembly with the pad and screw), you get your money back......and its a heck alot easier than trying to figure out where you left the special tool to change the pads, and actually changing them. I bought all my stuff from a local auto paint supply house. As far as texture goes, I'm not sure what level the white pad was that was included in the Porter Cable kit.....it seemed to be very close to the Meguiars buff pad I used, which is a very NON abrasive one. I think you get most of the abrasion from the polish that you use. Mequiars is pretty neat in that they put the level of abrasion on the outside of the bottle shown as a scale with an arrow. The M83 is in the middle of the abrasion scale. The big thing about the "random orbit" polishers is they advertise to be "swirl-free." I'm sure you could damage your paint with one if you tried, but if I could do it without swirls (and I did) anyone can. What I did was the first time I used the pad, I applied some polish to the pad to lubricate it, then just squirted a line of polish on the paint. From there on, I just put a small line of polish on the paint, and moved it around with the polisher. The thing that suprised me was how quickly it worked. I used speed 3 (of 6) on the polisher and moved the polisher roughly 24" in 3-4 seconds. I started on the fender, by the time you get it done, the part where you started starts to haze, so I buffed it off with a terry cloth (by hand). It comes off very easily and shiny. If its not shiny at that point, you might need to move the polisher across the paint a little slower.....but that speed worked for me. I applied the wax the same way (with the foam pad, and buffed clean by hand). I don't claim to be even close to knowledgable in this area, this just worked for me. I have heard that a wool pad in the hands of a professional will get the best finish by far.....but in the hands of an amateur (like me) gets swirl marks and areas of burned paint and bare metal . In my opinion, the random orbital polishers are easy to use, swirl free and allow me to do a way better job than I could using a high speed buffer. The pics below show the Hook-It pad, the middle two are the white pad the comes with the Polisher (I used for the M83 polish), and the last one is the Mequiars pad I used to apply the wax. Hope this helps,
-
Hey Cable, It's funny you should ask with your UltraDyne sticker. I've never had this engine on a dyno, I'm basing it on numbers that UltraDyne posted shortly after I built this engine. My engine is a .030 over 350 with 10.5:1 forged pistons, Holley 750 dp that has been rebuilt and flows 930 cfm, Victor Jr. intake and Dart II Sportsman heads that have been ported and matched to the intake, and UltraDyne NF series solid camshaft. I'm not sure what the duration is at .050 but its advertised duration is 282/290 and gross valve lift is .542/.563. That doesn't sound like much duration, but this was one of their "tight lash - unsymmetrical lobe" series cams.....valve lash is set at .016 hot on intake and exhaust. I bought this camshaft in the early 90's, and the technology was pretty interesting. The cam holds the valve closed longer (when compared to a symmetrical cam) to build more cylinder pressure, then when the valve opens, the intake ramp is steeper than a symmetrical cam, so it catches up and passes (valve lift wise) the symmetrical cam, then the ramp tapers off at the top and is less steep on the closing side of the lobe to prevent the valve from "bouncing" off the seat when it closes. This cam outperformed their popular 288/296 duration camshaft in valve lift at .050 and in dyno tests, if that says anything. Anyway, UltraDyne built an almost identical motor, except they used 11.0:1 pistons (mine are 10.5:1), they used Dart II Sportsman heads right out of the box (mine have been ported and matched), and they used a Holley 750dp (mine flows 930). Their engine dyno'd at 510 hp. I cant wait to put it in the Zcar. It ran 7.50's (1/8th mile) in the S-10 that I use to own.
-
Thanks for the kind words Ernie. I've read many of your posts, just browsing around and you set a great example for the rest of us. I regret not having any pics to add, but I especially enjoyed reading your "old school photo" thread....great stuff! Thanks again, Chris
-
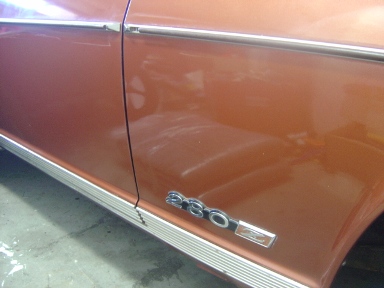
I have a '77 2+2 and I stumbled onto a product that made my paint look great. Before I go into it, I promise I am NOT affiliated with Meguiars or Porter Cable. I was looking for a way to fix my wifes car (not the Z) because her clear coat was pretty dulled. I called Meguiars, and they asked if it would be applied by hand, or with a polisher. I told them I planned to use my polisher (Porter Cable 7424-same as you can get at Lowes, but they call it a 7336sp $100.00). They recommended "Meguiars 83 Dual Action Cleaner Polish" ($25.00 at a nearby paint supply store) applied with the random-orbital sander/polisher, followed by Meguiars NXT Generation Tech Wax (Wal-mart). It worked really well, so for kicks, I tried it on the Z and I could not believe the results. I used the polisher on medium speed (speed 3.....max is 6) with the buffer pad they included. It was extremely fast and easy....I'll never apply wax, etc. by hand again. I think the M83 Polish is made for base/clear paint, but it still worked great on my one-step enamel paint. If you have a one-step paint job, just beware when you use it, and know that you are removing a small amount of actual paint (the dulled top layer) and dont spend a lot of time buffing one area. My paint was very dull, and actually had a rainbow look to it (like the way gasoline does on the surface of water). I was almost embarrassed do drive it, but now it looks great. If you are considering getting a new paint job, I would NOT recommend doing what I did....just put the $125.00 towards the paint job. I was just looking for a way to spruce up my dull paint job, and now am very pleased with it! I didn't use this pad, I used the BUFFER! I wish I would have taken a before picture, but I didn't. Here is an after picture of the right front fender showing the clear reflection. http://forums.hybridz.org/attachment.php?attachmentid=1768&stc=1&d=1164653844 Oh yeah, I'm new to this forum....is there an easier way to attach an image from my computer than by doing the thumbnail/link? The top 2 pictures were from web-sites, so I just copied and pasted them.....couldn't do it with the picture of my car which was on my hard drive.
-
Great idea Pop N Wood....thanks for the pic. Do you have the JTR kit? Forces, Sorry, I guess I wasnt very specific in my original post (all I said was it would be street driven, but more of a street-racing type). Right now, I believe the MSA kit will be the best for me, and this is why..(please correct me if I've overlooked something). I have a 500hp naturally aspirated 350 that I will put in the car first. Somewhere down the road, I plan on getting a 6-71 blower. I definitely want the long tube headers, so that leaves it between MSA and Scarab/Hooker. I also want as much room in front of the engine for blower belt, etc...so that leaves the MSA kit as the best choice......maybe Santa Clause will bring me one .
-
Hey, thanks for the kind words Mike. I'm just tryin' to set an example for the new....er guys, lol.
-
Best advice I've heard in a long time bro ! Now that I've had time to step back from all the data collecting, and think about what I've learned....I think the most important thing for me is "options." I want the option to use long tube headers, the option to put a good puller electric fan and electric water pump, etc. I'm most likely going with the MSA kit, although I will check into the JCI kit that M1Noel mentioned. Heres the link if anyone wants it http://www.johnscars.com/zcar/zcar.htm . Oh yeah, I have not yet looked for a place to buy the MSA kit. If anyone knows of a good deal out there (or anyone to aviod!), please let us know. I'll also post my findings.
-
You guys are all awesome. Thanks alot.
-
Thanks for the reply Bartman. I recognized your name from my information gathering earlier. Matter of fact, I looked at your website and bookmarked Thermal Tech Headers, thank you. Oh yeah, nice ride you've got! Thats interesting what you said about with the JTR kit, the oil pan is still above the front crossmember. I read...the kit is lower than that one, this kit is more forward, this kit.....etc, etc.....and its difficult to visualize if the differences are really needed. I'm glad you pointed out that although the oil pan is lower, its not a problem......thanks again.
-
Is there a swap kit out there, which is "preferred" more than others? I've done plenty of searching and reading, and for my application, it appears the benefits of the JTR, MSA or Scarab/Hooker are pretty minimal. I have a '77 2+2 that I want to put a carbureted sbc/turbo 350 trans into. It will be street driven, but more like weekend street-racing. From the reading I've done these are the considerations: JTR: Pros: More rear weight % (but not much). Slightly lower CG. More room in front of engine for puller fan, water pump options. Cons: Cannot use long tube headers. HEI distributor clearance (some have to notch the firewall). Hood latch must be romoved to work on distributor. Balancer size restrictions due to clearance problems. Oil Pan ground clearance??? MSA: Pros: More distributor clearance than JTR so no need to remove hood latch. Not as high and forward as Scarab/Hooker. Can use long tube headers. Can use factory size balancer. Cons: Poor instructions I read one post where a guy said the th350 transmission mount that MSA makes for the kit, will NOT fit a 2+2 because the body is longer, so the mount point is in a slightly different location. Scarab/Hooker: Pros: Works without modifications. More oil pan ground clearance. More distributor clearance. Cons: Harder steering with more weight over the front wheels. More front weight % (but not much). Higher CG. Air filter clearance. 1. I've read many posts where people who had the JTR mounts were modifying them to move the engine a few inches forward. My thought was that the MSA mounts would accomplish this. I was basically sold on getting the JTR Manual for the info, and the MSA kit for the mounts....then I read about the 2+2 th350 trans mount issue. 2. I am a little concerned (maybe incorrectly) about the oil pan to ground clearance of the JTR kit (I think the MSA kit is slightly higher). I want to use a factory oil pan if possible. 3. I will be using an MSD billet distributor, I dont mind using block hugger headers and am not concerned with the weight/cg changes. The sad part is that I have all of this info, and am no closer to picking a kit than I was a month ago . The JTR kit sounds impressive, but reading a post from the JTR guy (MikeJTR I think) where he said the primary reason for moving the engine back was to get the manual shifter to better fit the factory hole, makes me shy away since I'm using an automatic. (my impression is that a little firewall clearance was sacrificed for the benefit of shifter location....which is great if you are using a manual, but I'm not.....so I would rather have the wiggle room.) I still can't lean toward the MSA kit though, as I have read more than one post of people that say they will never buy another product from them......Decisions, decisions . Oh yeah, some of the posts I've based this on were several years old, so the issues I listed above might not be a factor anymore (because of new products). If so, please feel free to point it out. Thanks in advance.