
Teekass
-
Posts
203 -
Joined
-
Last visited
Content Type
Profiles
Forums
Blogs
Events
Gallery
Downloads
Store
Everything posted by Teekass
-
Hey Pop, I think about fuses and wire ratings the same way. Have you ever wondered why Datsun put an 80 amp fuse link on that 10 gauge wire? When I replaced my fuse links with a maxi-fuse block, it didn't give me warm fuzzies putting that big of a fuse on that size wire. Sorry, didn't mean to hijack the thread. gijonas, I think the calculation you mentioned in your first post is how to determine the amperage draw of a light bulb (or bulbs). Watts/Volts=Amps
-
I promised I've searched, and couldn't find any posts like my problem. I have a '77 2+2, and the turn signal lever won't stay in position when turning to the right. It works fine to the left, but not to the right. The turn signal bulbs flash correctly if I hold the turn lever up, it just won't stay up by itself (I've heard there's medication for that!). The problem seems to be completely mechanical. I've looked at the switch (without completely removing it), and don't see anything that looks broken or out of the ordinary. I can't see what holds it in position when left or right is selected, so I'm not sure where to start though. Anybody ever dealt with this problem?
-
Check out this site: http://www.atlanticz.ca/zclub/techtips/fusiblelinks/index.html I bought a Stinger maxi-fuse block from a local auto stereo shop. http://www.cardomain.com/item/STISFPD4MAXPT
-
Good to know I'm not the only one.....everytime I replace something, I find 2 other things that need replacing .
-
I've read where people have the same ohm range gauge as you, and the gauge works fine....just backwards. Seems like I also read where someone sent their gauge back to the factory and they changed the linkage in it so that it reversed the way the needle worked. If it's an Auto Meter, I've been impressed with their customer service and warranty. I'd bet they would work with you on it.
-
I guess the above ideas could be worth a try...although I don't know that much about resistors. My gas tank needs to be "Renu'd." When I have that done, I'll try to get a good sending unit and see if that works any better (just need to do some "searching" and find out where to get one). My guess (after reading Greg's post) is the sender is the reason for the gauge not being linear......I hope Datsun didn't make them work that way on purpose! Either way though, I can still use it the gauge the way it is.
-
Great point Greg. No, I sure didn't check to see if the sender was working linear. I would bet the 30 yr. old sender would be to blame (for not being linear) before the fuel gauge. I still don't think the gauge would give an indication until it had a few gallons in it though, since it would be more than 73 ohms. I'm definitely not complaining about the Auto Meter gauge. It gives me the information I need, now it's up to me to get use to the way it works.....I remember a post from Larry (COZY Z COLE) where he said that his fuel gauge works backwards, and he likes the looks he gets when he stops for gas when the gauge reads full !
-
You're welcome! I feel the same way about the 6 gallons. As thirsty as mine is, at 6 gallons, it's time to think about getting fuel anyway.
-
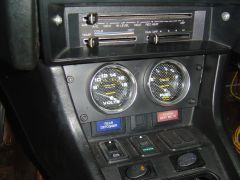
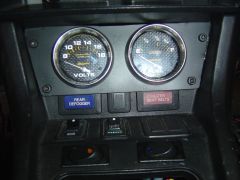
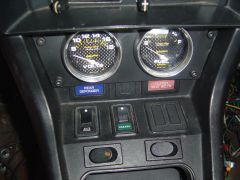
I was involved in a fuel gauge thread a while back, and thought I would post my findings from the fuel gauge I just bought. I have a '77 2+2. I removed my sending unit, and it tested at 88 ohms empty and 10 ohms full. I bought Auto Meter's #4815 which is 73 ohms empty and 10 ohms full (they also have other styles with that ohm range). With the gas tank completely empty, the needle points at the E (not the yellow E "mark", but the white letter E). The needle was just above the peg. I added one gallon at a time, and the needle didn't move (from pointing at the E) until I added 4 gallons. With 4 gallons in the tank, the needle pointed between the E and the yellow E mark. 5 gallons was just below the yellow E mark. 6 gallons, the needle pointed at the yellow E mark. 9 gallons = 1/8th tank 11 gallons = 1/4 13 gallons = 1/2 15 gallons = 3/4 16 gallons = F It works in the correct direction, but it's not linear and is unuseable with less than 4 gallons. I'm still happy with it though.
-
-
-
-
I agree, it does look great! Now that you mention it, I think I remember a thread by you (or someone else) raving about how good of a job they did. I'm definitely gonna get them to redo mine. They're about half way down my list of to do's......you know what I mean.
-
Looking Good! Keep us posted on your progress. BTW, is that an aftermarket fuel tank using the factory straps?
-
Distributor Question
Teekass replied to Hopelessly Confused's topic in Gen I & II Chevy V8 Tech Board
Same for me bro! -
Who swaps their engines by themselves?
Teekass replied to Plague_oc's topic in Gen I & II Chevy V8 Tech Board
Man, that is so true. Also, once you have a welder, it opens opens up more ideas when fabricating. I've turned into a "weld-nut" junkie (you know, the nuts that are welded to the bracket, panel, body, etc. so you don't have to hold the nut on the back side while you put the bolt through). -
Yes, the timing mark on the balancer should be at 0 when the #1 piston is at TDC. As far as the rocker arm position, it depends on which TDC the engine is at. The rocker arms should be free (as in both valves closed) if the engine has just finished the compression stroke. If the engine has just finished the exhaust stroke, the exhaust valve should be almost closed, and the intake valve should be starting to open (this might not be exact though, because of your camshaft.....different lobe seperations, intake centerlines, etc. will cause the valves to be in slightly different postions at this TDC)
-
Distributor Question
Teekass replied to Hopelessly Confused's topic in Gen I & II Chevy V8 Tech Board
Your TH350 (along with most automatics I think) will roll in gear, although not as freely as it will in neutral. -
Time for me to brag!!! LS1 IS RUNNING
Teekass replied to a topic in Gen III & IV Chevy V8Z Tech Board
Congrats! Post some pics when you get a chance. -
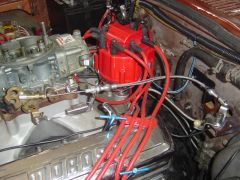
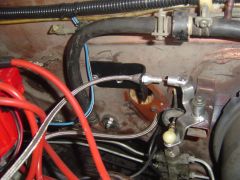
Sorry I'm so slow responding, been working out of town and the last 2 hotels didn't have internet . On the Lokar....the braided wire slides into a collar (follow the braided part toward the carb until you see the collar). I just removed the inner cable, removed the braided hose from the collar, put black tape over the area I wanted to cut, and cut the braided wire with some snips. Then I slid the braided wire back into the collar, put the inner cable back through, and cut it to length. I did have to work with the braided part a little bit to get it back into the collar though......mabye better tape would have prevented this? It still wasn't hard though. Thanks everyone for all the compliments. I'm sending all the credit to BARACU though (real name is Al). He PM'd me some pictures of his car, which is done this way, so I could do mine. v8dats and SpeedRacer, very nice....and clean too. And thanks for the pics. The real reason I did this thread was because I had trouble finding pics of how others hooked up their throttle cables (I'm sure due to my lack of searching skill ). Now theres a recent thread for anyone scratching their head like I did.
-
We don't need no stinking fusible links!
Teekass replied to Warren's topic in Ignition and Electrical
Good site: http://atlanticz.ca/zclub/techtips/fusiblelinks/index.html'>http://atlanticz.ca/zclub/techtips/fusiblelinks/index.html http://atlanticz.ca/zclub/techtips/ -
I searched about a month ago for a way to hook up my carb linkage, but didn't have much luck. Thanks to some PM's and pictures from BARACU (thanks again, Al ), I got mine done. I'm making this post in case there are others looking for a way... I did find some posts of people cutting holes in the firewall, attaching a clevis pin to the top of the gas pedal, etc....... I was looking for an easier way. Basically what I did was use the factory bellcrank and attach a throttle cable to it. The two parts I purchased were: Lokar 24" stainless braided steel throttle cable LOK-TC-1000HT $36.95 http://store.summitracing.com/partdetail.asp?autofilter=1&part=LOK%2DTC%2D1000HT&N=700+0&autoview=sku Lokar throttle cable bracket with springs LOK-SRK-4000 $20.88 http://store.summitracing.com/partdetail.asp?autofilter=1&part=LOK%2DSRK%2D4000&N=700+0&autoview=sku I started by removing the bellcrank arm, and drilled out the inner ball from the bottom. Once I got the ball removed, I hooked up the Lokar clevis pin to the bellcrank arm. Next, I made a bracket out of 1/8" plate (heated and bent in a vise) to bolt to the firewall and support the throttle cable (I used the factory bolt holes that held the factory throttle arm). After securing the cable to this bracket, I mounted the carb bracket and linkage, then cut the Lokar cable to fit. I'm very happy with the way it feels. I had to move the gas pedal stop (on the floorboard under the pedal) down a couple of turns to get wide open throttle, which ended up being a good thing. I was worried about the pedal being too sensitive, but the pedal "throw" is actually a little longer than factory. Oh yeah, please excuse the dirty firewall .
-
-
-
I am looking for an oil pump primer SBC350
Teekass replied to THUNDERZ's topic in Gen I & II Chevy V8 Tech Board
I'd hate to see the advanced tool list.