
Daeron
-
Posts
2148 -
Joined
-
Last visited
-
Days Won
2
Content Type
Profiles
Forums
Blogs
Events
Gallery
Downloads
Store
Posts posted by Daeron
-
-
Oh, so like a big funnel. When I said two webers I meant DVG's, the car had dual weber DVG's. Please don't take offense to my comment, any information I can get is greatly appreciated!
understood

stinks how sometimes things like this can get misinterpreted over forum chats, good to know we are all on the same level.
-
Yes - but keep in mind the port openings at the head are roughly 34-35mm. So, theoretically, that would be a straight shot with no taper in the bore of the intake to the head. Secondly, you never run Webers wide open at 44 or 48mm. They have chokes that take them down in sizes ranging from 28-38mm. You can only stuff so much air in a 34mm hole, and also depending on what other mods have been done to the motor will affect jetting and choke size selection, as well as overall performance. He "could" have a pretty hot setup - never know until the dyno...
I am aware that the bores are tapered down by venturis in all the side draft carburetors installed on Zs, but I was referring to the standard six-throttle carb setup as it has been used on Z-cars for 40 years; six 40 or 44 mm bores tapered down by say, 36 or 40mm venturis respectively. (Am I overestimating? do that many 40mm carbs actually get 32mm venturis?) Understood, certain applications will see throats/venturis ranging from 28 to 42mm (I know I've seen 38mm venturis for 40s, I presume 42 on 44s) Given all of this, it stands to reason that a 34mm bore carburetor is more limited to its power potential than a 40mm bore carburetor, which these mikuni CV mark IIs apparently came up to (according to superficial google search by yours truly.)
I have never seen an L engine where the carburetor venturi size was specifically chosen to match the intake valve size. As I understand it, the venturi is there as a restriction in airflow to generate the vacuum needed to suck the fuel up through the jet and into the engine. The valve size is taken as a given, and the carburetor inlet bore is sized to flow an appropriate amount of air into the engine. The venturi is sized to tune the carburetor to feed this engine the right air/fuel mix, and then the intake manifold runner and intake port in the head are shaped, sculpted, and sized appropriately to ensure that this given amount of air and fuel, achieve high (and highly tuned) velocity on its way through the intake, into the engine, and out the exhaust. To achieve this velocity, the size of the air channel usually starts out large and tapers down to the size of the valve gradually. In other words, the fact that many many L-series engines (four and six cylinder alike, cylinder size matters more than whether its an L6 or 4) have venturis sizes that are similar to their valve sizes is largely coincidence.
And PLEASE understand, I am not trying to sit here with my arms crossed and explain why what you said is wrong.. I am trying to either explain why 34mm bore carbs ARE inherently a bit more limiting than 40, or explain MY misconception that keeps me from understanding your point of view.. so please, don't take offense. I wasn't trying to take any tone, just to explain as well as possible in as few words.
I should also mention that 99% of my personal hands-on experience with these types of side draft carbs is helping my uncle with the carbs on his roadster engines, (U20 OHC 2 liter as well as 1600 OHV) but he runs triple webers on his Z, and we know plenty of 510 guys, so the discussions and lessons have run the gamut of 4 and 6 cylinder datsun concepts with sidedraft, individual throttle carbs. MOST of the time it has concentrated on max-effort power, but rarely (only two engines) has max-effort power meant "race engine" as opposed to street car use.
Daeron, you said the webers are 40mm, but I only had two of them. Now I have 6 34mm carbs. What am I missing here? Not trying to argue, just trying to understand. Yeah I know a guy that runs a Kia club, ha a Kia club... but he puts on an event out here every year and dyno runs are only $20I am not quite understanding this.. two webers? I guess you are saying that this is certainly an upgrade from stock SUs, which I would never argue against. I LIKE what you've done, and I need to emphasize that I suppose
I am merely pointing out a "ceiling" of sorts. If you have six 34mm bore carbs, then you certainly have less flowing potential then someone who is running 40 or 44mm bores. or is 34mm the venturi size in the carbs you have?? If that is the case, then you are most assuredly running comparable sized carburetors to the "standard."Once again, I say above ALL else that I really like this setup for its originality, resourcefulness, and execution. I only wanted to point out the potential shortcomings and put them in perspective compared to the "standard wisdom," more conventional choices.
In all honesty, I like the way these carbs look set up next to each other ALOT, (more each time I look at em, and I liked em in the first place) and with a nice airbox, a proper setup and tune, large venturi throats and a well-selected turbocharger, I am sure you would make enough power and look pretty enough doing it to make everybody talk nice or shut up
-
http://www.zcar.com/forums/read/12/1948051
If that doesn't make you feel like the biggest butthole in the world than I'm not sure what does...
Depressing... Even if I did wait to buy carbs I would have never been that quick to see it. They were like ducks and bread crumbs. Damn.
Wowzers, that was a great deal on those carbs if they really were as advertised!
-
well, whatever CFM they flow, a 34mm carb is NOT very large for a Z-car engine.. Keep in mind that the standard Weber/Mikuni/Solex "bore size" debate is between 40 and 44mm, with occasional bouts up to and including 50mm!
I'm still not knocking anything, I am just trying to put it all in perspective.
-
Just a thought, I assume these are from a 750 4cylinder with 1.5 sets of carbs put together. If you multiply 750 x 1.5 you get 1150cc. The motor your puting them on is a 2800cc. Now I know the bike spins faster (old bike, maybe 9000rpm max) but are these gonna be enough carb to have any sort of top end? Bottom end could probably be great, but I'd think you'd hit a brick wall way before redline, even with boost. That was the first thing that came to my mind. If I'm way off here, someone please fill me in. If you get this thing running I'd love to see it sometime, Puyallup isn't that far from Lynnwood...
I can't find out exactly how many carbs the bike used, but it was originally a 3 cylinder. so if the bike used three carbs then he is using two full sets. Not that much difference, but I'm not sure the bike used three carburetors.. (maybe I'm just ignorant on motorcycles, heh) The Mikuni CV Mark II carbs he is using apparently came with bore diameters ranging at LEAST from 32mm to 40mm, so theres no telling without getting a bore diameter from the OP.
What size ARE they?
-
I've used aviation form-a-gasket before, but that Right Stuff stuff.. Does that come out of the can like easy cheez? I really like the look of that, it may solve my leaky valve covers on my subaru better than anything else tried yet.... hmmmm....
-
And you were planning on running a vacuum reference line to each float chamber of each carb for on-boost enrichment? That'll be a mess of tubing..
Are these used in draw-through setups or blow-through setups on turbo'd bikes?
-
That's the kicker. If your going to use RTV then let it cure first. Otherwise you'll squish it all out to float around inside your valuable mechanical bits. I installed mine dry and made sure to torque it correctly and haven't had a single leak yet.
exactly.
The cork absorbs oil and eventually gets cooked over time... but with a coating of RTV, the cork is made virtually indestructible and the RTV is given a place to hold on to. It's not unlike fliberglass cloth + resin == fiberglass.
-
Beautiful!!! Its about time some photos of this idea carried to fruition showed up!
Thats TWO firsts this week; someone else threw mikuni single barrel carbs from a motorcycle onto a 240 via half of an EFI manifold, and now we finally have pics of the SU/TBI concept!
Stellar! What size injectors did you wind up using?
-
I have heard tell of a few reliable sources (from my subaru forum, http://www.usmb.net) that like to coat a cork oilpan gasket with a thin layer of oil safe RTV sealant, let it cure for 24 hours or so until its only minimally tacky if at all, and then use the gasket like that 7 ft-lbs sounds about right, make sure you spin around from point to point as if you were tightening lugnuts.
-
I guess it isn't really a point that is spelled out that often, but to be honest this *is* the sort of question likely to fall by the wayside here.
The answer is, if all you have done thus far is mild modifications to the exhaust and a cold air intake, the stock EFI still sees it as essentially the same motor. Some would say that installing the aftermarket exhaust, the 60mm throttle body and the stock NA 300ZX injectors (which were slightly larger, i think about 15cc or so) is the simplest way to feel like you did something, but others would argue that even those simple changes would be so un noticeable without significant (not MAJOR but significant) work to the intake manifold, and the intake and exhaust ports. The thing to remember is that this EFI system is very simple, very antiquated, and built to run at stock performance levels.
There are a handful of old school "tweaks" that can be used to "fool" different aspects of the computer, but really without a wideband O2 sensor and the ability to constantly pay attention to your a/f ratios while operating the engine, you won't really see significant change.
That is not to say that by installing an aftermarket fuel rail and new injectors of a similar or slightly larger flow rating would necessarily be a bad thing. The fuel rail can be used for later endeavors in the Quest For Vroom and still be perfectly suitable to stock running. Also, replacing old factory original injectors is likely a sound idea at this point in time; you never know what performance hidden faulty parts could be "robbing" you of.
However, in the end, you have to keep in mind that a slight overbore, headers and exhaust, and a cold air intake alone do not make a performance package, and throwing big dollars at injectors now, with stock EFI, is going to start hurting engine performance if you go too big. If you DO plan on going larger later, then you could get a rising rate fuel pressure regulator, and use other "stalling" steps before you are at a point where larger injectors are NEEDED.. this would avoid buying an intermediate set of "stockish" injectors before you are too far upon the Quest.
-
yeaaa...it sucked. and msa will TELL YOU that it fits. i'm trying to get the difference back from them on what i had to spend to get it to fit so hopefully that goes well. but..aside from the fit, the sound sends chills down my back. it truly sounds like no other car on the road.
haha i can't tell you how awesome it was to blow by a sti the other day. it had a catback and as i'm sure we all know, those subies are quite loud with their flat 4 but man did i get HIS attention ^.^
the best is when you cruise past them from behind unawares while engine braking...
-
Multimeters canb be had for 5-10 bucks at harbor freight. They aren't the greatest (they really stink TBH but at that price they're practically disposable) but you pretty much NEED something to track this down. I am imagining a stuck open fuel pressure regulator is a possibility as well, try pinching the return line off with your hand mostly and see if it will fire like that, with the pump hotwired.
It seems that the pump control circuit has been verified non-functional. That is not uncommon, and you seem to be on the right path to track that issue down, but there are definitely two distinctly different things wrong with it, and a bad relay probably would not cause this gradual puttering out.. I would concentrate on the AFM issue you noticed to a degree as well, and the coolant temp sensor wire as mentioned above.
You should be able to find component tests for all of these things in the manual; it is important to conduct the component tests for the CTS and the AFM both AT the component, and at the ECU wiring harness. Testing the function of the unit at the ECU plug also tests the wiring associated with the unit. If a component tests fine at its own terminals, but doesnt test the same at the ECU terminal, you know you have found a bad wire (I like to call 'em "magic wires" because they usually come and go like little gremlins..)
In any case, it is extremely difficult to troubleshoot these areas without a multimeter, and rather easy to do so with one. using the meter is fairly easy to pick up, too, and I can help with that if needs be. Blue's techtips page has a link to "common electrical testing procedures" i think....
-
I wouldn't call it a "taboo" as much as a "why-do". Not criticizing in the least, but the webers with their infnite number of jet sizes are so incredibly easy to tune, they take the cake for the "standard" folks and the grouping of the mikunis and the solexes and the SK/OER carbs are more than enough to satisfy most people's desire for variety/"originality." To my knowledge, this is the first time actually seeing six one barrel bike carbs on a car.
SO, my point is, up until now it has simply been an idea to which the common reply is "yah.. but why?" The answer to the why is understood before it is asked; the query isn't in search of a reason, its more to state the simple fact that easier ways exist. Most never bother taking a project to fruition, but if YOU have the parts handy, then its A+ and you get to be the one to break new ground.
It IS pretty cool, but I just fell in love with the appearance of the old SK carbs last night (never seen them in 27 years on this earth, all of which were spent in S30 Z-cars) so I am a little jaded to ANOTHER new carb on the motor, heh..
-
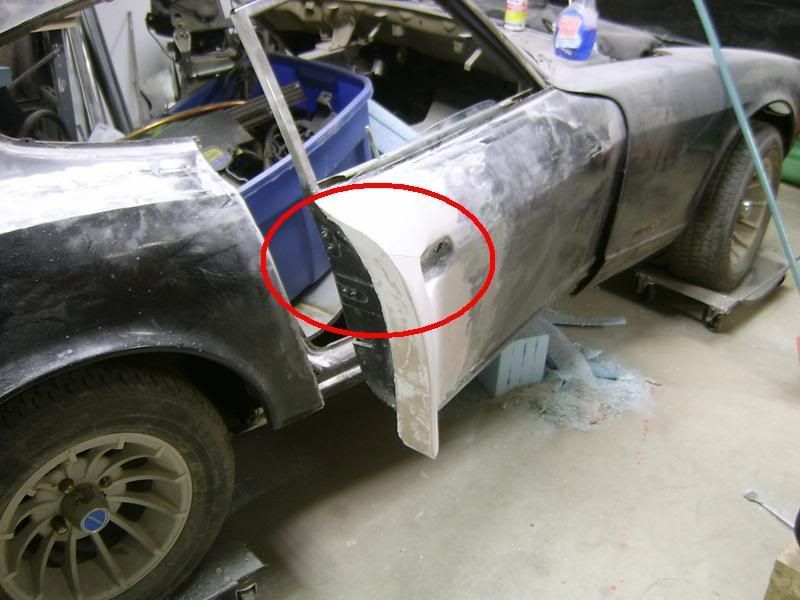
One thing that stuck out to me was the interruption of the line flowing from the front corner of the car, through the signal lights and door handle. It was "picked up" on your original door flare, and I did some paintbrush tweaking showing what I would shoot towards.. all of this is suggestion and I imagine it will probably be well taken.
I circled the area I tweaked here showing what the door would look like closed. Most of my tweaks only show a portion of the changes I envision, and I circled the zone I worked in here.. all I refer to is the change of overall curve here:
The blue spraypaint shows an area I would "lift" and the green spraypaint shows an area I would "drop." The red curve at the tail focuses on the approximate region I would envision the disappearing edge of the butt-cheek to be; I imagine pushing the corner edge in towards the driveline axis of the car and possibly lifting the bottom rearmost corner up a good bit a la 250 GTO, and the red curved lines near the door show a VERY rough approximation of how I might accomplish the bulbing or ballooning profile line to incorporate it all into a single undisturbed line. I couldn't get a decent curve in paintbursh, but the shape of Terry's car is what you should go for, simply transposed further forward on your car.
I think re-integrating that line into one would accomplish alot to make it LOOK like the "wedge taper" effect begins earlier on the car, because as it is you have to look at your car and Terry's car side by side to really see that yours is much further forward at ALL, and the actual difference is night and day; his doors are practically stock compared to yours. Also reference the 70's corevettes in this region for guidance.
(speaking of 70's corvette, what about doing door handles off of one of those?)
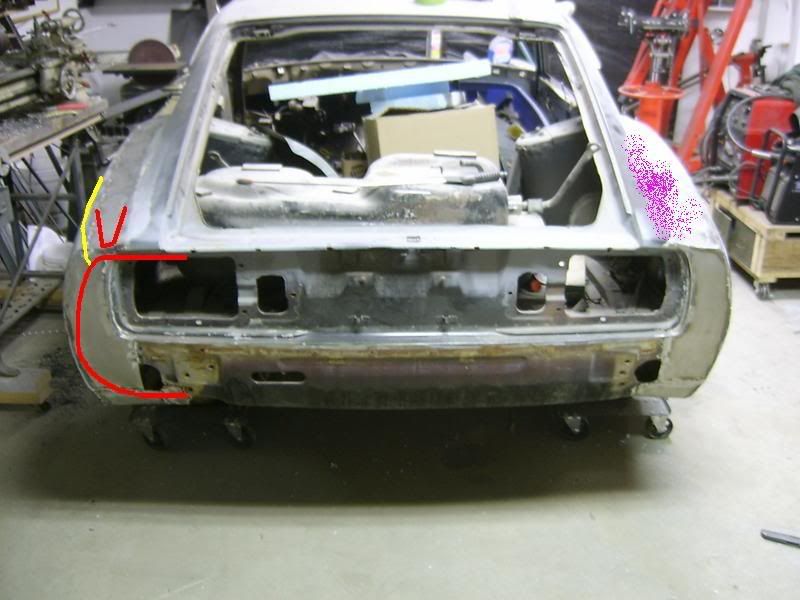
And here is the concept of the tail section.
I used a yellow line to indicate my conceptualized "edge" of the vehicle; combine that line with my rearmost red curve in the second photo in your head. The red squared off U shape indicates the edges I would have cut on that piece of steel you added; note that the "bridge" of the U would NOT be parallel to the front edge of the added piece of steel. The red curved outline shows the perimeter of the plane I envision to be the tail panel, and the purple spray painting indicates the zone that I have the most trouble with.. Looking at it now I think I went too far forward on the car, but I was attempting to spraypaint purple in the area I would slightly "lift" outwards to match the overall "hump" of the buttcheek. This top outer corner, after all, is one of the most important quadrants of a butt, after all.
I am sorry to bombard you with so much I think I would change if it were to fall into my hands all of a sudden.. but please, understand that your work has stimulated my imagination so much I had to go to such lengths to give you my input; I am NOT a widebody person, and I am in LOVE with this even more than with blueovalZ's car, which I had thought was the only widebody I really liked for an S30.... so ALL this booklike postage should be taken as a compliment to you anr your work, and as encouragement.
EDIT
I forgot to mention that my profile of the tail panel would almost fit the stock 240 tail light lenses... turned SIDEWAYS....
-
I cannot BELIEVE it took me over a year to notice this.
For advice/input on my part, I start by saying this: picture what a caricaturist would draw of a 240Z.
Could you possibly snap a few photos of how the car looks as-is? in reading through the thread you linked to as an "update" of sorts, (regarding the Miura shape and how it inspired you) it seemed like there have been some updates in the actual appearance.
What I would be working towards is an effect identical to the back of blueovalz's car, and complement that concept on the front side of the fender flare. I (also) would personally have extended the "flare" further forwards on the door, but not by much. I would like to see the door end up with the front, bottom, and rear edges "flared;" the flare line continuing through the car from the front marker light, through the door handle recess and into the "butt cheek" as I think of it, then finally taper downwards slightly and inwards as the rump comes to meet the rear face of the vehicle.
(I LOVE this project and none of the critique here is intended in a negative sense at ALL, but I wanted to word it strongly so I could emphasize the issue I am trying to point out for clarity of communication)
As you have it now, the transition from the sail panel behind the quarter window (vertical side plane of the car) to the horziontal, and then back to vertical, through the area just aft of the quarter window to the back corner of the car, is completely buggered.
Here is a shot of blueovalz's car in primer:
here is a shot of a GTO conversion car: (in my mind I can picture a GTO car that has a much more Z-ish looking integration of the three planes)
I REALLY like the concept of shooting for something GTO ish for the backside of the car, but that would require shaving the existing rear corner of your car from being as square as it is now to a much rounder aspect. The same would need to be reflected in the front. I would shoot for an oval shaped backside similar to this GTO, but with about 3-4 inches in vehicle "width" removed, to give the entire "rear corner pillar/wraparound to the "butt" outline" a tight, drawn-in look. Maybe not quite as exaggerated as 3-4 inches.
The door skins I would wind up making essentially a three-dimensional U-shaped plane, stock sheetmetal surface for the middle half of the overall length and height, meeting your "flared out" front fenders and rockers.. I am picturing extending the ide you worked into the back side all round the perimeter of the door to meet "widebodied" front fenders, but the front side of the door may well work fine as-is if you can hit the front flare juuust right.
I would say some rrreeeeall slow-blending, but ultimately substantially flared front fenders (again taking this flare in all three dimensions, so it bows AWAY from the current line every so slightly) that flare back to stock location by the headlight bucket would complete this car, but they would be tricky. Stock fenders with smooth-molded flares (not the bolt-on affair that everyone loves these days) would match the car well enough though.
NOW... I say all this because I (amazingly) JUST stumbled onto this thread, and you are almost EXACTLY duplicating what I saw in an old (76? 78?) hot rod magazine (pretty sure it was Hot Rod Magazine or one of the other super-big ones that have been around forever.. not my scene TBH) The article claimed to be the first Big Block (it was a chevy) in a 240Z. They basically just welded an additional set of front fenders and rear quarter panels from a crash repair parts supplier on, faired everything in, and were off. I was trying to explain this idea in a thread someone made discussing chopping the entire vehicle up to "wide body" it.
In my opinion, and with all due respect to Terry and ADORATION of his car, this car EASILY has the potential to blow his out of the water when it is done. However, in my mind, the "ideal" widebody S30 Z car would look distinctly like his car, and your car looks like this ideal car in progress. I am going to try to take a couple of your photos and stock front fender photos and use paintbrush to make some sketches to illustrate some of my ideas. Basically, picture, say, the caricature view of stony's avatar, or something similar. Mild exaggeration in all dimensions, making for a ferrari-esque muscularity overall, as well as MUCHO more room for rubber underneath.
In conclusion (for now)
-
find the factory service manual for the car, the process is not ALL that incredibly difficult. Make sure the system is properly evacuated, though.. I removed an entire A/C assembly from a parts 260 or 280Z (almost all the same, minimal differences)and it wasn't that much of a chore at all. It gives you a chance to renew all of the sealing foam pieces that have deteriorated over the years as well. It is certainly a largish affair to deal with properly, but it isn't incredibly difficult by any means.
-
Do you have complete wiring schematics for the car from an FSM? I ask regarding the dash wiring. My uncle probably has 73MY pieces for the entire affair, if not a complete 73 dash, that could potentially be pillaged for some sale parts. The dash wiring is completely independent of the rest of the wiring, so it should be easy to re use all or most of it.
I am basically going to need to dissect my entire harness and replace the vital wires that need it. I NEED to do at least a minimal job of it to get the car functioning again; if I discover that we have complete 75 wiring pieces somewhere I may just pull a complete stock swap, but step one is dissection of what I have on the car.
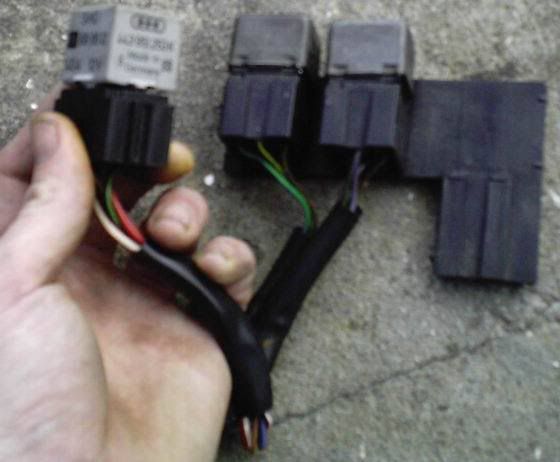
I've already spliced in a maxi-fuse panel I pilfered from a 94 caddy sedan deville in the boneyard.. Check out the early 90s GM products and beyond for potential junkyard sources of rewiring supplies. The block I used was one of two present in a three block box, the other block was a relay panel IIRC and the entire affair (which shared one common cover) also had a mini ATO fuse panel that attached to IT, and I may end up installing that entire instead of trying to muss iwth my stock fuse panel anyhow. Time will tell on that front.. but many GM products seem to have components worth re-using. Spend and hour or so with a few minimal tools (screwdrivers, one of each, pliers, maybe a 10mm socket, long extension, and ratchet, all 1/4 inch..have more complete tools in your car if you should need em) and explore the GM section of the junkyard, looking at what there is to be had. The pieces are largely classed into 4 or 5 types, and used in many vehicles that I cannot list.. a Cadillac Catera is a particularly unique beast.
Theres also a nice relay bracket available on late 80s BMW 3 series:
It has a nice black plastic cover that slides over the entire affair, and is scaleable to house up to five relays, four or five prong type. The plugs are sourceable in many vehicles, including the BMW model listed.
-
What sort of plans do you have for an airbox/airhorns/filter? It looks nice for a temporary mock-up, but do you really intend on running it that long? If so, I admire that kind of rugged budgeting (in other words, I am broke, too) but it *does* look a little unfinished without some sort of extension onto the air intake of those carbs. What did they have on the bike?
I have to admit that while there is a big part of me that LOVES this idea, there is also a part that can't stop rolling his eyes at it.. definitely an honorable mention for abstract implementation:coollook:
-
what year car is this?
-
Put a fully charged battery in the car.
The spherical thing, might that have been a cylinder? if so it was just a little condenser to filter radio noise; it should be there... but mine isnt
There is no external regulator, both alternators are internally regulated in your case.
Charge the battery fully; autozone will do it for you while you wait. Bring the alt in to autozone, have them test it (may as well do both) and have them charge your battery while you are there.
There are two TOTALLY different looking starters for the car; one is a direct drive, and its a simple looking starter: motor, solenoid, the motor connects directly to the flywheel teeth. The other is a gear-reduction starter, and it has the axle of the motor offset to the location of the flywheel teeth, and also has a small gearset that makes the actual contact with the flywheel. This gearset is housed in a neato looking aluminum "neck" of sorts, and is NOT co-axial with the motor.. I am guessing you switched from one to the other. I personally prefer gear reduction, but thats just for the sound and the cool factor. They both wire up the same; positive battery cable, negative cable on the housing, yellow solenoid signal wire.
Start with a fully charged battery and see what happens. If you have a fully charged battery and put it in the car, and the thing will not start the next day, then your battery is either bad, or you have a drain. If you have a multimeter, you can set it to amperage (usually requires moving the red lead to a different plug on the meter) and check to see what amps are being drawn from the battery with the key off. If NOT, then fully charge the battery, crank it up, make sure its OK strong, and then disconnect the battery cable overnight, come back the next day and try to start it.
If it won't start then, you have a bad battery. The battery was involved in an accident? Might not be a good sign. I have been known in the past to open up the covers and top a battery off with water, even though you arent supposed to do that anymore for some reason... it helps in some situations, IF the fluid was low.
Good luck; the guys at autozone (or wherever) are your friends with something like this. get everything tested.
there IS also a chance that for some reason your starter motor is dragging too much amperage. is the other starter still functional?
Just throwing some ideas out there.
-
had to google "cow magnet."
brutal.
My question is.. would that part be considered an "engine internal?"
-
on my 87 subaru EA82 (1.8OHC, hitachi built EFI) the ECU has a green LED that comes on whenever the O2 sensor reads "rich" and cuts off at stoich or lean.
Does the Z have the same thing???
-
With ITB's the engine is Balanced Cylinder to Cylinder from the Start!
IMO it is a matter of preference, for the most part. I think all of us would agree that a theoretical "ideal air intake" (given: limited to throttle plate type setup) would likely be ITBs with a Perfect version of Jeff's plenum on it. This ideal would likely cost arms and legs, thousands of arms and legs, so it will never come to Be...
However, one thing I wanted to point out is that the primary benefit in having a plenum (cold air aside) is the common resonance chamber and assisted velocity from running all six cylinders though one common orifice. I may be poorly stating it, but jmortensen said as much above and I don't think enough attention was brought to it.
This is one reason I am eager to build myself a dual TB bolted to SU EFI manifold, and start tinkering with an air plenum supplying them with fresh air. Once I get the bloody thing back together, that is.
Obviously I will be fudging around in the dark, but in my mind it should be fairly easy to make it a "best of both worlds" scenario on a budget, if I can do it right. With such a pile of parts, it is hard to think of NOT using anything that I have already and buying something else instead.


In Progress: 75Z getting 81ZX Turbo motor.
in Nissan L6 Forum
Posted
hows progress??
The only way I can begin to communicate the number of ways in which a helping set of hands is a MAJOR assistance working with these cars, is to say that it taught me how to be a mechanic they are easy to work on, but having a kid or two around interested in helping (me and my brothers) so much easier.