Derek
-
Posts
1344 -
Joined
-
Last visited
-
Days Won
53
Content Type
Profiles
Forums
Blogs
Events
Gallery
Downloads
Store
Everything posted by Derek
-
This just goes to show you your company is only as good as the person answering the phone. I bought a power window kit and central locking system from Spal. I was totally blown away by the quality. I had some questions about the hook up and the tech emailed me schematics and walked me through the whole process. I had to call him back for some more info and he was as nice as could be. I can never understand why employers put up with tech people with bad attitudes. I'm so sick of people who are being paid to help me treating me like it's a bother so now I'm starting to call them on it. Our country is now based on it's service industry and we're rapidly flushing that down the toilet. Derek
-
Started out in Optimist Prams when I was 9, went to Flying Juniors for a few years, moved into big boat offshore racing at 14. Graduated to fore deck - bow man and raced pretty much continuously until I was 25 or so. I raced on everything from a John Alden wooden ketch to a Farr 30. I took up windsurfing for a while and raced a bit but nothing serious. I was then talked out of retirement to do bow work on a Farr designed 42. This thing was very exotic and was the most serious boat I ever raced on. We did very well racing on Biscayne Bay and SORC off shore racing. I was on that boat until just before hurricane Andrew. My knees just couldn't take the punishment anymore. Fore deck is a young mans sport! Now I'm land locked in the middle of the state! Derek
-
So you see it's true! Sorry no more progress photos. I'm too close to getting the car on the read right now so the manifold is going to stall for a while. Derek
-
This is the one I got. http://ww1.autopartauctions.com/a.asp?A=818741&ap=6815&C=11&G=229 I've purchased a fair amount of stuff from this sit and haven't been disappointed. Derek
-
I used a pump out of a rx7. It was nice and quiet. derek
-
I was thinking about putting it in the Wheelabrator machine after I clean up the parting line so I'm thinking the smut treatment might be a waste. Any thoughts on this? Derek
-
Ok I added some more pics of the casting process to a gallery page. http://album.hybridz.org/showgallery.php?cat=850&ppuser=21354 I haven't had time to do any more work on the manifold yet so no new pics on that. Derek
-
-
-
From the album: intake casting
-
From the album: intake casting
-
From the album: intake casting
-
From the album: intake casting
-
From the album: intake casting
-
From the album: intake casting
-
From the album: intake casting
-
Well hopefully you'll be getting a real close look because I'm counting on your help to get the meggasquirt dialed in! Derek
-
Now for the small world award. Steve is a frequent visitor to the foundry. He's known the owner for quite a few years and I've met him a few times. He's really a great guy and has a firm handle on the home brew "build it on a dime" mentality. The foundry uses induction melters. They use Olivine green sand. I've got a bunch more pics that I'm going to be uploading to a gallery in the next few days. I'll let you know when I've got it done. I'm sure we can work Kevin Bacon in here if we try hard enough! Derek
-
I wondered what took so long for someone to pick up on that! Seriously both of these guys (one is the owner) have been doing this continuously since both were in high school and they're both in their early fifties. The first time I saw it I couldn't believe it because I'm like mister safety at my shop. Now when they pour bronze and iron it's a whole different story. They look like spacemen. I don't want this to turn into a debate about foundry safety so if people want to go that direction then let's start a new thread. Thanks Derek
-
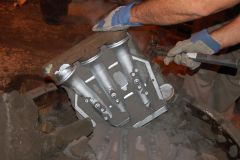
Thanks guys. I'm really happy with the way it turned out. That's why they make band saws and tig welders! Well I figured if it doesn't work as a manifold I'd park a seal behind it, teach him a tune and go to work at a circus! I'll knock the cores out later this morning and post a few pics Derek
-
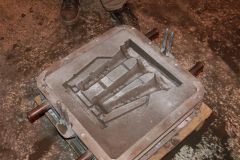
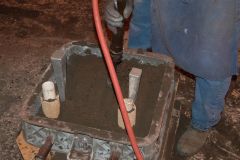
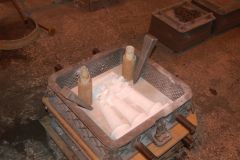
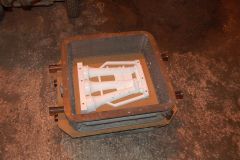
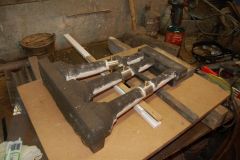
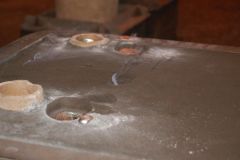
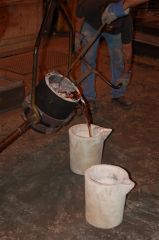
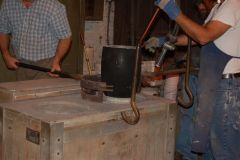
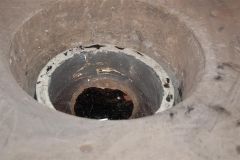
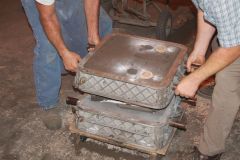
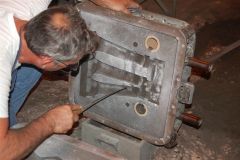
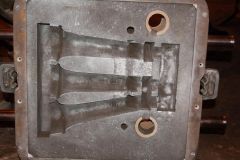
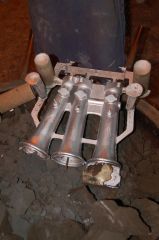
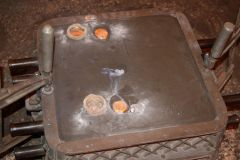
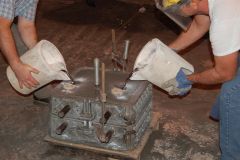
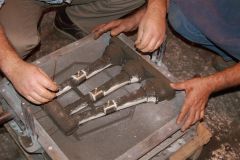
Well I finally got some time to get over the foundry to pour the first manifold. If you are new and need to come up to speed here's a link to the design stage http://forums.hybridz.org/showthread.php?t=121021 And a link to the pattern making http://forums.hybridz.org/showthread.php?t=121478 Here is the core assembly all glued together with the stainless tubes and the bronze bushings in place This is the pattern with the flask around it. Ramming the sand This is the drag or bottom of the mold with the pattern removed Setting the core. Cores makes castings hollow. We decided to do a dual pour. Don't try this at home! I'm running the camera by the way. The moment of truth. I'm really happy with this I ran out of time but tomorrow I'll shake out the cores and post a few more pics of the casting. Derek
-
From the album: intake casting
-
From the album: intake casting
-
From the album: intake casting
-
From the album: intake casting
-
From the album: intake casting