

Pop N Wood
-
Posts
3012 -
Joined
-
Last visited
-
Days Won
5
Content Type
Profiles
Forums
Blogs
Events
Gallery
Downloads
Store
Posts posted by Pop N Wood
-
-
what thread is the bleed valve, and what thread is the tee?
ive got a ton of brass fittings here in the store and will be more than willing to help. im assuming your using 3/16 line and double flaring the line using 3/8x24 nuts...
Thanks for the offer. I bought a bunch of metric fittings so the T and bleed valves are all M10x1, so I think I am set.
Just need to get over this stomach virus so I can get some garage time.
-
The price of the car doesn't do much to affect the cost of insurance. It is the cost of what you could do to others that gets expensive.
That being said, the definitely won't pay much to fix a 30+year old car.
-
Who posted that message?
I know the early blocks (98-99) didn't have windage openings between the block main webs. They were also notorious for "oil consumption" issues and blowing oil through the PCV system and into the intake. Maybe they are all related, hard to tell.
But I thought the 01-02 blocks had the upgraded oiling baffles.
-
The only metal 12 mm OD - 10 mm ID tubing McMaster Carr carries is made out of copper. After looking high and low for 1/2 inch SS tubing to make a fuel pick up tube I can catagorically say if MMC doesn't have it good luck.
They have 12 mm OD and 9 mm ID that could be reamed out to work I guess.
I like the no spacer route.
-
That is the IRS. With a solid rear axle the torque tries to lift one of the wheels causing it to spin more easily than the other wheel. Get the car into a turn and you will see the open diff.
There is always a lot of talk about turning one wheel etc, but the best way to tell if it is limited slip is to pull the cover and look. It is so simple to do I don't know why people try any other way.
-
Did you just buy the radiator mounts from JTR? Some months back JTR said they were going from steel to aluminum. Maybe the new stuff isn't as sturdy as the old?
-
I bought a couple of Campbell Hausfield tools and some Husky tools. The Husky air tools from Home Depot are both working rather well. The CH stuff is OK but definitely like the Husky stuff better. Also have a Sears impact driver that is not what I would like it to be.
And like the others said, you really need a 220V compressor. A true 5 HP continuous motor will need 22 amps at 220V. My die grinders will run my compressor continuously, but I never fall below 90 PSI or so. Haven't tried a larger sander. All the rest of the tools barely tax the compressor.
What I really need to do next is get a second air tank so I can get the moisture out of my air lines (something Tony D recommended). I have a separator in the line, but it doesn't seem to keep the condensate out of the copper air lines I ran about the garage.
-
Weight is the killer of gas mileage in the new cars. My 79 Ford Fiesta weighed in at something like 1700 #. Try finding anything that weight nowadays.
For fuel mileage:: Mini Cooper Diesel
The Mini One D, according to the company, is capable of running distances of over 600 mi. on one tank, which holds 13.2 gal. Reported fuel consumption is somewhere in the neighborhood of 48.7 mpg in the city and 65.7 on the highway. These numbers make this Mini the most beneficial mpg-wise of all the Mini variants produced by the BMW group.Although at 75 HP and 133 ft-lbs of torque it has to be an absolute dog. The old Volkswagen Beetles had more oomph.
-
Yeah, I have always thought that high exhaust gas temps are from running too lean. That is what all the turbo guys say.
Need to get this right so I don't burn off the ceramic coating from my headers on startup.
-
Try looking up a service manual for an 83 zx.
I think we have links for that on the site here. I know I have seen links for wiring diagrams.
-
I think i understand your problem. The TEE you got uses bubble flare seats (like a little valley at the bottom of the hole), while your lines are flared to screw in to fitting with an inverted flare seat (little mountain at the bottom of the hole). Am I right?
if this is the case, there are two possible solutions.
#1, go out and buy yourself a flaring tool. Making a flare is a 2 step process....first you have to use the die that fits inside the line to make a bubble, then you use the conical shaped die on the press screw to crush the bubble making your inverted flare. You can make new hardlines using only the first part of the flaring process, and they will work in your new TEE.
#2, if you have access to a lathe, you can make some small inserts that press into the holes in the TEE. I have a picture of one at the office I can post tomorrow so you know what I'm talking about. I think it would be easier to remake the lines with the proper flare for the fitting you have.
I have the flairing tool and a coil of hard line. I am making the hardware from scratch. Now that I know what a bubble flair is I just wanted verification on how to make one. Thanks.
I like the insert idea. This guy had an interesting idea to cut them out of a 240 MC. I wonder if the inserts are available by themselves. Seems like it would be a bitch to machine those with a lathe.

-
I have a 98 Toyota 2wd, 4 cyl 5 speed extra cab. Gets just over 25 mpg. Industructible motors. Terrible snow car.
-
No, not stock. I bought a TKO and LS bellhousing from Keisler engineering. They talked me into their hydraulic throwout bearing. You can see it this pic of the trans and bellhousing.
They claim it is out of a BMW. It only has a single feed line. So to bleed the system they tell me I need a T right on the outside of the case. They say it will bleed fine.
Normally they sell the hydraulic lines and MC with the trans set up. But since I was putting the trans in a Z they weren't sure about the line length etc. So like a dumb ass I tried to save a few bucks and build the stuff myself. When I later realized how difficult it was going to be to get the appropriate metric fittings I called back and tried to get the package pieces that I left off in the first place. But somehow getting the rest of the package was going to cost like $150 more than what they credited me in the first place.
Everything should work out fine. But if I had it to do over I wouldn't have done buisness with Keisler.
-
Hey. Thanks guys. The proverbial easy button.
-
I would love to see a write up detailing this also. I know Jon has written in bits and pieces what needs to be done in the group buy thread. But a nice cookbook write up would be greatly appreciated.
-
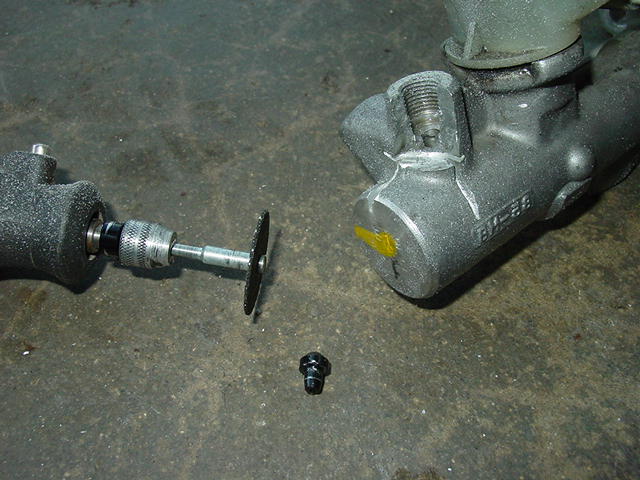
Got a brake line T to hook a bleed valve into my clutch line. Thought I had everything I needed to double flair some hard lines into the T. Now I notice all three connections on the T have I guess you call it a female taper. So the pointed bleed valve will work great, but how do I connect the double flair hard line?
Do I need to get a different T with 2 inverted flair fittings and one non-inverted flair (for lack of a better term)?
Man, everything on this swap takes 10 times longer than you think it will. First spend half the day just trying to find the brake fittings I bought months ago, and now this. I honestly think I have spent more time on line trying to buy parts than I have working on the car.
Edit:::
Maybe I have answered my own question? from this page
The bubble flare is used with a male swivel nut, and seals at the bottom of a drilled and tapped hole, with a nice angled bottom. While it can usually be resealed, it has a limited lifetime - there's no good way to get back the deformation that was crushed out for the first seal, short of remaking the flare from scratch.Making such a flare is easy: if you are in possession of a standard 45 degree double flaring tool, the bubble flare is what results after the first half of the operation. Simply stop there, and you have the bubble flare which will seat nicely at the bottom of the hole. If you continue, inverting the form tool and finishing the job, you then have the more familiar double flare used by Girling and the US automotive industry
-
Sounds to me like you still have a vacuum leak or a misadjusted mixture. You must be running lean, so putting on the choke dumps more gas into the carb letting it run better.
If the car has been sitting then I guess you can't overlook the possiblity the carb is gunked up causing it to run lean. Maybe some dirt blocking a fuel orifice.
Get some starter fluid or propane and continue to look for vacuum leaks. pay special attention to the throttle shaft bushings since those are what caused me to replace my early carbs. Of course replace or tighten all the vaccum hoses and check the brake booster for leaks.
If all of that works, pull the carbs and rebuild them.
Reading back through this I realize that maybe the carbs are just out of adjustement. But I don't know anything about adjusting the flat top carbs.
I have a set of dual downdraft webers I could make you a deal on.....
-
Is it the brakes rubbing? When you replaced the wheel cylinder, you should have been able to adjust the brake shoes back so they don't rub. If the wheel is hard to turn like that, then maybe your rear wheel bearings need some attention.
-
I bought a pair of Harbor Freight furniture dolly's when I needed to move a hot tub. I think $35 for the pair. When I got my crate motor, I mounted one dolly to the bottom of the crate to move it around. I then installed a couple of 2x4 spacers to get the crate up over the engine lift legs. Further modification to the crate allowed me to bolt and unbolt the trans to the back of the motor while it is sitting on the crate and dolly. It moves a fully loaded V8 and trans with ease and slides right up to the lift.
The old L6 is still sitting on the second dolly in my driveway. I did make a metal frame out of old bed frames to mount the L6 and trans to the furniture dolly.
-
Is it possible for improper valve adjustment to do this? Or bad valve timing, like a worm timing chain?
The other possiblity is maybe your compression gauge just aint what it use to be.
At any rate puling the head will tell you if it is combustion chamber deposits.
Just throwing out ideas.
-
I gave you the simple way to do this that works, your over thinking this thing and making it hard, it doesn't need to be.
I'm with Paz8. Mine is just cut.
-
-
See if he can get on with a 6 speed manual trans too. Getting them together would save you big bucks.
-
The moderators get rather testy when new people ask such basic questions.
Read through the frequently asked questions page. Particularly the secion on chevy V8 swaps.
http://forums.hybridz.org/showthread.php?t=116670
Making a quick read of the rules will make your stay here a much more pleasant one

Drill and tap ring gear?
in Drivetrain
Posted
Has anyone found a source of tubing yet?
Guess we need a source that will return emails and is not in England. Then they need to be willing to sell something smaller than a ton at a time.
Did find some 12 mm OD - 9 mm ID. Guess that could be reamed out.