

Xnke
-
Posts
1985 -
Joined
-
Last visited
-
Days Won
9
Content Type
Profiles
Forums
Blogs
Events
Gallery
Downloads
Store
Posts posted by Xnke
-
-
The RB crankshaft is 81mm OD. No Doubts About It.
-
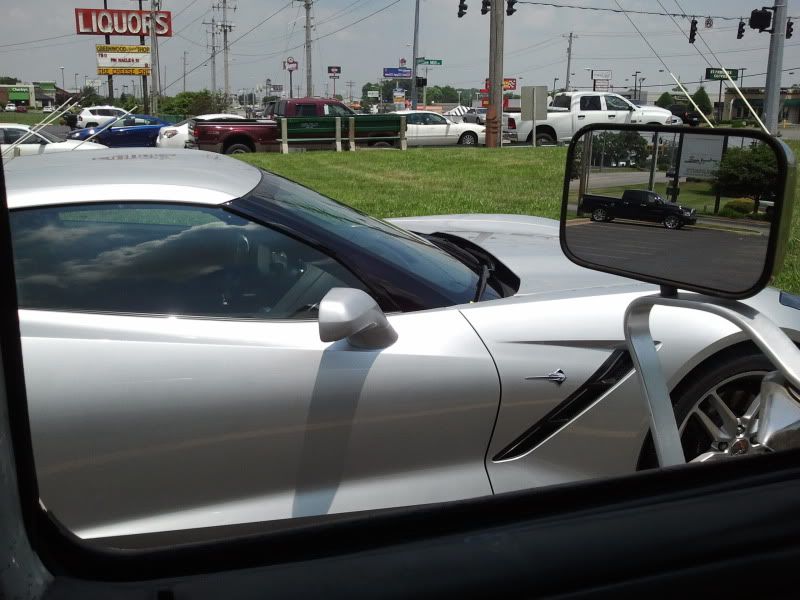
Parked next to this the other day at lunch. Part of living 10 miles from the assembly plant and driving past the plant every day.
This is the first non-dealer-plate one I've seen. Full street tags, this parks in someone's garage every night.
-
It's probably just an L24 block with an L26 bottom end, or they put in L26 pistons. It's not a big deal, and a compression test won't tell you anything about the compression ratio.
-
There are L26 pistons with the same pin height, bore diameter, and pin diameter to be placed in the L24 configuration. These pistons are dished, -4cc if I recall correctly.
-
Try sidegapping your plugs. It makes a big difference in my engine, especially around idle.
-
Inline6, i was referring to the OP's request for information, I am not in georgia but not too far out
-
Send the cam to Paeco and get it Paecolloyed. No worries about cam wear...EVAR!
-
I wish I could find a job like that. There is a company that does alarm work in Kentucky, Tony...It could be profitable if the owner ran it like the shop you took over.
-
I can do the welding and straightening for you if you can't find someone. I have done it a number of times
-
I plan to hang this one under the passenger side headlight bucket; and duct air in from the brake duct opening in my air dam. I can keep the whole thing above the oil pan, but only just. I really don't want to have to worry a lot about damaging the cooler and dumping all my oil because I mounted it too low and didn't quite clear the parking curb.
-
Make sure the head is drilled for the 6-bolt intake and it'll fit. I'm not positive I've seen a head that *wasnt* drilled for the 6 bolt intake...but I could be wrong.
-
Try running 3* of timing on the launch control and cutting 2 of 5 sparks; richen things up a *little* and see how it goes. Set the launch to hard limit you at 3500RPM, with the soft limit (the point when it starts retarding timing) at 2800.
I bet that'll get you some boost on the line...works a treat on the ZXT here.
-
The RB20DET box is internally identical to the KA24DE and SR20DET gearboxes. Nothing special about it at all. The RB25DET gearbox is the same as the Z32 and late Z31T gearboxes, and is much stronger.
It's all in how many times you want to change gearboxes...going to straight cut gears isn't going to increase the strength of the tailshaft splines, which you already tore up, nor will it save the front countershaft bearing from exploding, which is the normal death method of these gearboxes.
-
It's JIC, not JCI. They are physically identical, but are held to slightly lower thread tolerances and are made of plated steel or stainless steel depending. AN fittings have tighter thread tolerances, and are made of anodized aluminum.
That's the only differences as explained to me by the local Parker Hydraulic distributor.
That and JIC fittings are not HORRIBLY expensive, like AN fittings...nor are they anodized in garish red and blue.
That said...anyone who did the job in AN fittings has already documented this for you. They just spent more money and their fuel lines don't weigh as much as yours will.
-
Yeah...this one was going to get a 1UZ-FE, ITB's and headers. Gloss black paint, full chrome, black leather interior with banana yellow inserts in the seats...
-
Call Isky. There isn't a limit on LSA...but it may get impractical. I had a stock turbo cam re-ground to a 113LSA, no problem.
You will need to go through and set up the lash pads properly, and getting the correct thickness may be spendy or take some work, but getting the cam cut isn't an issue.
Elgin camshaft also has a few turbo grinds that work really well too.
When you call for a custom camshaft, they will ask for head flow numbers, exhaust sizing, intake sizing, and desired output.
-
Had a bit of mixed luck this afternoon!
I missed a buy of a 1976 Toyota RA22 Celica by fifteen minutes...the car sold for scrap metal to a dealer. I have called said dealer trying to throw money at him to get it before he crushes it.
BUT! I found a local flowbench and slapped the currently-37mm-ish ports on it, and did a little flow work! This is with what's left of the old valve job, on used, but clean, stock-sized valves. I lapped the valves in to get them to seal up closed, but that's about it. The top angle of the 3 angle job is still there, but a lot of the bottom angle isn't or is modified from the die grinder.
Lift - Intake Flow
.1 - 62.4
.2 - 117.1
.3 - 157.8
.4 - 199.1 (FIGJAM!)
.5 - 214.1Lift - Exhaust flow
.1 -- 51.4
.2 -- 80.3
.3 -- 102.1
.4 -- 128.8
.5 -- 134.1Not too bad! I have no idea how this compares to a stock port; as I don't have any heads with stock ports except a Maxima N47. I also have no idea if this bench is padded/accurate/garbage...it's an old garge-built unit that seemed pretty consistant, though. I was getting very close to the limits of the bench, I had the air valve wide open to get the full 28"WC for the upper end of the intake flow. A guy in the back of the neighborhood has it, but he's moving out this week. I saw it in his garage and asked if I could borrow it for a few minutes. An hour later, I was done and helped him load it into his moving truck.
I asked...he didn't want to sell. I have a very good idea of how to copy it though...
-
That's the pump INLET...hot water comes out of the cylinder head, into the heater core, then returns to the pump inlet. The thermostatic valve is in that T-fitting that's bolted to the side of the block, in the heater core return line to the inlet of the water pump. (At least that's where it's supposed to be.) I have also seen reference to a thermostatic valve actually installed in the rear manifold half too...not sure on that one, never seen it.
The hot water comes out below the thermostat, flows through the manifolds, into the thermo-valve T-fitting, then returns to the inlet of the water pump. Blocking this circuit should, in effect, eliminate heating of the manifolds and the cooling circuit should behave exactly as it would once the engine has come up to 170F and that thermostatic T-fitting closes up.
Probably a bad sending unit for the dash gauge if you are reading normal temperatures everywhere else in the engine. Check your electrical grounds; at idle...the alternator isn't really putting out much voltage, as RPM's climb, the voltage climbs. Your gauges will report inaccurately as system voltages rise, which would occur as RPM's climb above 1500RPM. Could be a voltage regulator or alternator issue, could be a bad ground for that particular sending unit. My temperature gauge works fine, and my sending unit works fine...but they won't play nice together in my car due to grounding issues with the sensor.
-
Got the cooler back from the cleaning shop today. Cost me 25$ to have it internally scrubbed. Good thing too, because the 2" diameter 20 micron filter screen got clogged twice before the black ash quit coming out. Not much metal in there, but a LOT of old oil residue...and this cooler had clean-ish engine oil in it!
-
For me, the port diameter is to lift the port up in the head. Theoretically I could push the port floor down about middle of the radius, then weld up the floor near the manifold face to lift the port, increase the short side radius, and retain the 35mm diameter, but that's a lot of work that just isn't necessary at this level.
Pending an agreement with my neighbors to not run the die grinder during their TV shows, I am not getting much work done during the week right now. (Please don't from 6 to 8, thanks!)
-
That probably isn't the problem. A sudden rise in coolant temps, due to removing a circuit that isn't even active at the temperatures we're talking about?
There is a thermostatic valve that closes, blocking circulation in that circuit, when the engine is up to temperature, according to the FSM.
I'd start checking for a water jacket that pressureizes very quickly on startup.
-
Go to www.Google.com.
Type in the following EXACTLY.
site:hybridz.org "Z31 ECU swap"
Read. Every thread that deals with swapping the Z31 turbo computer and MAF is available.
-
The way I plan to do this is run the 2.5" full exhaust as my daily; and switch to a 3" pipe that dumps right in front of the passenger rear tire for the odd day at the track (they just broke ground on the new 3.2 mile road course!) and days I feel like being a dick on the highway.
The header was worked from the beginning to go from the 1 5/8" primaries into the 2.5" secondaries, cone down to 2.5" and then back up to 3" for the exhaust. I may build a full 3" pipe early next year; depending on funding and enjoyment factor.
Remember...this is my only car. I have to live with it every day, and part of the challenge is making it livable! This car will be built to handle 30 minute stop and go traffic jams in 100*F heat in Kentucky, as well as reasonably rowdy interstate driving at 70MPH in 20*F weather. Rain or shine, this car needs to behave. (That last bit is the reason I'm going to mount some rather ugly wheels on the car...Tire selection!)
-
Keep in mind you're feeding a smaller motor; so you should be able to run 10lbs no problems. Check your plugs for death ash or signs of fouling; and remember that if you are misfiring the O2 sensor will read rich...even if you are lean!
Stahl Header Primaries
in Exhaust
Posted
It is whatever you want them to be. Stahl no longer sells that header as an assembled item, to my knowledge.