djwarner
-
Posts
111 -
Joined
-
Last visited
Content Type
Profiles
Forums
Blogs
Events
Gallery
Downloads
Store
Everything posted by djwarner
-
If I remember correctly, 280Z automatics through '76 had an R180, 3.545 differential. Checking the parts microfiche, it appears the 2+2 may have had the R200 though.
-
I had the passenger's front turn signal go MIA even after cleaning the switch contacts. It would work just fine when exercising the switch manually, but not work from the lever. After some serious troubleshooting, I found that culprit was the nylon part that couples the rotary action of the lever to the linear action of the switch. Over the years, the nylon part had shrunk. This is not uncommon with nylon as it has some affinity to water. As I worked the turn signal lever, I could see the nylon part racking. If I squared the part up with a fine bladed screwdriver, the MIA lamp began to flash as it should. The fix was simple enough, I scrounged a washer to shim the extra space between the nylon part and the switch. I think I ended up selecting one about .050" thick. Put back together the turn signal lever feels like new with a much snappier action.
-
Supposedly 1969 Datsun 240z "The First Original Z" $35,000
djwarner replied to ArchetypeDatsun's topic in Non Tech Board
I agree with the '73 year based on the photos. Considering the date of manufacture is placarded on the driver's door jamb, my opinion of the poster slides away from incompetent to ignorant to malevolent. Wouldn't touch a car from this poster on a bet. -
Leaking oil pressure sender
djwarner replied to RebekahsZ's topic in Gen III & IV Chevy V8Z Tech Board
The thread on the engine block is a British Pipe Thread standard. Yours is close but no cigar and a leak. -
I never notice how small a Z really is, till this photo
djwarner replied to PLATA's topic in Non Tech Board
Comparing my wife's 350Z to my Series I 240Z, the 240Z is 7" shorter, 7" narrower, 1.5" inches lower, and 1,000 lbs lighter. Also the wheelbase is 13" shorter. -
I tried to use the nomenclature in the FSM. They show measuring the free play by mounting a magnetic base on the rear of the case and applying a drop indicator to the flank of a tooth on the drive gear. They indicate the side bearings have a preload that reduces as the bearings wear in. I suspect the side bearings have worn excessively because the differential is relatively quiet until it comes up to operating temperature. I figure there is some preload left but since the outer case is larger than the differential carrier it has more thermal expansion that releases the preload as it warms up.
-
Thanks for the input, John. Your description of runout occurs when the axis of the drive gear is out of square with the axis of the side bearings. This is one type of runout. Another type of runout is radial runout where the axis of the drive gear is parallel to the axis of the side bearings but not coincident. Radial runout presents itself as the drive gear running eccentric. The runout I'm referring to is described in the FSM is when the pinion gear teeth are not fully engaging the teeth of the drive gear because the drive gear is offset from its desired position. Because the flanks of the teeth are not flat, this allows excessive freeplay when shifting from the drive side of the teeth to the coast side. Besides scarcity of used 3.54 R180's, after 40 years, just how many used "serviceable" R180's are you apt to find? My suspicions of improper maintenance are based on the fact since getting the Z, for every item I've worked on that was worn or broken, I've found at least one item that suffered from a mechanic's hand.
-
I posted this on the ClassicZcarClub forum but I think I will get some additional input by posting it here. My R180 has 180K miles on it and has the developed the usual whine between 45-55 mph that changes pitch between driving and coasting. The manual says this is an indication of excessive runout between the pinion gear and drive gear. I have previously replaced the wheel bearings all round and have been impressed with the change in ride. When I first got the vehicle 18 months ago, the side seals showed evidence of leakage and one half shaft was installed backwards. After the mechanics replaced the forward differential mount, side seals and re-installed the half shafts, I noticed a clunk when shifting from driving to coasting and vice versa. The u-joints were okay but there was a noticeable amount of free play (read runout) in the differential. After my success with the wheel bearings and I have read through the FSM several times in anticipation of replacing the bearing in the differential. I have learned several things: A. It appears that the shims on the pinion shaft serve to establish preload on the pinion bearings and to establish the correct height of the pinion gear to the side shafts. The preload is required to minimize the axial movement of the pinion shaft. The correction to the height is needed due to variation in the various machined dimensions of both the pinion shaft and housing. B. The left/right position of the differential case assembly is established by shims installed under the side bearing retainers. These shims establish the preload of the side bearings and the clearance between the drive gear and pinion gear. The variation in clearance of the drive gear and pinion gear determines its runout. These shims come in various thicknesses from 0.2mm to 0.5mm. Again these shims account for variations in machined dimensions including bearing heights. The various machine dimensions are stamped on the parts to determined which shims are to be used. C. The shims in A. correct heel or toe contact errors in between the pinion gear and drive gear. D. The shims in B. establish the clearance between the pinion gear and drive gear. This is a major contributor to runout. E. Page PD-8 of the FSM manual says to inspect the pinion and drive gears for surface defects and runout in excess of 0.08mm and to replace the pinion and drive gears as a set if needed. F. Pages PD-12-13 describe checkout after re-assembly and specify drive gear/ pinion gear runout of 0.1mm to 0.2mm - This is greater than the allowed runout in E. ?!? G. Correction for excessive runout or improper preload under F. is to adjust the shim thicknesses under B. by trial and error. The side bearing preload value is less on re-used bearings to account for wear and may require adjusting shim thickenesses. The various shims are sold in sets of 10 - if you can find them. The pinion/drive gear matched sets are rare and can cost more the a used differential. The side bearings are relatively cheap. Pinion bearings are expensive. Considering the above, I have the following questions: 1. If the pinion gear preload is acceptable and no axial runout found, would you consider changing the side bearings only? 2. Since one half shaft was installed backwards, what are the odds that the left and right side bearing retainers and or shims were inadvertently swapped resulting in a shift in the differential carrier assembly and an excessive runout? 3. Assuming bearing heights should be pretty consistent, would you consider changing bearings and re-using the same shims? 4. Has anyone replaced bearings without swapping the pinion/drive gear set and what was the result? I am also open to the opinions of our more experienced members.
-
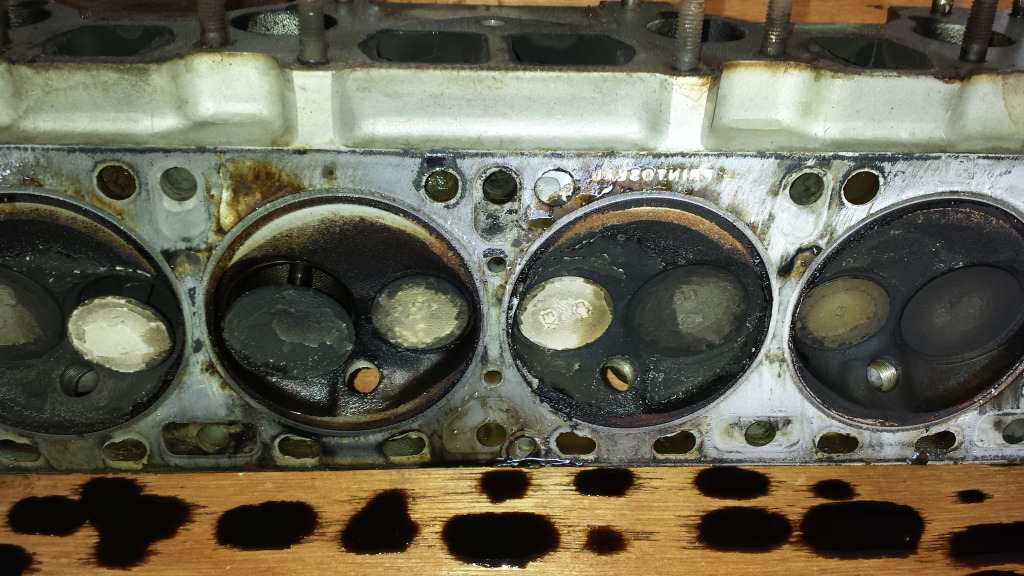
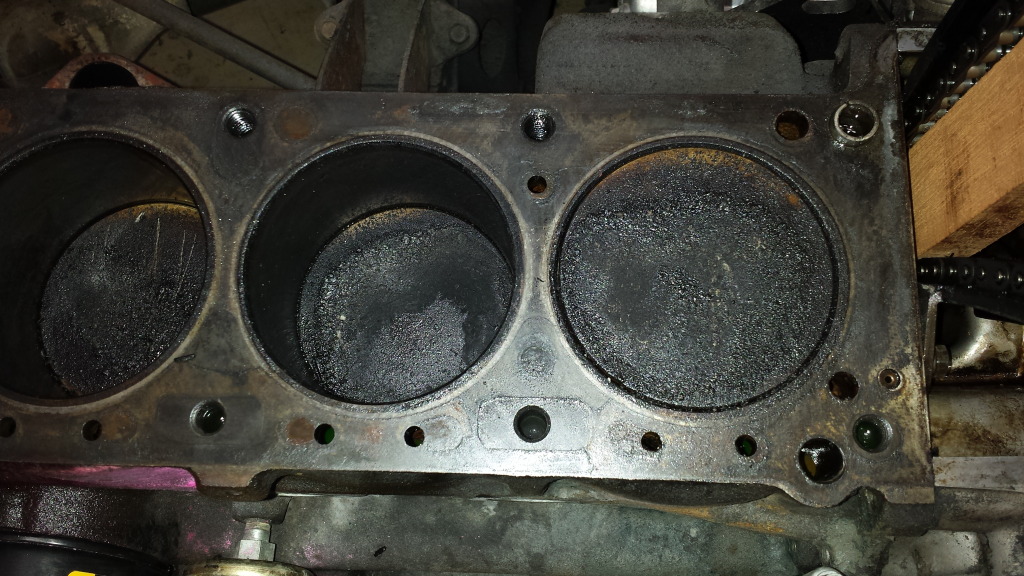
When I changed the head gasket the first time, I purchased a Felpro. I was a little suspicious when I pulled the head and found a Felpro already installed looking identical to the new one. I had decided to change the head gasket because of an oil leak between #3 and #4 cylinders and high compression reading indicating excess coke. Sure enough, the new head gasket leaked in exactly the same place, and now I had the lumpy idle. After a lot of research, I finally decided to spring for a NISMO head gasket. I even ended up talking directly with Nissan Motor Sports to determine I needed one with an 85mm bore and 1.2mm installed thickness. PN 11044-E4620. Before pulling the head for the second time, I decided to do another compression check. #3 came in at 125 psi while every other cylinder came in at 190-195 psi. Obviously I had a valve seating problem. With the head off, I removed the intake and exhaust valves and cleaned up the valves and seats. With the re-worked valves and new head gasket, the engine fired right up and idled almost 300 rpm higher. I had no idea just how bad the cylinder was affecting the idle. She now purrs like a kitten. Sam280Z thanks for pointing me in the right direction. Just a heads up for our fellow Z car owners. Nissan Motor Sports indicated they now only had 42 of these head gaskets left in stock. Considering the legacy status of these cars, I suspect there will not be another production run when these are gone.
-
Single strand safety wiring is always preferred if possible especially when using the .040" wire. Remember the safety wire is not taking any load stresses, just preventing the threaded bolt from backing out under vibration.
-
Has anyone tried this type of air deflector?
djwarner replied to djwarner's topic in Windtunnel Test Results and Analysis
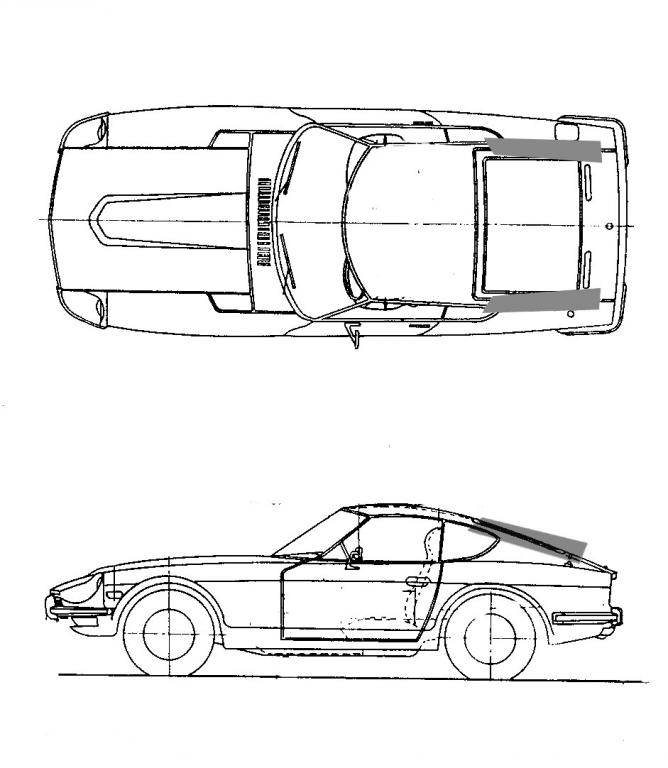
I was thinking about a station wagon air deflector running across the top, but I found this picture on the web
-
I was reading a 2001 post by Michael regarding aerodynamics and exhaust fumes and spoilers. His in depth description of why 240z aerodynamics were so poor got me thinking. NACA scopes are effective because they roll a vortex into the duct to help break up the laminar flow. I got to thinking about the low pressure area over the rear hatch and the relatively higher pressure on the sides of the cockpit. It occurred to me we could put a curved air deflector over the sail directing air onto the hatch to help to detach the laminar flow coming over the top. I envisioned a deflector like those used on station wagons to keep the rear glass clean. Attached is a picture suggesting my idea. the air deflectors are colored gray. Comment from the more aerodynamically literate among us would be appreciated.
-
I'm on a one year sojourn making my Series I S30 with 179K miles one of the best driving ones around. Started with new struts all around, next came differential mounts fore and aft, flushing and cleaning the A/T, then new wheel bearing in the rear, and new bearings in the front. Among other things I've noted is a whine between 45 and 55 that changes pitch between driving and coasting. I suspect the diff had been run with little or no gear oil for some time as both axle seals had to be replaced and the fill port was frozen shut. Replaced the diff oil with 145/80. Now it doesn't sing until its been driven 30 minutes or so. Evaluating the removed bearings, I've found radial and axial excessive play in the rear bearings and a very lumpy front bearings. After each change, I have been surprised at how much of the noise I thought was coming from the diff was actually caused by the bearings. This brings me to my question. The old Datsun expert said nobody ever serviced a differentials because no one had the proper tools. They were simply replaced. I also realized that even the diff on my 350Z has some detectable noise at 18K miles. The questions are: Would it be a reasonable job to pull the old bearings in the diff without attempting a full realignment? Any special tools/skills required? And would the bearings only replacement yield a significant improvement?
-
Hi Sam, Removed the head by the book (Chilton and Haynes) using the jam stick for the timing chain. Took pictures of everything including the cam sprocket before dis-assembly. Since I was working alone and did not have and engine hoist, I removed the manifolds before manhandling the head. Sprocket and timing chain were marked with a magic market before dis-assembly to assure proper re-installation. Carbs were rebuilt by the prior owner about 15 months ago and were running fine before this. Carbs were maintained vertical sat on a table without moving while they were off. Idle throttle and mixture were reset after re-installation per instructions of the US Weber distributor. I don't have a method or a gauge to check their balance. Upon re-installation, linkage was adjusted to remove any free play and assure equal alignment between units. 3 months old plugs were cleaned and gapped while out. Timing was spot on and confirmed after re-assembly. I always use a torque wrench for spark plug installation - especially with aluminum heads. Leads and distributor cap were removed as a unit, inspected and placed on the table next to the carbs. Cap, rotor, and distributor base were marked to insure proper re-installation and alignment. De-carbing was performed with a steel brush on a drill after nothing I had seemed to chemically attack the deposits. The pictures in the last post should give you an idea how bad the deposits were. As for a leak down test, I haven't visited Harbor Freight to pick up the tool yet.
-
No Dash or Turn Signal Lights
djwarner replied to Glliw's topic in Trouble Shooting / General Engine
First things first. Check the water level in your battery, check for corrosion on the battery terminals and in wires connected to them, and then take the battery to Wally World and get it tested. Normally corrosion in the load side of the circuits increases the resistance reducing current flow. This would result in voltage remaining high. Before starting the engine, turn the ignition to run and turn on the suspect load. Observe the ammeter. If the meter deflects a small amount, suspect the battery side of the circuit. If it deflect a large amount, there may be a short in the load circuit - but that should be popping the fuse. There are two large spade connectors in the wire bundle on the passenger side of the center console. The wires for the connectors are white and white with a red stripe. These connectors are on the power side of the circuits and corrosion in these connectors may also cause a voltage sag. -
Actually I have down draft Webers. I replaced the manifold gasket when I de-carbed the cylinders, cleaned the mating surfaces and torqued to factory specs when re-assembling. I may be a bit anal regarding the intake valve cleaning, but the rest of the head is super straight.
-
Interesting thought Sam. When I finished cleaning #3, I noticed just how much the passageway had opened from when I first removed the head. If the stock cam has something like .440" lift, .030-.040" reduction in the passage way would significantly reduce airflow in my opinion. My impression of the lumpy idle was that the odd pulse seemed to have more power rather than less as a miss would have. A leak down test would be in order though. Thanks for the suggestion. Of course, my Series I 240z was an old car when the first ECU was put in a car.
-
I can understand heavy detergent use can prevent carbon/coke build up, but have my doubts about washing away glass like hard deposits like those I found while de-carbing my cylinders. Before attacking with a wire brush, I tried soaking in Seafoam, strong detergents, penetrating oil, and anything else I could find in the shop. For those of you who haven't heard about walnut blasting http://www.youtube.com/watch?v=TMQDdb4szUY
-
I'll have to try Shell. There's no station nearby, but worth going out the way if it works.
-
I have already replaced the valve guide seals with the head on the engine. The head was rebuilt in 2002 and is pulling 19.5" of vacuum and I pulled the head for de-carbing because I was seeing 210-215 psi on the compression check. Sorta hate to mess with a head that's performing that well.
-
Removing the head has as a prerequisite the removal of the intake manifold. It also requires removing the exhaust manifold, draining the cooling system, replacing the head gasket and affecting the timing when you remove the valves for cleaning. Can't help but think the opportunity for something unfortunate happening would be much greater, especially since I've already de-carbed the combustion chambers.
-
I had already used Seafoam three times shortly before pulling the head. The build up on the valves are not spongy or porous, but rather a hard coke. On the #3 valve that I could get to, the coke just laughed a hard wooden probe. Coke is actually like an amorphous glass, breaking through the outer layer to gain access to the coke/metal junction is almost impossible.
-
While replacing the head gasket and de-carbing the combustion chambers, I also cleaned the back side of the #3 intake valve because it was open. It had some .030-.045" layer of hard coke on it. Only later did I realize that there was no easy way to get to the closed intake valve without disassembling. Since this was beyond the scope of repairs as planned, I put the engine back together with only the #3 intake valve clean. I didn't think the extra clearance would make a significant difference, but the engine has a distinct lumpiness now. So I'm wondering about how to remove the coke from the other valves while installed on the engine. I've been using TECHRON but I'm still seeking other methods since the hard coke is not going to allow speedy results. I've heard of people using crushed walnuts with a sand blaster nozzle and seen some photos showing promising results. Has anyone tried removing the intake manifolds and blasting crushed walnuts with the engine in the car? Open to other suggestions.
-
I would suggest you buy Gorilla Tape rather than duct tape. It is much stronger and the adhesive seems to stick better. Found a quarter sized hole in the front side of my driver's rear inner wheel well. A small piece of Gorilla Tape stayed in place and kept the inner dogleg area dry for several months until I got the sheet metal replaced.
-
You could try doing it yourself. A google search of DIY ANODIZING should get you a long way. Here is on source: http://www.focuser.com/atm/anodize/anodize.html