

Jesse OBrien
-
Posts
664 -
Joined
-
Last visited
-
Days Won
1
Content Type
Profiles
Forums
Blogs
Events
Gallery
Downloads
Store
Posts posted by Jesse OBrien
-
-
3M 8964 chip guard is a much better choice than undercoating. Its paintable and designed to work in underbody areas. Undercoating or chip guard have no rust protective qualities. All rusty areas should be preferably sandblasted and coated with a zinc based epoxy primer,
Undercoating/chip guard work as a sealant, and merely prevent salt and water from collecting on steel. In that basic respect, they both help prevent rust.
The zinc coating is a great idea, but sounds like it'd be very expensive. I've used sacrificial zinc several times on several projects, but hadn't considered it on the underbody.
-
If you're looking for a good seal for ~5 years against salt and regular road wear (don't go running over lava or anything) I'd put money down on it. Any undercoating will need to be redone every few years, just from dust and debris from the road kicking up. I suggest that you get something inexpensive that will adhere well and seals completely (3m is my weapon of choice). I've had consistently good results with it; I just need to find a way to seal rocker panels and fenders effectively on a CRX. Undercoating really doesn't cover those areas very well.
-
I'm back to looking for an s30 to build, so if there are any inexpensive shells in the SF Bay Area, let me know!

I took the dash apart because the gauges had stopped working, and installed my new Tach and voltmeter. I have some sort of ambient drain that I haven't been able to pinpoint yet, and the only gauge that currently works is the voltmeter.
I did a pretty snazzy job wiring up the voltmeter, in the stock clock housing. I'll have to dig up the pictures I took and post them later.
I also took the hideous wood-grain finish off the dash, leaving the bare black plastic that looks worlds better. Have a look for yourself!
-
3m undercoating, it comes in aerosol can and is available at most stores where spray paint is sold. Works well, easy to use, made by 3m, and easily attainable. Be careful undercoating is sticky stuff, it does not like to come off.
Other name brands will work too, I just prefer 3m. I like the cans since it's easy to get it where you need it and great for touching up. Go check out what your local store has and try it out.
That's what I used for the interior and exterior of my project CRX. It goes on very smooth, and really helps with sound deadening in addition to rust prevention. Just make sure the paint beneath it isn't flaking, or the underbody coating will come off as well.
-
Pull the head, replace the valve, slap on a new head gasket, and sell it!
-
-
Hey man, I'm going to use these newer pics to give the flare mock-ups some more tries. The last few just didn't work at all.
It's looking great, but won't you have binding on the front suspension? Are you going to add wheels spacers or something on the fronts?
-
Don't get me wrong, I'm normally a salvage yard lover. In NH, you could often go to any junkyard, make an offer on a part, and walk away smiling while the guys behind the counter smiled right back.
Just for the sake of comparison, I picked up some knuckles in NH from a DA Integra for $100/pair. They actually pulled them for me at no charge. That means they were going to detach as little as possible while getting the knuckles out, and I ended up with a set of calipers, rotors, and ball joints included.
Here at pick 'n pull (that's a specific COMPANY of salvage yards, by the way) I took the same setup to the front counter and it was rung up as $475. That's more than they are from the dealership. I have yet to find a deal through this company that doesn't involve slipping parts into my pockets.
-
I would have dumped that transmission on the floor and walked out. How the heck did the price jump all of the sudden?
Actually, I was ready to just walk out and leave the trans blocking the counter. Gollumthesage was kind enough to move it aside. I was not in a mood to be polite.
-
Well, I just went to the local pick 'n pull in Richmond, and found an 84 Celica GT with a manual transmission. It happens to be 10% off transmission days, and I took a look at transmission's normal prices on the way in ($99). I confirmed this with a nice guy at the front desk, and grabbed my tools. An $89 transmission sounded just peachy, so a a few friends and I pulled it (~3 hours, all told) and wheeled it up to the front victoriously. We had a Toyota w58 trans for my Celica for $90! Woohoo!
Apparently there's some magic to their math, because it came up as a $260 part... after 10% off. What a ... deal? A used w58 with a starter motor of dubious integrity for $260.
I have never mentioned my first experience with a pick 'n pull before, as I was hoping it was a uniquely bad experience. I bought a pair of $30 knuckles for a grand total of $320 (with a few other miscellaneous parts). I was also expected to pay $120 for an injector resister. The little lump of metal that sells for $27 from the Honda Catalog, including shipping, was $120 at pick 'n pull.
I can honestly say that I will never support this organization again. Consider this your own warning.
-
Any pictures yet? I'm interested to see this beast.
-
Woohoo, congratulations man! Get it on the road!
-
I do like that idea. I like the round tails as well, and I just tossed this idea together.
-
I don't think I'm going to be able to use stock lights. I might end up with old Mustang lights, or just make a light panel and use trailer lights (or similar) in the rear. I'm open to suggestions, though.
I haven't quite finished my wiring diagram, so I haven't decided how my lights are going to be segregated. I can use virtually anything, at this point.
-
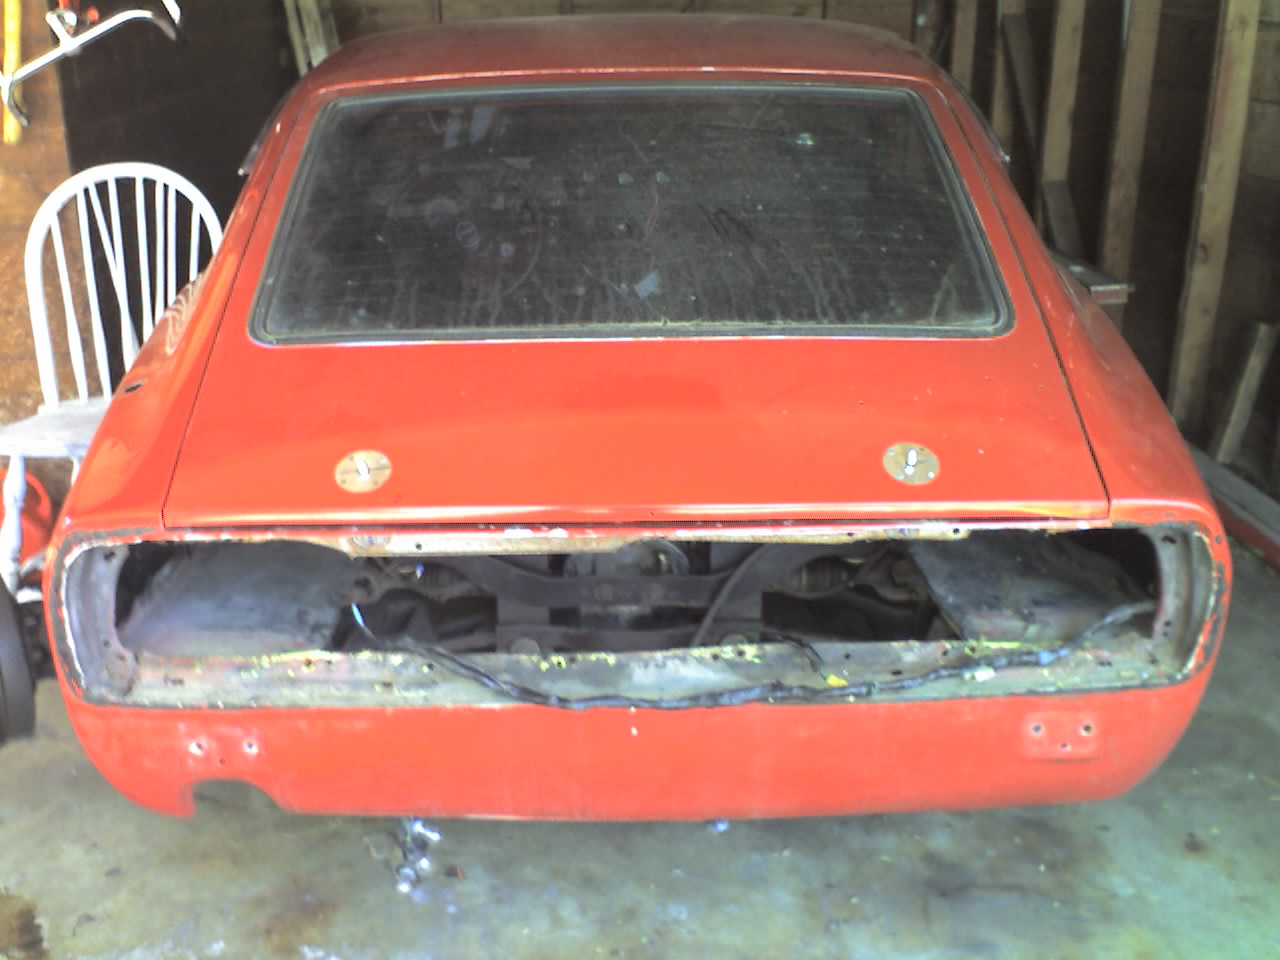
I tore off the very hacked tail light housing this weekend. It turned out worse than I had imagined. A strip of aluminum had been riveted around the stock steel, then covered over with bondo. The problem is that he didn't seal the inside and every one of the rivet holes started to rust.
I took as good a picture as I could to show what I mean. I'm definitely taking suggestions for tail lights.
-
You mean the head bolts won't budge I assume. Yes an impact gun is the correct tool to remove those along with a 6 point impact socket.
You assume correctly. Forgive me, I have a tendency to use the wrong terms when I really don't know what I'm talking about. I have a buddy with a nice snap-on electric impact gun that he'll lend to me for this project. I'm planning to get a compressor sometime down the line, so buying an electric impact gun doesn't make a whole lot of sense at this point (also, I don't have many other uses for it currently).
print out several copies of the bolt lay form out that I posted and carefully count/verify and check off EACH of the 17 bolt locations ....YES IM fully aware your 100% sure you got them all. but IVE seen more than one guy crack a head while trying to pry un a head with one bolt still in place!, and generally a couply good whacks with a rubber mallet on both sides of vthe head is all the force thats required to free a head from the block once all the bolts are removedand WHILE prying a head loose with a hammer handle in a port is not unheard of its looking for trouble to PRY any head loose
I don't have a printer, but I drew up a couple copies.
Just so we're clear: you're saying that a torch is a bad idea for loosening the head bolts? I was going to heat them a little (I've had good results heating stuck bolts before to loosen them up) then impact wrench them. I've removed two sets of heads so far (from the 327 that didn't pan out and the 350 that's going to be the block for this build) but these heads seem to be on much tighter. I didn't have any kind of problems with the others, I just yanked on a ratchet and they came loose (some took more persuasion than others, but they all came off by hand).
I'm also wondering how much these might be worth. The casting # says they're from a 68-69 High Output Corvette motor, so maybe it'd be better to try to find a collector/restorer to sell them to and get some nice shiny new heads (or an LT1 or LSX).
-
Make sure that you have all the bolts out of the heads before you pry or use the torch. On the SBC engines, there is often an overlooked bolt or two hidden deep under oil & sludge. There are 17 bolts per head.
Good luck.
might help
Thanks guys, I've gone through so much pb-blaster on this that there's no sludge/oil left to muck around in. I've been going through the GM service manual, and it seems like I have everything right, the head studs just won't budge. I may just have to buy an impact gun instead of a ratchet and hammer.
I don't know whether this is an approved approach to breaking loose stuck heads, but recently, on one of the car programs on Spike or Speed, a guy stuck a couple crowbars in intake ports and gave them upward whacks with the heel of his hand. Mind, I'm not recommending this but perhaps someone who actually knows can advise whether this is as bad an idea as it sounds.Cheers -- Gary
That doesn't sound like an awful idea, actually. Since they're iron heads I don't need to worry much about them cracking. I'd be worried about the valve guides more than anything.
I let it soak overnight, so hopefully I'll have some better results today.
-
Well, I've finally torn down the 240z, bought a replacement engine, and am in the process of righting the wrongs I've come across, so I figured I'd start a build thread.
For more detailed information, visit my site here:
http://madnessmanual.logolessstudios.com/category/projects/anger-project/
Basically, the history of the car is a big old mystery. I bought it with a 283 swapped into it, drove it most of the way home (towed the rest of the way), and drove it around for a bit. A few things were done very right, but for the most part the car is all wrong. Here's a short list of what I'd like to finish before putting it back on the road:
- replace welded r200
- swap out dead 283ci for new (to me) 350ci
- complete ground-up rewire
- circuit breakers in place of fuses
- custom ignition module (replace key, not replace distributor)
[*]patch rust spots, cover with primer
[*]fabricate a tail light assembly
[*]t5 or t56 transmission
[*]replace front and rear suspension
[*]regular maintenance
- brake job
- replace all fluids
[*]replace funky fuel tank with a fuel cell
[*]paint stock wheels
- circuit breakers in place of fuses
This may not seem like much of a "build" but I want to make it right before making it big and scary.
- replace welded r200
-
It seems like choosing heads are a bigger decision than a camshaft. I currently have a set of 3890462 heads and 333882 heads (both came on engines I have now). I'm having a tough time getting the 3890462's off the 283ci (I'll probably buy a torch tomorrow, pb blaster isn't loosening them enough) but I'm considering just tossing those on the 350ci block (that currently has the 3338882's on it.
According to the casting number, I think the rochester carb is an 650cfm, but that seems a little big for a stock GM carb. I like the way it works, but it's currently loaded with vacuum messiness.
I've gutted the car and found lots of nasty coverup jobs and twisted floorboards, so it looks like a good portion of my budget is going toward a decent welder, some sheet metal, and a creative application of brake lights. I've changed my current engine goals to "get it on the road". It seems like the stock 350 block, fuelie heads, rochester carb, and performer intake manifold will accomplish that goal the best. That way I'll have time to focus on the chassis, and probably build an entirely separate engine on a stand.
I've put both th400 transmissions up for sale, and I'm hoping to get a t5 to bolt up for this for now (I've found a few semi-helical gear kits that got me excited about the t5). I need to start a build thread for this car.
... off to do that now, but as always, any suggestions will be taken completely to heart.
-
I'm curious to see how some retro charger lights would look at the rear drummingpariah
I had been looking into a lot of older rear light setups, I think the most likely at this point is an older (69 or so) set of fastback Mustang rear lights.
-
As much as the damage doesn't look too severe, it probably is. The inside of the wheelwells is structural (almost like a strut bar, across the middle of the car) so there's a good chance that there's frame bending going on. The cosmetics don't look like an obscene amount of work if you have a grinder/plasma cutter and a welder, but I'd pass on this one.
-
All I did was take the broken 280z lights out, and the dying Escort gas tank. I've got some welding ahead of me.
-
Suggestions?
-
This project is nasty! Why's it squirreled away in non-tech?


*New* Z project!
in S30 Series - 240z, 260z, 280z
Posted
Oddmanout84,
I hate you. Let me explain.
I recently sold my s30 and bought a sweet old rwd Celica, and have been very happy with that decision ever since (the s30 required gobs of work, and the Celica is a great dd). Then you went and ruined that by having this thread. I'm going down the street to make an offer on a few Z's that haven't moved in a few months. You bastard.
Oh, and I'd have suggested a v8 if you weren't already pot-committed to a Nissan engine. They're simple, easy to diagnose, easy to tune, cheap, available everywhere, and relatively easy to install into an s30 (you'd spend about as much time installing as you've spent diagnosing here).
Also, I just wanted to follow your build thread. It looks kind of awesome. I'm excited to see it, and more excited to HEAR it (you should get video once it runs on its own steam).