Fauxre
-
Posts
315 -
Joined
-
Last visited
-
Days Won
5
Content Type
Profiles
Forums
Blogs
Events
Gallery
Downloads
Store
Everything posted by Fauxre
-
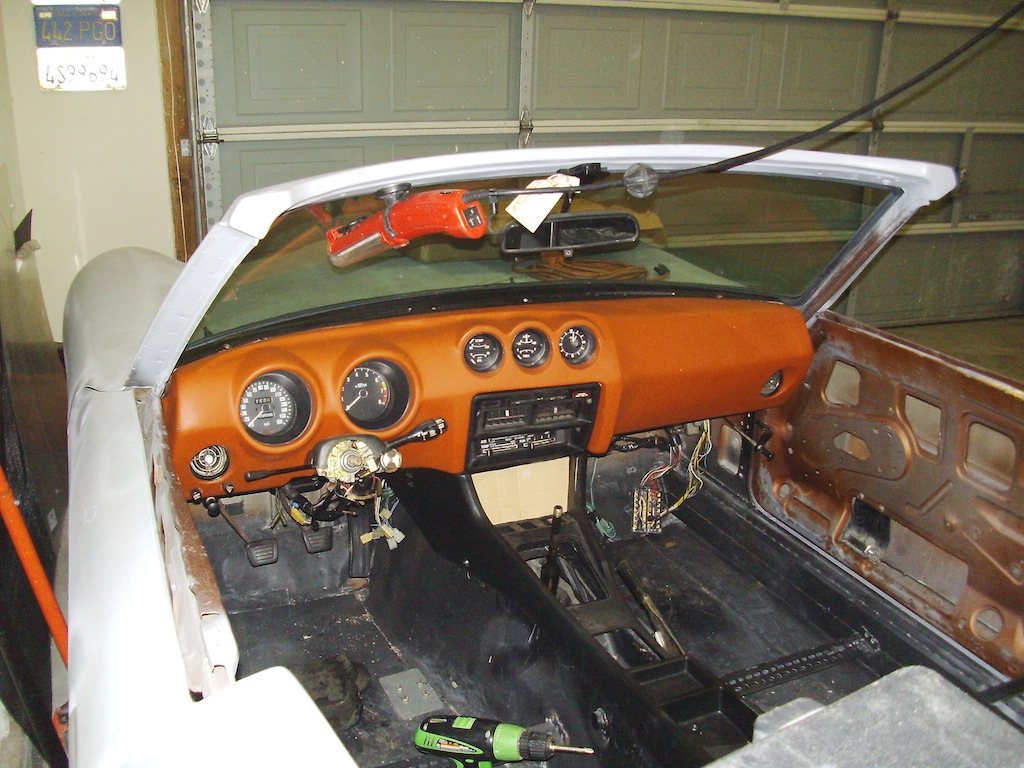
Reinstalled the gauges and dash wiring... ...and mounted back in car. Leaving everything in primer until the car can be driven and all the flaws can be corrected. Repairing and customizing the center console next.

-
Gotta have priorities, Dan.
-
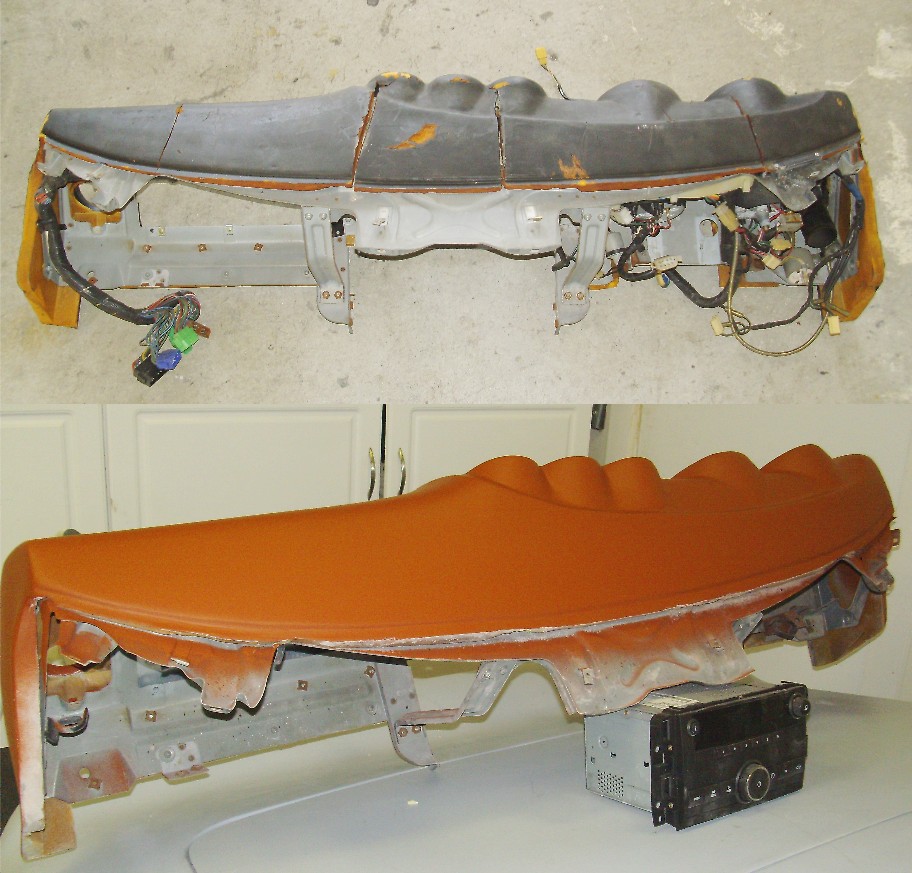
Got all the guts stuffed back inside... ... and mounted back in the car.
-
Thanks. It doesn't look as good in daylight. Lots of little blemishs and waves, but it's good enough for mock-up of the rest of the interior.
-
Got that right... this project certainly has been an education. And although I can't wait to finally drive a finish product, the journey there is what it's all about. But, after reading many build threads, I don't believe there is such an animal as "the easy build".
-
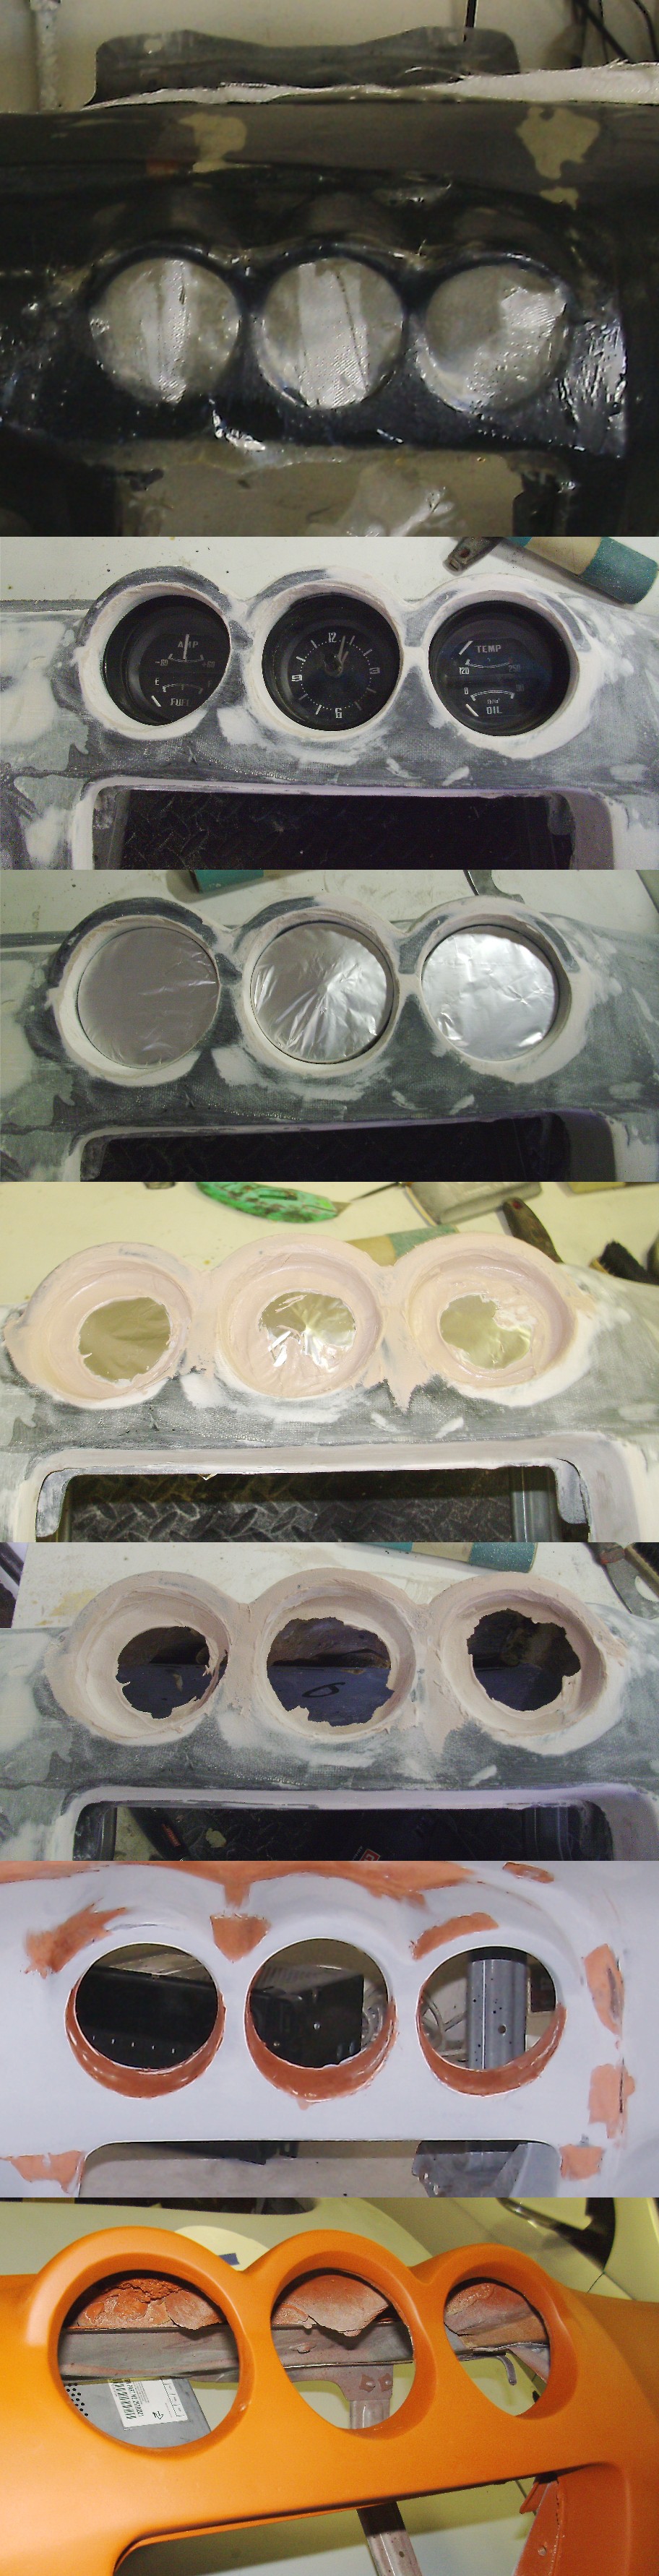
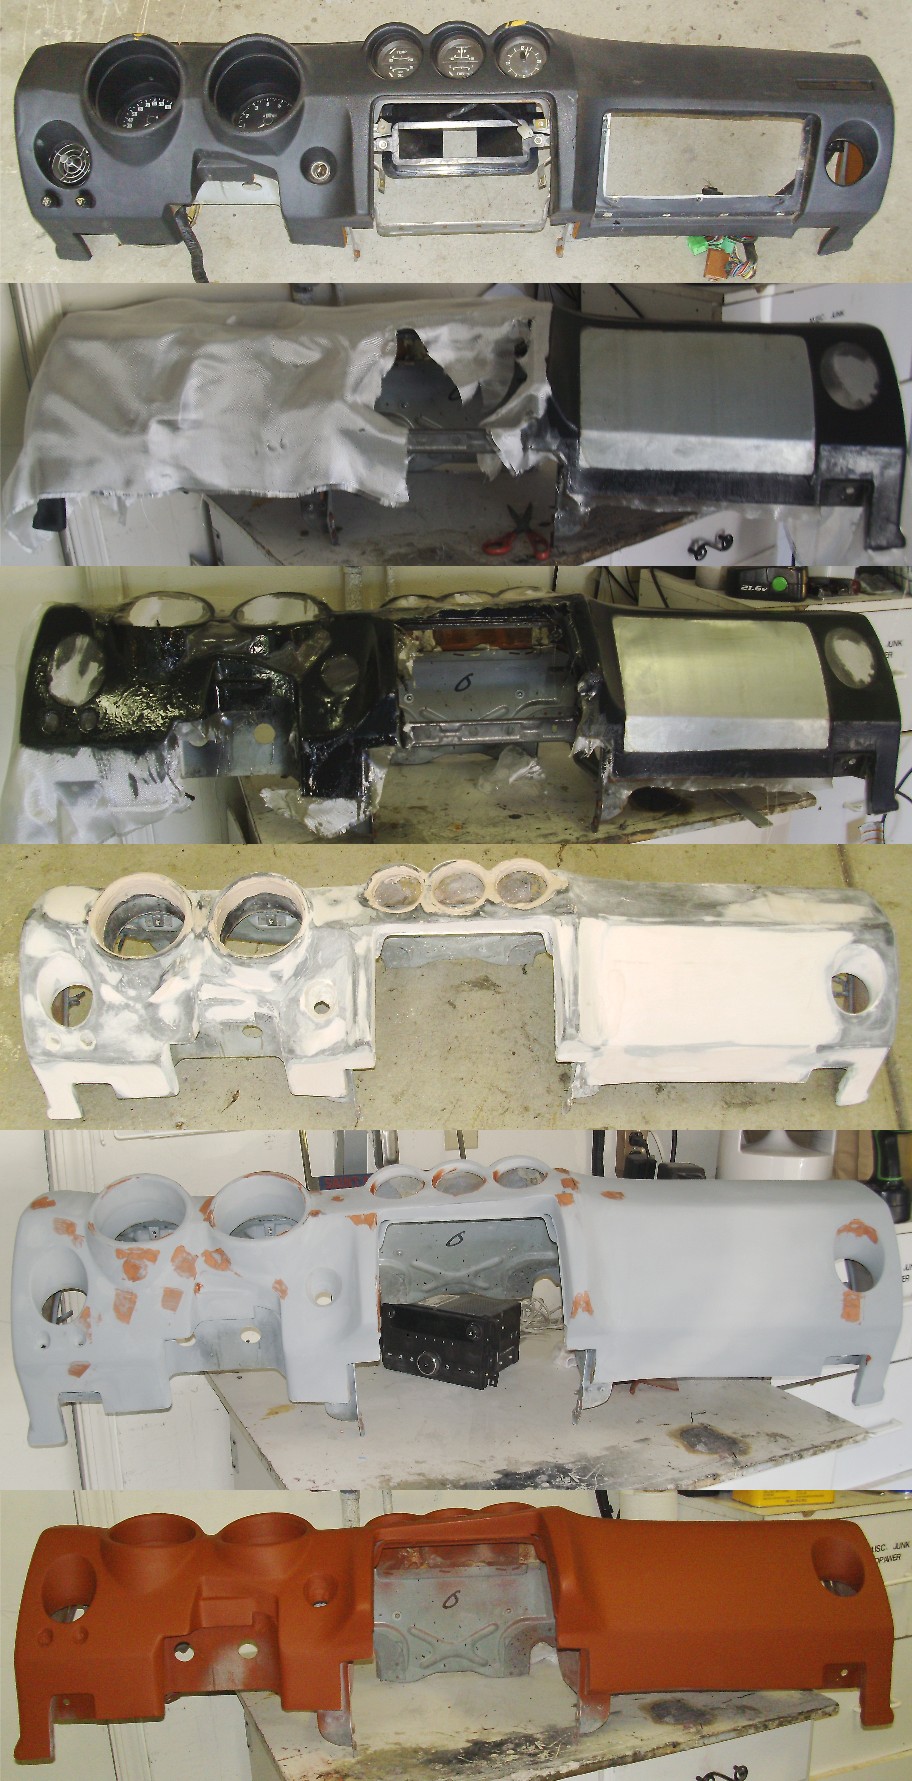
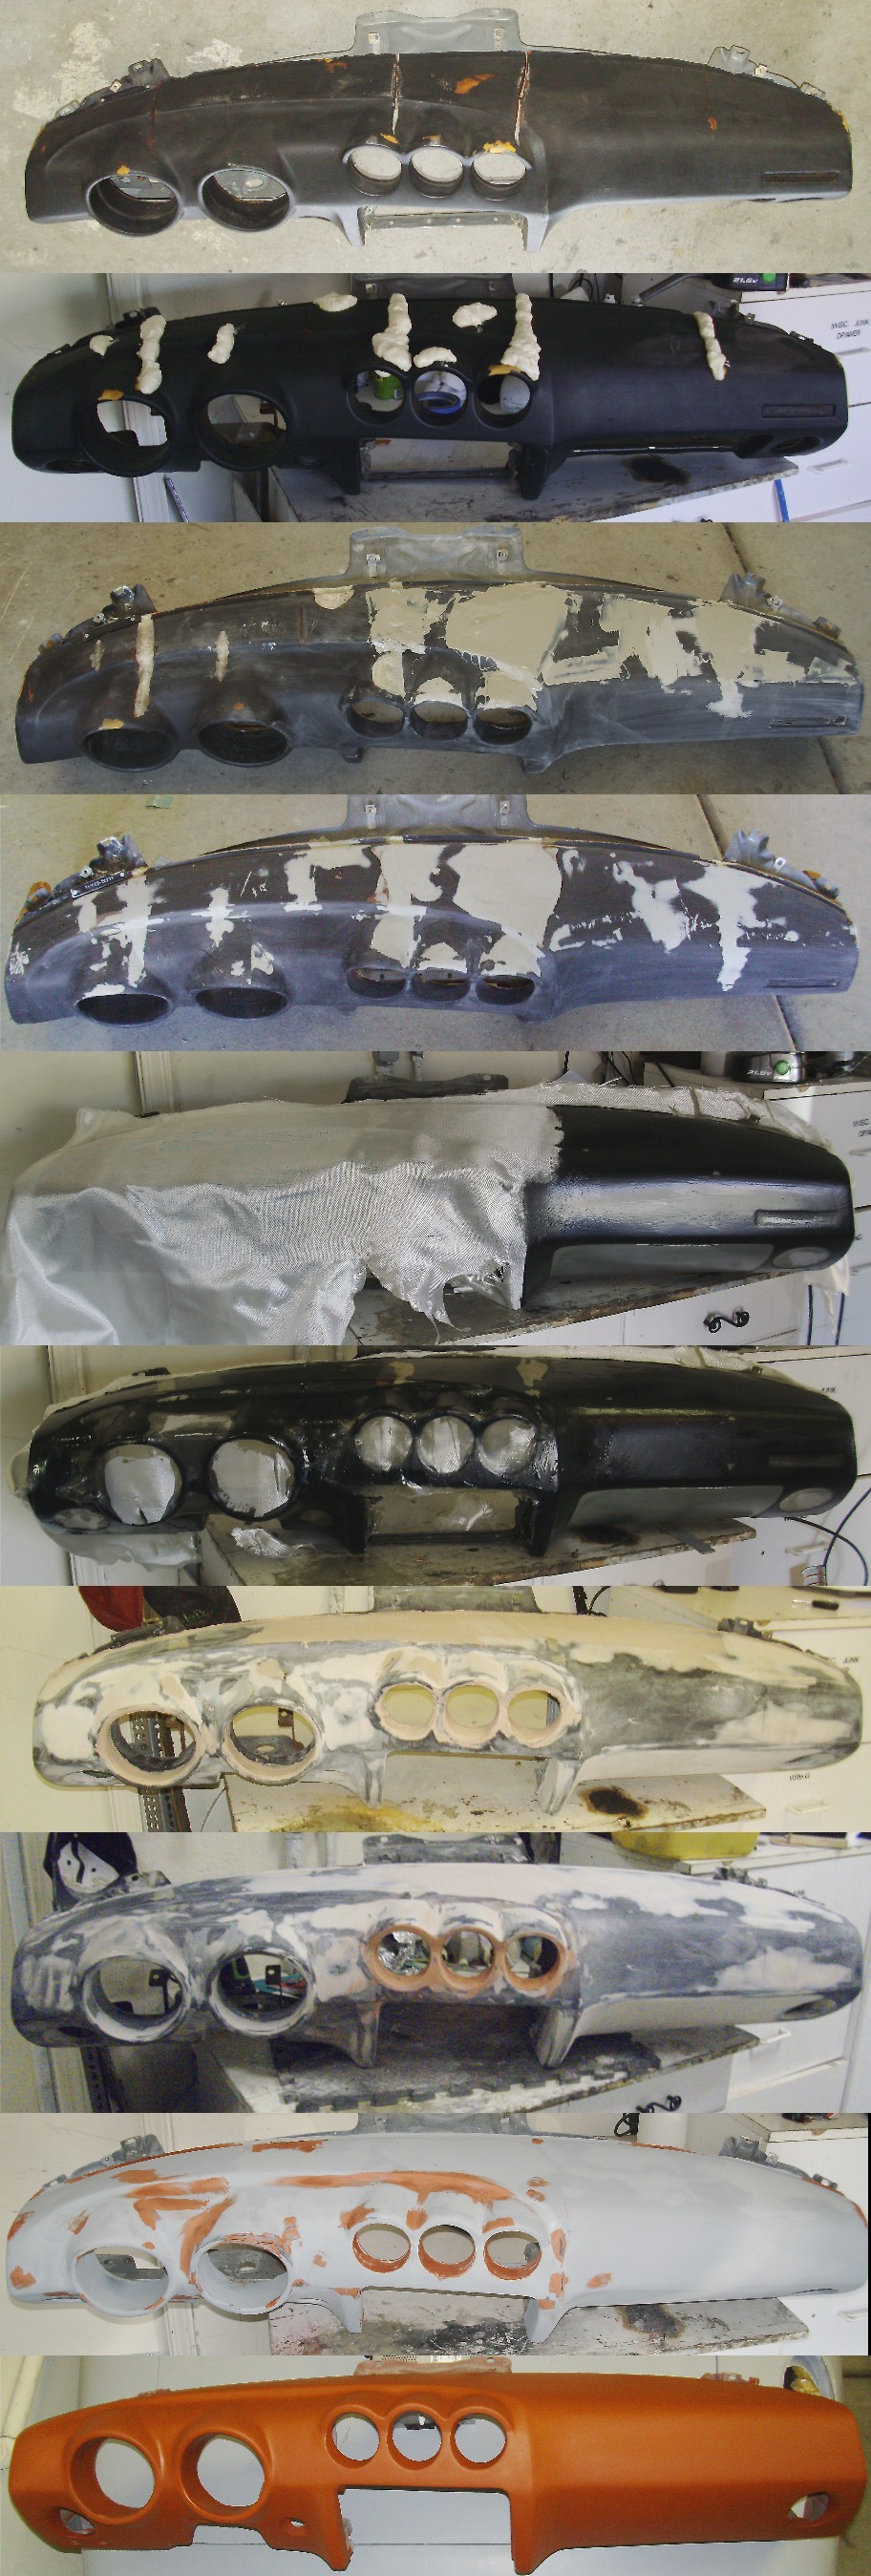
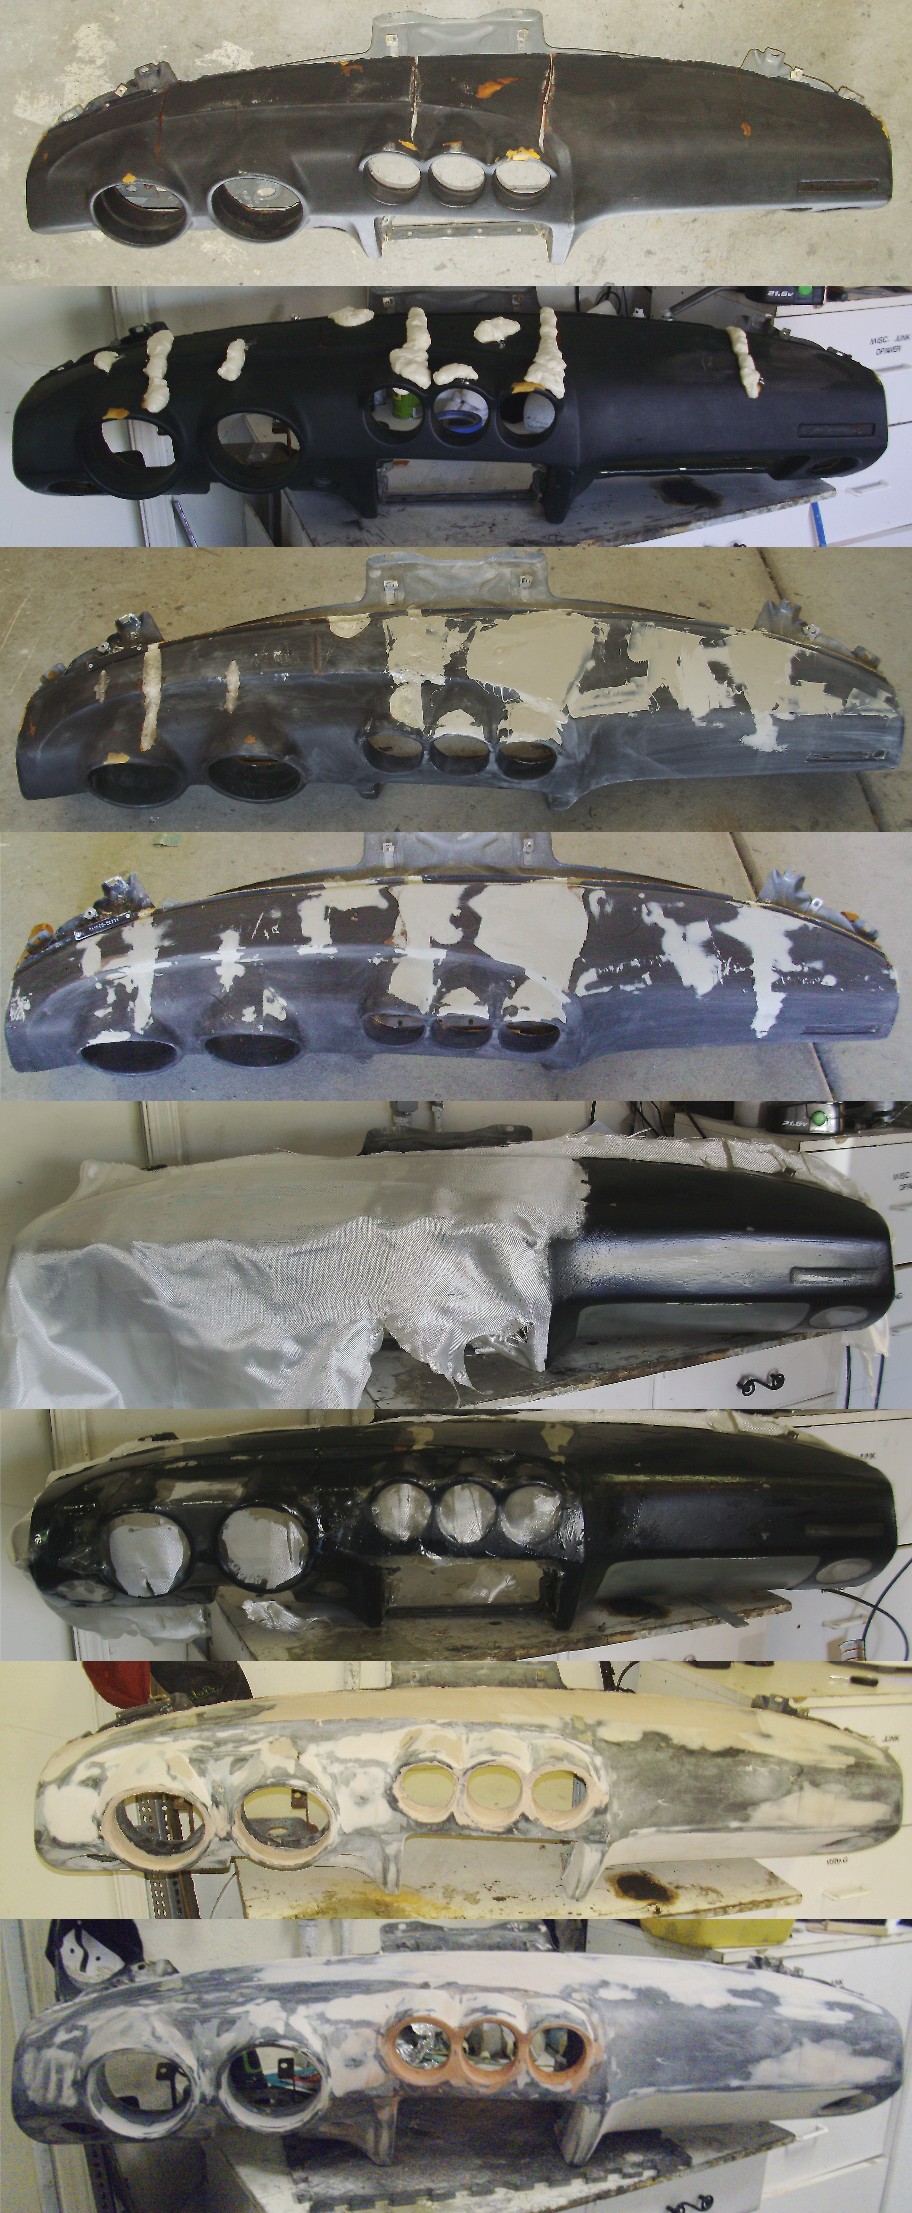
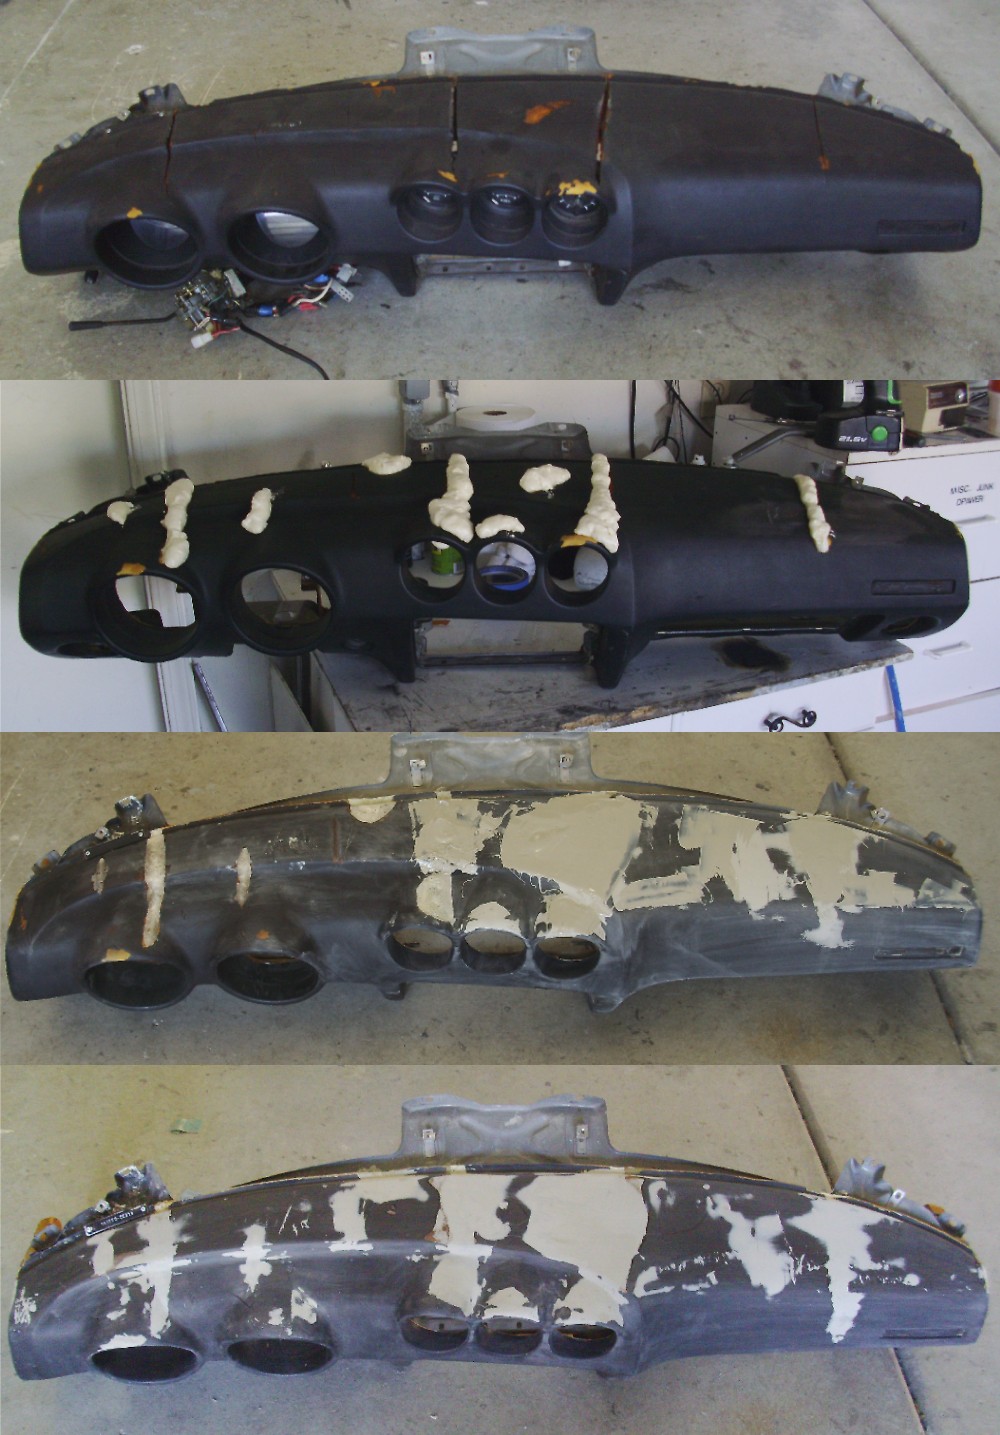
Here's my version of time lapse photography. The pics between the foaming of the cracks, and the laying down of the fiberglass cloth, depict the use of the bumper repair material from my attempt at the "cheap alternative". If you're gonna cover with fiberglass, just sand the foam flat. I used the fiberglass cloth in hopes that I'd get a seamless finish. But I found it didn't stretch enough around the gauge housings, and I ended up with several weblike voids that had to be cut out later. Next time I'll try fiberglass matting, to get into the tight spots, instead.
-
HAHAHA... makes a pretty good doorstop too.
-
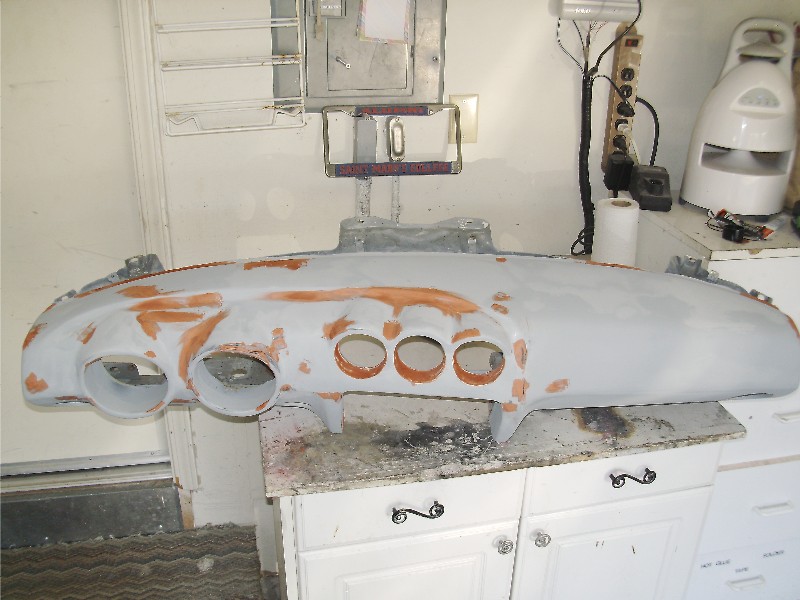
Here's how it looks so far, in primer. Not perfect, but almost good enough to paint.
-
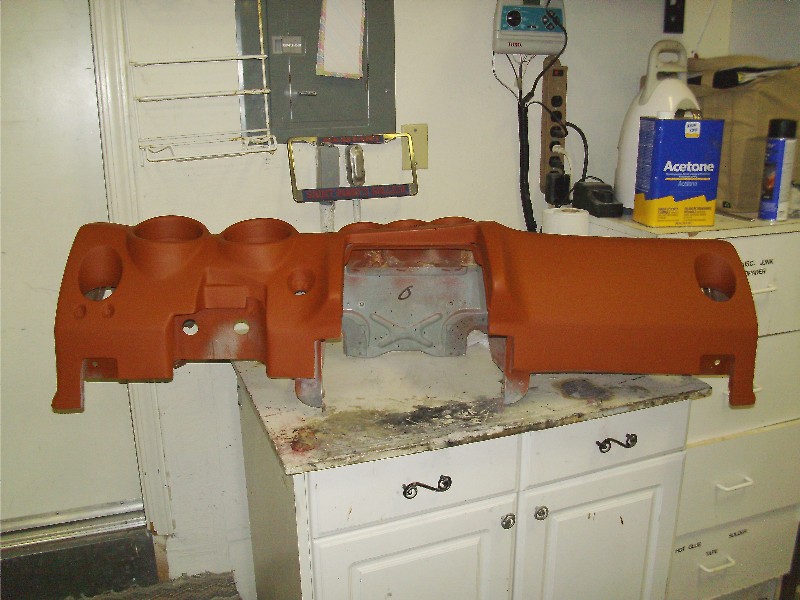
Finally got around to working on the dash again. Attached are the compilation pics from the start to its current state in red primer. It's not perfect, but with a little fine tuning it can be painted to match the exterior, if I decide to go that route. Only took 2 pics from the back.
-
A few accessories for the holidays.
-
Hey LanceVance, Thanks for the info. Interesting concept. I'd like to see a finished dash in person.
-
LanceVance, I'm not familiar with "flocking"... other than my Xmas trees. I'd be very interested to learn about it. Where can I get it? Cost? Do you have any pics of the finish? I like the no glare aspect, since my project is a roadster. I've been considering a 'wrinkle finish' paint as an alternative, but would prefer something that looks more like a factory dash finish. As far as wrapping the cloth, I stopped at the edges of the black vinyl in most areas. If I were to do this again, I think I would cut the cloth to wrap around as much of the dash foam as possible. I haven't run into any specific problems with the way I did it, but the dash is far from done. As for the adherence of the resin to the vinyl, it's my understanding that the resin will not adhere to the vinyl very well. However, it seems to me that since I used a single sheet of cloth that is molded around the old foam in multiple places, and is embedded in all the nooks and crannies, separation is unlikely... but only time will tell. After I glassed, I found this video. It promotes drilling a lot of holes in the foam for the fiberglass filler (used on in the video) to settle into and give the new surface a better grip. It probably makes sense to do the same with fiberglass cloth and resin. Maybe next time. http://www.youtube.com/watch?v=TQDM0aq882c
-
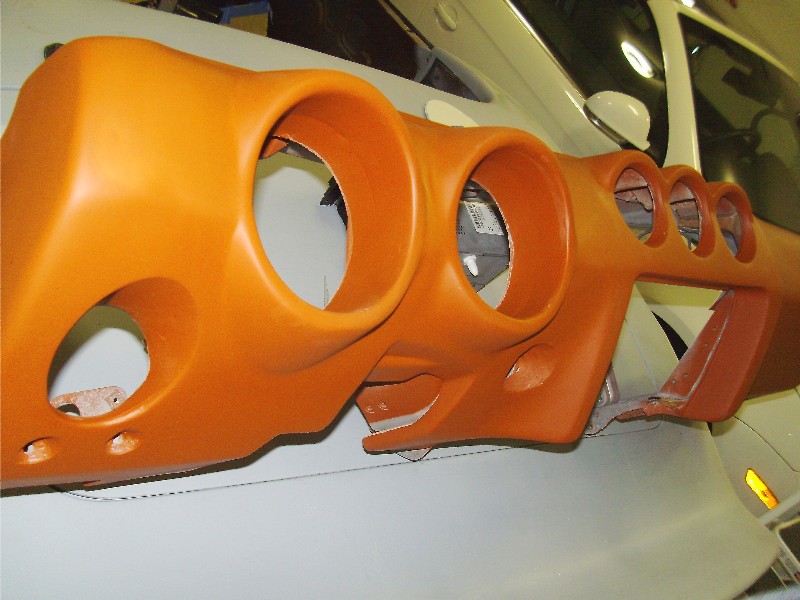
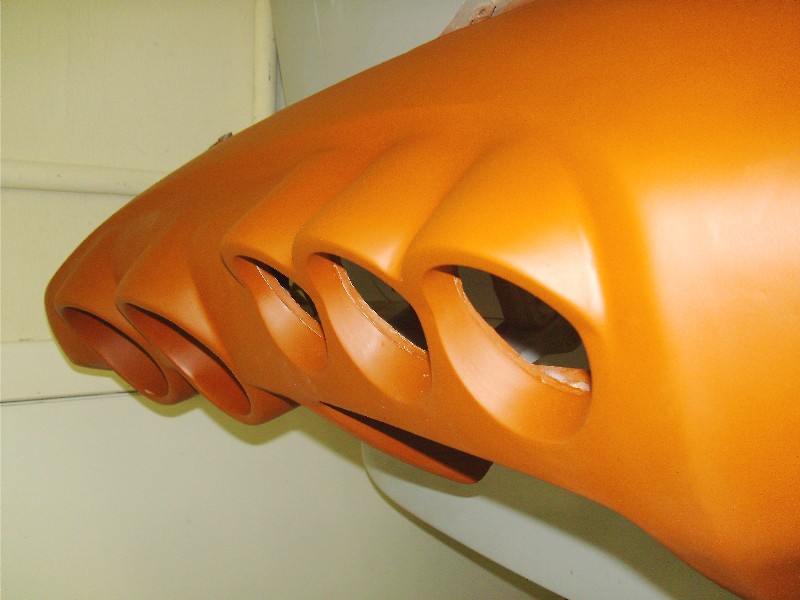
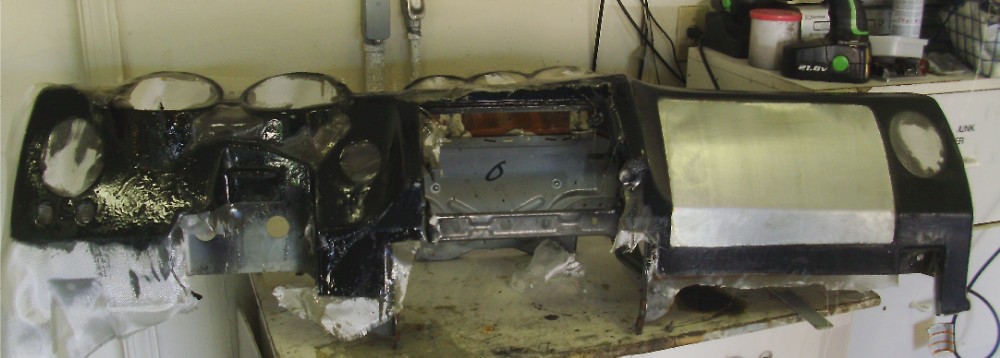
I had the very same experience with the SEM products. The final result looked like crap and was very brittle. So. I also went the fiberglass route. Here's a composite photo of the dash so far. Covering the dash with fiberglass cloth produced a very hard surface and no cracking when it was bolted in for test fitting. Not sure if I'll go with the textured look, paint or try to cover with some kind of material. Dan Juday has a very nice dash, with a smooth finish, painted the same color as his car. That's the standard I'm shooting for.
-
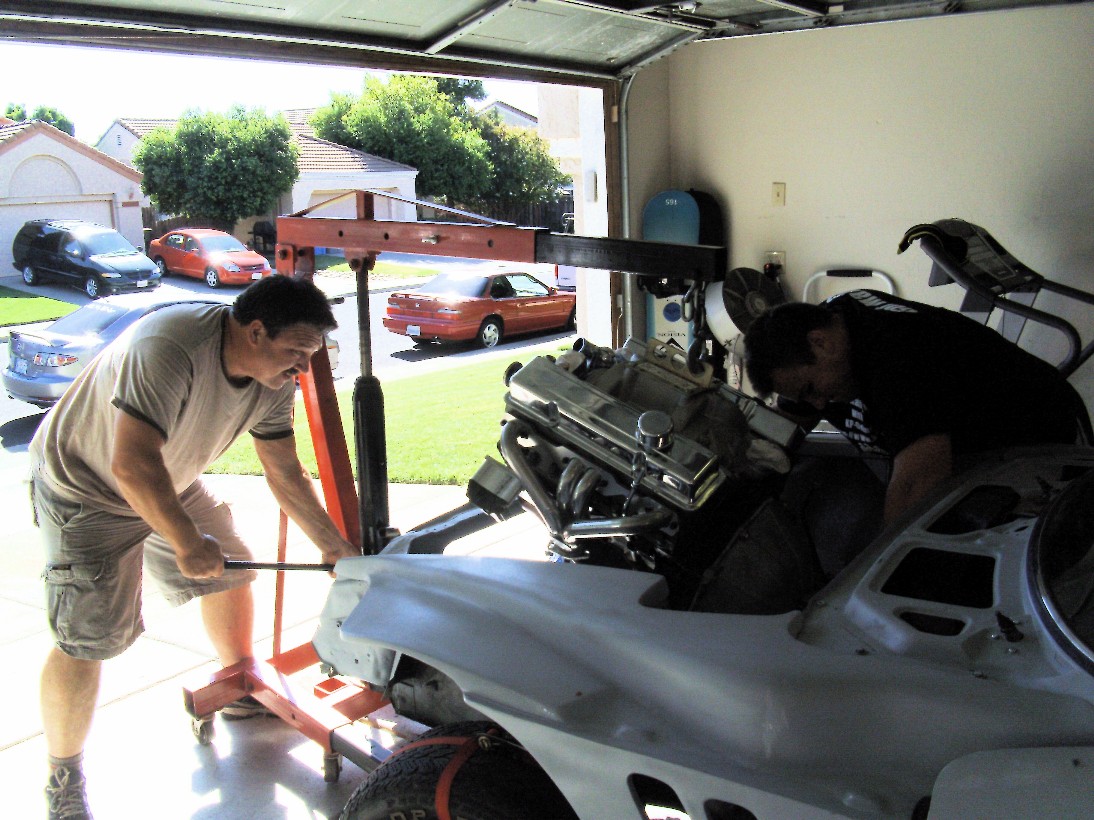
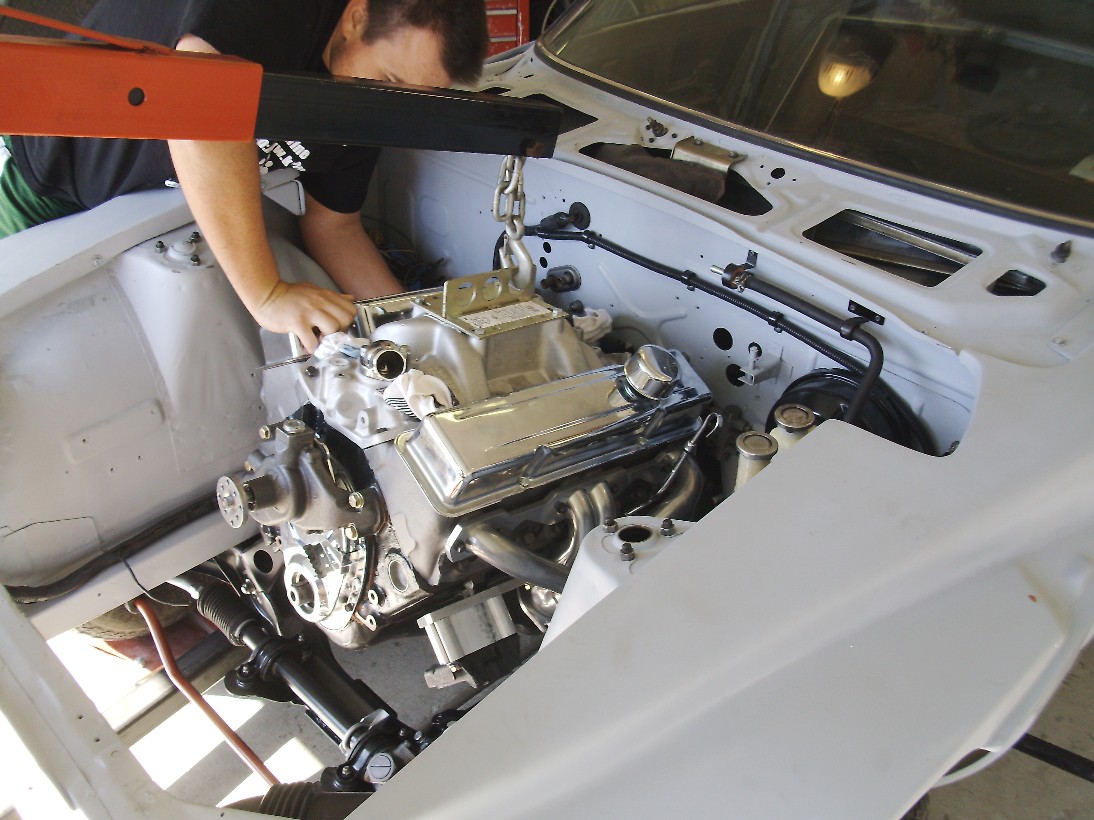
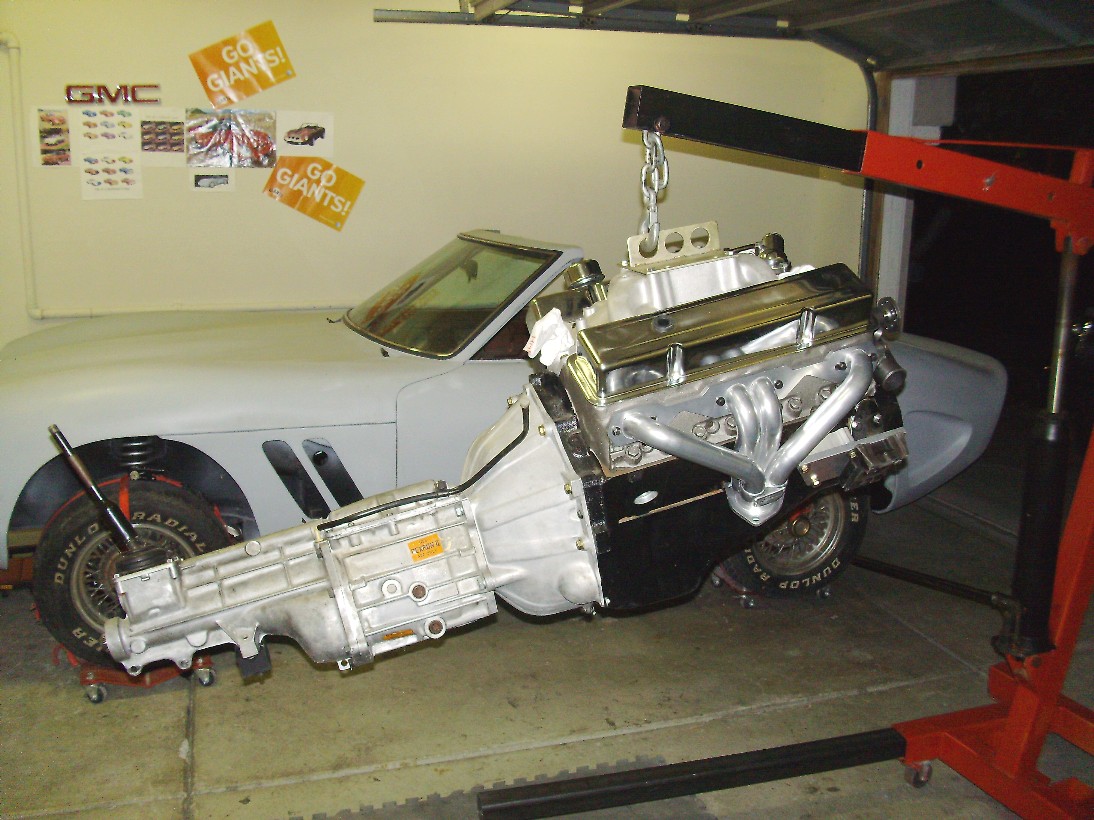
OK... it's in!!!! Took a little help from my son Nick and his fiance' Channing, who took the pics. Went in easily. The JTR people sure have the bugs worked out of this procedure. Fits like a glove. I've been heading toward this day for so long, I'm not sure what I want to do next. It'll come to me.
-
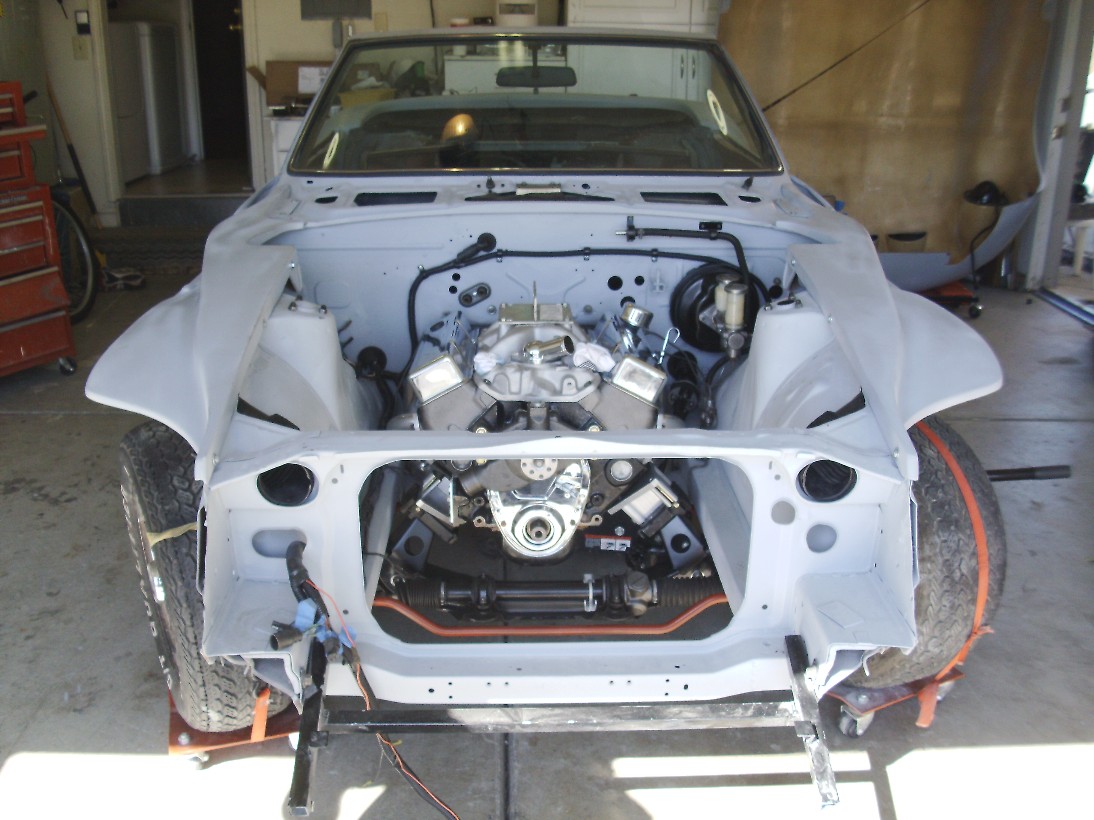
Big day tomorrow!! My son will be helping my install the SBC 350 into the VR. Don't have all the items on the block that JTR recommends before installing, but should be able to add them later with minimal effort. Can't wait to see how the suspension sits with some weight in the engine bay.
-
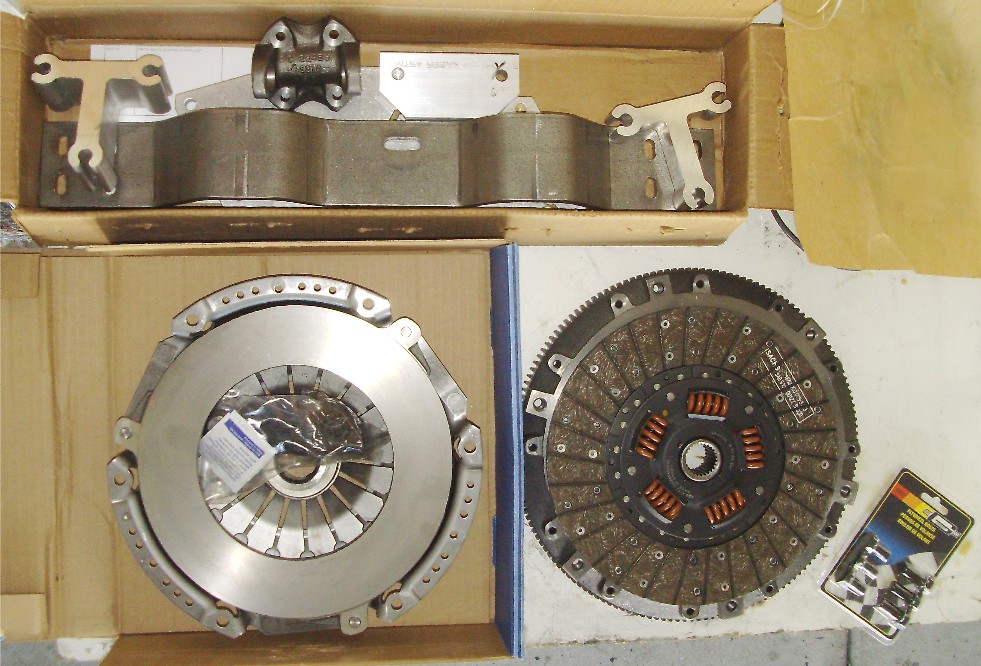
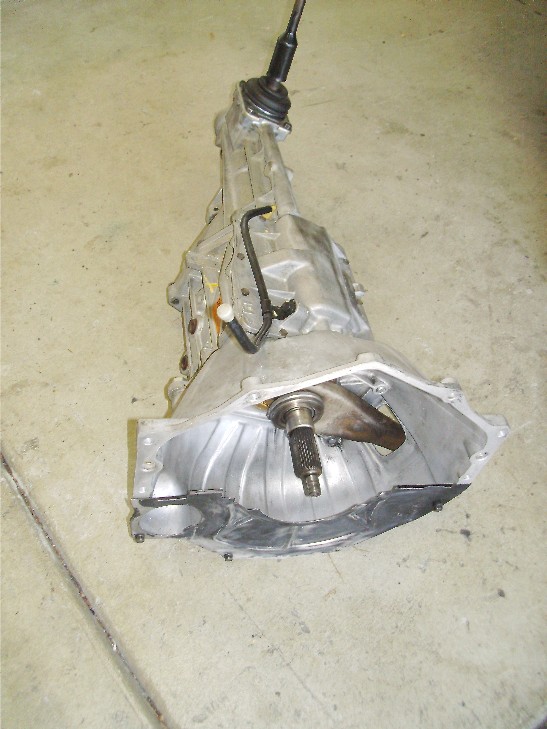
CHRISTMAS IN AUGUST!!!! My flywheel, clutch kit and engine / tranny instal kit are here! Can't wait to get that All American iron in my Italian inspired machine.
-
"Great Stuff" is what I used. It's about $7 a can at Ace Hardware.
-
Xmas in August... Flywheel, clutch kit and engine/tranny installation hardware arrived today!!!
-
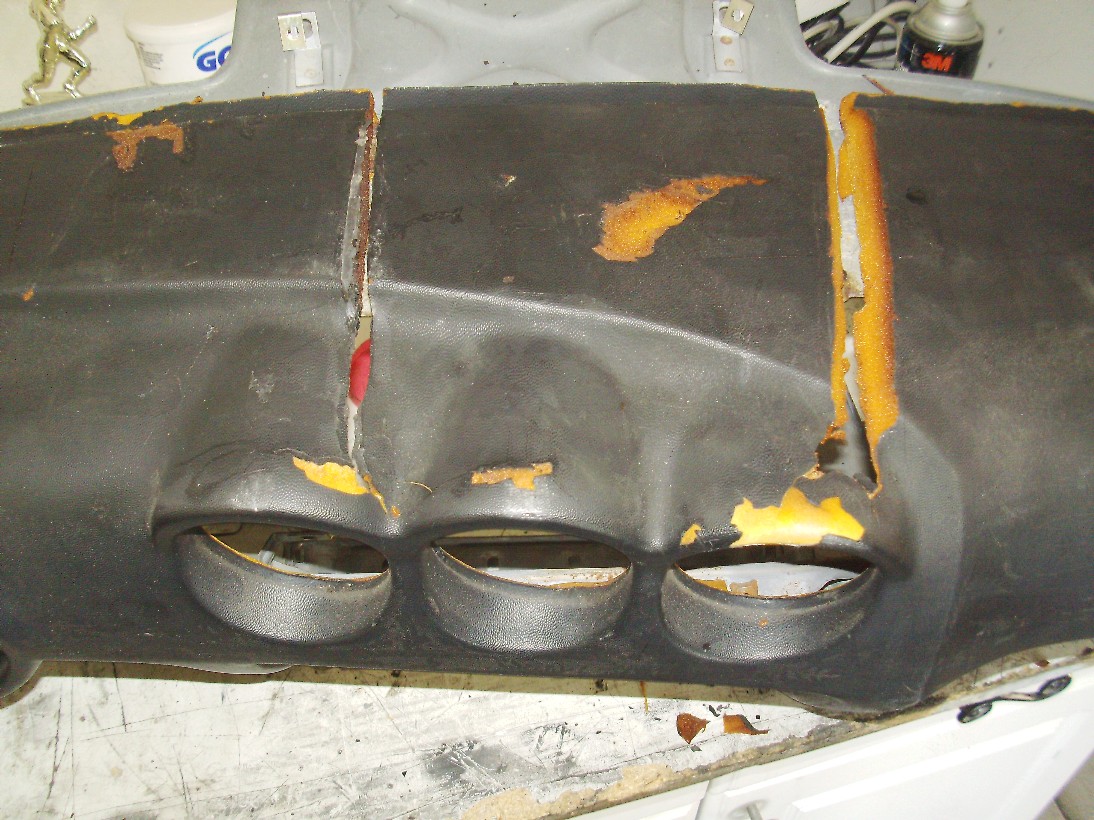
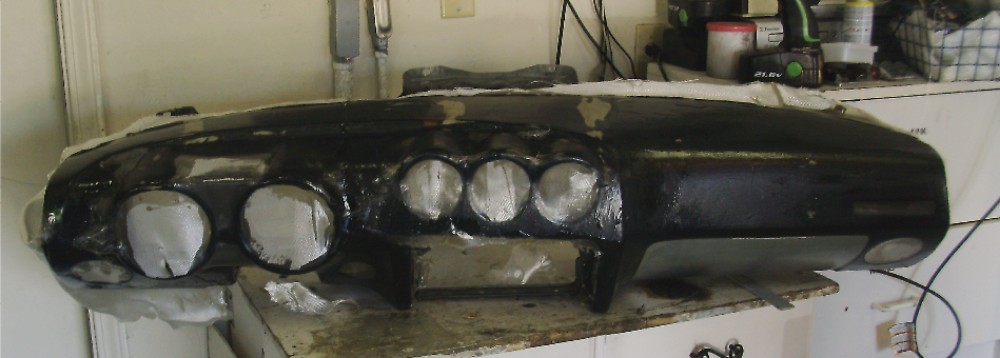
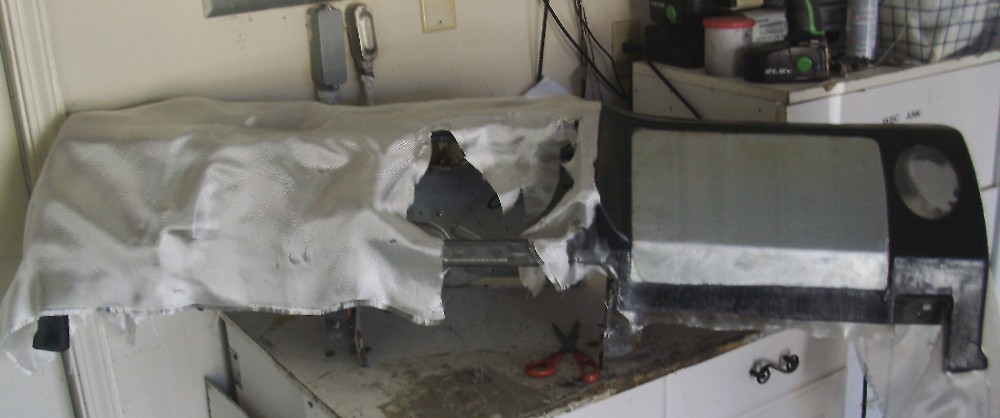
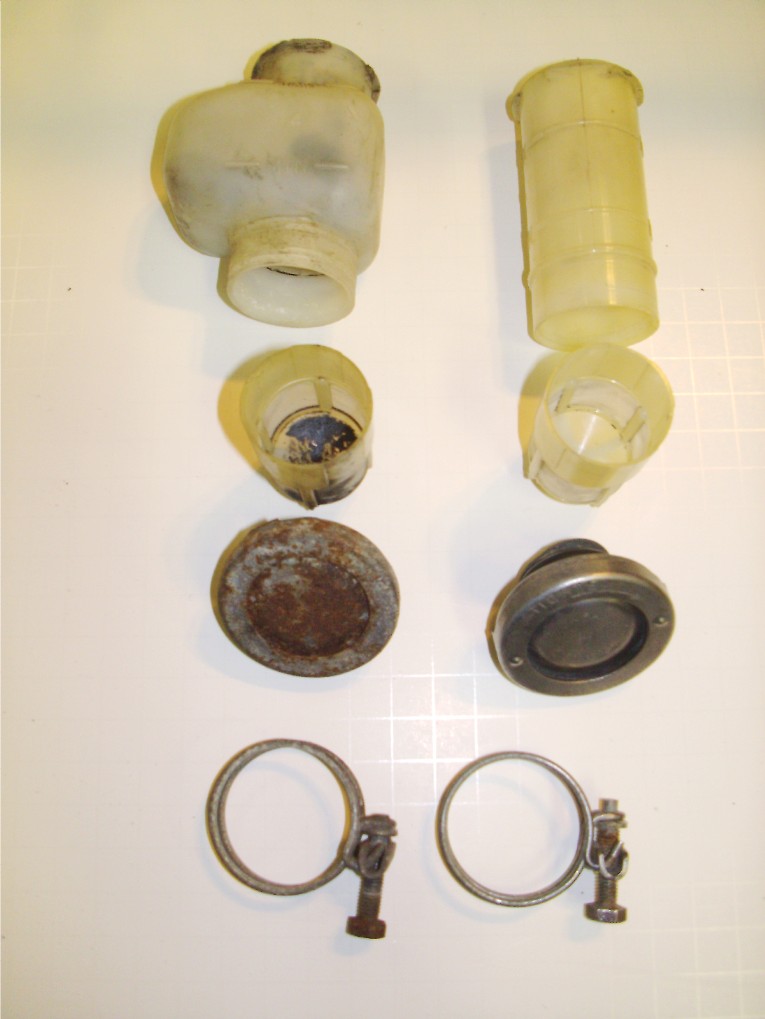
While I waited for my engine / tranny installation parts, I decided to attempt to save my old cracked dash. I followed the method used here http://www.classiczc...ght=dash+repair with mixed results. The final result was not very good. The plastic is so old and brittle that it cracks under the slightest pressure and the final texture and paint just wasn't going to be visually pleasing. I decided to cover the entire dash with fiberglass in order to get a good hard surface to work with. The glove box door was warped and looked bad, so I decided to eliminate it all together. Not sure if I'll have it painted to match the cars exterior, try to cover it with material or try some other finish technique. One thing's for sure... there's a lot of sanding in my future.
-
Thanks! Skill? Not sure the trial and error method can be called skill. Much of what I've done on this build is completely new to me. I've been learning everything as I go, like welding in floor pans (hoping I don't end up with a Flinstonemobile) and fiberglassing (hoping big chunks don't fall off when I hit a pothole). I am determined to finish, though... some day.
-
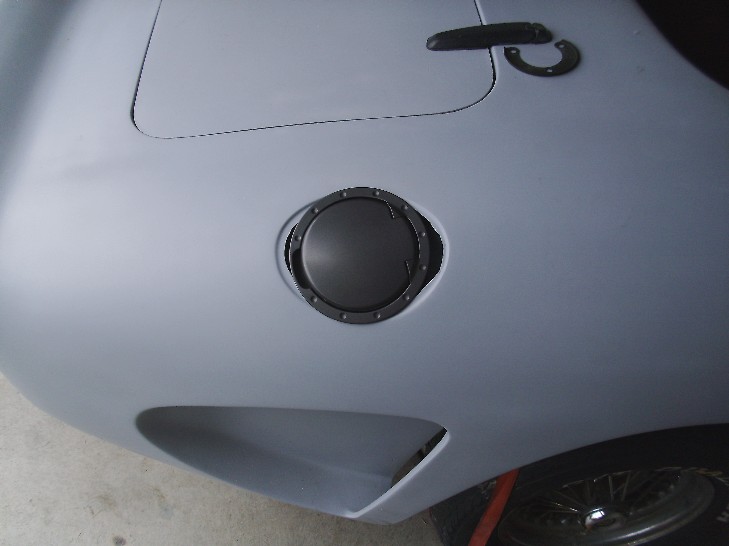
This fuel door from a Mitsubishi Eclipse might be a nice alternative to a LeMans style gas cap. Not sure if I like it enough yet... will see. Next up... flywheel and clutch components for the SBC 350. Looks cool with the ceramic coated Sanderson shorty headers!! Then with the WC T5 attached I'll slide the whole thing into prepped engine bay.
-
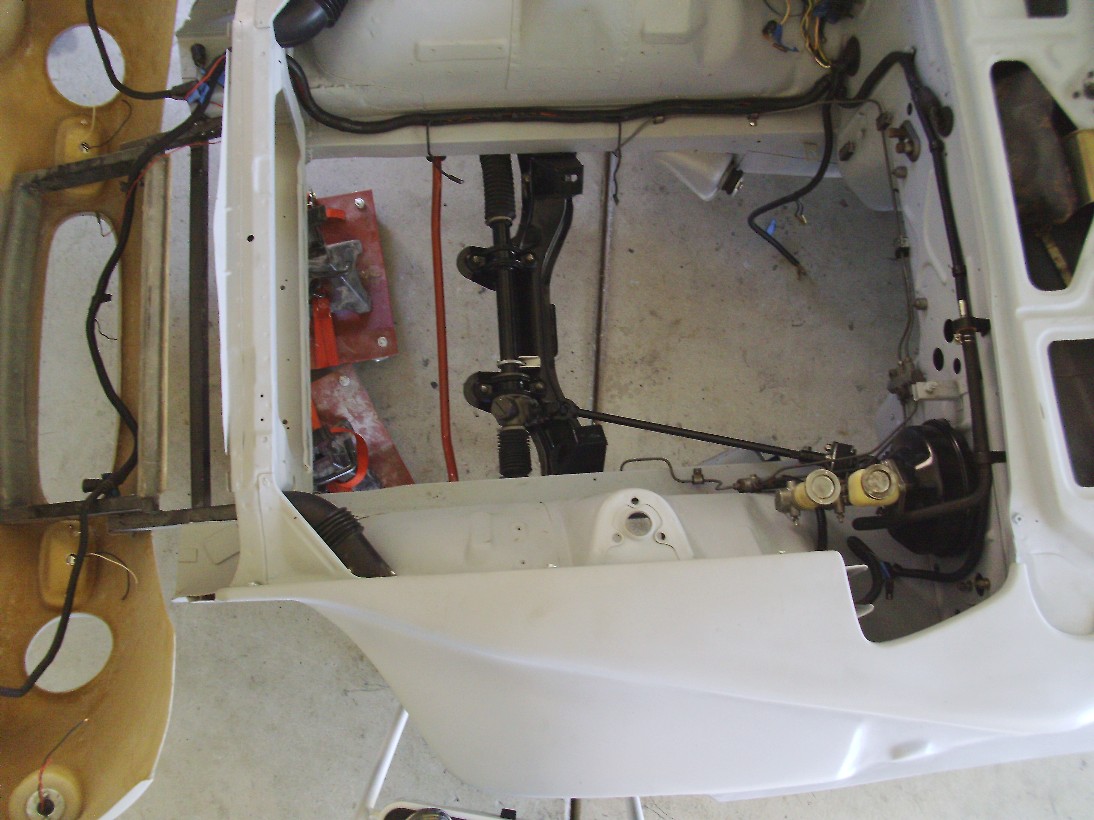
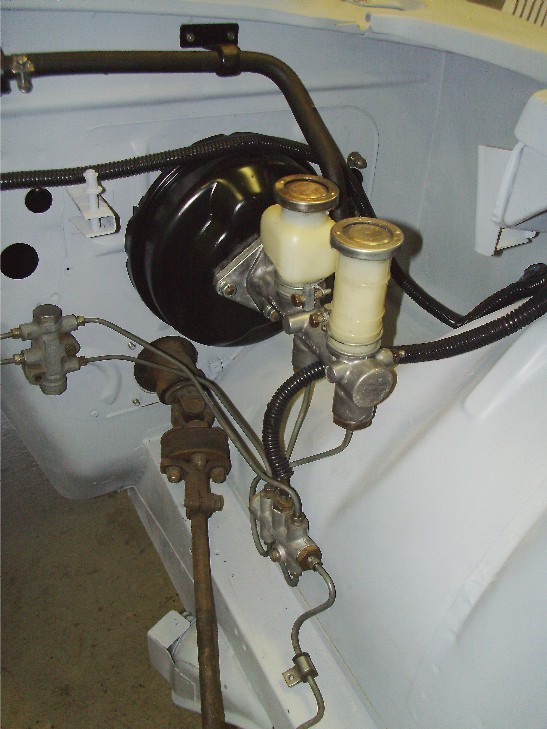
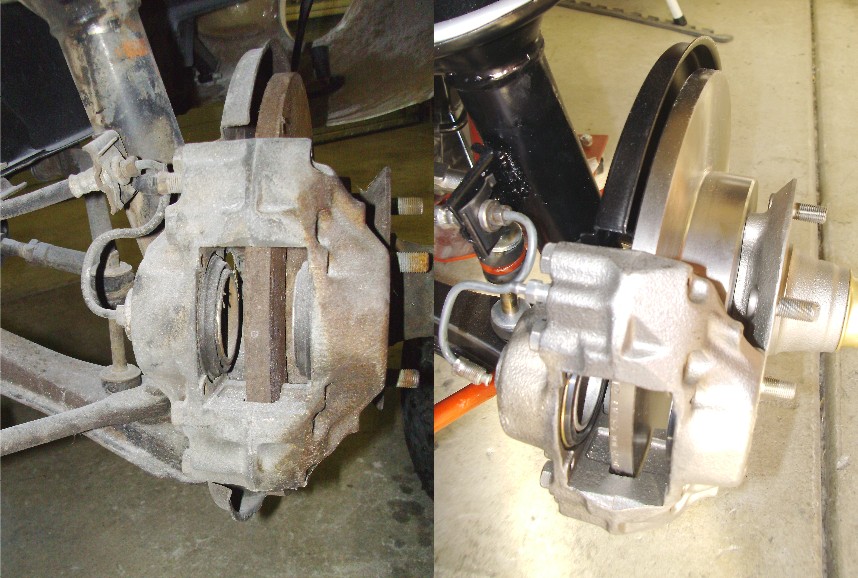
Managed to save the original brake master cylinder and all but one brake line.
-
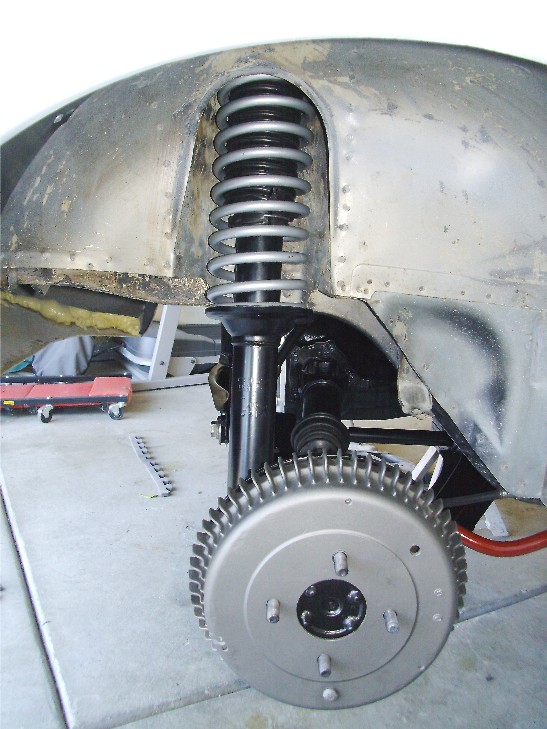
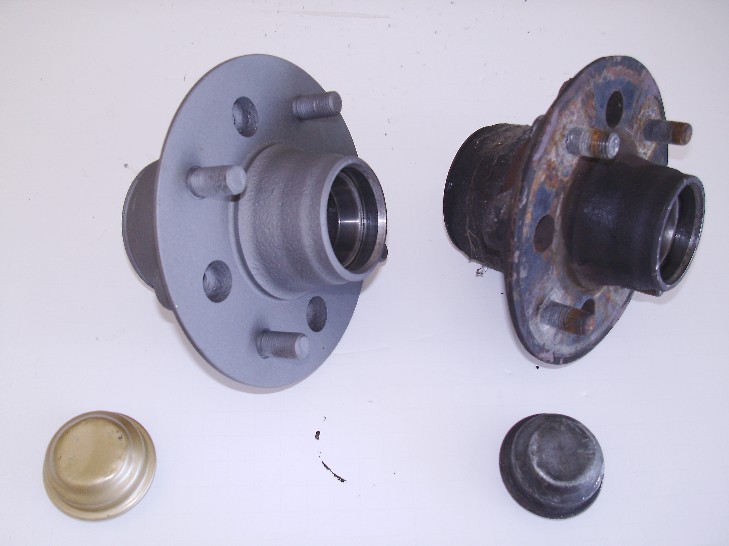
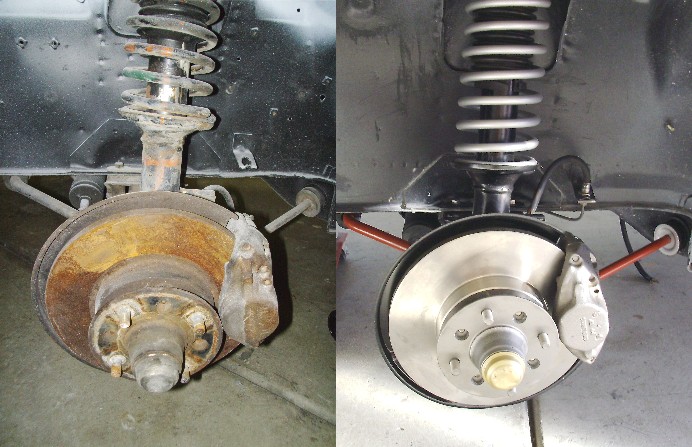
Virtually all the rear suspension remains original. A lot of elbow grease and a little paint can make a huge difference.
-
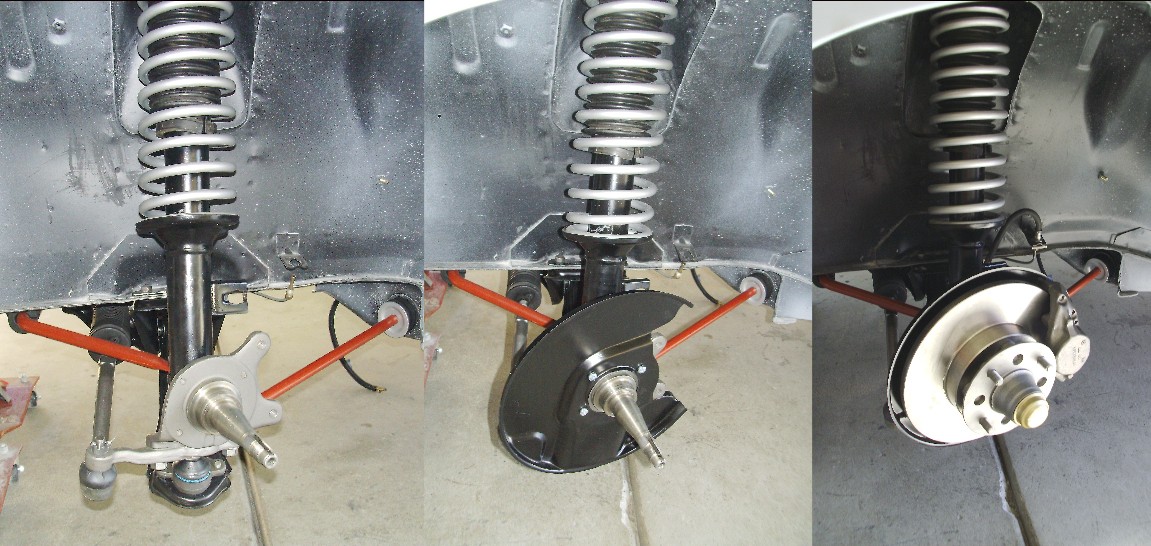
Forging ahead, I've managed to blast and paint the suspension all around the Velo Rossa. The front strut housings have been sectioned and now contain new ZX struts. New ball joints, tie rod ends and rotors up front.