Fauxre
-
Posts
315 -
Joined
-
Last visited
-
Days Won
5
Content Type
Profiles
Forums
Blogs
Events
Gallery
Downloads
Store
Everything posted by Fauxre
-
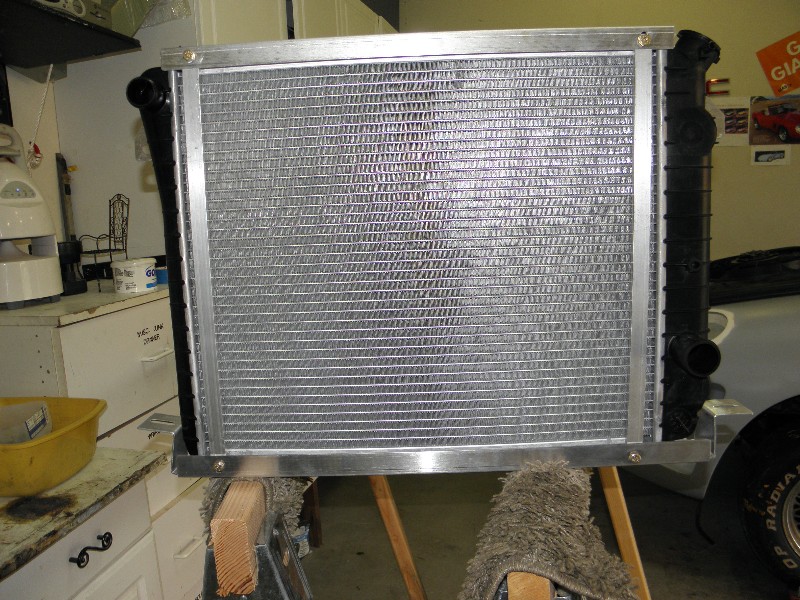
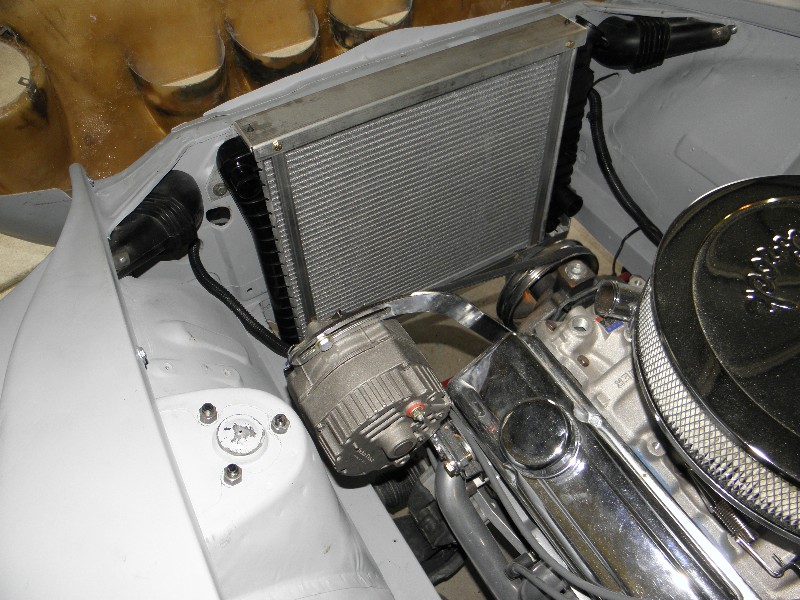
Radiator from Stealth Conversions arrived this week. I had a few minutes between home repairs.... ... and slipped it in easily. Another small step toward the finish line. Now back to the yard work.

-
I thought it was just me. I've sent off a message to administrators.
-
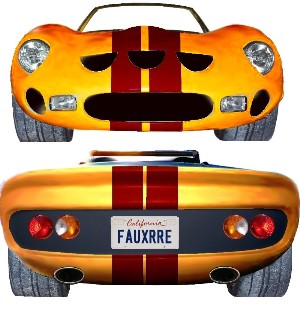
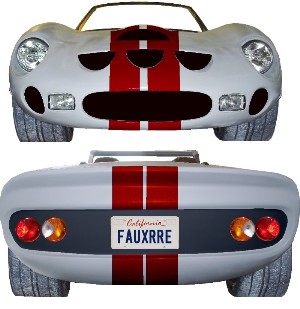
Playing with some paint schemes.
-
Thanks guys. I appreciate the positive feedback.
-
I agree. I wanted to recess the lights as well... and I still might, if I get ambitious enough to deal with the metal work underneath. But the finished look has to be elegant. Thats what I thought re. the gas tank. I'm considering a couple generic tanks that hold 15-17 gallons and have the right dimensions for mounting in the center of the old spare tire well. They leave plenty of room on the sides for mufflers and duel exhaust. Downside? As usual... cost. But I'll probably bite the bullet on this one to ensure quality and the final look I'm after.
-
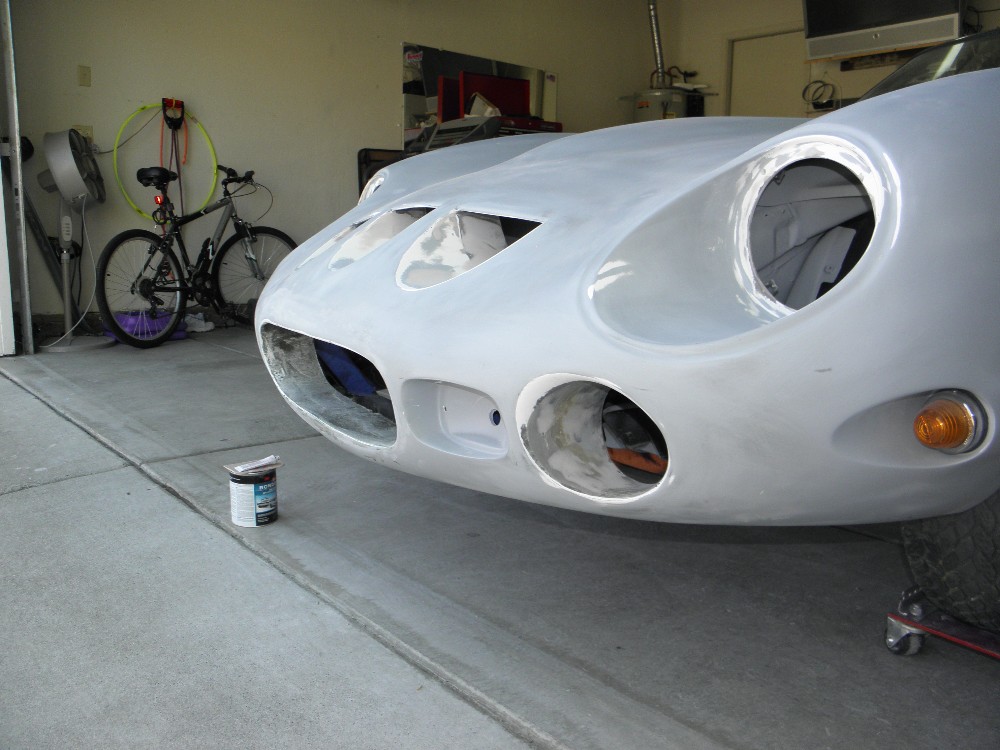
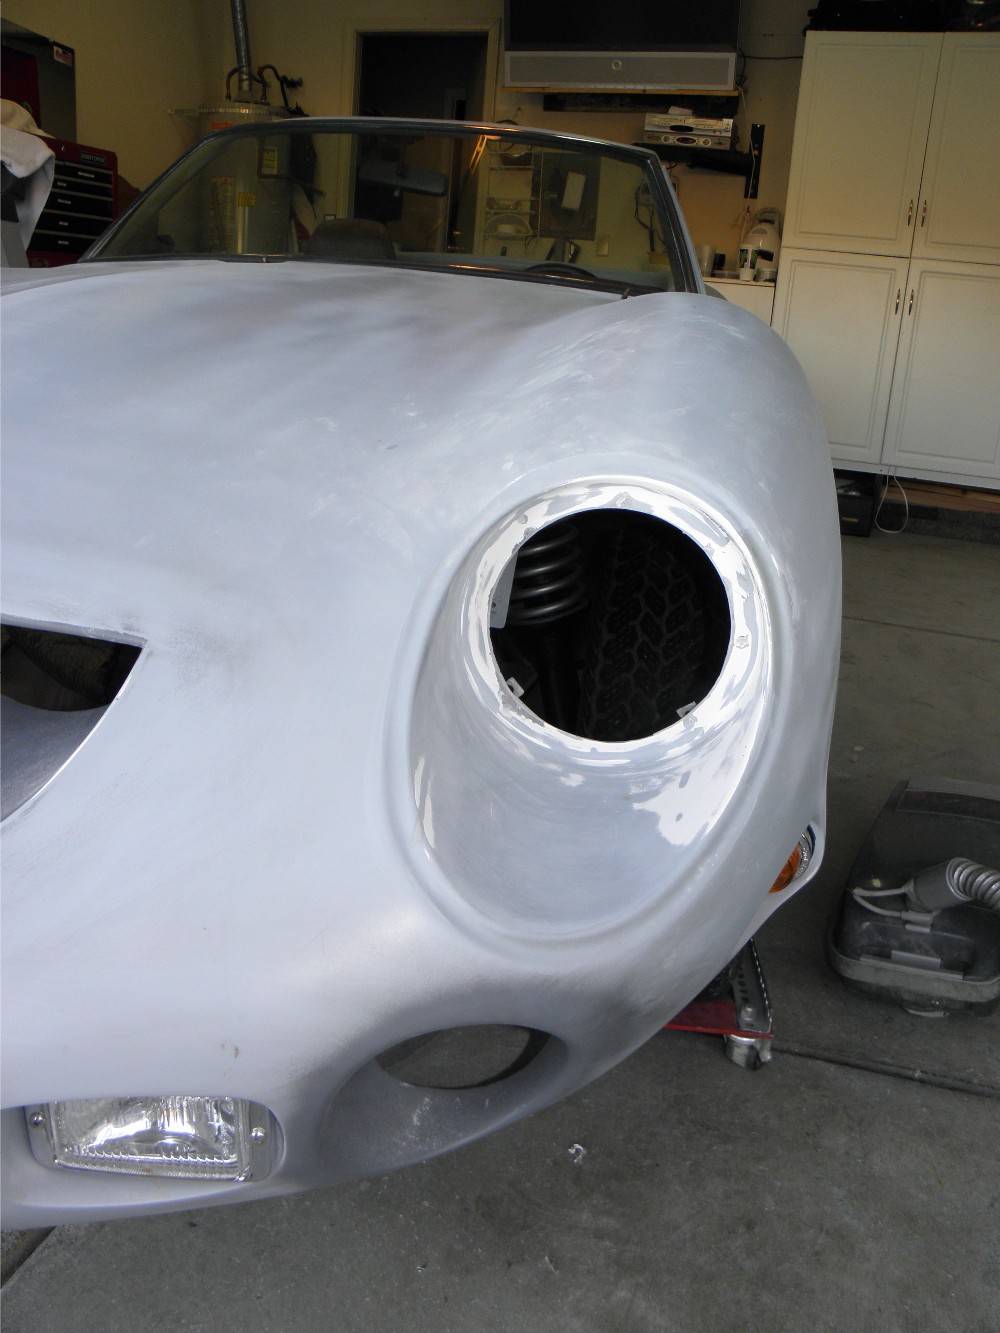
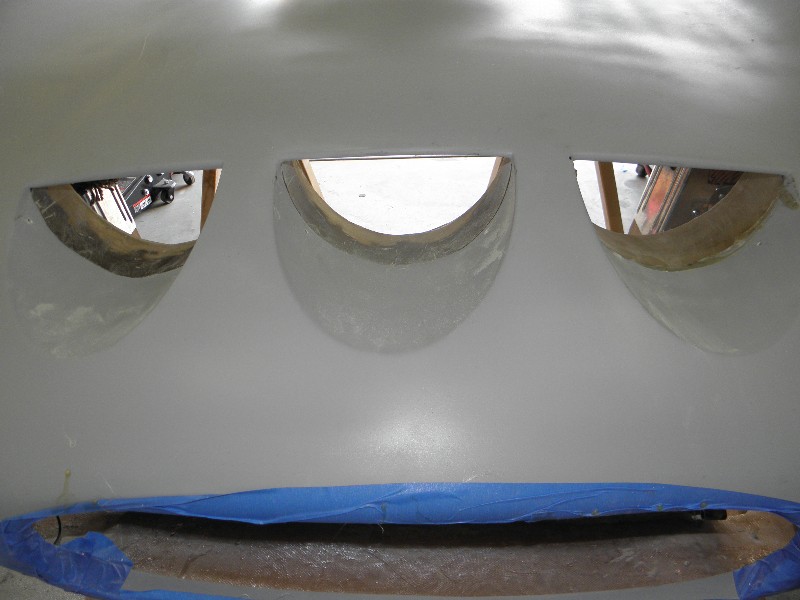
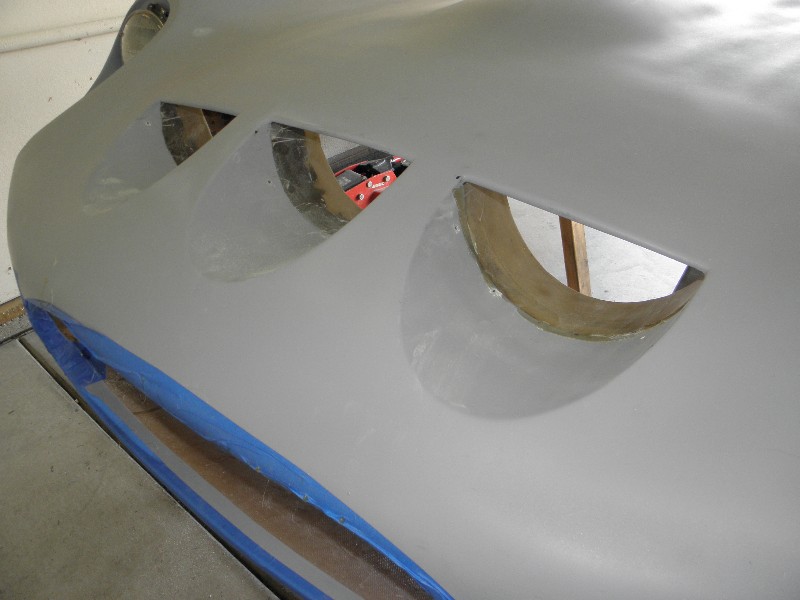
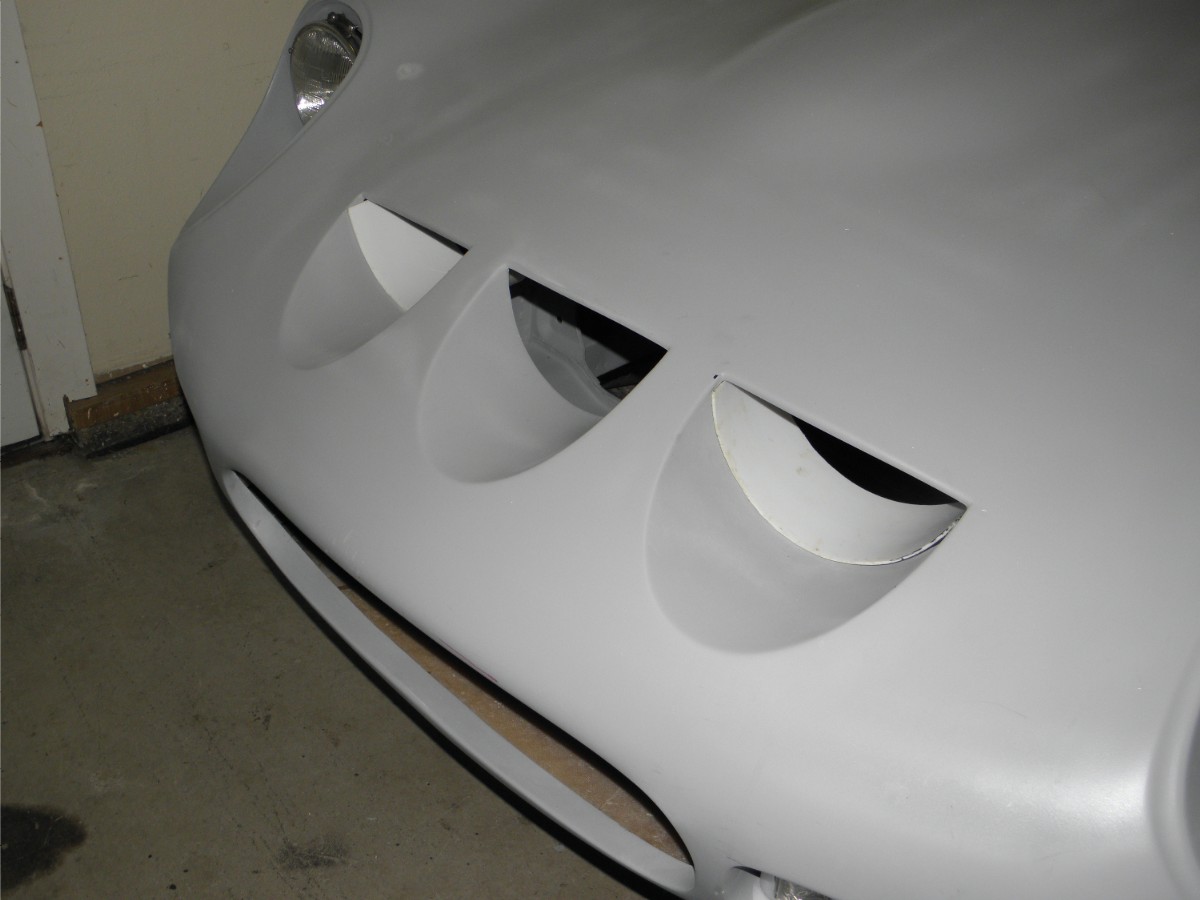
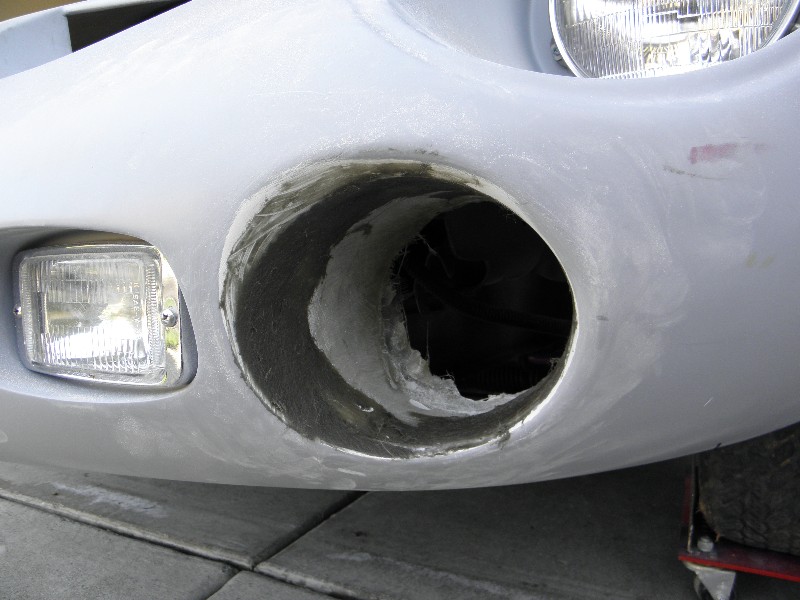
Down to the final mod to the front. Extending the lip of the large nose opening. Still pretty rough.
-
You're so right Dan... I want to!! Quick question. You used a gas tank from a Subaru, right? What model and what is the capacity? I need to make a decision pretty soon.
-
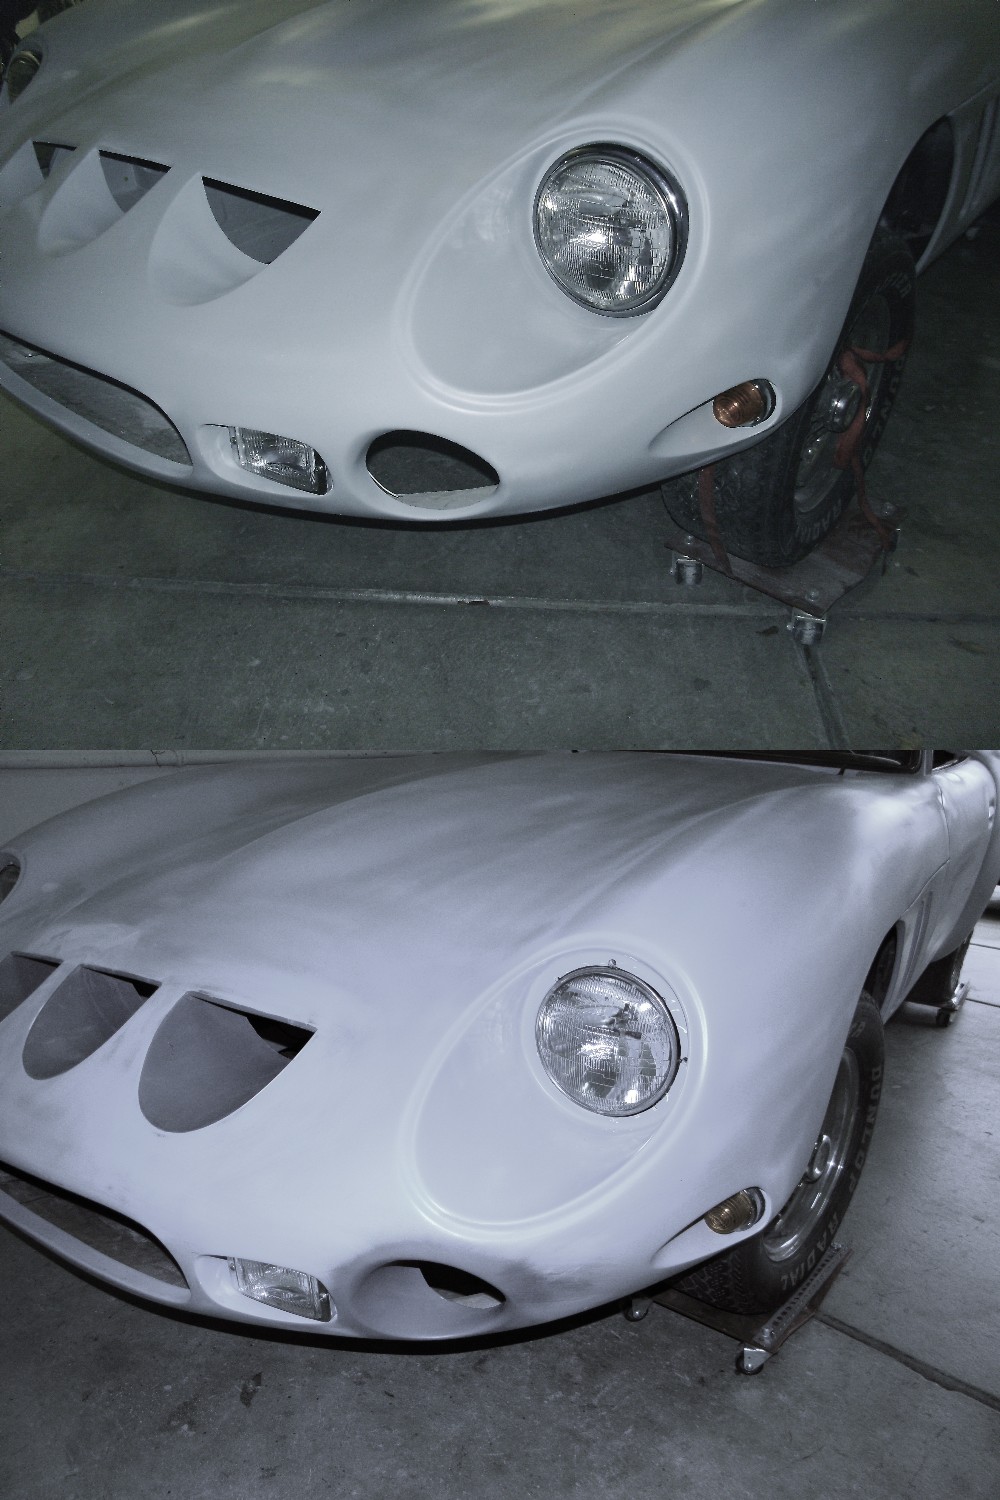
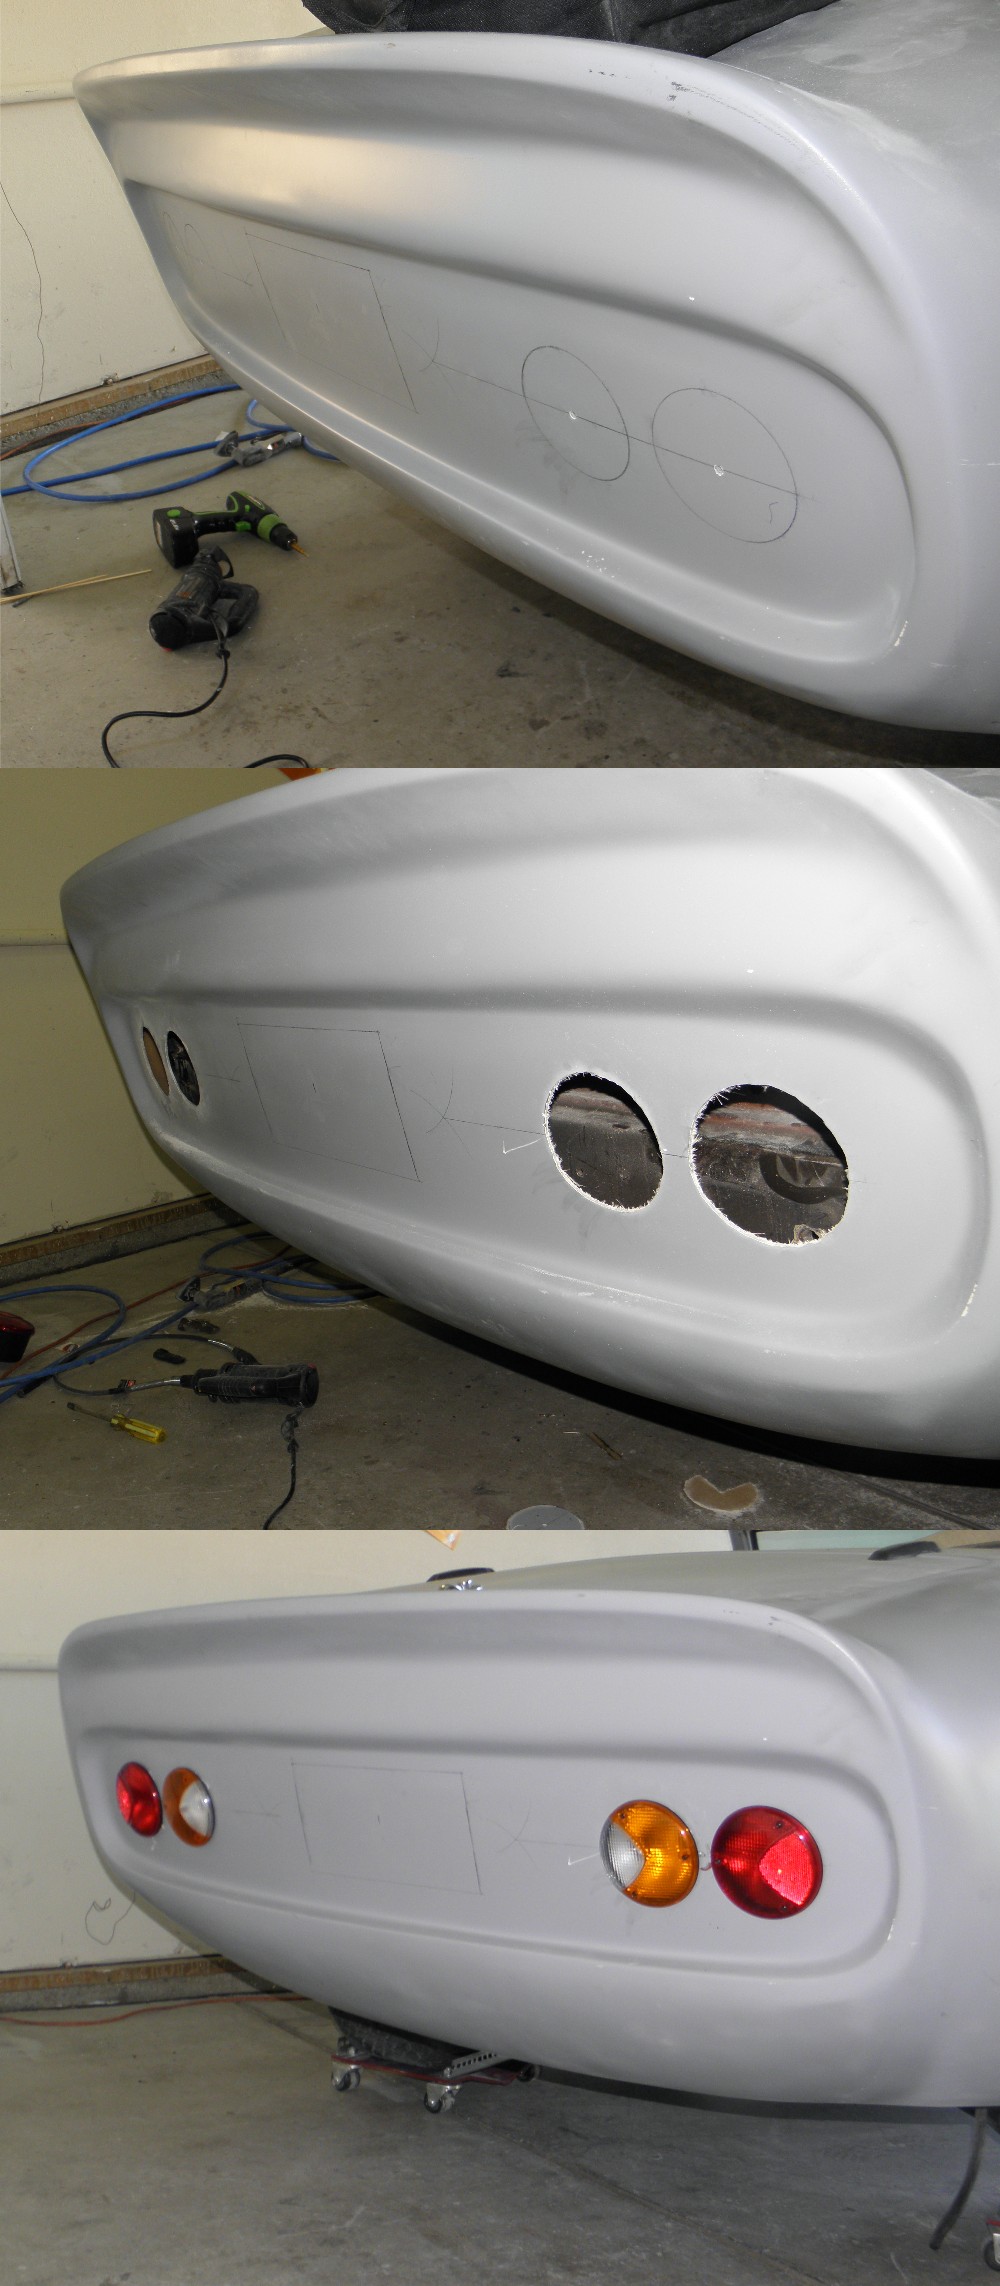
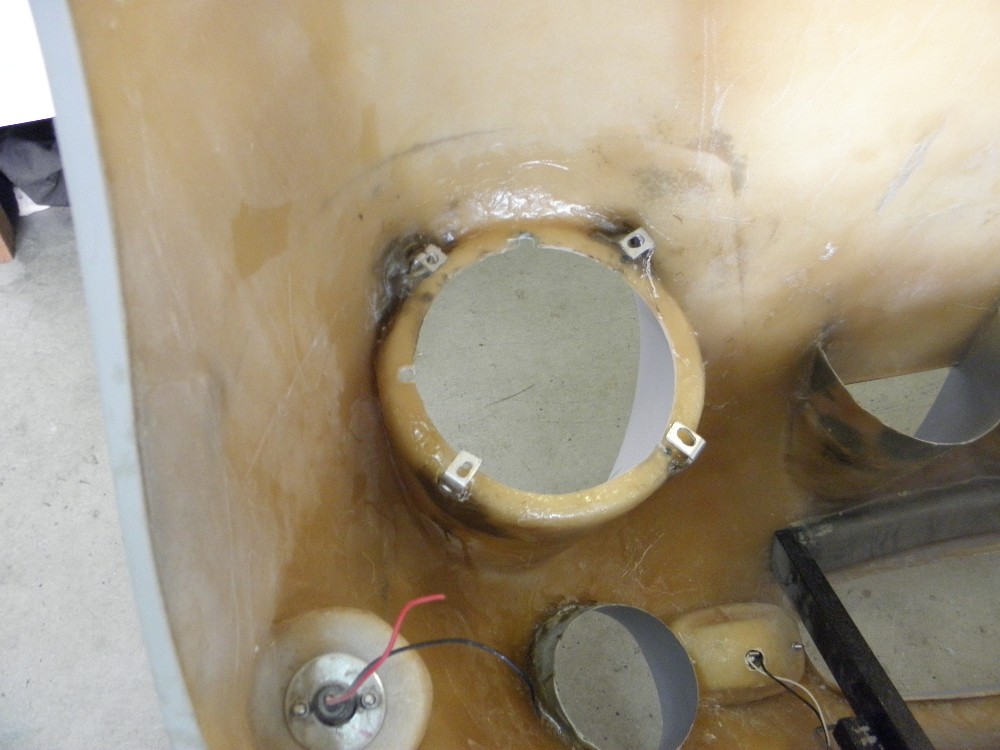
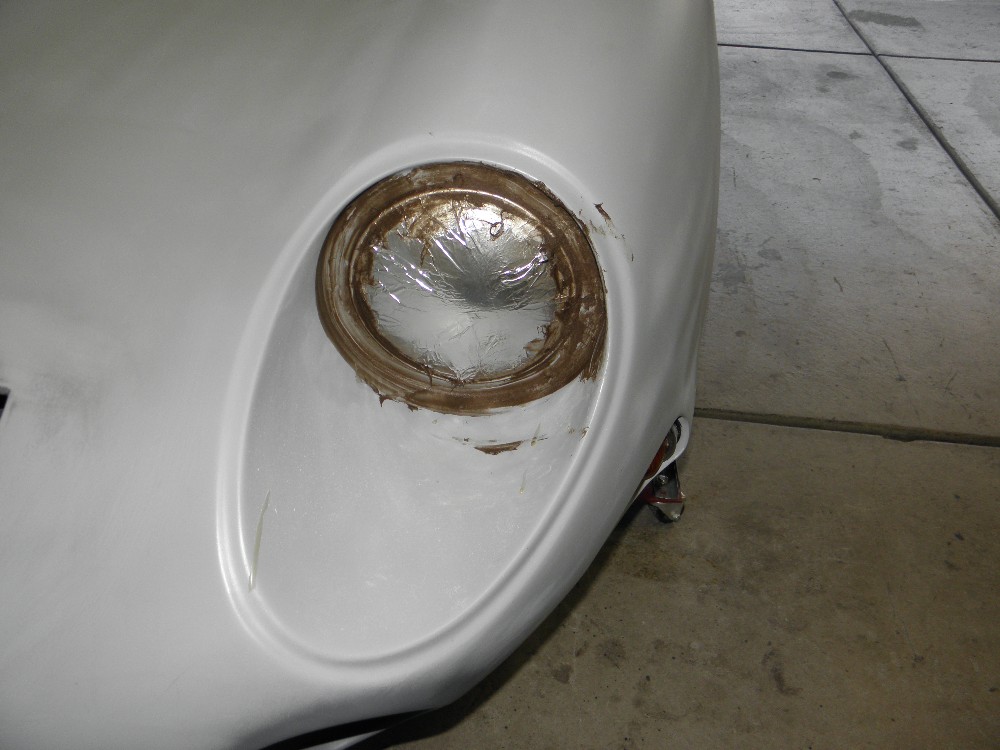
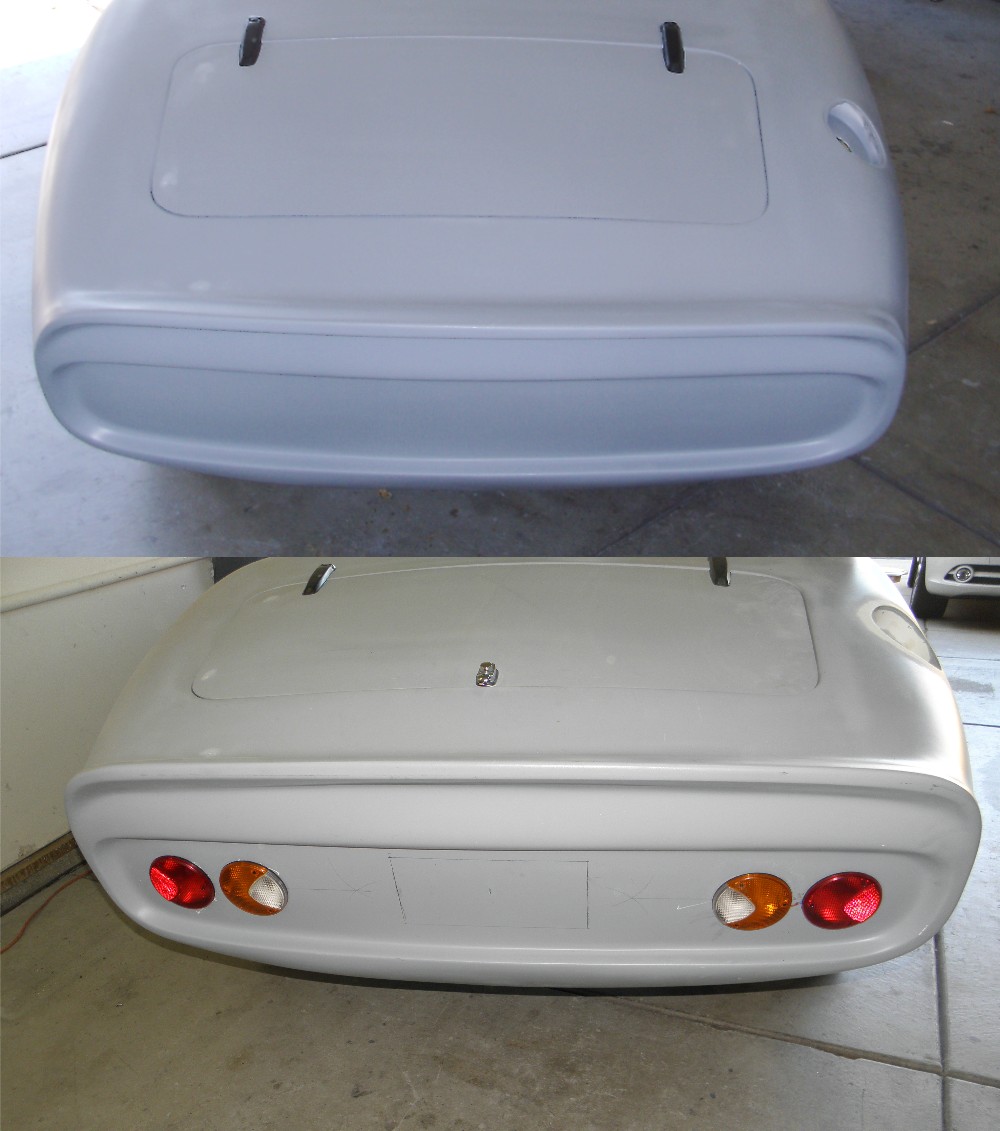
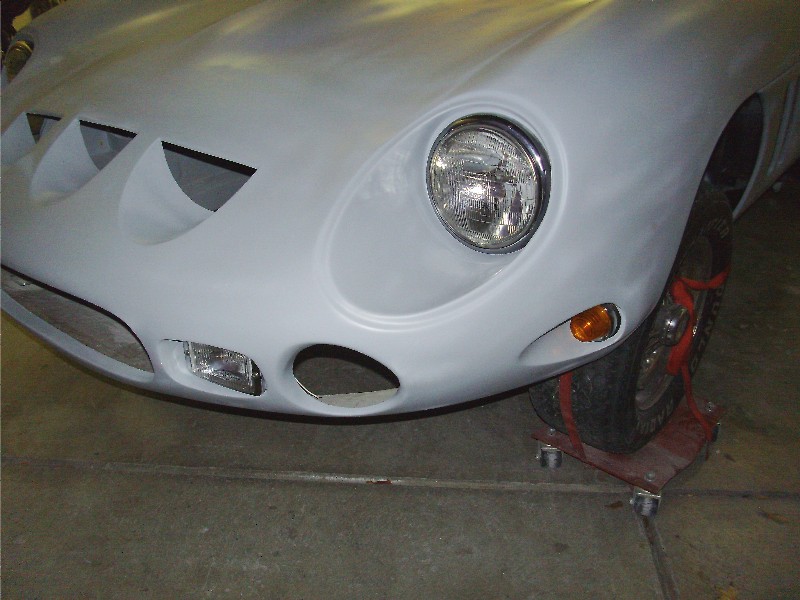
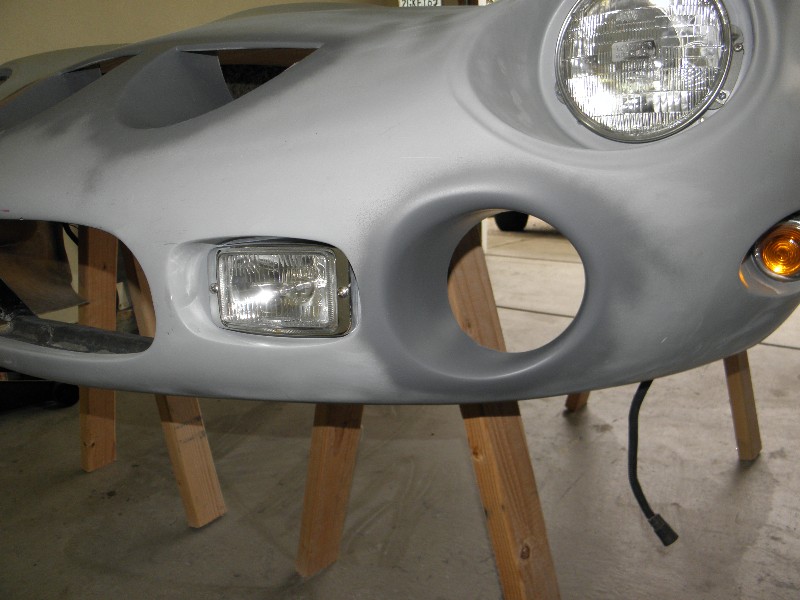
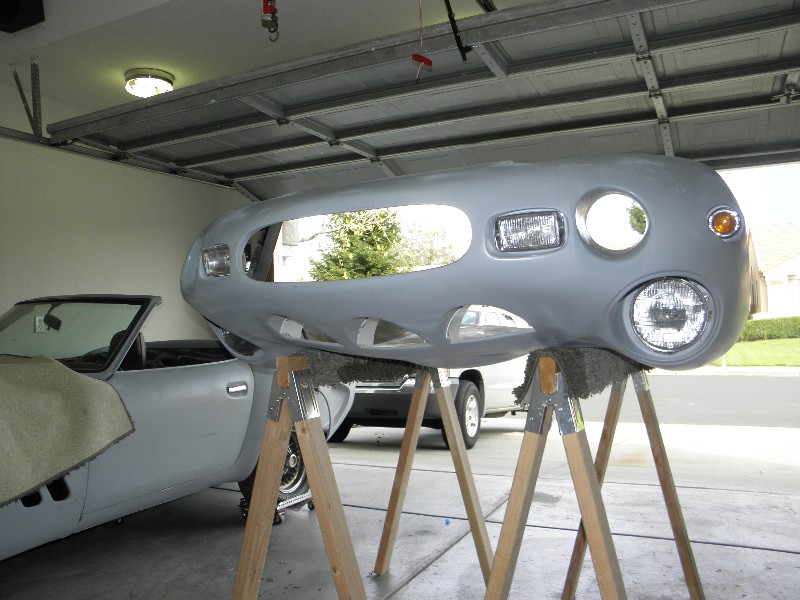
To achieve the look I want for the headlights, I glassed-in four metal brackets to the back side of the front scoops. A little short strand fiberglass filler to 'glue' them in place and several layers of cloth and resin to completely secure them. I wrapped the headlight in foil and mounted the whole assembly. A little more filler to fill in the irregular gap... ...and some light sanding yields a perfectly round hole. I then turned my attention to the taillights. After many hours of debating the exact locations of the lights, studying the curvature of the back panel, measuring, remeasuring, marking, erasing, remarking (in the exact same places) and then doing it all over again, I finally worked up the nerve to make that first cut. A rotary tool made easy work of the cutting and sanding of the fiberglass. The old Datsun sheet metal underneath was a different story. The depth of these lights, approximately 3 inches, required the modification of the old valance underneath. Limited access through the new holes, made for slow work. After a couple of hours of small cuts using the rotary tool cut off wheel and a reciprocating saw, and some adjusting with a hammer and short length of pipe, there was finally enough room to slip the mounting brackets in and bolt the lights up tight. ( Pics of the mangled sheet metal are too gruesome to post.) I may adjust the orientation later, but for now I'm satisfied with the look.
-
Hi Jagster, I love the roadster. I'm about four years into my build. You can see what I've been doing at my build thread.... http://forums.hybrid...lle-velo-rossa/ I chose the Velo Rossa kit from Reaction Research. http://www.kitcarz.com/ The owner, John Washington, is a great guy. He's been very helpful answering any questions I've had through my build and several years before I even purchased my kit. I'm not a Ferrari purist when it comes to my project, so I'm free to experiment with different looks. As far as unfinished kits, most of the ones I've seen are already mounted to donor cars. I have seen just the body kit on Craigslist, but only once, several years ago. I know the price for a new VR kit has gone up recently, but I still think it's a bargain compared to others. I'm happy to answer any questions you might have about the VR kit. Take a look at my thread and let me know what you think. Wes
-
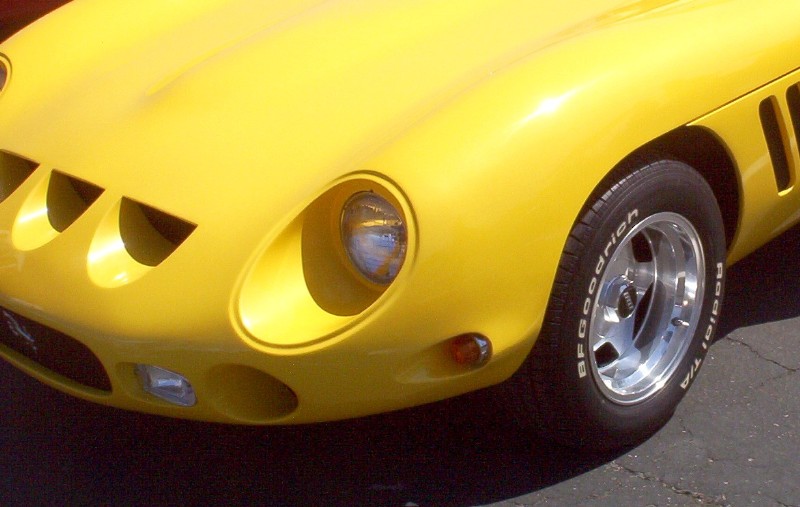
OK... so I've been searching here for a day and haven't found what I'm looking for. Can anyone who has owned or built, a Velo Rossa or 250 GTO, tell me how to install the headlights as seen on the Velo Yellow car. My headlights currently look like this. The trim rings are not attached, the just sit there. I've seen several finished cars with lights mounted on the inside of the hood, but no photos or description of how it's done. Can anyone here help me?
-
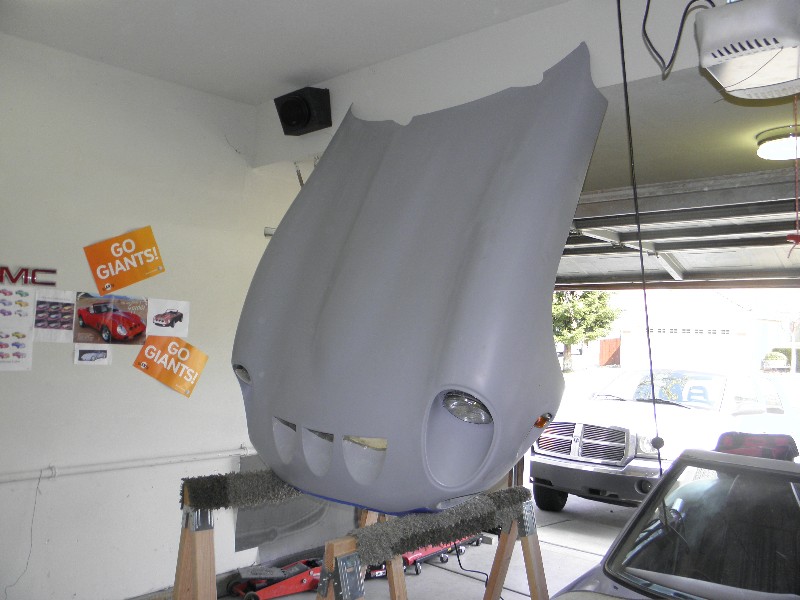
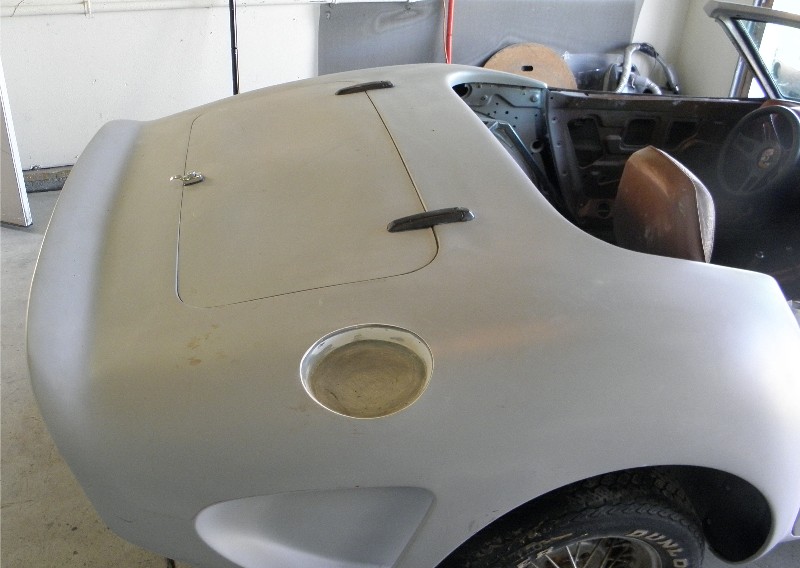
Standing the bonnet on it's nose makes for easy clean up to the underside. Still needs some sculpting to completely eliminate the joint lines, but looking pretty good so far. The last of the cosmetic fiberglass work to the front will be to extend the inner lip of the large opening like in this Photoshopped image. The headlights will be remounted to the inside of the hood for a cleaner, more modern look.
-
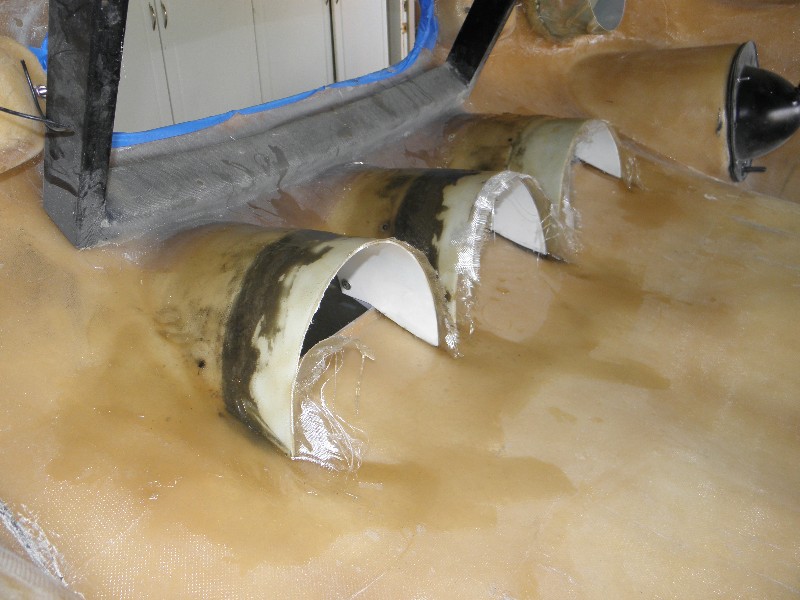
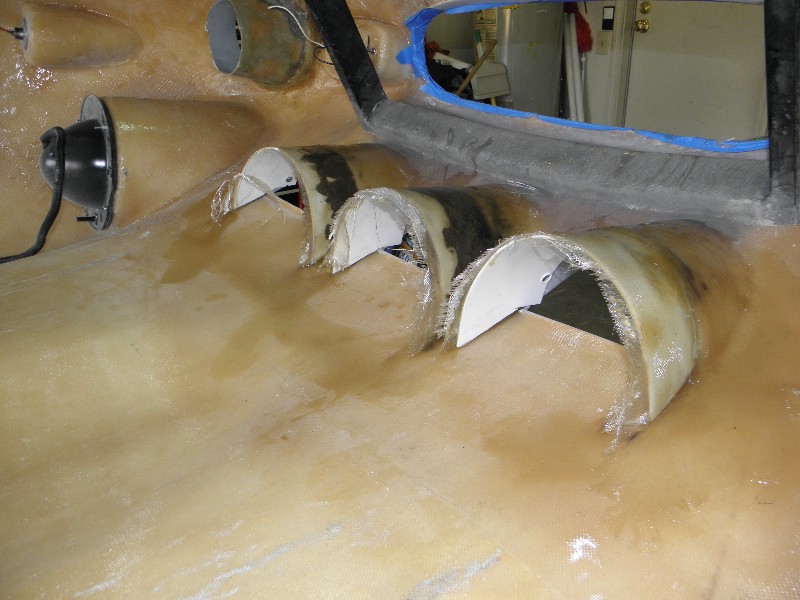
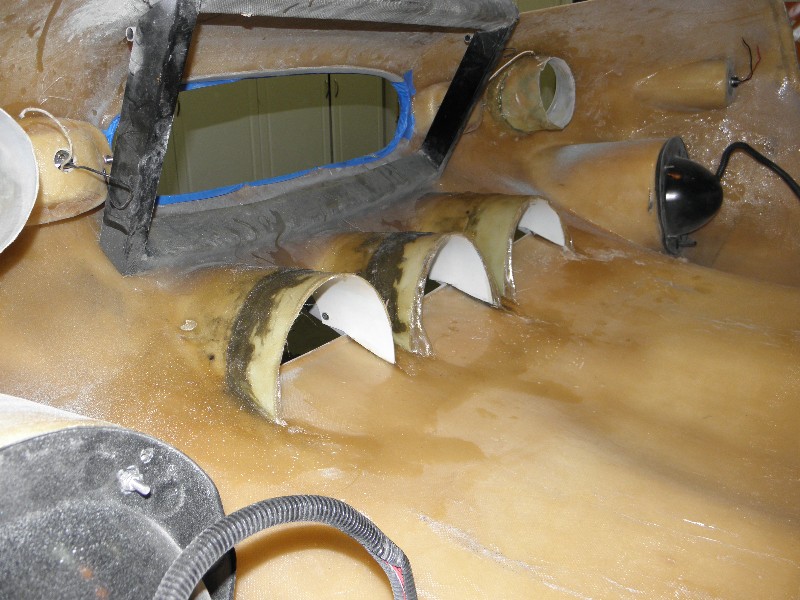
OK... found another bucket... made another form... and now it's glassin' time. Flipping the bonnet over on a couple of saw horses gave me the perfect working height. The forms were held in place with a few screws. I worked through the nose opening, as trying to get to the scoops from either side was quite awkward. Can't wait to get the forms off and do a little finishing. Perfect activity for the rainy whether here.
-
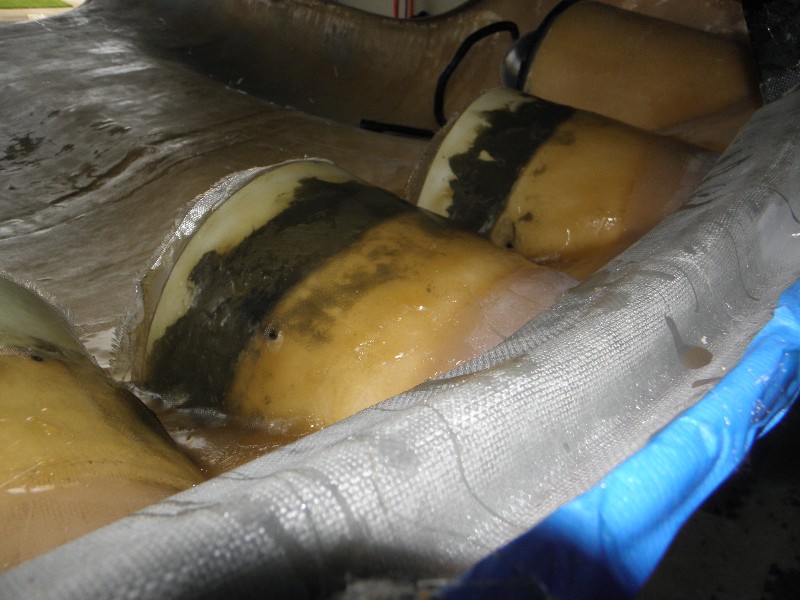
Made a couple of forms from a 5 gallon bucket to extend the scoops under the hood. Wasted most of the bucket using the trial and error method and didn't have enough left for the third form. Have to wait for another empty bucket.
-
After reading a few threads here regarding throttle cables, I decide to go with the Mr. Gasket Universal Kit. The two LOKAR kits that seem to be the preference here are very nice... but at a combined cost of around $80 plus shipping? My kit was $25. It looks great and works perfectly.
-
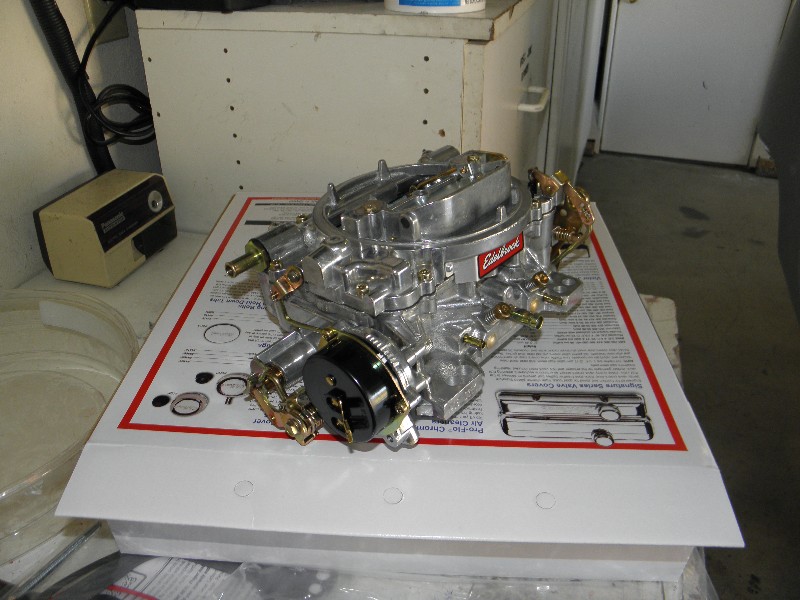
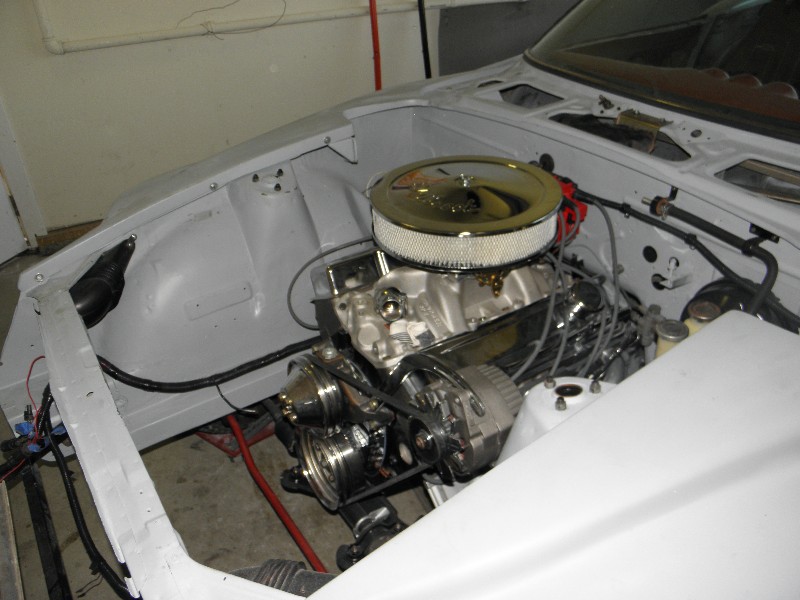
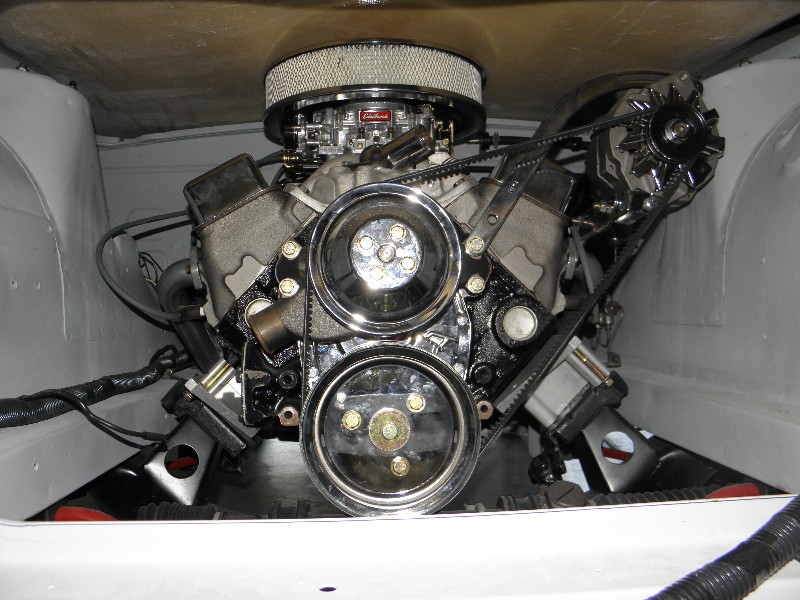
WOW!!! Summit Racing is serious about getting orders out quickly. I put the order in at 2:30 yesterday afternoon, and everything that was in stock arrived by 12:00 noon today. And that was using UPS regular ground delivery! I guess when racing is actually part of the business' name, you gotta be fast. I can't stop staring at my shiny engine... ...it just barely fits under the hood.
-
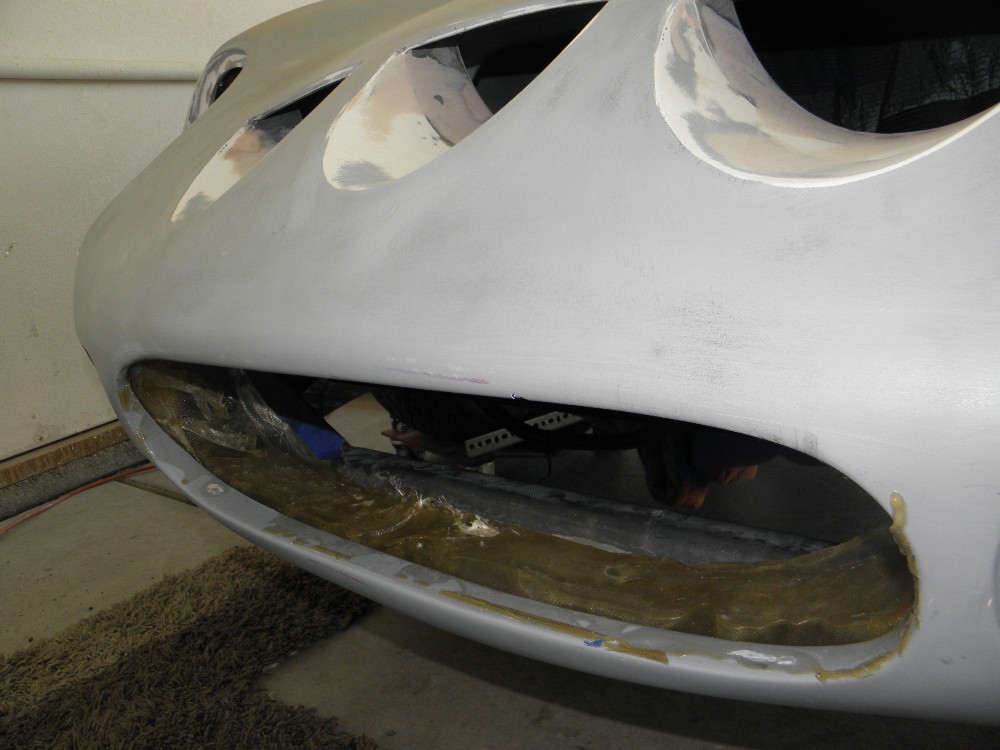
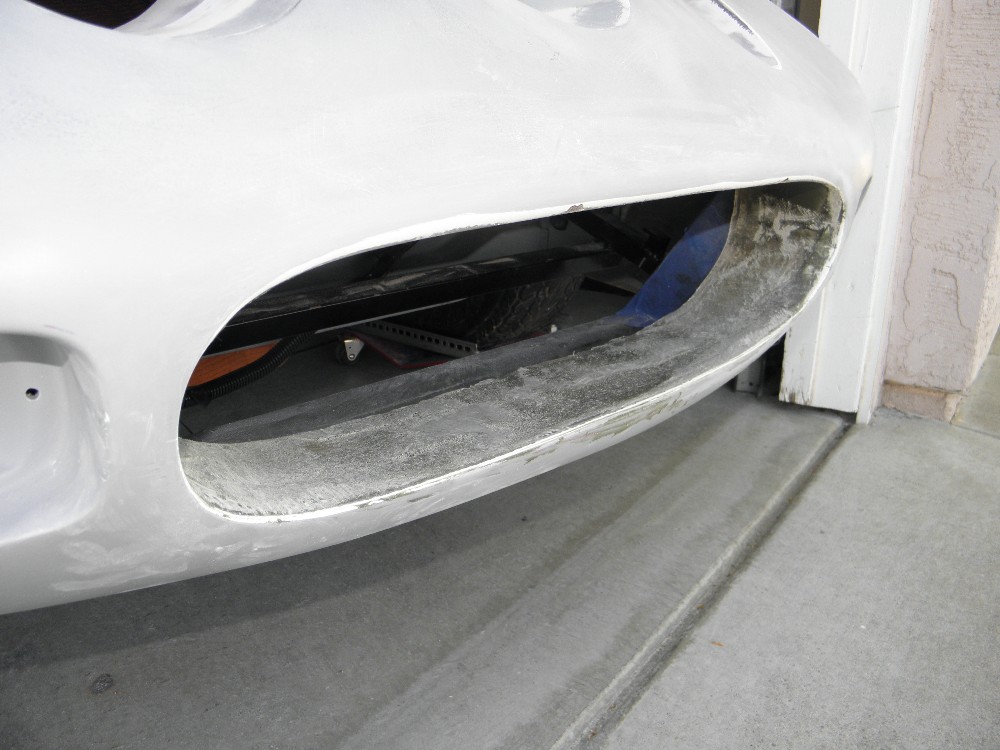
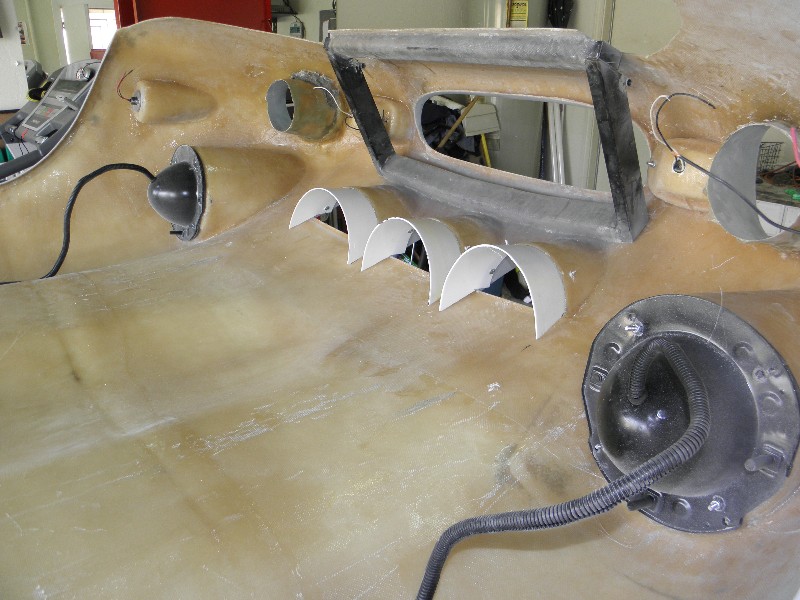
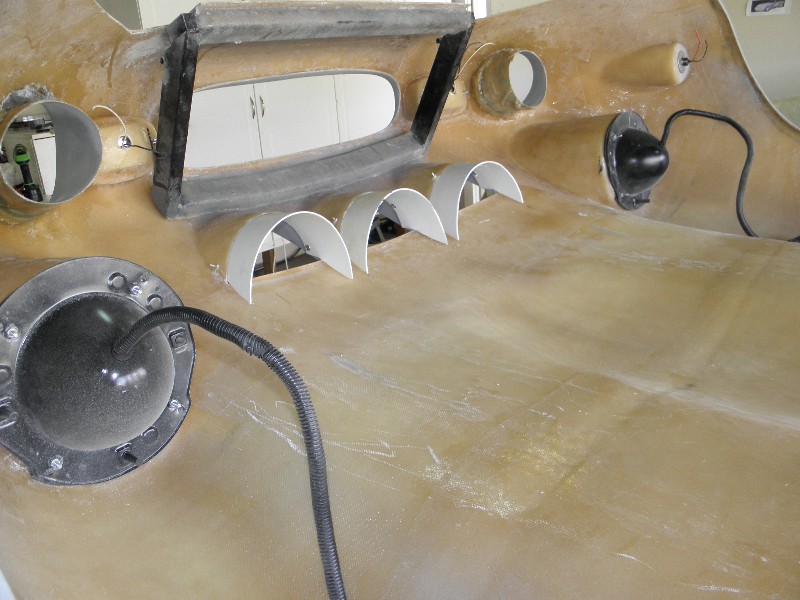
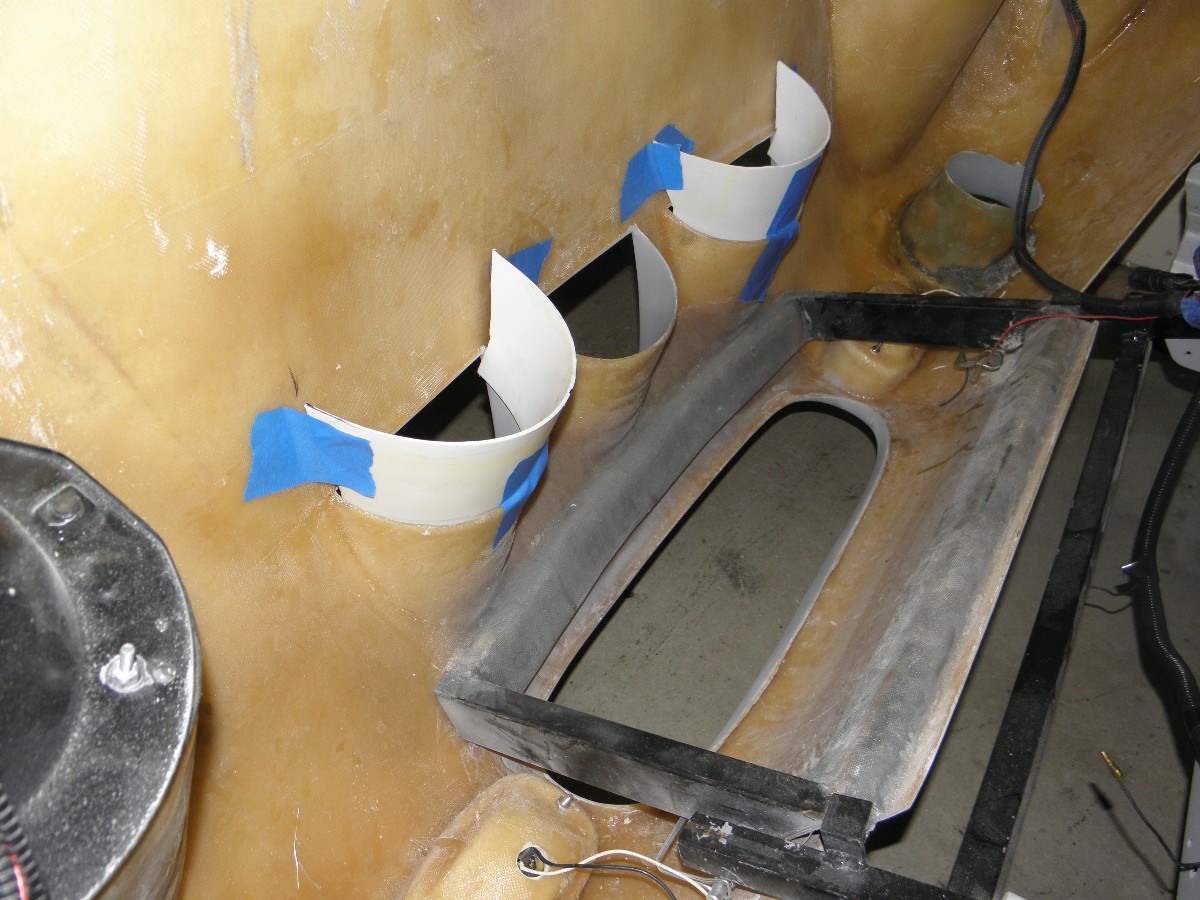
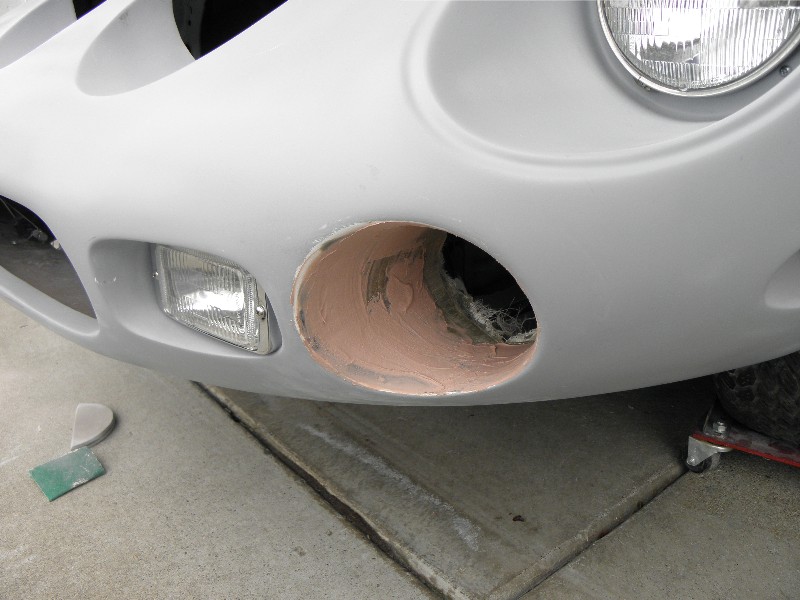
I was able to spend a good chunk of money today on parts from Summit Racing. Several are on back order, so I'll continue working on the small body mods while I'm waiting. Continued to round out the lower vents. They're not quite finished yet, but they're close enough to the look I'm aiming for, to get a little primer. I'm going to extend the "sugar scoops" 1 1/2 to 2 inches under the hood in the same way. I like the 3D look the extra depth adds.
-
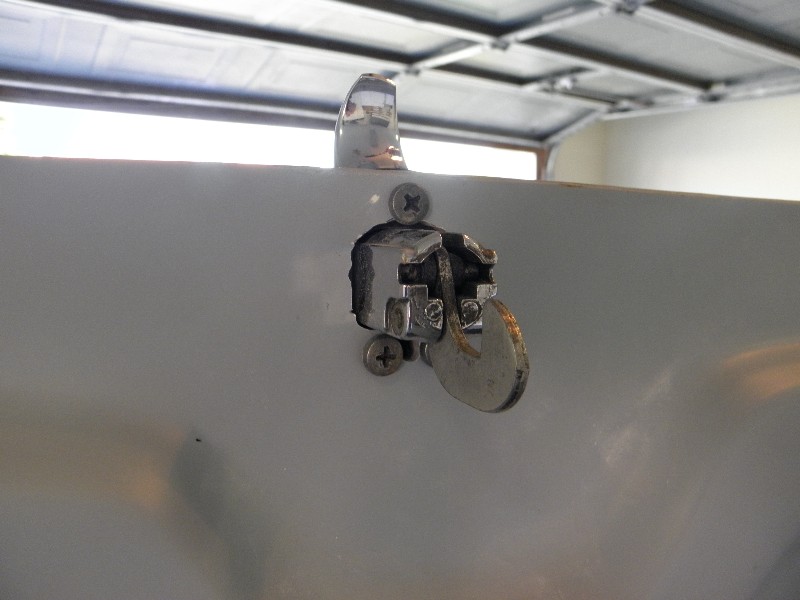
Nice day, and since I only worked 'till noon, did a little sanding and filling. Another pass with light filler, then I'll trim the back off. Attached the trunk latch... ...and made a striker plate from a piece of scrap steel.
-
Mysterious... I'm intrigued.
-
Thanks Dan. What kind of "little glass project?"
-
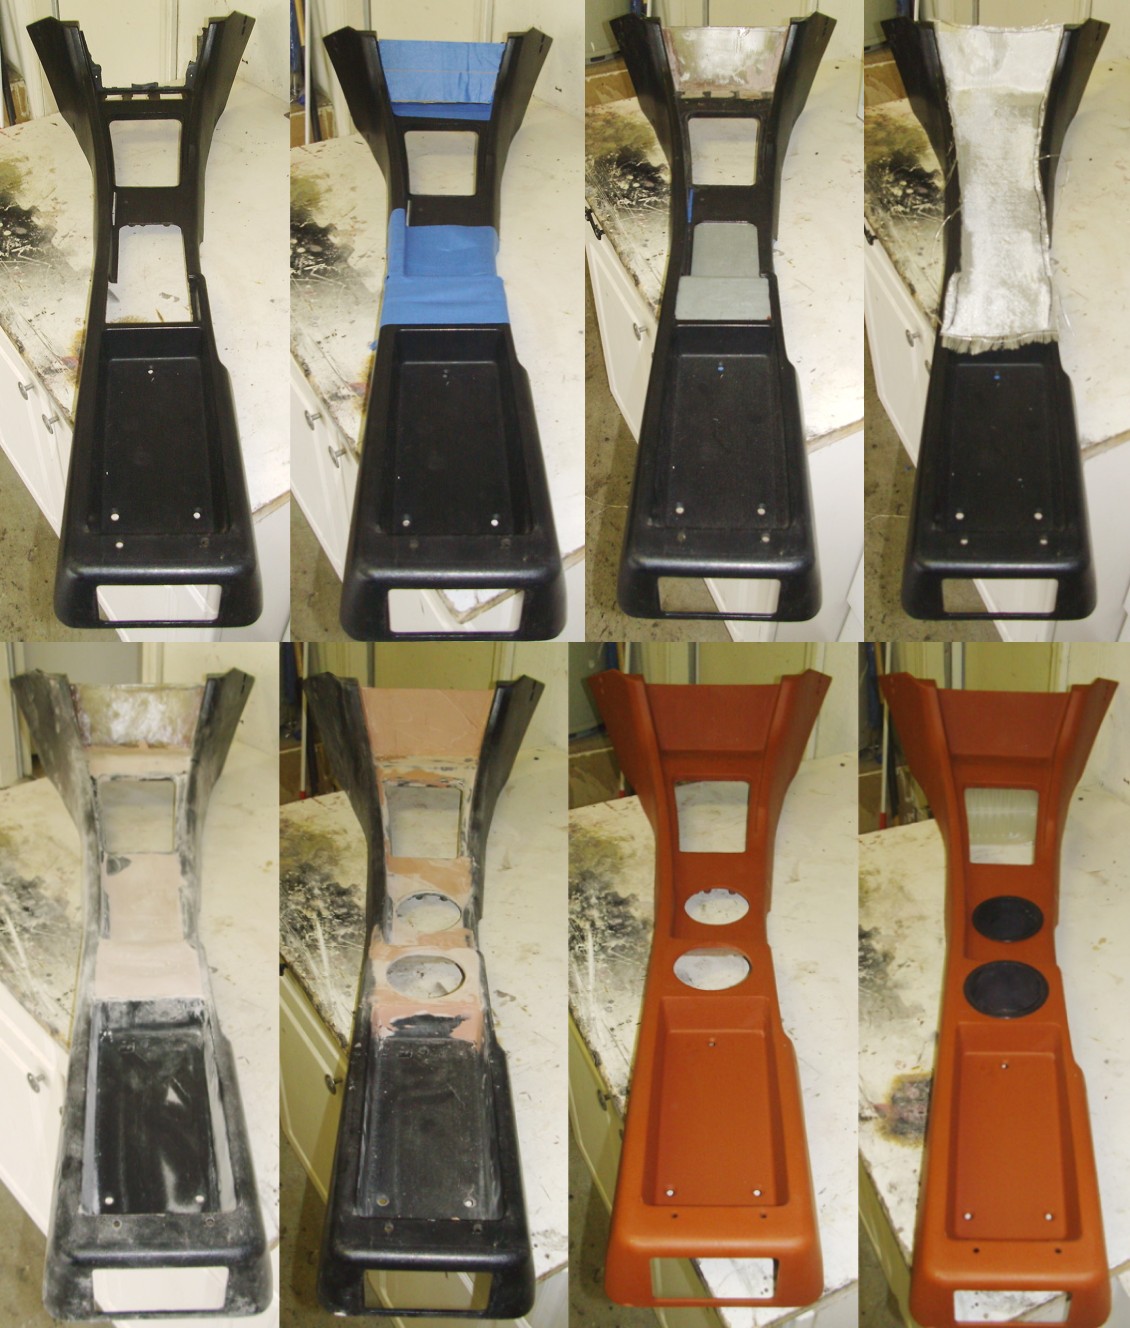
More Body Mods I'm still short on "cabbage" for parts. I don't want to loose the momentum I've build up in the last month, so I'll keep working on the little body mods that don't cost much in materials. The lower round vents on the bonnet aren't deep enough for my taste, so I spent a little time this last weekend extending them. The process was pretty straight forward. I taped an empty plastic potato salad bucket inside the vent to form a mold. I wrapped cloth fiberglass strips around until I got the thickness I wanted. I'll trim them at the back and shape / blend the front openings later. I've changed directions a couple times on the fuel door/filler style. Originally I was going with the Le Mans style (read, expensive) gas cap, so I installed the optional fuel filler pocket. Then I found a nice filler cap, at the wrecking yard, from a Jaguar that was far more cost effective. But after a while, the size and style just didn't seem right. The next incarnation consisted of a plastic door/pocket assembly from a '90 Miitsubishi Eclipse. It's contours are very close to the curve of the VR's fender mount location, and for the longest time I thought this was the way I was gonna go. So I trimmed out a nice big hole in the fuel pocket to accommodate Mitsubishi door assembly. But I want something in chrome or polished aluminum to match the door handles and the trunk latch and hinges. Turns out, the "chroming" process for the plastic makes the final product almost as expensive as my first choice. If I'm gonna spend that kind of money on such a detail, I'm gettin' the real thing. So, I filled the hole in again. Guess I'll just bite the bullet and spend the money... that is if I ever scrape it together.
-
Hi 89stanger, Same town. If all goes well, you might see it around town this summer.
-
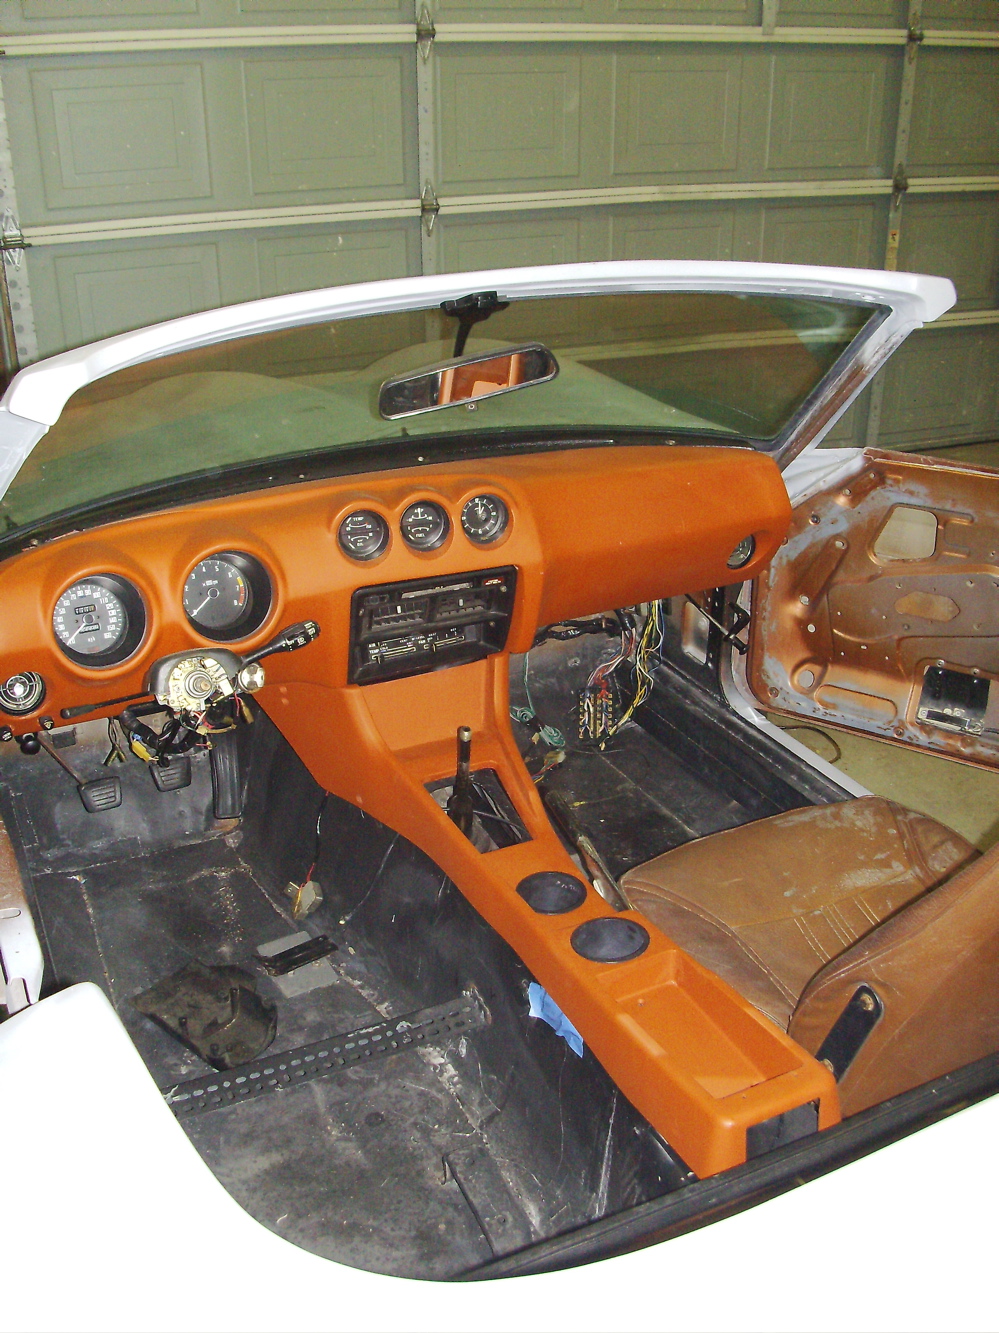
Until I'm ready for sound, I'll leave that area blank. Hoping there's enough room for a small nav screen maybe. No design ideas yet for the door panels. I like the look of the original Z panels well enough, but I think I'll go with something a little more custom, since mine basically fell apart during removal.
-
Don't need an ashtray... but who can go anywhere without cup holders? The interior is coming back together nicely.
-
In the living room? !!! I can tell how that would turn out at my house... ...DIVORCE!!
-
Sunny Z, I'm very interested to see how the Plasti-dip turns out. I like the idea of a rubberized finish, especially with my project being a roadster. Are you concerned at all that the thickness of the product will still allow room to reinstall the gauges? Mine were very tight even before adding any filler.