inline6
-
Posts
483 -
Joined
-
Last visited
-
Days Won
7
Content Type
Profiles
Forums
Blogs
Events
Gallery
Downloads
Store
Everything posted by inline6
-
Were both of those aftermarket?
-
As a 16 year old, I used to get miffed when a shop wouldn't allow me to buy parts and have them install them. With lots more years behind me and the wisdom of traversing through them, I realize that only when it is possible to determine they are "white boxed" original suppliers to OEM, or high quality from proven track record, do I use them. Wrong metallurgy and or specs and aftermarket ball joints can wear out in 7000 miles for sure.
-
I was instructed by David Weber of Malvern Racing never to run the plastic spacers with o-rings. According to Dave, the carbs have to be "isolated" from vibrations to work properly. He told me to run rubber isolators. These use gaskets instead of o-rings. No leakage issues are another benefit. Here is a pic showing them between the carbs and the manifold:

-
I chased shimmy problems in my Z on and off for several years (shimmy was always there, but efforts to find it were "on and off" ). I replaced tires, wheels and tires, rebalanced several times, new compression rod bushings, new inner control arm bushings... I even rebuilt a good steering rack with all new factory parts including new inner and outer tie rod ends. Still had the problem. I even messed up said rebuilt rack because the rack gear and pinion wore at dead center because of the continued shimmy, before I found the problem. In the end, I replaced the only components that hadn't been replaced... the lower ball joints. I hadn't replaced them before then because they were the newest parts on the front end when I bought the car. And sure enough, they were the problem. They were aftermarket. Even though the boots were good and the outside of the joints looked fairly new, the joints had worn. I put new OEM joints on and haven't had a shimmy since. And by the way - for some reason that speed range ~45 is tell tale. If your shimmy goes away again at 50 or 55 and you are smooth above that - I would suspect the ball joints big time. G
-
I'll let you conclude things with abdi first. If that should fall through, I have what you are looking for. Diff is indeed a 4.38 with K on the top of the case.
-
bump
-
Pretty sure I have one. Got it from an import salvage yard - pretty sure it was from the front of a Nissan pickup. I'll snap some pics and get back to you.
-

Anyone know of a running 3.35L LD28 (gas powered)?
inline6 replied to inline6's topic in Nissan L6 Forum
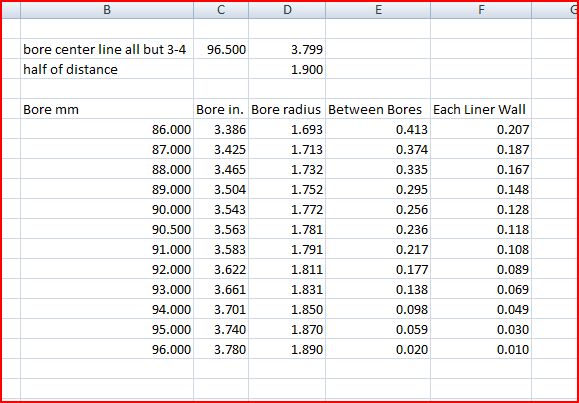
My bad - I recalled the wrong info from my spreadsheet. You'd have to bump the bore to 91 to get to 3.512 liters, which may be possible (with ductile iron liners). I think 90 is more doable, when looking at bore spacing info:
-
Anyone know of a running 3.35L LD28 (gas powered)?
inline6 replied to inline6's topic in Nissan L6 Forum
These are the exact specs I have been investigating as of late - with 6" rods. Ends up being a 3.5L. Though, we are thinking of having custom liners (press fit) with o-rings made - the LD28 block will be machined to fit. As a next step, either an LD28 block, if I can find one near my engine builder, or my "holed" N42 will get some test machining... I may still have to go with a standard deck height engine, but at least I have a good N42 that will take 89 mm bore (possibly a 90 mm also) without issues on hand. Rod gets much shorter if I have to go that route. Billet crank will be procured regardless of final direction. -
Let me know if you have one and obviously what you want for it. Need it shipped to Danville VA Thanks for your help. Garrett
-
Anyone know of a running 3.35L LD28 (gas powered)?
inline6 replied to inline6's topic in Nissan L6 Forum
Why braze and stress relieve? How about just machining out the bores completely... and installing custom liners as is done in a lot of modern aluminum blocks? But also keeping the closed deck? -
Anyone know of a running 3.35L LD28 (gas powered)?
inline6 replied to inline6's topic in Nissan L6 Forum
Awesome amount of work (and money) you've got in that car of yours - I looked through a bunch of your pictures. Very nice! What kind of transmission are you running? With the standard deck height, I'm guessing you have about a 5.4 inch rod. The bore on the dyno sheet is listed at 3.5" (89 mm). So the stroke has to be 90 mm to get 3.359 L. Still looking for anyone out there with an LD28 "tall block" with similar bore and stroke but with a 6" rod... -
Anyone know of a running 3.35L LD28 (gas powered)?
inline6 replied to inline6's topic in Nissan L6 Forum
The engine Les' built for the green hornet car utilized an N42 block. That is my assumption based what I gather from searching the forums, yes. The LD28 block has gaps for coolant to pass between all bores. That bit of info, and comments about several sonic tests seem to make the case that the cyl. walls do not share the same OD as the N42 or F54 blocks. -
Anyone know of a running 3.35L LD28 (gas powered)?
inline6 replied to inline6's topic in Nissan L6 Forum
Sorry, typo'd the title - meant to say 3.35L. This Rebello video makes reference to a "tall deck" block/engine. The stock V07 crankshaft per Dave is "with a shorter stroke" than the Brian Crower crankshaft... And the longer of the two rods in the video is about a 6 inch rod. The block is likely an LD28. So, from the various comments in the video, it appears the engine being built was a 3.35L, with a 6" rod and a custom billet crankshaft with a stroke longer than 83 mm. So, who has one of these? -
Curious if anyone knows of one of things in actual existence. Rebello calls it a "tall deck".
-
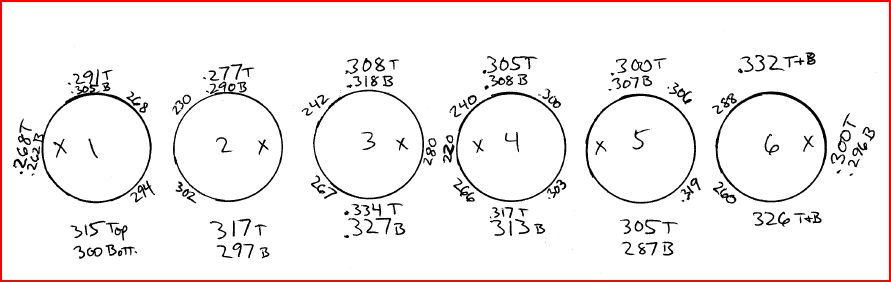
One of my two N42 blocks has been disassembled and sonic checked. Here are the results. "x"s mark exhaust valve location. The "T" measurements are top of the bore and "B" are bottom. The thinnest measurement was on cylinder 4 where coolant flows between cylinders 3 and 4. The measurement there was .220". There is also a spot on cylinder 2 that was .230". We're looking to bore out the block to 89 mm. To do so, we have to take .059" out of the cylinder wall all the way around. So, at the thinnest point, we could be at .220" - .059" = .161". And at the .230", we'd be at .171". My engine builder recommends going no lower than .180". My recollection of the guidance from several here on hybridz is for normal aspiration (NA) going no more than .125". I have read that some have had to check 4 or 5 blocks before finding one that will take an overbore to 89 mm. If the .125" guidance is acceptable, and our measurements are correct, it seems this block would be good for 90 mm. It seems that I have gotten lucky with the first of the two blocks. If we offset bore cylinder 4 directly toward cylinder 5, we should be able to end up with .170" (.010" offset) or ,180" (.020" offset), but perhaps that is not necessary?
-
If you can dig up or recall any further which Ford, let me know. I will certainly will look into that.
-
Well, that's going to be too much I think. I have a tally on the new engine and new safety equipment that is already around $15k, and I'm sure there are some less expensive options in this case that will work. Thanks for the info though.
-
Is http://www.vistaproauto.com the place? Have any build spec details?
-
I am looking to see if there have been any new developments/options regarding radiators for our z cars. I found the following: KoyoRad makes radiators for the Z These are all aluminum, and available for around $300 or so. Then there is the Stealth Conversions option. They discourage using all aluminum radiators outside of race car applications. What are you folks who are running greater than 300 hp using or wanting to use when you get around to your next upgrade?
-
There is a lot to be said for this... a very well designed package that is backed with success in the real world. That said, here is my reasoning: My personal preference... I like the sound of our venerable L6 when it is revving at 7700 more than when it is revving at 7000. I have the Sunbelt cam, springs and retainers in my possession... which is to say I have a sunk cost of upwards of $1500 USD in camshaft related hardware (cam, springs, retainers, rockers) that if sold would be lucky to fetch 1/2 of that. I like the engine characteristics with the Sunbelt cam. It was streetable enough... had a lope at idle, and revved easily at the high end, all of which, I like. Though with the 3.3 L displacement vs. the 2.9 L I had before, my understanding is that those characteristics would be altered a bit. With my current transmission, differential, and rear tire size, the 7700 RPM works well to keep engine operating range in the torque/power making rpm zones for all gears I would use at the track: Though again, this transmission will have to be a short term solution as the torque output is too high for it over the long term. However, I have been given a lot of info outside of the forums that I am still processing.
-
I found these two places - BHJ lists the Datsun L6 application at $868. http://www.bhjproducts.com http://www.ccaracing.com Anyone know of other available options? I've also read of some who apparently bored holes through sacrificed cylinder heads.
-
Seeing dowels installed in the cranks in the "How to Modify Your Nissan/Datsun OHC Engine" book by Honsowetz years ago, I thought their only purpose was to aid more strength to keep the flywheel from sheering off. Now I see what else can happen if you don't have them, so I'll be sure to add them to the next build.
-
You are wrong to relegate me to one of those who has grasped onto a paradigm that the L6 can't rev safely beyond X. I am well aware of your L20 powered car (have commented in the past on such) and others who have revved various displacements of the L6 well beyond the "7200", "7500", "8000", etc. so called "limits". I don't have enough time outside of work, or a staff of minions to do my bidding, or the desire to spend the potentially couple of tens of thousands of dollars (on engines and test equip, further ed., etc.) it would take for me to learn first hand what others (who, to my knowledge, are not competitors BTW) already know. If I did have those things, I would do/utilize them. To be clear, it is not an inability to get off my ass, nor is it that I am lacking in brain capacity. Instead, given the constraints I do have, I believe it is wise to seek the commentary/advice of those in this community who are more knowledgeable. This piece of what you had to say was valuable: The L28 has no practical limitation, and the issues about 'dwelling' in the region on-track were already adequately addressed by John Coffey in his comments. John's comment was read, processed, and stored when he provided it - it was very helpful, specifically because it was a solution backed up via real world experience to an important issue I wanted to learn more about. I'll add to my knowledge in this subject matter area as I can. I'll apply it in the most judicious way I can for my particular application and hope it will lead to good results and good fortune. Along the way, I believe some others will get value from my efforts to share here also. You snicker at other's... because they have inaccurate information, because they have less knowledge in a given subject area, because you have a preference to be acerbic along with your teaching, or because of their misfortune, as you wish. Garrett
-
Hmmm. For the street? Will it be "soggy below 6(k)" per another one of your recent posts? I think you were specifically speaking of use in an L24, but how much different would this 8500 rpm cam be in a 3.4L? Different enough to be good for "on the street"? Just trying to understand because I'd really, really, like to use my Sunbelt cam in the 89 mm X 89 mm version with Honda rods for the bottom end (3.3 L). Toward that goal, I recently sourced a factory nos P90A with the bigger combustion chambers...