inline6
-
Posts
483 -
Joined
-
Last visited
-
Days Won
7
Content Type
Profiles
Forums
Blogs
Events
Gallery
Downloads
Store
Everything posted by inline6
-

Just started playing with Innovate LM-2 on Mikuni 44 2.9L stroker
inline6 replied to inline6's topic in Fuel Delivery
I started out thinking I could tune these carbs for "acceptable" AFR with full throttle application in 4th gear from 1200-7700 RPM... even with this big cam. Right now, I can't use full throttle at below 4000 RPM in 4th without a dive of the AFR to mid 10s along with experiencing what I perceive to be engine misfire. The taller the gear, the more prevalent this issue is. If I am in first, it isn't a problem. My understanding is that I am a still a long way from what I can yet achieve with these carbs (and my specific engine) from a tuning standpoint. But, yeah, I am starting to realize that I won't be able to achieve the original goal until I switch to the Tec GT and the TWM fuel injection. -
Just started playing with Innovate LM-2 on Mikuni 44 2.9L stroker
inline6 replied to inline6's topic in Fuel Delivery
I'd like to think I can figure it out, but I am wondering if my cam and my intake as well as cylinder head porting haven't made that too tall of task for the limited action of swapping out jets. I also could be experiencing some reversion... I'm going to try to get the AFR curve from 3500 RPM up to be "right" and then see where I am with full throttle dumps at 1200 RPM (that is as low as I go - it is my idle speed for this cam) up. -
Just started playing with Innovate LM-2 on Mikuni 44 2.9L stroker
inline6 replied to inline6's topic in Fuel Delivery
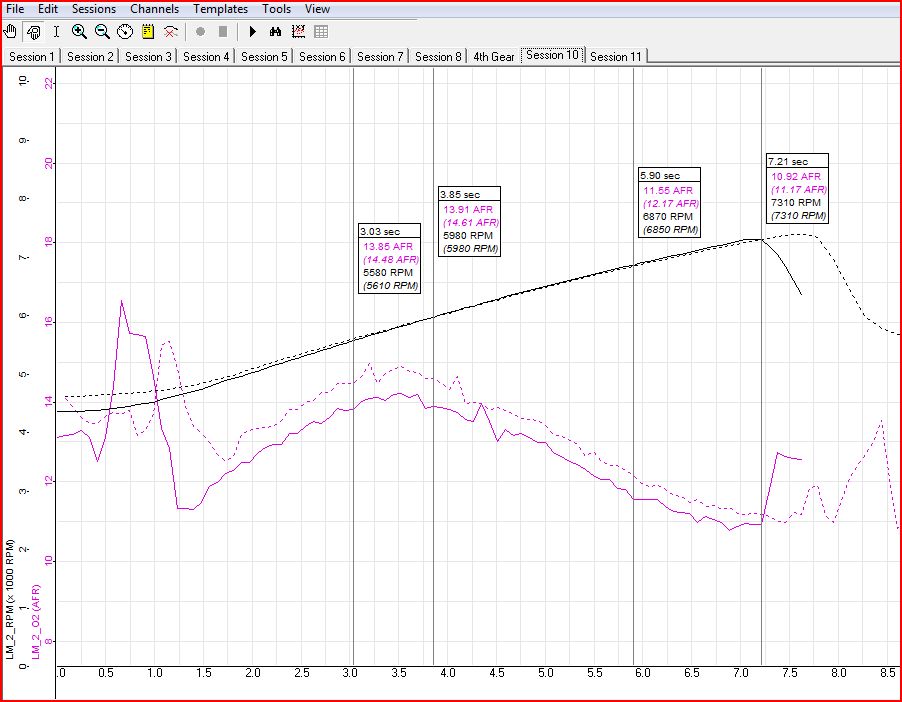
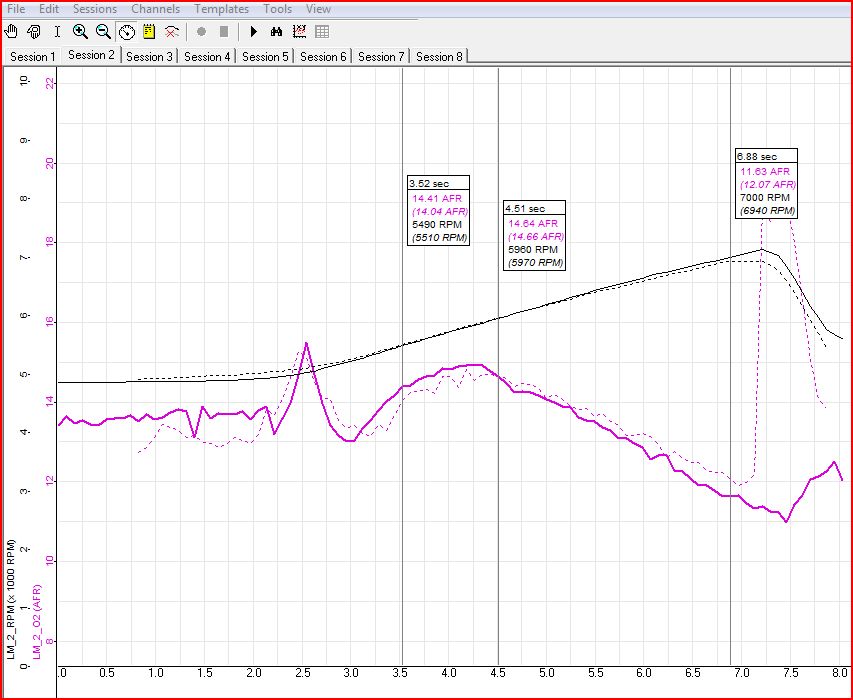
I was able to work on the tuning some more yesterday. I started the day with: Main 180 Air 250 Pilot 57.5 Pump 45 Choke 37 Last change was going from 240 to 250 air correction to try to produce a leaner AFR above 6700 RPM. Here is what actually happened - the dotted line is the previous run with 240 airs - the solid line is the current run with 250 airs, both are in 3rd gear: Interesting that the bigger air jet caused the range between 5300 and 6000 to lean out more while causing the range from 6000 up to get richer. Isn't that the opposite of what you'd expect? Because the AFRs were at or above 13 for all of the graphed RPM range except above 6600, I decided to try upping the mains another step to 185: The dotted lines are the 180s from the previous run. Only the mains were changed - again in 3rd gear. The AFRs were made richer across the test RPM range. Here is a comparison of two 4th gear runs. The runs differ only in that the prior run (dotted lines) had 180 mains. This run has 185 mains: Interestingly, when I went to full throttle on the 185 mains run, AFR didn't dive into the 10's as has typically been the case. I am more conscious of the problem, however, so it may just be that I am squeezing to full throttle over a couple of seconds instead of snapping to full throttle. Since going with the bigger 250 airs richened the top end and leaned what has been consistently the leanest RPM area on many plots, I'm thinking the next step will be to lower the airs to something like 230. My prediction is that my plot will flatten out - richer in the 5300 - 6000 range and leaner in the 6000 plus range. But first, I'm going to tighten up the manifold nuts. I may have some slight leakage at the header, and I want to be sure that is not the case. I'll do that and make a plot run. If nothing has changed, then I will change to the 230 airs and see what happens.
-
New Cam and Rockers - odd looking at 500+ miles
inline6 replied to inline6's topic in Nissan L6 Forum
Well... you are onto something there. Years ago, I had a Datsun 510 that I put a 490" / 290 cam in. I think it is in the How to HotRod your Datsun book that any lifts over .490" require the addition of an external spray bar for the l series 4 cylinders... (I don't feel like taking the time to double check the specifics right now). Anyway, I had the cam in the car and it was fine. But on a trip back home (college days) I spent some extended time at 100+ miles per hour, and when I got home I had one wiped lobe (around number 5 or 6). Tom Howen (friend and co-conspirator of David Weber of Malvern Racing Fame) put it in his "varsol" tank and shot the fluid through the cam bolt hole and observed the flow. It became obvious in an instant that the location of the oiling hole for the lobe that wiped was 180 degrees from optimum placement. So, on the new cam that went in, only one mod was made - Tom set it up in his mill and drilled straight through the oil hole in the lobe that had failed. Thus, that one lobe had two oiling holes, and the cam was unmodified otherwise from the previous one. I had no issues ever again - and I beat on that car mercilessly. So, you could absolutely "fix" a lot or improve things substantially by better placement of the oiling holes. That said, I do recall someone saying that oil "spray" from a spray bar in addition to cam oiling helps cool valve springs which will extend their life. FWIW. No, I haven't primed without the bar. And, I am not running a cooler, but I do have a competition pan from DP Racing. -
New Cam and Rockers - odd looking at 500+ miles
inline6 replied to inline6's topic in Nissan L6 Forum
I don't have a pic, but I do have a video showing it rather well. -
Just started playing with Innovate LM-2 on Mikuni 44 2.9L stroker
inline6 replied to inline6's topic in Fuel Delivery
Just came across this thread which discusses reversion. Kind of seems like what I am experiencing. Darn it. -
New Cam and Rockers - odd looking at 500+ miles
inline6 replied to inline6's topic in Nissan L6 Forum
Yikes! I am sorry that happened... it's disheartening when stuff like this happens. I did ditch the Nissan spray bar - I have a Rebello unit now. As often as I am taking off the valve cover, I think I'll be putting some red loctite on those bolts this very next time! -
Just started playing with Innovate LM-2 on Mikuni 44 2.9L stroker
inline6 replied to inline6's topic in Fuel Delivery
I don't know if I buy the argument that these carbs can't be tuned to work across the entire engine range. TonyD has repeatedly chimed in on many threads. He is saying that it can be done - it is just harder. From another perspective entirely, when folks go to the dyno, at the end of the day, they can typically take home some kind of chart that has a full RPM sweep with max torque and max hp. I'd have to concede that with my engine combo, I wouldn't be able to do that. I'd have to settle for a curve from like 4000 to 7700. I don't think I'm ready do that yet. Regarding too big on airs: per the Mikuni Service Manual, air correction jets affect "the flow of fuel mainly at medium and high-speed...". Because my AFR is dropping to low 12s or high 11s right now at the highest RPM range for this engine (6900 - 7400, with redline supposed to be 7700 - I just haven't gone that high yet), and larger air correction jets lean out the mixture, then I should actually be going with bigger air correction jets, not smaller ones to try to raise AFR a bit at this engine speed range. Hmmm... I don't know. As long as I can put more fuel in with "bigger" main fuel jets and with "bigger" air correction jets (speaking relatively here) and still achieve a "power" target AFR, then I should be making more power vs. "smaller" main fuel jets and "smaller" air correction jets, right?. Even if I do give up on tuning for full throttle at below 3000 RPM, I wouldn't go with smaller mains and airs at this point because my AFRs are not too rich at middle engine speeds. I mean, I am currently seeing above 14s from 5700 to 6500... and above 13s from 5400 to 6700. That is too high for good power. If I did go smaller, I'd experience lower total power output and probably an increase in fuel economy. But, that is not really the goal. Actually, I already did this while at the dyno a couple of weekends ago - with the caveat that the cam timing was off, I know. But, I changed the main and airs to be much smaller several times, trying to eliminate "rich" completely - trying to get to a "too lean" condition. Basically, as I went down in size, a "hump of leaness" became more and more prevalent in the mid-range RPMs, and I still was not able to get rid of the 10s at snap open throttle and low RPMs. You can see more detail about those runs on the dyno in this forum thread if you would like. Yes the cam was mis-timed, but I don't think that the general behavior vs. correctly timed would be completely different. In other words, if correctly timed, I believe the overall trends I experienced would be the same... just different RPM points would be in play. You may be right, however, I'm not willing to give up just yet. -
Just started playing with Innovate LM-2 on Mikuni 44 2.9L stroker
inline6 replied to inline6's topic in Fuel Delivery
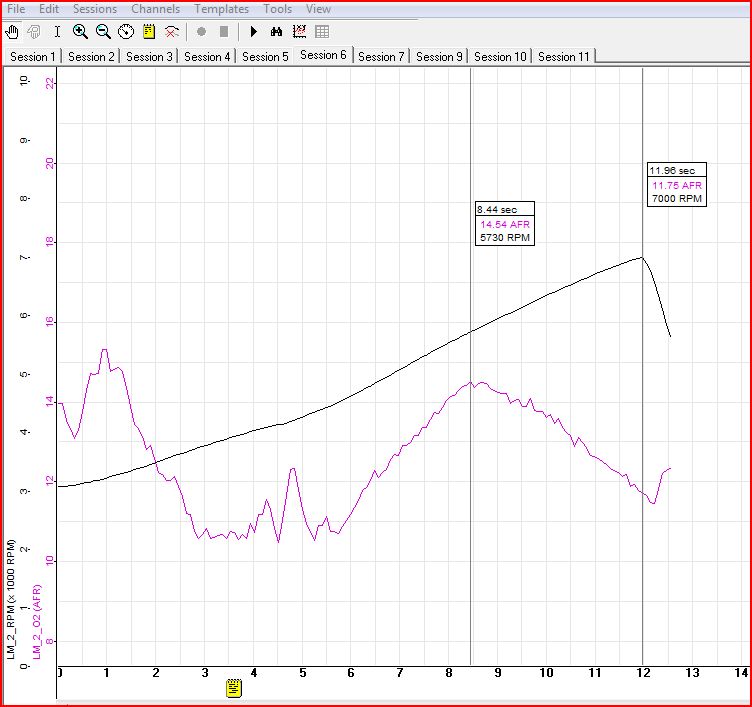
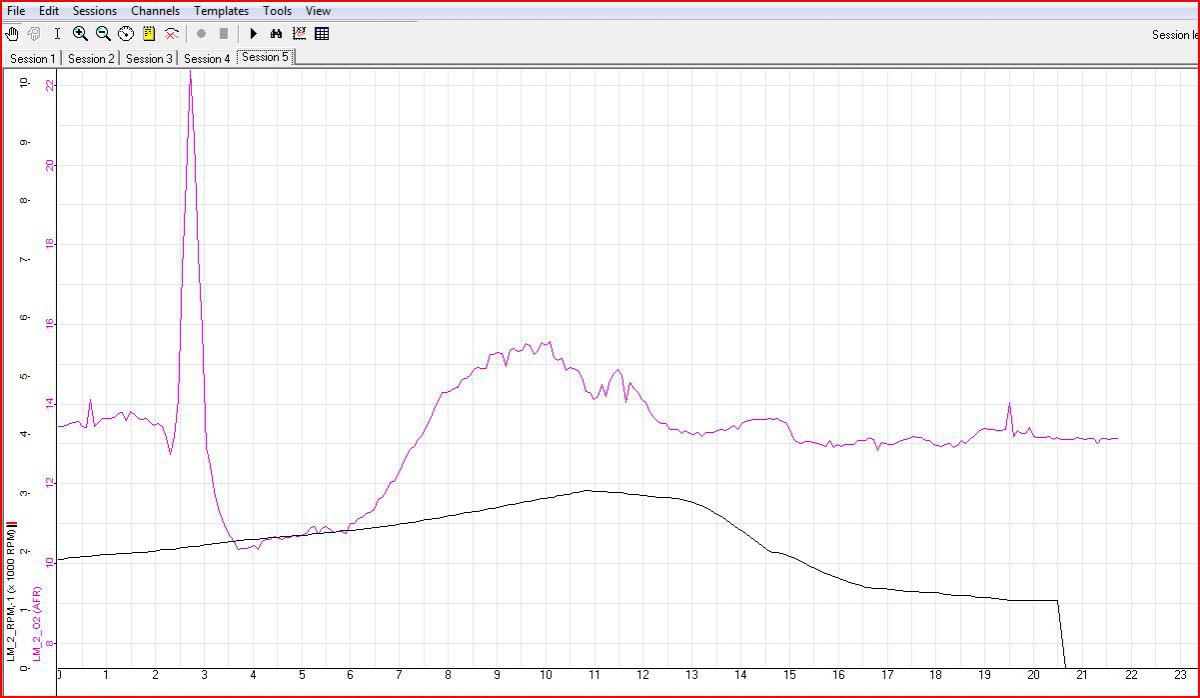
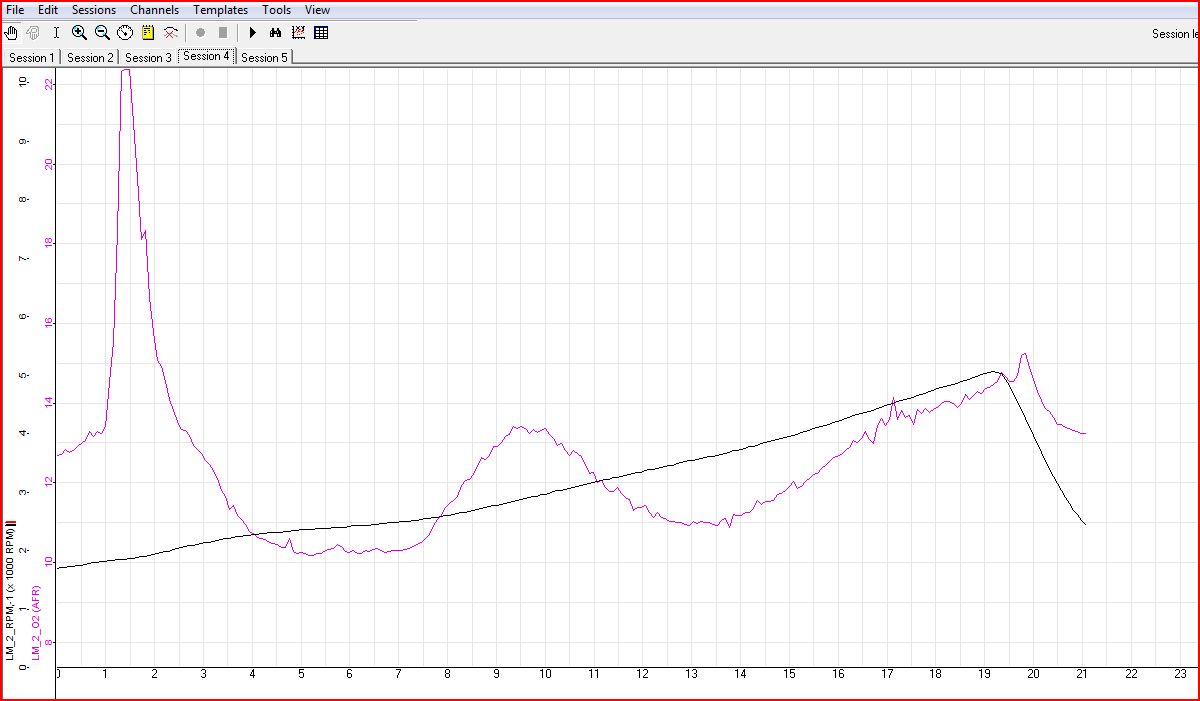
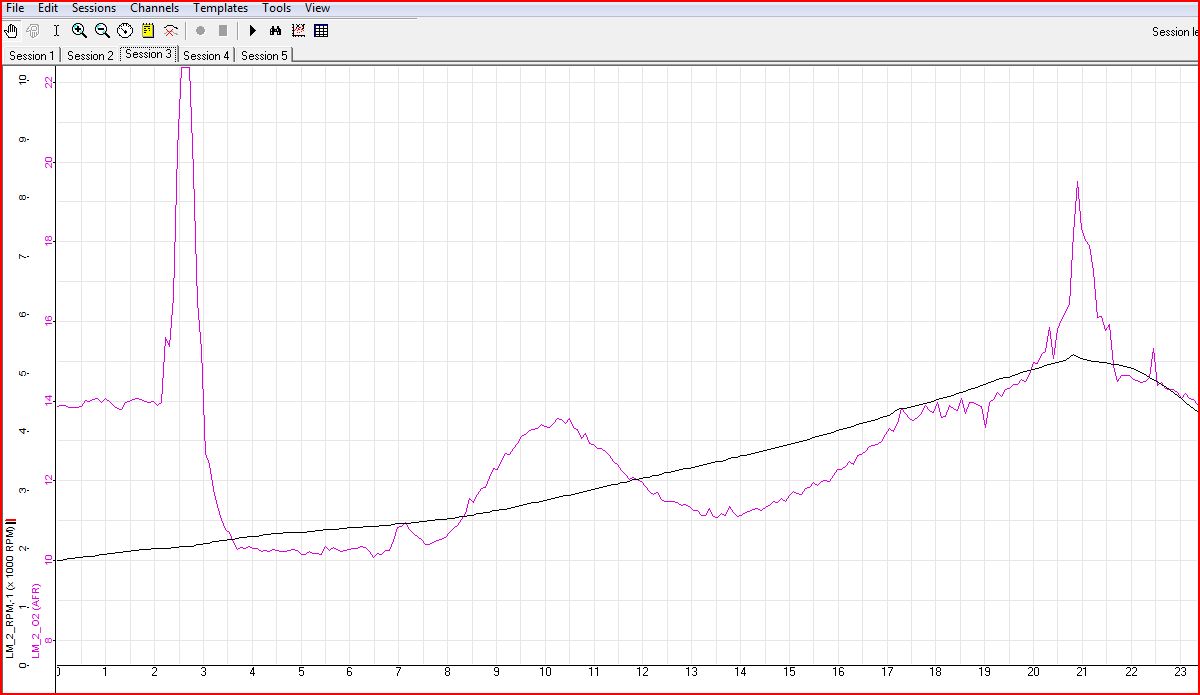
Ha ha! It's been two more years, and I am finally back to tuning. I've been through a ridiculous amount of hassle with the engine, but hopefully I am past all bad stuff. Those issues are detailed in other threads however. So... I've been reading and re-reading Mikuni tuning info in the forums and thinking about how these Mikunis work - at times with spare disassembled carb in hand. First, a description/re-iteration and some story telling of things using a hypothetical situation: I'm on the chassis dyno in 4th gear with the engine turning say, 2000 RPM. The throttle plates on the Mikunis aren't open much to do this, so the carbs are running entirely on the pilot circuit. The pilot circuit is drawing fuel from the same fuel source as the mains... up through the jet block holder - my Mikuni carbs have separate "pipes" for the pilots than those of the mains. Air for the pilot circuit is drawn from fixed diameter holes in the top of the jet block. Air and fuel are mixed together within the pilot jet. Downstream of the pilot jet, the air fuel mixture is traveling, again in a separate pipe. This pipe travels out of the jet block, along the top of the throat of the carb, crosses over top of 4 bypass holes on the front side of the throttle plate, and one more hole on the backside of the throttle plate. At 2000 RPM, with the throttle plate is open maybe 5-10%, there is no fuel/air mixture coming out of the auxiliary venturi. There is a high degree of vacuum in the manifold (9" mercury), as the throttle plates are near shut. The six pistons going up and down at 2000 RPM are causing some major sucking at the backsides of the throttle plates. This is drawing the fuel from the pilot system. The only fuel mixture feeding the engine is coming from the pilot screw outlet hole (backside of throttle plate) and perhaps some of the bypass holes (in front of the throttle plate). The pilot screws are set at exactly 1.5 turns out and the wideband AFR is showing 14.4 (air to fuel). Now, I slap the throttle to the floor as fast as it will go. The throttle plates jumps to wide-the-frick open. What previously was major sucking at the backsides of the throttle plates now becomes nearly no sucking at all temporarily (0" mercury). Without the sucking the pilot circuit goes basically dead... and a massive glob of air leaps towards the pistons - partly drawn by the pistons jumping up and down in their bores at 2000 RPM. Though it looks like a lean fire in the cylinders is imminent, there is also this stream of fuel that was launched from the pump nozzle right when I started to slap the gas pedal down. Per the Mikuni manual, once the throttle was open 30%, no more fuel was added to the pump circuit, but the stream (which is suspended in Matrix "bullet time" animation at the moment) will last as long as it takes for the fixed volume of fuel to pass through the hole size in the pump nozzle as dictated by the properties of physics (fluid mechanics specifically). This stream is meant to keep the flames alight when the glob of air gets into the combustion chambers... and until the separate and new supply (a guyser really) of air/fuel mixture can be mustered to come forth from the main circuit. Now... The main circuit is a bit different in design. There is basically this big, brass screw (jet block) in the jet block holder. At the bottom the jet block is another screw with a hole in it. This main jet is totally immersed in the gas within the carb float chamber. The hole meters the flow rate of the fuel from the chamber. At the top of the jet block is another screw with a hole in it. The air corrector jet is totally above the gas in the carb float chamber. The hole in the air corrector meters the flow rate of the air which comes from outside the carb body, through channeling in the float chamber cover and into the jet block area, above the fuel. At 2000 RPM, the pistons are jumping up and down, the stream of fuel slips into the glob of air headed for the combustion chamber. As the first bit of fuel from the nozzle gets consumed by the voracious pistons, they speed up a hair. Additionally, the pipeline of air from the cold air intake to the combustion chamber starts to get a move on. The part of this air that passes through the auxiliary venturi speeds up relative the to air around the outside of the aux. venturi. The air passing by a hole in the aux. venturi creates a "depression", which in turns "draws" on the main circuit. The fuel level in the float chamber is sitting a touch lower than waist high on the jet block. As the vacuum builds from in the aux. venturi, the "negative pressure" sucks the fuel higher within the jet block hole. Fuel travels through the main jet, then through 4 ovalized holes in the bottom of the jet block and works its way up around the sides of the jet block. At the same time, air is drawn in through the hole in the air corrector jet... down into the jet block. It exits via 8 small holes around the periphery of the jet block. These holes are above the correctly set fuel level in the float chamber. The main and the air corrector inputs work together to set the mixture of air and fuel that is drawn up high enough in the jet block hole to where it has reached the exit of the jet block holder hole - the pathway to the aux. venturi is downhill from here. We are nearly to the question of the post now - don't stop me, I'm on a roll! The guyser of fuel now enters the aux. venturi where it is met at 90 degrees by a screaming banshee of air. It smashes into the fuel constantly... turning it into a spray of bazillions of droplets. This new source of air/fuel mixture then makes its way to the combustion chamber. AND... wait for it... Upon first being consumed, the AFR turns sharply downward to around 10.8 (which causes me much stress, as well as washes away the nice protective layer of oil that should be on the cylinder walls). Now, I will admit that for this one run, I saw the 10s and let the throttle off the floor to allow recovery, but by 6.5 seconds I've been back into it, the pumps are outta the picture for sure. Jetting at the time was: Main 180 Air 240 (up from the 220) Pilot 57.5 Pump 40 Choke 37 This is really the opposite of what should be happening. What could cause the AFR to go very rich just after a full throttle snap-open situation such as this? One obvious answer might be "too rich, go smaller on main jet", but the rest of the run isn't indicating crazy rich at all. Another potential answer: "go smaller on the pumps". Well, the chart already is showing that upon initial throttle application, the mixture goes lean for about a second (centered at 1 second). Full throttle, not much depression to pull on the aux. venturis... a big cam that doesn't pull air through the intake a lower engine speeds... How does this translate to "hard pull" on the mains... providing an overly rich mixture? Here is another run a few moments later, also in third. I start at much higher engine speed to avoid the low speed, throttle dump problem. Pumps are done within the first second or so... the AFR climbs into the 14's from 5700 to 6400... then marches down to ~12 at 7000, where it levels off quite a bit. Sure doesn't look crazy rich in this rpm zone! Ideas? Could something be going on with the air supply channel - where the air correctors draw their air from? I am running a cold air box... I did remove the air filter for one of my runs on the dyno two weeks ago - it had no noticeable effect. Based on these charts, I've got 250 airs in the car, ready for the next run. That's where I am for now.
-
Here are the specs on the short block. The engine was to be a 3.0 stroker, but sonic testing the walls of the block revealed that we should only bore out to 88 mm and not 89 mm. The rods are about 8 mm longer than stock (but around 180 grams lighter) and the crank was offset ground (and lightened) to increase the stroke to 80.391 mm instead of the stock 280z's 79 mm... vs. the diesel crankshaft's 83 mm. Pistons are custom JE forged units to provide 11 to 1 compression ratio with the larger bores, longer stroke, and longer rods. Head is an E88 that has been milled over .100" to reduce combustion chamber size and to attempt to get "some" quench. If I had it to do again, I'd weld up the chambers and then make them custom to run with flat top, forged pistons... to get the 11 to 1 compression ratio. Cam specs are: Intake Seat duration 320 degrees .050" duration 290 degrees Valve lift with zero lash .565" Net valve lift .550" Exhaust Seat duration 315 degrees .050" duration 274.8 degrees Valve lift with zero lash = .565" Net valve lift =.550" This cam uses an unusual single valve spring instead of an inner and outer. The installed load is only ~ 60 lbs on the seat. At max lift, the load is only about 190 lbs. Max RPM is 7700. I am using titanium retainers. Carbs are Mikuni 44 PHH (sidedraft) with 37 mm chokes. Header is a Nissan Comp unit with 1 3/4" primaries...twin outlet to a merge collector, followed by a 3" custom stainless exhaust. Here is my engine build thread on hybridz if you want to read in more detail: Thanks!
-
I've been successful in working through a spate of problems... and for now, the new engine is running pretty well. When I got back from logging some Air Fuel Ratio runs, I captured a short video of the new engine sound. Sorry the sound quality isn't great - I think a lot of reverb is coming from being in the garage, but the picture quality is nice The cam is a Kinetic Sunbelt grind. Exhaust is 3" with two round mufflers, one in the tunnel and one at the back.
-
Well... I found a big problem... Last Sunday, I decided to verify that the vacuum advance was working correctly. I disconnected it and ran the engine with a timing light, and was surprised to see very little movement. I decided to take apart, clean and lube the appropriate areas of the advance mechanisms in the distributor, as well as verify the vacuum advance was working. Afterwards, I was amazed to see that it did make a difference - I got a few more degrees of ignition advance from it. I reset the timing to only provide a max of ~ 34 degrees BTDC. After doing this, I took the car for a short drive. The engine was making a fair amount of noise... It had been since I took it to the dyno, and while I had been trying to say it was just my imagination, I decided it really wasn't. It really was making a lot of noise and it sounded like it was coming from the valve train. I checked the cam and rockers... everything looked great. I checked my valve lash, and found several to be .4 mm which is like 16 thou, so I tightened all of them up to .012". When I started the car, the noise seemed even louder, if that is possible. I ran it less than a minute. And, I shut it down in disgust. Not knowing what was messed up, I decided to do a leak down test. I got percentage loss for 1-6 of: 4,5,3,2,2,4. I then tried to see inside the spark plug holes to examine the bore walls. I saw a vertical mark or two, so I decided to buy a "borescope" and take a detailed look inside the bores. That cam on Thursday, and with it I was able to see quite a bit more. And what I did see looked like shiny have moons in the exhaust valve reliefs on the tops of about 3 of the pistons! That got me thinking... valves hitting pistons would cause LOTS of noise. And just before I took the car to the dyno, I had removed the Kameari cam chain tensioner to check into some unusual noise it seemed to be making. It turned out to that it just wasn't quite tight enough - there was nothing wrong with it. But, maybe I screwed up the cam timing when I took it off? A check of my cam timing was next. I was able to find the time to do that today... and sure enough, it was wrong. My timing chain had slipped one tooth on the crank sprocket when I was messing with it. That retarded the cam 18 degrees, (20 tooth sprocket - 360 degrees), however my adjustable cam gear is set advanced by 3 degrees. So, the net amount it was retarded was 15 degrees. And in that state, I went to the dyno last Saturday! Again using my Borescope, I ran the camera down the front cover of the engine. I was able to jiggle the chain to change it's position on the crank shaft and verify it with the camera. With the marked lower and upper timing chain links aligned properly with the lower sprocket and the cam gear, I started the engine. And the "clacking" - the noise was gone. Go figure, huh? I took the car for a brief spin tonight and MAAAAAN, what a difference. The power is soooo much better. And, I am not sure why, but the AFR's are much improved at lower RPM and heavy throttle inputs. I even tried what before would produce 10's, and could not! Next tuning session will be interesting. When I got back, I did another leak down test. This time the engine was warmer, and from 1 through 6, I got percentage losses of: 3,4,3,4,2,3. Now, I will get back to tuning. Hopefully, no problems crop up in the coming days or weeks related to the valves hitting the pistons. We shall see.
-
Yes, that makes alot of sense. It is just half a millimeter, but I had a few thoughts about this. First, siphon action is what delivers the fuel to the auxiliary venturi. Logically, a "very low" level of fuel will require more siphoning "action" to pull the fuel than a "very high" level. I'm guessing that siphoning action difference between these two different levels can be compensated for via changes to the jetting, but I do not know this. When I attempted to set my fuel level to the Honsowetz spec, I actually used a section of wire that was .815" instead of .826", because my attempt to mark it was a bit off. That resulted in a fuel level that was .032" "high" vs. the .847". It is still within the +/- 1 mm range in the manual, but given the problem I'm having, I'd rather be on the low side than the high side. In my particular circumstance, I am experiencing AFR's in the low to mid 10's across a very wide range of main fuel jets. Right now, with main fuel jets of 130s to 180s, I get 10's when I apply fuel throttle at low rpms (I do this in such a manner that I can rule out the pump nozzles being the culprit). So, my "high" fuel level may not be part of my problem, but I'm going to set the level to ~ .847" below the jet hole surface, and see if it helps the problem I am having at all.
-
I am working through my Mikuni tuning issues... and I think I found something that anyone still messing with Mikuni's and who is using Honsowetz's How to Modify your Nissan/Datsun OHC Engine should know. On page 112 and 113, it says: "To check fuel level without disassembling the carburetor, remove the jet cover - center top of the carburetor and remove one jet block. The fuel level should be visible in the jet-block hole. The recommended fuel level is 0.826-in. (21mm) below the float chamber top surface - horizontal surface at the top of the jet-block hole. This directly relates to a fuel level that's 0.787-in. (20mm) above the horizontal center of the throttle bore on 50mm and early 44mm models and 0.940-in. (24mm) above the throttle bore on later carburetors." My Mikuni PHH Carburetor Manual has a drawing (Fig. 3) on page 3 that shows the fuel level in the carb body. It does indeed indicate that the fuel level should be 24 mm +/- 1 mm (this is for 44 PHH - the dim is 24.5 +/- 1 mm for 40 PHH) above the horizontal center of the throttle bore. However... I have a 44 PHH carb body in my hands at the moment, and measuring with a caliper, I am coming up with a different measurement than published in the Honsowetz book. On the front face of my carb, between the two throttle bores, there is a step in the casting right at the throttle bore horizontal center. This makes for very easy measuring. From that step ("the horizontal center of the throttle bores") to the "float chamber top surface", which is also the same surface at the top of the jet-block hole, I measure 1.792". Now... If 24 mm, when converted to inches, is 0.945", then the recommended distance to the fuel level below the float chamber top surface should be 1.792" minus the .945". So, the distance down to the fuel should be 0.847". In other words, instead of using 0.826" for the measurement from the jet-block hole down to the fuel level, I should be using 0.847" Can somebody else confirm this? Interestingly, I have the jet block holder... and an OA jet block in hand also. With the jet block installed in the holder, the jet block stick up .285" inches above the jet block surface. If I add the .285" and the .847"... I get 1.132" which sure looks to me like it puts the float level exactly in the middle of the "fat" barrel portion of the jet block - the part that is widest in between the 4 elongated, lower holes in the jet block and the eight round holes above.
-
Well... Only because I've never come across anyone running mains and air correctors that far apart, I guess. Recently, I came across some guidance that when you are just looking for a starting point, use air correctors that are about 30% higher than the mains. Since I appear to be not even close... I kinda was following that. 140 Main 220 Air Corrector, and move the pump stroke from middle hole to lowest hole... that is what you are suggesting I try? Electromotive TecGT and TWM throttle body setup with fuel rail, injectors, and even a custom harness for a z car is sitting in a box in my garage... But, I am trying to learn something about these Mikunis... After I struggle with them and live with what I am sure will be lots of compromise, I will switch and I will love fuel injection.
-
Engine is basically a 3.0 stroker... only it is 88 mm bore instead of 89 which makes it a 2.933. Comp ratio is 11.15:1. Running on 93. Cam is big: Intake Seat duration 320 degrees .050" duration 290 degrees Valve lift with zero lash .565" Hot valve lash .015" Net valve lift .550" Exhaust Seat duration 315 degrees .050" duration 274.8 degrees Valve lift with zero lash = .565" Hot lash = .015" Net valve lift =.550" Cam currently Advanced 3 degrees (101.5 ICL) Porting and polish done to both the head and intake.
-
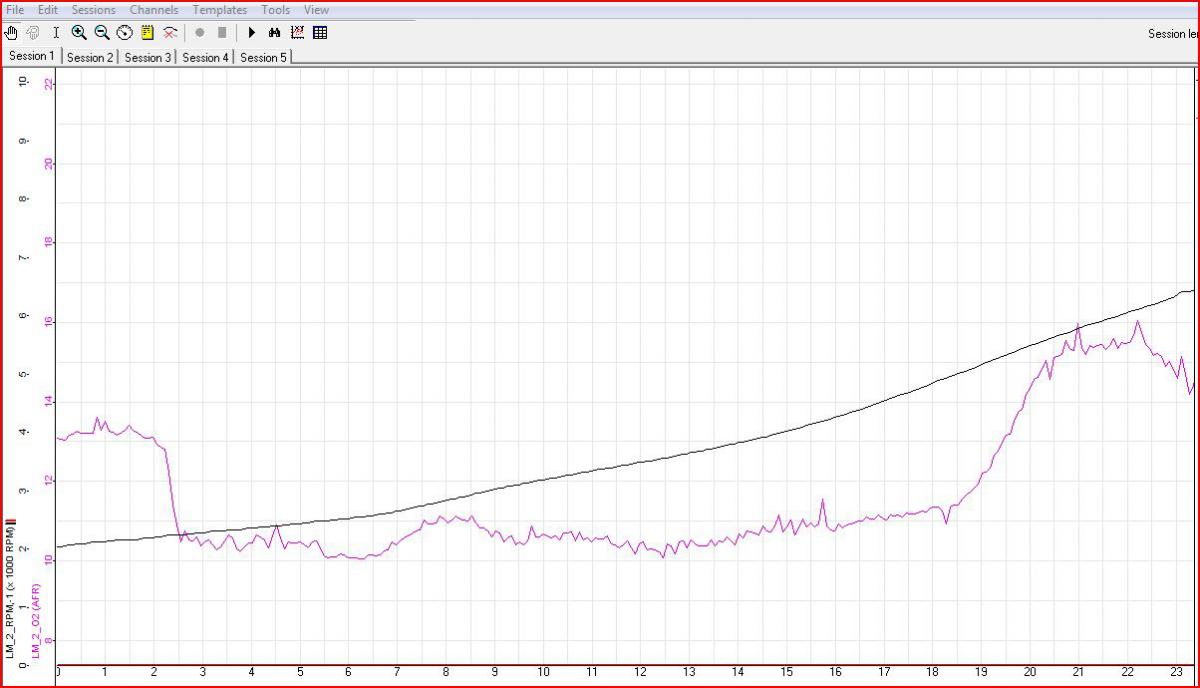
Well, I did my first ever attempt at tuning on the dyno today. Unfortunately I am baffled by the engine behavior I saw. First, some basics: All floats have been checked, checked again, and triple checked. The last method I used (Honsowetz book) was marking off .826" on a length of wire, removing one jet block per carb, and sticking the wire down the jet block hole. The fuel "jumps" to attach to the rod when it touches. The .826" measurement is from the fuel level to the jet block hole surface. My floats are set correctly within .020" of the specified measurement. Ignition is a Crane Hi 6S and is triggered by a Crane optical trigger in the distributor Distributor is a Nissan Euro unit with a functioning vacuum advance Timing verified to be no more than 34 degrees advance. Initial advance, if it matters is about 17 degrees at "idle speed". Fuel pressure is below 3.5 and above 3.0 psi. Initial jetting was determined by doing mainly half throttle pulls in 3rd and 4th on the street. I attempted full throttle pulls, but the LM-2 would show low 10's AFR when I "dumped" the thottle (even several seconds later). Initial jetting: Main 180 Air 240 Pilot 57.5 Pump 50 Choke 37 I didn't want to be at 10's for extended periods of time. Rather, I figured, I'd be able to find the right combination when I took it to the dyno. So... Listed below are the changes that I made in order to attempt to get the mixture somewhere close. I did all runs in 4th gear. The dyno operator told me that once I was in fourth, to snap it to full throttle and hold it to redline. From my prior experiences, I figured it the AFR would drop down to the low 10's and struggle to do anything... but what the hell. Once in fourth, I was around 2000 and went full throttle. The AFR dove to low to mid 10's. The engine struggled to build RPM. It felt like it was mis-firing ... Eventually, the AFR climbed up and out of the 10 zone... and the engine ran well for a short range of RPM... I'm guessing around 4000-6500 RPM, but RPMs were not increasing very rapidly above there, and I there were a few misfires, so I let out. Unfortunately, my LM-2 plot wasn't any good for this run. The dyno operator told me to make it less rich. Next, I went with: Main 170 Air 230 Pilot 57.5 Pump 50 Choke 37 Once in fourth, I was around 2200 and went full throttle. The AFR dove to low to mid 10's. The engine struggled to build RPM. It felt like it was mis-firing ... Eventually, the AFR climbed up and out of the 10 zone... and the engine ran well for a short range of RPM... I'm guessing around 4k-6k, but rpms were not increasing very rapidly above there. Unfortunately, my LM-2 plot wasn't any good for this run. Given essentially a repeat performance, I was told to make it less rich. Next, I went with this: Main 160 Air 210 Pilot 57.5 Pump 50 Choke 37 Once in fourth, I was around 2200 and went full throttle. The AFR dove to low to mid 10's. The engine struggled to build RPM. It felt like it was mis-firing ... The AFR climbed up and out of the 10 zone... not achieving a 12 AFR until 5150 RPM. The engine ran well for a short range of RPM... Looking at the plot from the LM-2, I'd say 4000-5500k RPM. RPMs were not increasing well above there, and the AFRs were going higher than before... into the 15s, so I let out. We were pretty confused as to why the changes weren't making a bigger difference. In an attempt to try to go too lean, I went with this next: Main 140 Air 210 Pilot 57.5 Pump 50 Choke 37 Once in fourth, I was around 2150 and went full throttle. The AFR dove to low to mid 10's (stayed there about 4 seconds). The engine struggled to build RPM. It felt like it was mis-firing ... The AFR climbed up and out of the 10 zone. As the AFR got into the 11 range, the engine ran better. Looking at the plot from the LM-2, I'd say 2500-5100 RPM, but rpms were slow to build, and the AFRs after 5k going higher than before... well into the 16s, so I let out. Additionally, I note the presense of a midrange bump in AFRs centered at about 2900 RPM (look at seconds 6-10 in the plot) If we were confused before, we were baffled now... as to why the changes hadn't elminated the dive in AFR to 10's when transitioning to full throttle. Because we had tried lowering the main and air jets many times and didn't see the kind of change that we expected, I started thinking that there must be a completely different problem... outside of the main and air jetting. Even though I knew the pumps only are a factor briefly in these running conditions, next I changed the pump nozzles from 50's to 35's to see what would happen. Main 140 Air 210 Pilot 57.5 Pump 35 Choke 37 Once in fourth, I was around 2000 and went full throttle. The AFR dove to low to mid 10's (stayed there about 4.5 seconds). The engine struggled to build RPM. It felt like it was mis-firing ... The AFR climbed up and out of the 10 zone. As the AFR got into the 11 range, the engine ran better. The midrange bump in AFRs is still there and in the same spot (2500-3200 RPM). With the 35 nozzles however, now a lean spike has been introduced when going to full throttle. Continuing with changing something other than main and air jetting, I began to think maybe there is a lack of air flow. Though the air filter and cold air tubing seemed adequate, I thought I would remove the air filter next and just see if it made any difference. Removed K&N air filter Once in fourth, I was around 1800 and went full throttle. The AFR dove to low to mid 10's (stayed there about 4 seconds). The engine struggled to build RPM. It felt like it was mis-firing ... As the AFR got into the 11 range, the engine ran better. Looking at the plot from the LM-2, I'd say 2500-5000 RPM, but rpms were slow to build again. Knowing that AFRs at the high end were going above 15, and seeing no substantial difference with the air filter off, I let out. The same behavior... including the lean spike by the 35 nozzles introduced when going to full throttle. Finally, just to use the remaining time, I did one last desperation attempt to go too lean. Next I ran: Main 130 Air 190 Pilot 57.5 Pump 35 Choke 37 Once in fourth, I was around 2000 and went full throttle. The AFR dove to mid to 10's (for about 2.5 seconds this time). The engine struggled to build RPM. It felt like it was mis-firing ... The AFR climbed rapidly and was hitting 15s before I even got to 3k RPM, so I let out. I'm not sure where to go from here. I'll be studying these plots, my previous tuning attempts, and think about how to proceed.
-
I'll be sure to post. By the way, my car is HLS30 - 16511. Yours and mine were made pretty close together in the same factory about... 45 years ago.
-
So, quoting from the article, this seems to be the reasoning for why during the intentional ignition misfire, the pre-cat O2 is showing rich spikes: "The O2 sensor is made up of two platinum thimbles (one exposed to the atmosphere, the other to the exhaust) separated by a solid zirconium dioxide electrolyte. The exhaust thimble, being made of platinum, is a catalyst much like a catalytic converter. If excessive CO or HC is present in the exhaust, it can be catalyzed on the thimble, using up the oxygen next to the thimble and causing a low-oxygen (rich) indication despite the fact that a high-oxygen content exists in the exhaust. This explains the mysterious rich O2 indication in my April 2000 column on using pre- and postcat O2 sensor readings to predict ignition vs. fuel sensor failures." Interesting. This is followed a bit later by "In its normal environment, the O2 sensor is very accurate at measuring exhaust oxygen levels, thereby making an accurate assumption of fuel mixture. Outside of the normal range, however, the O2 sensor’s response can be somewhat unpredictable, rendering its assumption of oxygen content and fuel mixture unreliable." I am thinking engine misfire from a lean mixture is an event similar enough to the above intentional misfire test... I am going to spend 2 hours on the chassis dyno this Saturday! Should be quite informative.
-
I've been doing some tuning of my Mikuni 44 set up as of late with the assistance of a wide band o2 sensor, and I have learned a few things that may be helpful to some others. Generally, I recommend determining these in the order listed: Pilot Screws: One bit from Honsowetz in the How to Modify Your Nissan Datsun OHC Engine which is a very specific instruction: run your pilot screws 1.5 turns out. I have mine set at 1.5 dead on, and the engine likes the 57.5 pilots at that setting. AFRs are where they should be for idle and low speed operation. The engine runs well in both of these conditions. Mains (Fuel Jets) and Air Correction (Air Jets): This bit came from TonyD... and that is stay out of the pump nozzles when trying to determine what the engine wants for main and air jets. Accelerator pedal movement may engage the pump circuit and if it does, this will throw fuel into the mix from that circuit. This will "mask" what is happening with the main circuit and you won't know what is what. According to the Mikuni manual, accel pumps are in play from 0 to 30% of throttle. So use inputs like 50% or 100% and ignore where the 0-30% is most likely occurring. Since the pump circuit has a known volume... and the duration of the fuel "injection" from the nozzle is specific to each nozzle, you could time the length of the injection duration if you are so inclined. Then you could ignore that time duration (from throttle open) in your Wideband AFR (Air Fuel Ratio) plots. Pump Nozzles: This one came from my engine builder. Know that sometimes wideband o2 sensors/loggers may show you rich readings when actually the engine is lean. This can occur when there is any engine misfire condition. The rich reading is resulting from a chain event of the flame going out too early, and the subsequent passing of remaining unburnt mixture through to the sensor. When you open the throttle quickly, if the engine is sluggish, but doesn't misfire, and your wideband shows rich, you are rich. However, if the engine misfires, and your wideband shows rich, you could be lean. Regarding this last one, I think that is what I am currently experiencing. I will be testing that theory out soon. As I have changed the pump nozzles from 50 to 45 to 40, I am fairly certain that I have been experiencing a more prevalent misfire when applying large throttle inputs (I haven't been doing much full throttle yet and there has been a fair amount of time involved from when I swapped nozzles one to the next to the last). I was going smaller and smaller because of the rich readings I was getting on the wideband when "throwing large throttle inputs" at the engine. Last tuning session, I was getting a large amount of misfire for the first couple of seconds of full throttle... even when in first gear. I am going to switch back to the 50's next and see if that situation improves.
-
Hi Mark, As an alternative to the TWM one, there is this one from England. I don't think you have to pay tax, but there is shipping and customs. It should be under $300 delivered though and it is better quality than the TWM. It is essentially a copy - just made better. It will still rub the shock tower unless you do something different elsewhere in the induction set up.
-
I didn't read any prior posts to your latest, so you may have said what you use your car for previously... street, autocross, track, etc. I thought I'd chime in here and say that I initially went with 200/225 and the short Illuminas. However, I found that I was bottoming out on the bump stops in the front too frequently. Lowering the car a lot can take travel out of the suspension. Even with struts modified to fit short inserts, bottoming out can still be a problem. The initial spring rate recommendation from Ground Control was 225-250 up front and 275 in the rear. I had gone with 200/225 for fear of being too stiff. But, to try to stay off the bump stops, I swapped in some 250/275. That did as intended and seems to be a very livable setup for street driving also - it's not too stiff.
-
Crane HI6 suddenly doesn't have spark.
inline6 replied to inline6's topic in Trouble Shooting / General Engine
The correct, replacement optical trigger fixed my problem. The old one was dead. The first replacement was incorrect - it is for XR700 and XR3000 only. Original ignition unit is fine. For anyone searching in the future - the 700-0020 trigger works on 5 volts. The 715-0020 works off of 12 volts. That is why you need to use the 715-0020 with the HI6 CD ignitions. G -
ZG Flares in stamped steel or injection molded plastic
inline6 replied to RebekahsZ's topic in Body Kits & Paint
For all of those who posted interest in steel flares, I happened to come across this and thought I would pass it along in case anyone would be interested. http://www.zccjdm.co..._FENDER_FLARES_ -
Crane HI6 suddenly doesn't have spark.
inline6 replied to inline6's topic in Trouble Shooting / General Engine
During all of my searching over the past weekend, I came across some info online that got me thinking the optical trigger I bought two weekends ago might be the wrong one. I called Crane Tech Support on Monday and had that confirmed. My new optical trigger (part number 700-0020) with the grey, black, and white wires is for the XR700 and XR3000 ignitions only. It operates on 5 volts. The correct one (part number is 715-0020) with red, black, and white wires is now on the way to me. So, I probably did diagnose the problem correctly: the original optical trigger died. The new ignition was probably not needed. I will be able to determine for sure when I get time to install the new, correct optical trigger.