inline6
-
Posts
483 -
Joined
-
Last visited
-
Days Won
7
Content Type
Profiles
Forums
Blogs
Events
Gallery
Downloads
Store
Everything posted by inline6
-

240z body parts for sale - Atlanta area - *** all sold
inline6 replied to inline6's topic in Parts for Sale
Hood #1 is spoken for... Hood #2 is available. Sure, send me a PM. -
240z body parts for sale - Atlanta area - *** all sold
inline6 replied to inline6's topic in Parts for Sale
I have a pending sale on one hood. The other is still available. One hatch sold. Other hatch no longer for sale (for now - I may need it). Headlight housings are still available - price drop $80 each. Fender still available - $250. I will sandblast the bottom where the rust is soon and post pics, then protect with some primer. -
240z body parts for sale - Atlanta area - *** all sold
inline6 replied to inline6's topic in Parts for Sale
I still have them. -
240z body parts for sale - Atlanta area - *** all sold
inline6 replied to inline6's topic in Parts for Sale
$100 each. I'll do free shipping for you going to MO. They are rust free, mounting studs and threads nice, no damage. Nice OEM parts. Can take more pics for you if you would like. Garrett -
240z body parts for sale - Atlanta area - *** all sold
inline6 replied to inline6's topic in Parts for Sale
Updated original post - basically one hatch sold, one hatch no longer up for sale, everything else still available. -
240z body parts for sale - Atlanta area - *** all sold
inline6 replied to inline6's topic in Parts for Sale
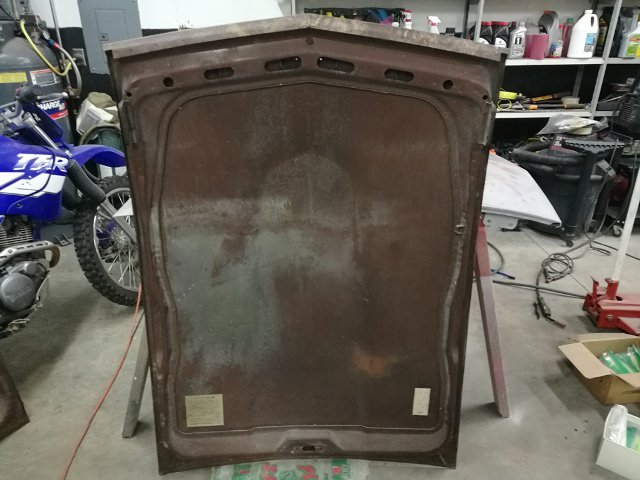
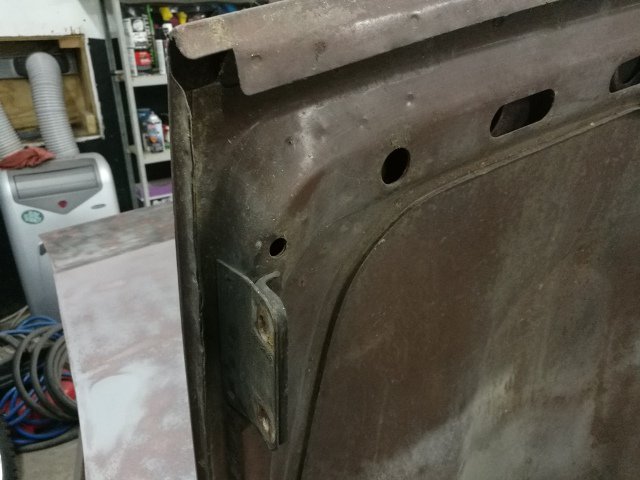
Updating with some pics of the hoods - this is hood #1 from desert climate - not even surface rust inside the front structure. The mounting holes have been slotted by someone which I didn't notice until taking pics. I have come across that before on another hood - it's an easy fix (mig weld and file) - $300 *** edit SOLD, and pics removed Hood number #2 - very straight, some light surface rust inside of frame. Acquired in Virginia in the early 90's from a 1972 240z and stored inside since then. *** $300 and still available
-
240z body parts for sale - Atlanta area - *** all sold
inline6 replied to inline6's topic in Parts for Sale
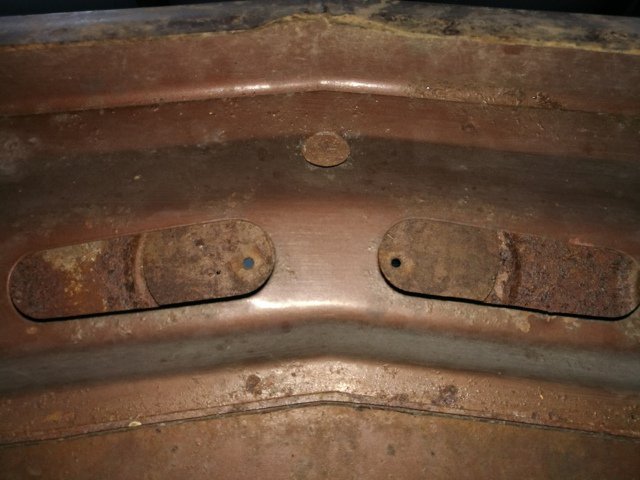
Based on looking online, the Nissan hatches are the same from around mid 1971 to 1978. https://zcarsource.com/hatch-240z-260z-280z-71-5-78-coupe-used The thing about hatch number 2 is that the defrost grids are vertical. From more researching online, I believe hatch #2 is from a car made between 1/1971 and 1/1972. https://zhome.com/History/New71Late.htm https://zhome.com/History/DesignChanges.htm Why don't I take some more pictures of it and get back to you. You can compare to yours and see. -
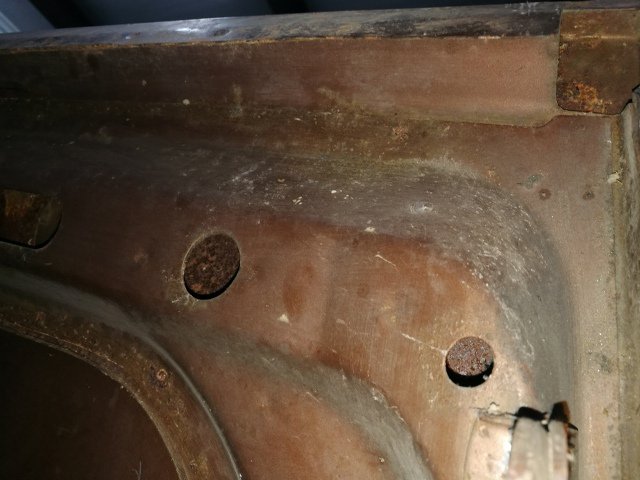
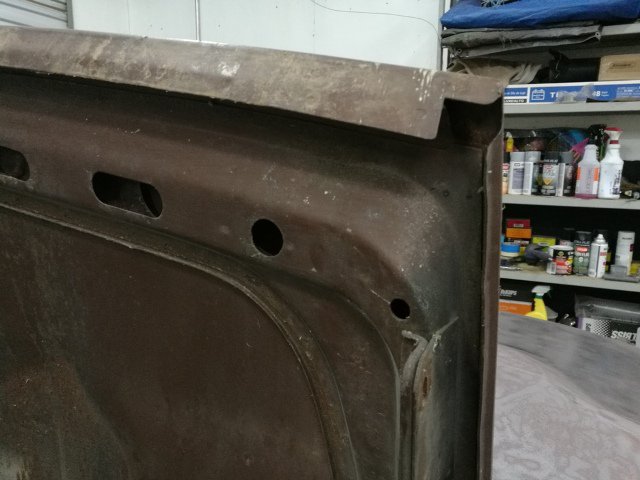
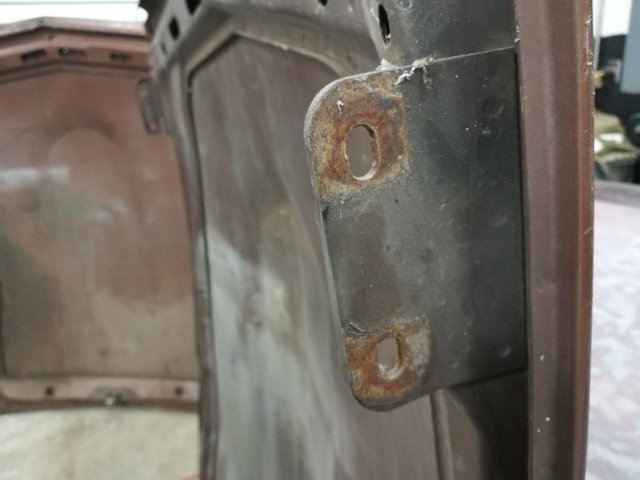
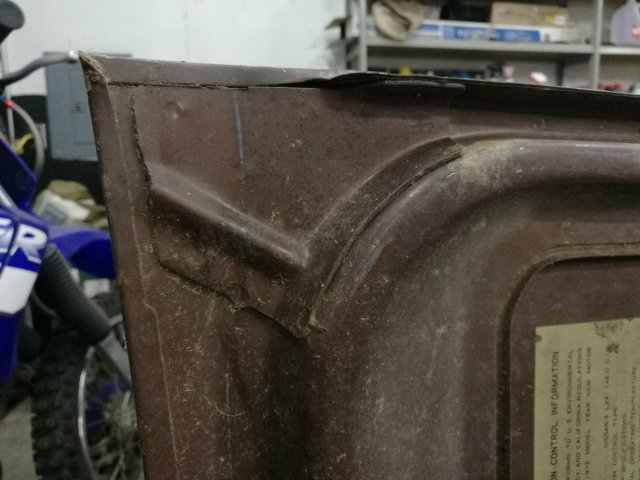
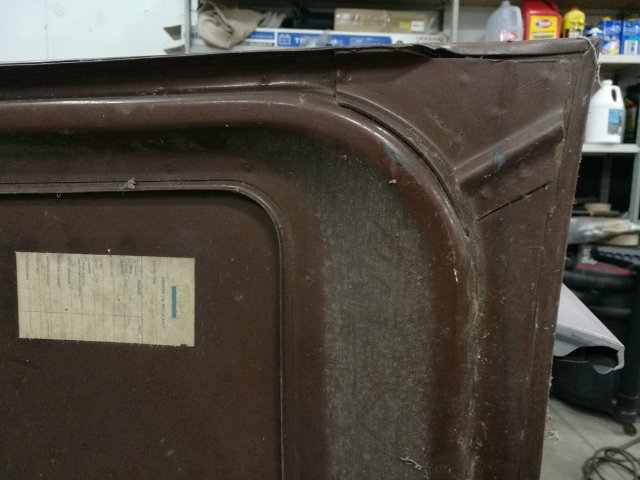
I have the following for sale - these parts lived in a dry climate and have been in storage for many years: Two 240z hoods. Both are OEM and in very good condition with no rust. If you would like more pictures, I can get them for you. ***Edit many more pics of hoods below. These are both available (11/7/2018) hood 1 $300 *** Edit - SOLD and pics removed hood 2: $300 *** Edit - SOLD and pics removed Two 240z tailgate/hatches. Not aware if there are any aftermarket versions of these - these are OEM. Both of these have the original Nissan glass as well. Tailgate/Hatch #1 (slight damage to rear edge) $150. *** Edit - Hatch #1 is SOLD (11/7/2018) This first one has horizontal defrost lines. I do not know if the defrost grid is functional. The lines look to be in good condition. The glass is in excellent condition. No significant rust anywhere. One piece of stainless trim has a mark: Tailgate/hatch 2 $250: *** Edit: This one is no longer for sale for now - I may need it for my car (11/7/2018): This one is complete with original Nissan glass, stainless trim, and a white inner trim panel. This hatch came to me via the Denver area, and has no rust. I can get more pics. 240z fender - passenger side $250 - OEM part *** Edit - SOLD and pics removed Straight, very little rust (only in the bottom corner): This part came to me from the Denver CO area - no accident damage. Does not come with the headlight housing which is currently attached to it in the pictures. That is also for sale however. Headlight housings - metal (left and right) *** *** Edit - SOLD and pics removed All mounting studs straight and intact with nice threads. $100 each: Again, happy to provide additional pictures.
-
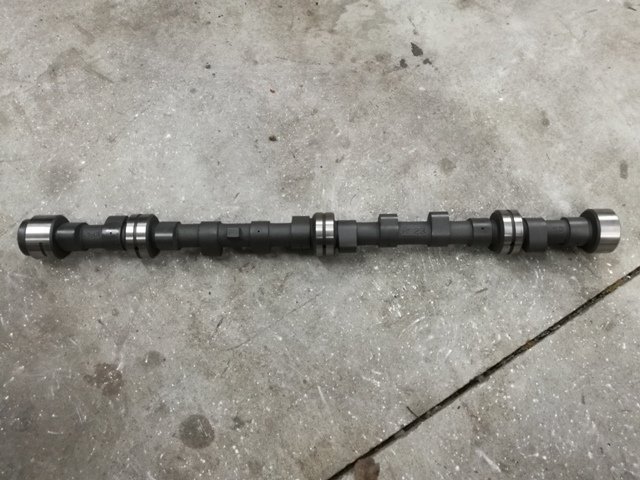
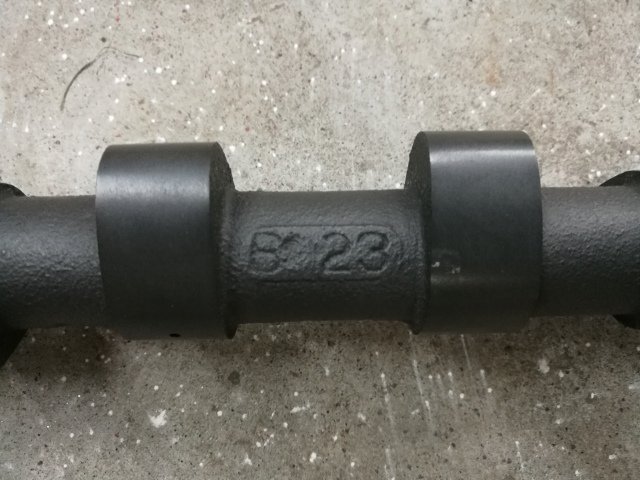
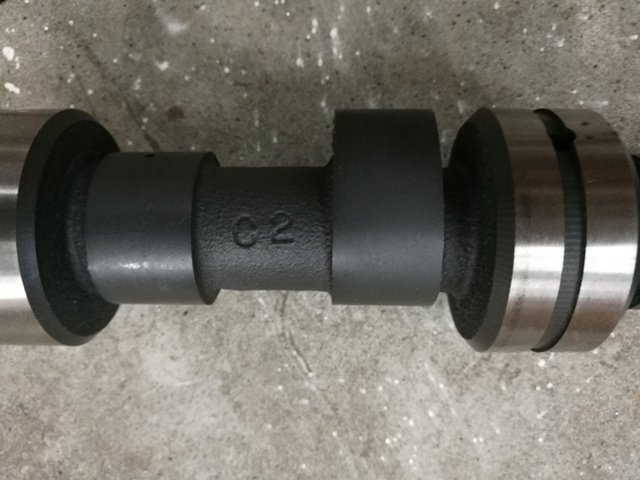
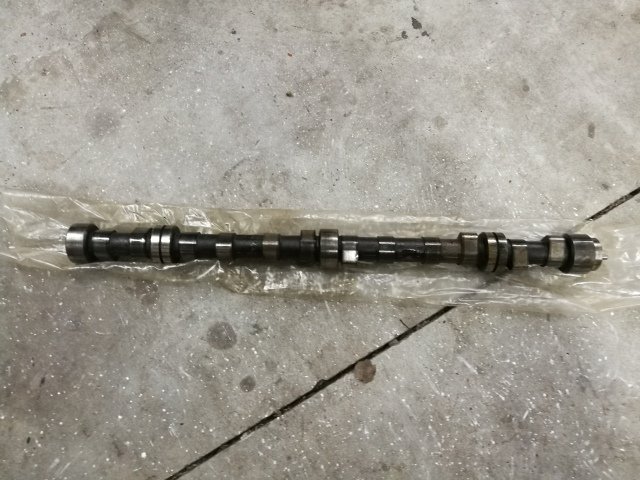
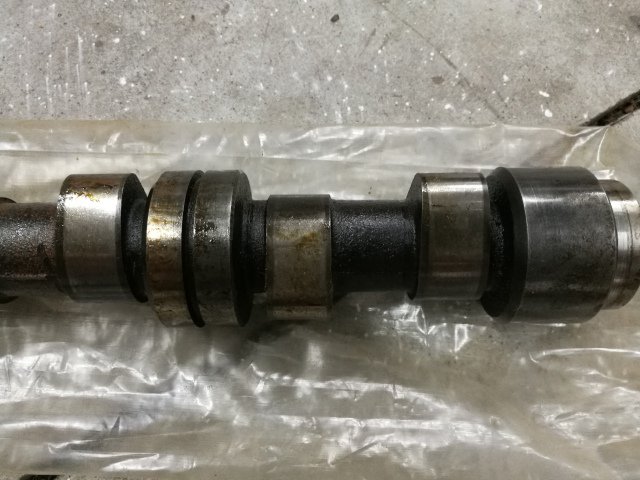
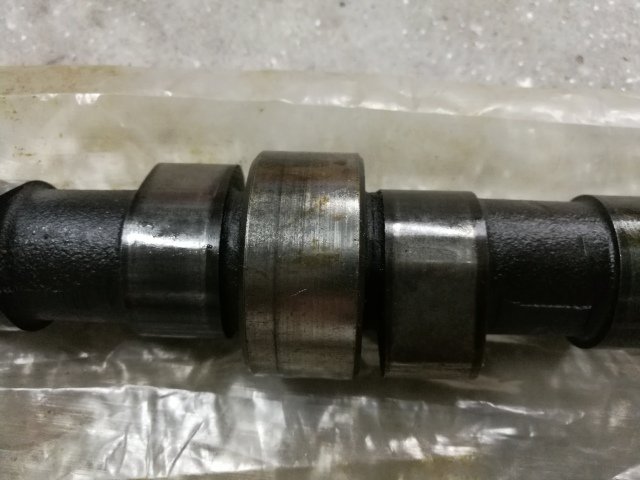
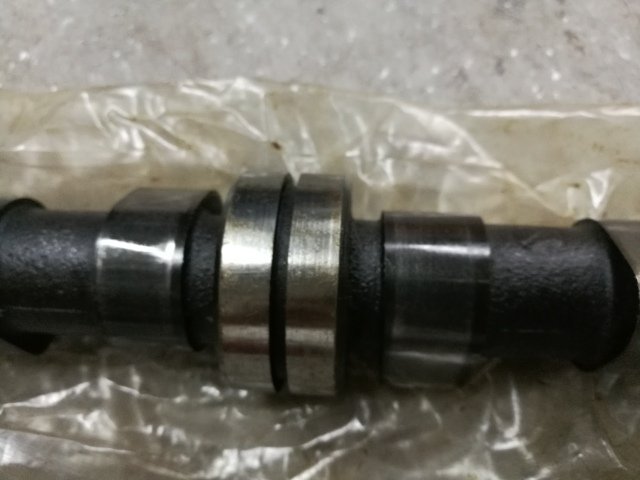
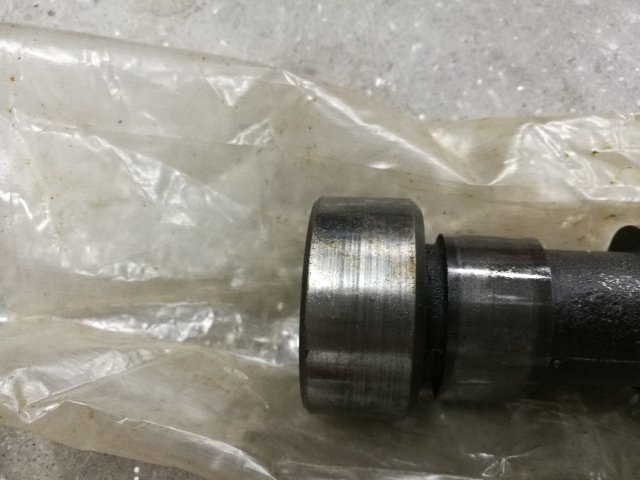
Price drop - Now $250 for the 495"/290 degree cam. Stock cam is still available ($50) - I can ship directly to your cam regrinder.
-
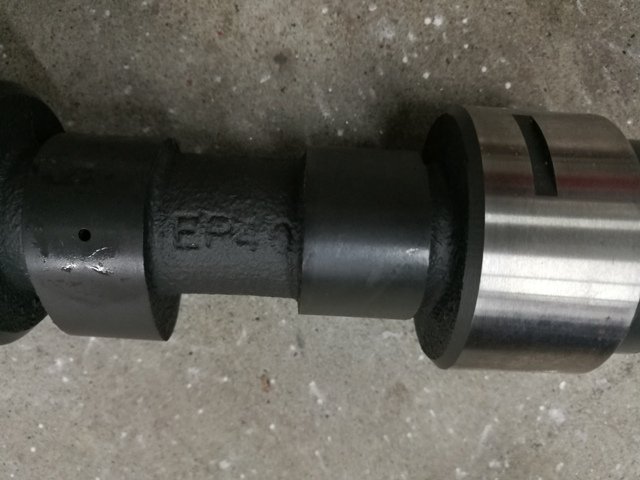
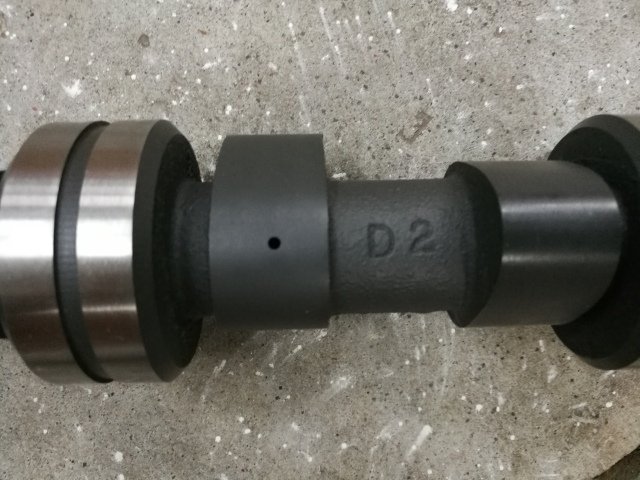
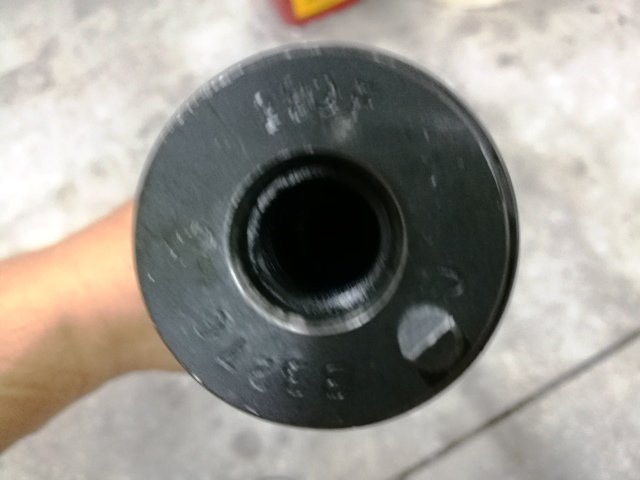
Brand new Schneider camshaft with mods. This one has been nitrided and has been drilled, tapped and an hex head type npt plug installed in the back. Current price is $275 at Schneider (not nitrided and no allen/hex plug in back): http://schneidercams.com/290F_L6.aspx $300 plus regular Fed Ex shipping to your destination. Sorry this picture is blurry - but the top has "290F": Stock, OEM datsun "A" cam for use with a spray bar (not internally drilled). Can be used after cleaning off the cosmoline (it has been coated) and polishing the journals, or this is a good cam core for a regrind. $50 plus reg Fed Ex shipping to your destination:
-
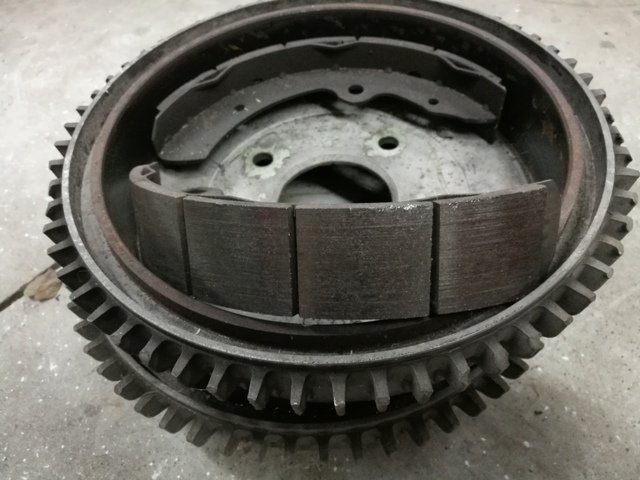
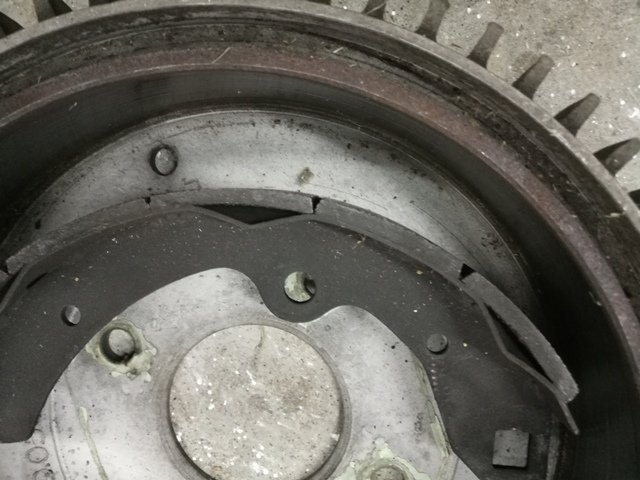
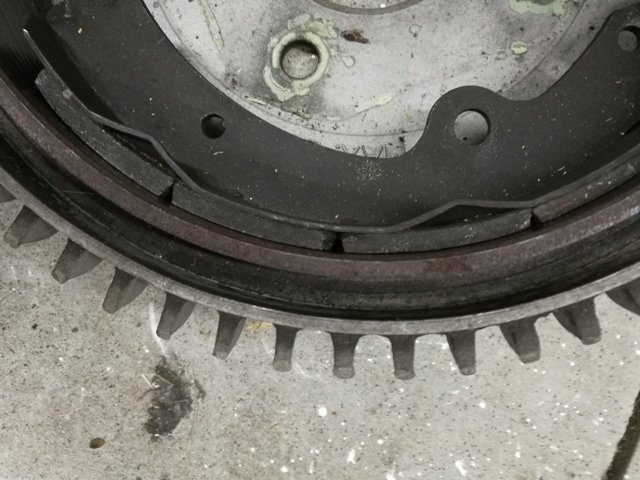
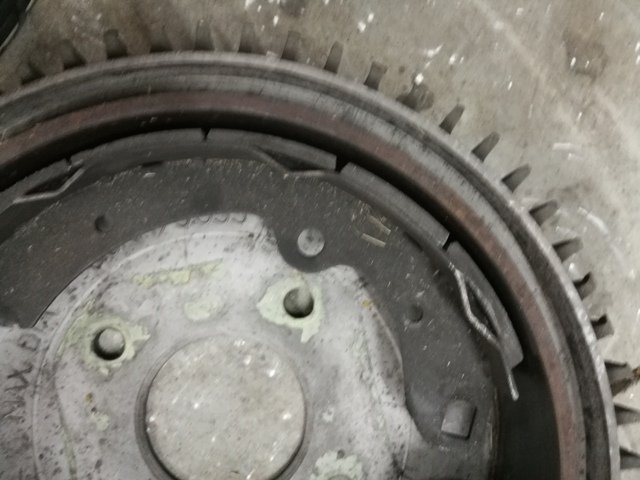
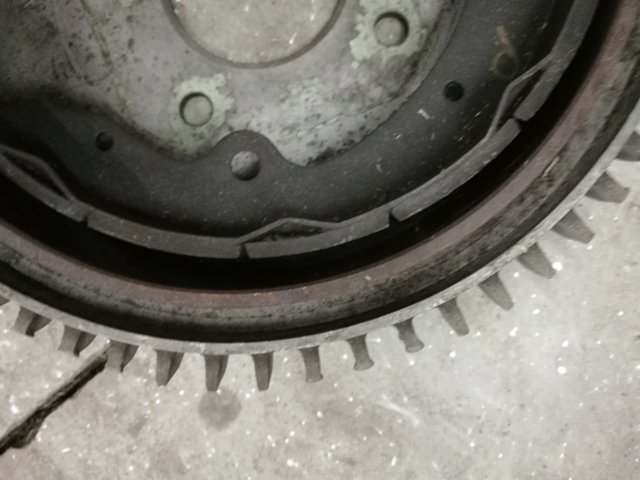
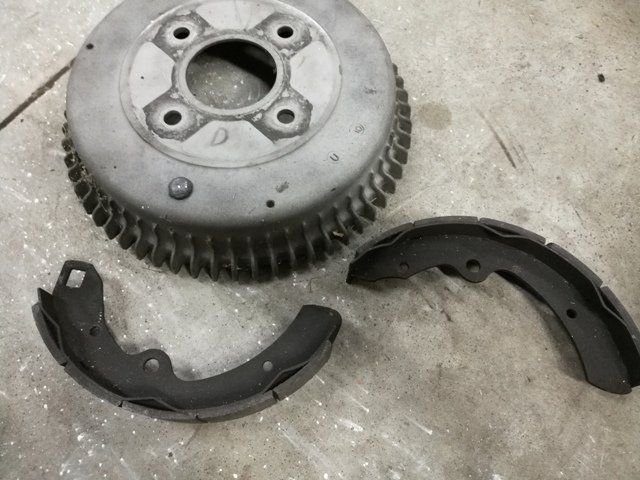
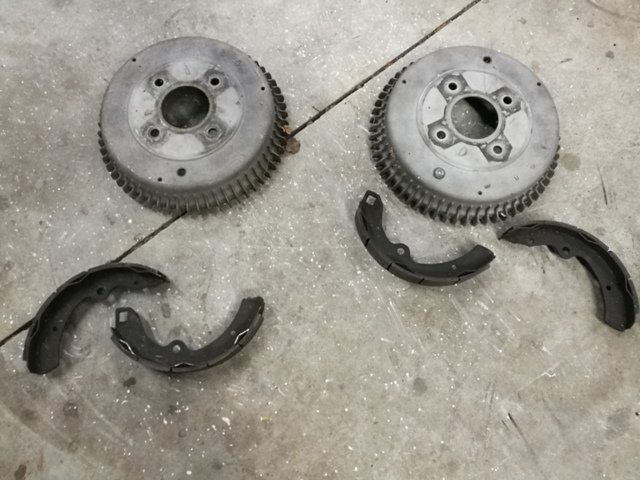
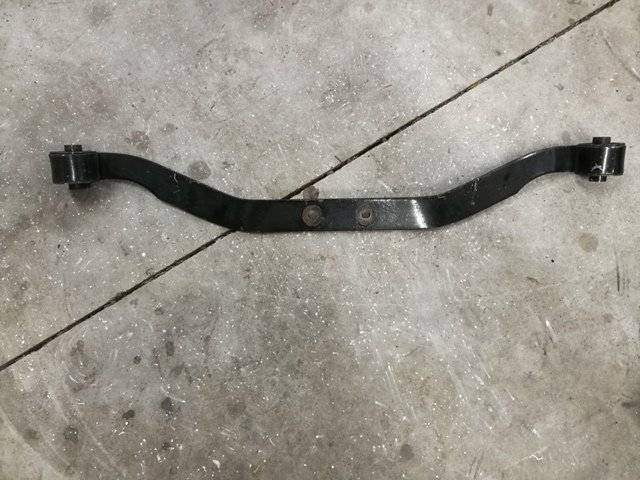
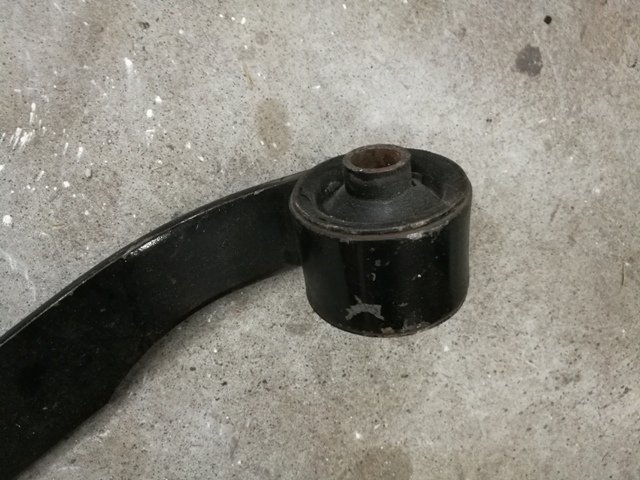
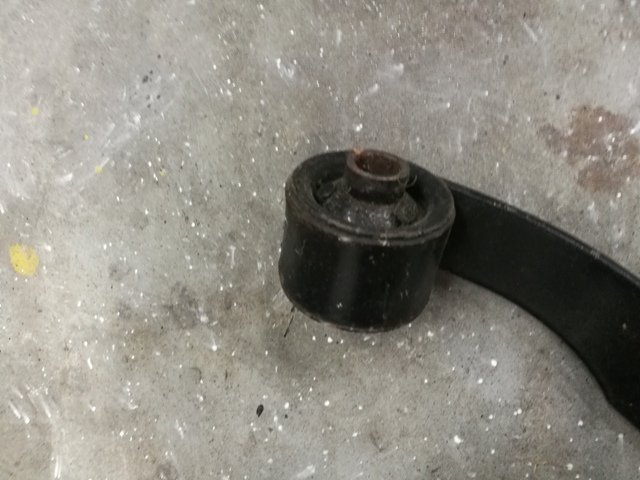
I have a few 240z "rear" items for sale. Add regular Fed Ex shipping to all prices: Drum brakes which are in good condition. OEM aluminum brake drums with shoes which have the Porterfield R4 compound - quite suitable for track use - not great for street use. Near full amount of material is on the shoes. Drums do not need machining to run - not hot spots and liner surfaces not out of round. They are within maximum diameter, I can measure and get back to you if you need that dimension. Shoes have been marked/labeled and kept associated with the drums in which they ran. These are bedded and ready to install. Make your next track day better with these vs. stock. $125 plus shipping. Mustache bar for R180 differential. In good condition - $40 plus shipping.
-
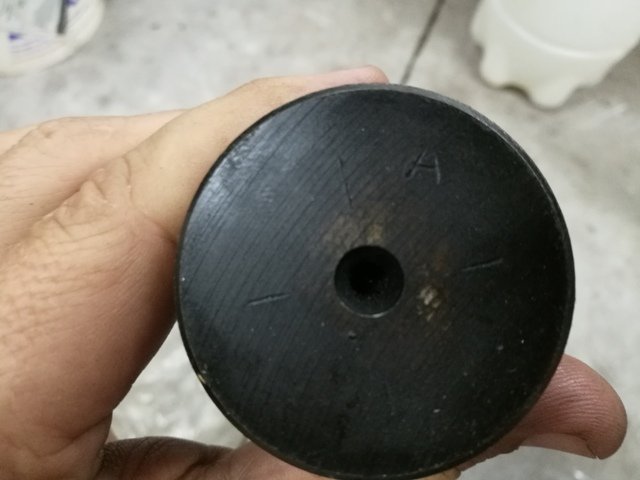
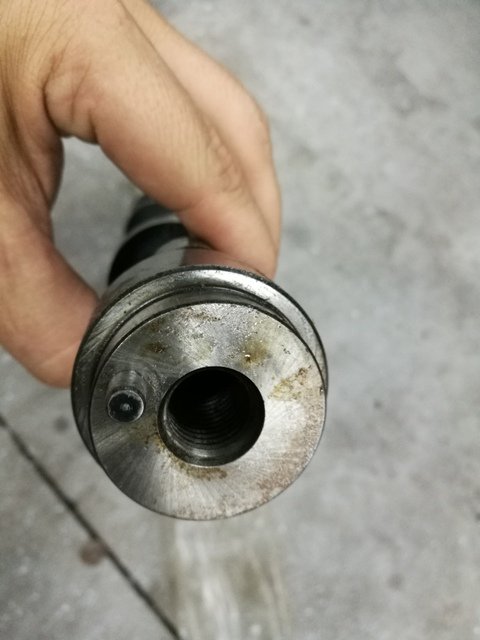
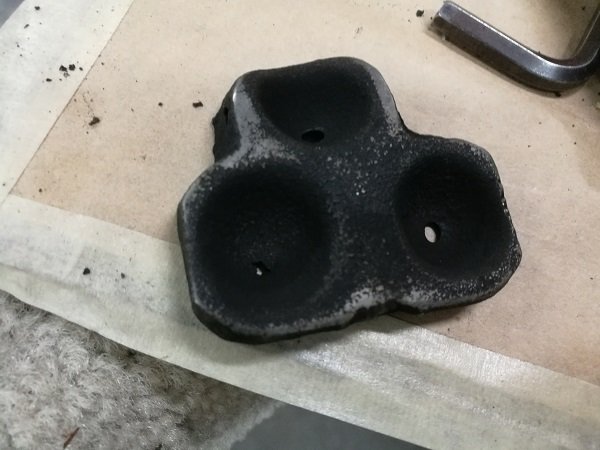
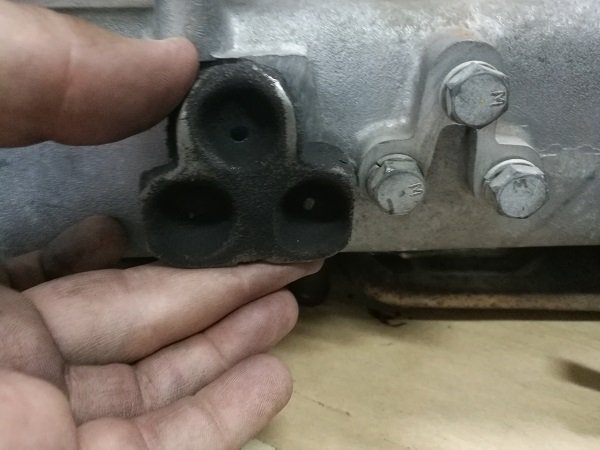
I bought a couple of N42 engines out of a salvage yard a while back and today, while I was getting ready to sell some parts, I found this thing rattling around inside the N42 intake manifold. Anyone know what it is and its purpose? It appears that it was inside the manifold and somehow attached originally to the aluminum bosses that correspond to these three bolts on the outside. Garrett
-
I just heard back from Sandy Armstrong at ARE. "Garrett, Well, you have pointed out an error both in our catalog as well as on the internet....We have changed our 1120 pan to not have the full trough but to have rack clearance. So the way we manufacturer those now is like the one on the engine that you sent. Thanks for pointing that out I will get a new picture uploaded on the web site." So, the "new" ARE pan has more clearance at the rack. I'll buy one and figure out how much lower the engine can go.
-
Been a while, but I was revisiting this topic and came across this picture on the Datsun Spirit site. This ARE sump pan appears to be a different design than the one shown on the ARE website. Can anyone confirm that the ARE pan has been redesigned so the "trough" (low part of the casting) is no longer running the full length of the pan? This design pictured would allow the engine to be dropped without interfering with the steering rack. I'll ask ARE and report back.
-
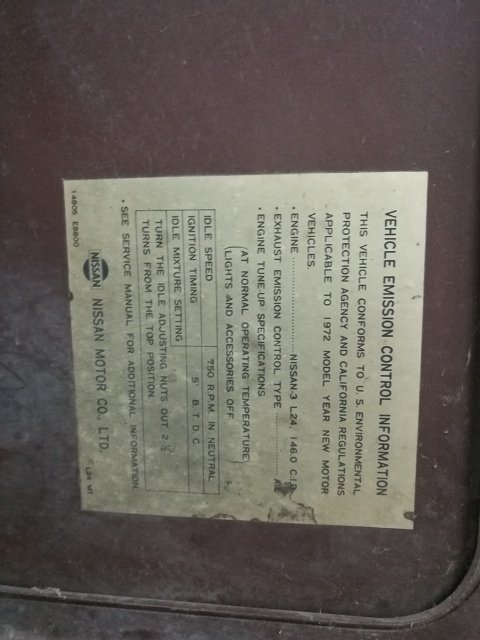
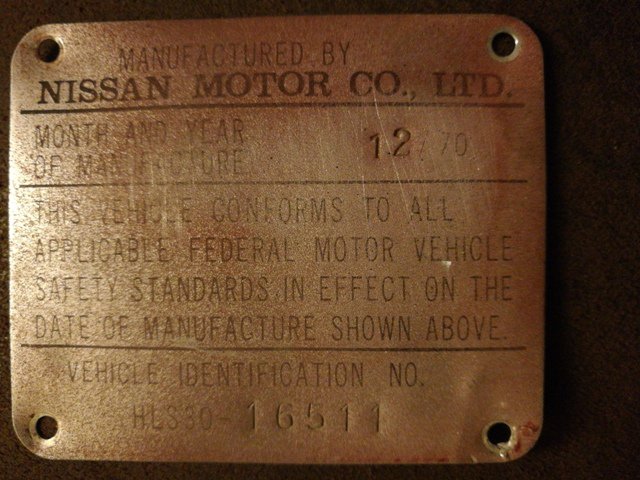
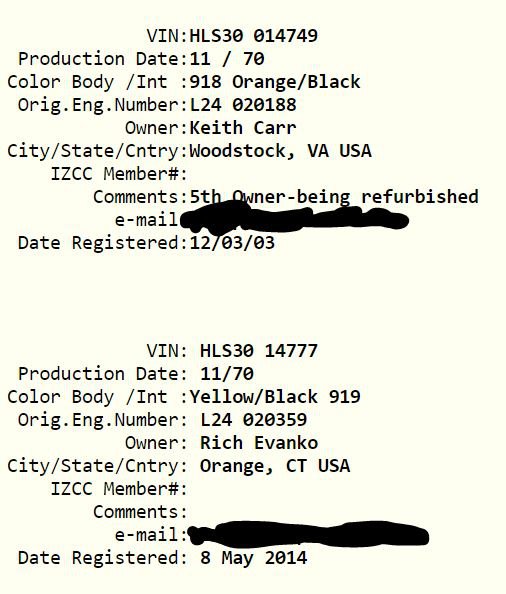
How is this possible? This car on eBay, was made in 1/71 according to the door tag, but has VIN HLS30-14751. My car's tag has 12/70 and the VIN is HLS30-16511. Here is my VIN plate (unfortunately partially sandblasted by a prior owner): Can someone explain? Did this car on eBay get held up in production - set aside for a bit? Anyone else ever hear or confirm this occurred at all with this period of Datsun's? Also, the Zhome registry has lots of VINs that are close to mine more or less with regard to production date. And here are two VINs from the Zhome registry which sandwich the VIN of the car on eBay - both show 11/70 production dates: Garrett
-
I have a New Old Stock (NOS) P90A head. I bought it for an engine project and ended up changing directions. No cam, valves springs or retainers - just guides and cam towers. If interested, I'll look around a bit and come up with a price.
-
Good to hear. I'm glad we were able to help. No ATF, use motor oil instead, pistons have to move/float freely through their entire movement range, needles and nozzles need to be in good shape (not interfering with each other at all) and installed correctly, fuel levels need to be set right. From there, setting nozzle heights and syncing the two carbs with each other properly is about all that is left for good carb operation. Extend the exhaust past the rear apron, a touch past the bumper is even better. A lot of the exhaust fumes come in around the tail light gaskets. They do not seal the tail lights to the tail light panel 100% even when new, and if they are dry rotted, then even less so. Pull your tail lights and have a look. The hatch seal (main one) doesn't seal 100% either. The curvature of the hatch panel doesn't contact the hatch seal firmly across it's entire surface (on my car at least). You can check by getting in the hatch area and fitting a shim/piece of thick paper all the way around the opening - checking for places where you can slip it between the hatch and the seal. Replace that seal if it is not in good shape. Also, a lot of people cause the car to run rich by installing the needles to far into the piston. You have to set the needles using the method I described.
-
Honestly, I think that guy has carb tops from different years or something. The vents tubes, comparing between the two tops, are completely different. My 4 screw SU's had float chamber tops that were the same. 5 Star Rising - ditch the ATF. See post 13 here.
-
Maybe different for different years... Have a look at this: By the way 5 Star Rising, don't follow ZTherapy method of setting float level. Look at the thread in this link - especially post 28. I never had any problems setting the float levels following the factory workshop manual instructions. No gross jets... I used the same needle and seat for both the front and the rear carburetor. I don't recall the posts and pins holding the floats being different heights for front vs. back carb.
-
There should only be one crush washer under the needle/seat assembly. You're rigging if you do otherwise. Your tab that touches the needle looks all bent - definitely wrong. I'm going to look for a pic that shows what it should look like. Take a look at these
-
I just looked again at your pics. That is not a Z on the base of the needle. It is an N. That was followed by the number - most likely 27. Those are the right ones. You really don't want to have scarring at that point of the needle. You may want to polish them up with some 2000 grit sandpaper, or think about replacing them down the road. Also, when assembled can you lift the pistons to the roof with your fingers, hold them tight against the roof and let go of them both really quick... and see if the pistons drop both at the same rate, and if they clunk on the carb floors. They should drop at the same rate. And they both should clunk. If they don't you've likely got a bent needle which can keep the pistons from seating. That will cause a lean condition as well.
-
Honestly, until you confirm the cam timing, and the distributor drive are installed correctly, doing other things that rely on those to be right are half efforts. Even with the remanufactured distributor, you should get the markings on the casting so it can be properly identified. Assumptions, such as that they sold you the right reman distributor for example, don't help solve your problem. Facts are better. You need to do what I outlined in my last post. I became an expert with my 4 bolt SU carbs - I ran them for something like 15 years. There is a list of things that need to be done right for those to be right. However, quite a few things can be wrong on them, and they still work reasonably well. Just looking at the needles visually isn't going to help you identify them. New old stock ones I bought for my car came with black "ink" N27 printed on the fat part of the shaft that goes inside the piston. Easy to rub off... and once it is gone, no way to identify them by looking at them - you have to measure their diameter at specified intervals along the needles length and compare to notes others (search the internet) have made in that same regard. You can find that info online. The "Z" is probably just what a previous owner wrote on them with marker - no bearing on whether those are actually z car needles, or which z car needles, obviously. A lot of people don't know how to set the needles in the pistons right. And getting the needles in the correct position is a crucial thing about the Z's SU carburetors. To start, you have to wind the nozzles all the way in, have the domes off. Grab a piston and have the needle set screw loose enough to slide the needle in and out of the hole easily. Then put the needles in the pistons so the fat base portion sticks out easily an 1/8th of an inch. Next, set the set screw so it is just tight enough to keep so that the needles do not move on their own, but can move easily if pushed upon. Test this. The needles should move easily if you push or pull them in and out, but they should not move if you hold the piston vertically and shake it back and forth. Set the needle again so the base is proud of the piston bottom (both the channel and the bottom of the piston). Then set the pistons in the carb bodies making sure not to bump the needles as you align them to go into the nozzles. When you set the piston down all of the way, the ridge on the fat base of the needle will contact the nozzle - and the needle will be pushed up into the piston. This sets a "touching" or no gap fit between the shank of the needle and the nozzle top surface. Remove the piston carefully and tighten the needle set screw. When unscrew the nozzles to their initial settings per the manual, you will have the correct gap between the top of the nozzle and the base of the needle. The needles are now at the correct height. Other things: Don't bother with ATF in the piston tubes. Just use standard 10W30 motor oil. I tried ATF and it didn't work as well. There are low and high markings on the screw in "dip" sticks. Set them both to full when the sticks are threaded all the way in - don't go over. I used a small bottle (like air tool oil) which allowed me to add single drops of oil at at time - as necessary to get the level set precisely. If you don't have a carburetor synchronizer tool, buy one. You need to get the air coming into each carb to be the same amount. This is done at two places: at idle, and "off idle". Until you set this correctly - the front three and back three pistons will try to operate like two different engines. Obviously, not a good idea - not smooth. With these things and those of my prior post - if you do them and can supply specifics back, maybe the solution to your problem(s) won't be far off.
-
What distributor are you using (get the letters and numbers off of the casting)? You need this in order to know what initial timing should be as different distributors require different settings. Previous owner(s) could have changed it. You said you've set timing many times. What did you set it at - initial setting in BTDC (Before Top Dead Center) degrees? Have you watched the timing change as you rev it up? Are you able to see the timing advance working? There is supposed to be both a mechanical advance (accomplished with fly weight) and a vacuum advance. Confirm that when you rev the engine up from idle that the ignition timing changes... (it should increase). What is the total degrees it advances to by, let's say 3500 RPM? It should be at least in the 30 to 36 degree territory. I understand that there may not be marks going that high. However, you can estimate by adding some paint marks on your pulley based on the distance between the existing ones. Paint additional marks as necessary so you can see the total advance that is occurring. Have you checked that the cam timing is set properly? Take valve cover off (and spark plugs out) and rotate engine by hand/socket until a bright (or dark) link matches the mark on cam gear and then align cam gear to mark on front cam plate. Be aware that there are two links on the chain that are notably different from the rest, so you may have to do this for both of them. After many revolutions, you will see a marked link will line up with the mark on the cam gear. When you further align the cam gear with the mark on the cam plate, you should be able to look at the timing pointer and its relation to the crank pulley markings to verify cam timing is set right. If the pointer is not pointing at the TDC mark, then keep rotating until the next mark aligns with the cam gear mark - align cam gear with plate and check pointer at crank gear. If neither of these line everything up, your cam timing is off. Also, you should check that the distributor drive spindle is correctly installed - you can remove the distributor and view it compared to reference pics of where it is supposed to be at top dead center (look on this forum or google images). You need to know that all of the mechanical alignments are correct before you can conclude that your ignition timing setting efforts are being accurately performed. Until you knock these things out as possibilities for the problem(s), you have too many variables to troubleshoot systematically.
-
New Haven, CT area members - Need L6 block for dry sump project
inline6 replied to inline6's topic in Nissan L6 Forum
I am in Marietta, GA. I'm inquiring to see if anyone nearby to Moroso Performance Products would be able to help. Thanks for responding though. 2 hours away isn't going to be close enough. If they were 5 miles away from you, I'd try to get you to help! -
Sorry I forgot about this for a while. I just took a look and I don't have any extras like you need.