inline6
-
Posts
483 -
Joined
-
Last visited
-
Days Won
7
Content Type
Profiles
Forums
Blogs
Events
Gallery
Downloads
Store
Everything posted by inline6
-

Crane HI6 suddenly doesn't have spark.
inline6 replied to inline6's topic in Trouble Shooting / General Engine
Spent another weekend on this and I can't find the problem. This has become the nightmare that I was afraid it would be. Looks like Crane has different wiring on their optical triggers and this may be what has really tripped me up. Soooo..... My original optical trigger has three wires: black, red, and white. The black wire a ground. The red wire is connected to the coil + wire, which gets voltage when the ignition is switched to on. And, the white wire is the "trigger signal wire". Initial work with a multi-meter and the hi-6 manual lead me to believe the optical trigger was bad. So, I bought another optical pickup. Though this one has three wires like the original, they are grey, black, and white instead of red, black, and white. Figuring that the grey replaced the red, I wired up the new trigger to the original Crane ignition with grey to red, black to black and white to white. That didn't work, so I got sent down the path of buying another ignition unit... more stuff was tried, etc. During one of my web search episodes today, I came across this: correct wiring of optical trigger with grey wire which this person confirmed with Crane tech support. The correct way to wire this new optical trigger is actually: black is the +12v line, the white is the ground, and the grey is the signal output. Why in the world this is the case is beyond me! Is it possible to damage the optical sensor by wiring it wrong? ***edit - I guess not. Just found this which says it is reverse polarity protected and short circuit protected.*** So far, I have tried original crane hi-6 unit with original optical trigger. I have tried the original crane hi-6 unit with a new optical trigger (which was wired incorrectly). I have tried a new crane hi-6 unit with the original optical trigger, and I have tried the new crane hi-6 unit with the new optical trigger: wired incorrectly and wired correctly. My thinking at this point is that perhaps I fried the original optical sensor while trying to prime the engine with the spark plug leads off. And that I fried the second one by wiring it incorrectly. Given this, I went in search of any information I could find on how to test just the optical trigger. I found this: normal optical trigger function With the original optical trigger, the white wire is the trigger signal wire. According to the link I posted above, this wire should see zero volts when the optical path between the LED and the photo-receptor is blocked. This is supposed to be the case when the "disc" with the slots in it does not have the slots aligned with the LED and the photo-receptor. When the slots align, the white wire is supposed to see 12 volts. I am seeing around 10 volts on the trigger wire whether the optical path between the LED and the photo-receptor is blocked or open. With the new optical trigger, the grey wire is the trigger signal wire. When the new optical trigger is wired correctly, I am seeing around 11 volts on the trigger wire whether the optical path between the LED and the photo-receptor is blocked or open. Any ideas? Anyone have hi-6 unit that can confirm what voltages are at the three wires for the optical pickup when things are working properly? Is the light from the LED visible - or is it infrared? I have yet to see any light coming from either pickup. Garrett -
Crane HI6 suddenly doesn't have spark.
inline6 replied to inline6's topic in Trouble Shooting / General Engine
Bought and installed a new Hi-6 unit today... and I still have the same problem. No spark. Diagnostics light on the new unit does the same thing. Lights up solid like it should when the ignition is switched to on. It just dims when cranking - it does not blink as the manual says it should. Manual says the unit isn't seeing the trigger signal. I replaced the ignition rotor also. The old one has quite a few miles on it. I'll go ahead and order a new cap also. Guess I'll be using the multi-meter tomorrow and will try again to figure out what could possibly be wrong. I hate electrical problems. -
Dollar has been gaining against all currencies as of late. Lots of news about it. Now a dollar buys 121 yen. Looks to me like the dollar hasn't finished its run... could be interesting over the next few months. Dollar to Yen
-
New Cam and Rockers - odd looking at 500+ miles
inline6 replied to inline6's topic in Nissan L6 Forum
I was running straight 30 weight until after I finished driving the car last weekend. I changed out the oil while it was warm to Valvoline Racing 10W-30. Of course I haven't started it yet since. And yeah, I could roll the dice and try to start the car without heating the oil, or what you said, or remove the spray bar and use the internal cam oiling only... if I want to risk it. -
New Cam and Rockers - odd looking at 500+ miles
inline6 replied to inline6's topic in Nissan L6 Forum
Heating the oil is a pain - no doubt. But let's consider what that is doing. Essentially, it is only doing one thing, allowing for quicker flow through the internal passageways at engine start and for a low number of minutes of operation just after start. Once the oil comes up to operating temp from normal engine operation, we have the same thing going on in both scenarios - i.e. pre-heating oil vs. not pre-heating the oil. Since I have driven the car on 3 or 4 different occasions now, for a total of 150 miles, and the cam is fine, then my problem couldn't be cam blank material, or I'd still have the problem. The problem is more narrowly defined at this point based on all my prior info: there has been a lack of flow at the time of engine start which has caused this damage. What I haven't been able to conclusively determine is precisely why that is the case. I have eliminated: poor quality rocker arms/pads (my rockers are OEM) incorrectly reground rockers (pad surfaces were checked after each regrind for parallelism with the rocker tips inadequate pre-lube of cam blockage in oil passages by foreign substance/material inadequate amount of oil in sump wrong oil pump when utilizing a drilled out oil restrictor jet in block (can't use the stock pump - use turbo pump which has more volume - which I am) worn or damaged oil pump broken oil pump drive gear lock pin holding gear to oil pump drive shaft poor oil choice such as those with low amounts of ZDDP Probable culprits, which remember, could be exasperated by this rather high lift, high duration cam are: installation of dry oil pump installation of dry oil filter installation of large oil filter (for example, the OEM nissan ones are smaller capacity than some of the "correct" aftermarket ones) rifle drilling of cam core (for weight reduction - has increased empty volume displacement inside cam) dual cam oiling (internal and external at the same time - more outlets reduces oil pressure at the orifices) It seems likely to me that the actual cause or causes are in this second list, and my current thinking is that it is most likely a combination of some of these factors. But I am not emboldened enough yet to not heat the oil and see if my problem is still present if I don't. -
New Cam and Rockers - odd looking at 500+ miles
inline6 replied to inline6's topic in Nissan L6 Forum
I've put maybe another 50 miles on it. The last time I drove it was two weekends ago. I was recording some air fuel ratio runs with an Innovate wideband O2 sensor. After that weekend I ordered some more Mikuni jets from Wolf Creek Racing. I also drained the Brad Penn break in oil out of it, and changed the oil filter to another new, Nissan OEM one. The plan was to get the jets so I could do some more tuning this past weekend. However... It seems that I harmed the HI 6 Crane ignition while trying to prime the engine prior to starting. Since I had a new filter, and I've been having so many cam lubrication problems, I wasn't going to risk starting the engine without seeing oil come out of the cam first. I heated the oil for 2 hours, I went ahead and re-adjusted the valves since the engine had run 150 miles. I pulled the spark plugs and laid the spark plug wires across the top of the carbs. Tried 5 times to engage the starter to prime the engine, each time dipping my finger into the oil pooled around the valve springs and putting it on the cam lobes. Couldn't get oil to come out of the cam. So I said screw it, the oil pan was actually a bit hot to the touch at this point, so I figured I'd start it and immediately get it up to 2k to get oil pressure rather than screwing around with a gear reduction starter speed to prime the cam. When I had it ready to start, I turned the key and the engine just spun... no hint at starting. Checked for spark on plug wire 1 and had none. Many hours later, I determined that the HI 6 wasn't indicating that it was seeing the spark trigger (an optical trigger in the distributor). I had a new optical pickup in hand from Summit Racing three hours later, but unfortunately that didn't solve the problem. I think somehow while cranking the engine with the spark plug leads off, I fried the trigger circuit in the HI6. That was the end of the plans to test different jet last weekend. This car is really testing me... makes me appreciate the other cars in the garage a whole lot. -
Crane HI6 suddenly doesn't have spark.
inline6 replied to inline6's topic in Trouble Shooting / General Engine
Picked up a new optical pickup from Summit Racing today. Just finished trying it. LED indicator on the HI6 unit still doesn't blink when I turnover the engine... it just dims. And I still have no spark. An entire day wasted and no idea what the hell went wrong. There is a rather prominent message in the manual about never unplugging the spark plug leads and turning the engine over... At the start of the day, I did this. I removed the spark plug leads and the plugs so I could spin the engine to get oil pressure (after an oil change and new filter). The spark plug leads were laying across the top of the engine. Maybe that caused something to fry in the HI6 unit. On the unusual side of things, I note that a strange, high pitched whine comes from the center post of the distributor cap every time I touch the white wire (for the optical trigger) from HI6 unit to ground. That seems to trigger the coil to fire, but the sound coming from the distributor cap is weird. And when I put the distributor cap back on the distributor, every time I disconnect and reconnect the optical trigger harness, I hear the same high pitched whine for a split second and the engine rotates - indicating the coil just sent spark to a plug. Doesn't seem right for it to do this. -
So, I was going to try working on jetting of the carbs today. But, unlike the past several weekends, when I went to start the engine cold, it didn't fire. No attempt at trying to fire... I went inside to retrieve the Crane HI6 documentation and see what I could find out. There is a single red led. When I turn the ignition on, it lights up solid. Using the troubleshooting part of the manual, I determine that no fault codes are triggering. I check for spark using my timing light. I get none. The HI6 manual says to crank the engine over and check to see that the led blinks. It just dims a bit when attempting to start but doesn't blink. I check power (red wire) and ground (black wire) to the optical pickup. I confirm power and ground. So... I am thinking the problem is the optical pickup. I read where if the white wire it put to ground, it will trigger the coil. I switch my timing light to the high tension lead from the coil to the center of the distributor cap. I disconnect the optical pickup at it's harness connection - wires (red, black, white) go from this connection to the HI6 control box. I pull the trigger on my timing light and ground the white wire. The timing light flashes, and the led on the HI6 control box goes out. I remove the slotted disk from the distributor shaft. I reconnect the optical pickup at its harness. I hold the disk in one hand and the pickup in the other and simulate the disc rotating within the pickup beam. The light on the HI6 control box stays solid - it doesn't blink like the documentation says it should when cranking. So, the pickup just "went bad", right? Am I supposed to actually see a light beam when the pickup is powered up? Because I don't.
-
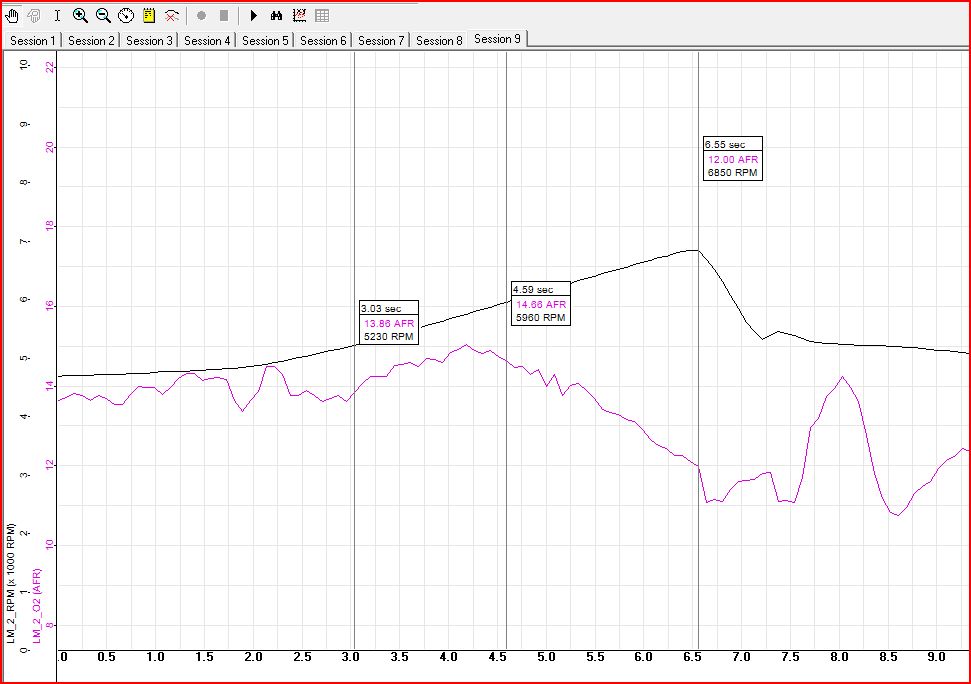
I've been working on the jetting of the Mikuni 44's on my engine. Attached is a plot showing RPM and AFR. Here are my notes from that session: 3rd on interstate. Downshifted to third and stabilize RPM (about 4800 RPM) Squeezed throttle slowly until near full throttle, shift to 4th, end recording. I've read that main fuel jet adjusts the fuel mixture at all engine speeds, and main air jet adjusts the mixture at "high" engine speeds. Current settings: Main 180 Air 230 Pilot 57.5 Pump 45 Choke 37 What I am seeing rather consistently in 3rd gear runs like this one is a bump up in the AFR in the 5000-5800 territory...(from steady state AFR I am seeing when on the pilots) which is then followed by a descending AFR trend until I short shift to the next gear. Thoughts? I am just trying to get the jetting "close" so I can make the most of my time at a dyno session.

-
Pop/Chatter doesn't describe it! R200 Nissan LSD - 38420-RS660-US
inline6 replied to inline6's topic in Drivetrain
Thanks for the response John. I'll do as you recommend. -
I drove my car for the first time in a year or two the other day. And, I gotta say, the behavior of the rear driveline is brutal. Let me just say right from the start that I searched through this forum and found all kinds of posts about people complaining of popping and chatter from their CLSD units. Popping and "chatter" doesn't even begin to describe what mine is doing. Some background: I bought this Nissan Clutch type LSD unit (see pic of box with part number below) and installed it in a NOS (New Old Stock) R200 4.11 open differential. It's been about 8 years, so my memory is kind of rusty, but basically, I followed the instructions that came with the carrier... I took the back cover off, removed the bolts holding the stock carrier to the diff, swapped out the ring gear to the LSD unit and put the LSD carrier with ring gear in the diff. The instructions provided a spec for backlash - as long as the backlash was within spec, there was indication that going deeper into the diff (redoing pinion gear shims) was not necessary. I used the fluid which came in a container in the box. This pic (which I found on the web) is the same stuff - Veruspeed 80W-90 synthetic for LSD. My recollection of driving the car with it the first time and to and from a couple of track day events was that it made the rear end jiggle a bit on tight turns but it was not too obnoxious. Fast forward a bit, the car has been sitting for a few years and I get my new engine in it. I take the car for a first drive with the new engine and the rear end behavior is much more severe than I recall. I did Ground Control rear upper camber plates while the engine was being built... and having read about the 300ZXT axle shafts being too long on some of our S30's, I became convinced that that was the new problem. So, I organized a group buy with The Driveshaft Shop and got some shorter custom axles made. Well, I have some engine problems... so fast forward another couple of years to last weekend when I take the car for a drive. So... backing up the car is none too fun. Put it in reverse, rev it up a bit and slip the clutch a lot if you don't want it to shudder like the rear brakes are on... Take a tight left or right turn and the rear binds up badly until Gozilla kicks the ass of the car a couple of inches to the side... Do that two to three times and congrats, you've executed a 90 degree turn at a stop sign. And here is the really odd one. Drive down the road in a straight for miles... and then come to a stop just by using the brakes, (no downshifting) put the clutch in as you come to a stop like normal, say, on a completely flat road. Wait for traffic to clear and as you rev the engine slightly and let the clutch out, the rear has to "unlock" before you can go. This is repeatable every time I stop, even from a straight line... to get going again the driveline shudders upon take off. You can elminate this with lots of clutch slippage... by the way. So, that's basically what is going on. Looking up the specs on the part number, there appears to be little info available as to what this lsd unit is, but best I can tell it is a 2-way Nissan LSD unit with 70 ft/lbs break away pressure. Based on my hybridz searching, my next step will be to check fluid level. I do recall some evidence that fluid escaped the vent when I was checking things over at one of my track day events... After that, I'm considering switching to Redline and adding some friction modifier. Anyone else have experience with this particular LSD unit?
-
New Cam and Rockers - odd looking at 500+ miles
inline6 replied to inline6's topic in Nissan L6 Forum
I drove the car yesterday for the first time since early 2013. I put about 100 miles on it and inspected the cam when I got back home. It looks really good. Rocker arm pads show faint signs of wipe patterns... and cam lobes are clean and shiny to match. The start procedure (which is a pain) is currently: Heat the oil in the oil pan with a drum heater blanket to get it nice and warm Remove the spark plugs and cam cover Apply 30 wt oil by hand to the cam lobes Engage the starter for very brief intervals (in between starter engagements, apply more oil to the lobes by hand) until oil flows from the cam. It takes about 3 tries of around 5 seconds each until I see oil. Re-install spark plugs and cam cover Start Looking back on all of this, I really don't see anything (yet?) that I can point to as the real problem. So, I guess it would be good to toss in a few summaries as this thread starts winding down. It appears that it takes a "long time" for the six cylinder L-series to get oil up to the cam during a normal engine start situation. Long duration cams, or valve springs with high static/compressed loads, or a combination of both... added with the above "long time" until there is oil, substantially increase the chance of doing harm to your valve train during the first few seconds of engine operation. Do not count on dry oil pumps to pull oil from the pan. Oil weight and temperature differences are factors, but setting those aside, it has been demonstrated that at least one oil pump (mine) pulled absolutely no oil from the pan (with a suitable "dummy" shaft made for engine priming prior to start) even when driven by a corded DeWalt drill at full speed for a lengthy duration of time. And finally, some speculation from me. Since I can't pin-point the problem, but am very aware at this moment of all the things that I did to try resolve it, and more importantly, all of what I did that did not resolve it, my advice to anyone reading this in the future is to be wary of utilizing both internal and external oiling... when running high performance (esp. big duration) cams. For stock or mild spec cams, perhaps it doesn't matter, but I recommend you go internal only instead. -
New Cam and Rockers - odd looking at 500+ miles
inline6 replied to inline6's topic in Nissan L6 Forum
This is a good thought. Based on all my research on Kinetic/Sunbelt Z cams, they always used the Estas blanks. Since I am using OEM rocker arms, I think the odds are against this being the problem. I mean, Kinetic sold some decent number of cams for Datsuns based on the people here on Hybrid alone that I know about. Those include Dan Baldwin, John Coffey, Mark (Zrebaron), and Erik (Erikr). Seems like it would have been discovered long ago if this was a problem. A new one of these from Megacycle is near $800. I'm not sure what a regrind would cost. I guess I'm not going to rule it out until this problem is behind me. Thanks for the input. -
New Cam and Rockers - odd looking at 500+ miles
inline6 replied to inline6's topic in Nissan L6 Forum
The detail for attempts 1 to 5 respectively: Attempt #1: Sunbelt cam - New - made from Estas cam blank which is a "chilled casting" and Nitrided OEM Nissan rocker arms - New - came in Nissan boxes - bought on eBay Mobil 1 full synthetic 10W-30 Attempt #2: Sunbelt cam - Used/Polished (same cam as attempt 1) - Still Nitrided OEM Nissan rocker arms - Reground by Delta Camshafts Mobil 1 full synthetic 10W-30 Attempt #3: Sunbelt cam - New - made from Estas cam blank which is a "chilled casting" - Not Nitrided OEM Nissan rocker arms - Reground by Delta Camshafts Redline synthetic 10W-30 Attempt #4: Reground by Cam Grinder who originally made the cam (same cam as attempt 3) - Not Nitrided OEM Nissan rocker arms - Reground by Delta Camshafts Redline synthetic 10W-30 Attempt #5: Reground by Cam Grinder who originally made the cam (same cam as attempt 3 and 4) - Not Nitrided OEM Nissan rocker arms - Reground by Delta Camshafts Brad Penn Racing - Break in Oil - 30 weight -
New Cam and Rockers - odd looking at 500+ miles
inline6 replied to inline6's topic in Nissan L6 Forum
Interesting set up! I can't really see anything spraying... it just looks like each lobe has a narrow band of oil on it at all times. Were you able to see how long it took from start until oil flowed from the journals? Could you verify that the spray bar was contributing anything at idle speed? Maybe I should do the same... -
New Cam and Rockers - odd looking at 500+ miles
inline6 replied to inline6's topic in Nissan L6 Forum
I'd be interested in seeing a video of that. Probably becomes a mess once oil starts flowing out of the cam, but it would be interesting to see how long that takes... at like 40 degrees for example. -
New Cam and Rockers - odd looking at 500+ miles
inline6 replied to inline6's topic in Nissan L6 Forum
I hadn't learned that I needed to install a pump that had been filled. I never had any issues before... and I have always installed them dry in the past. For the record, I've done 5 attempts: attempt one - new, nitrided cam, possibly a dry oil pump - my engine builder installed it. attempt two - polished journals on used nitrided cam, reground rockers. Oil pump did not come off - it was not dry attempt three - new cam, reground rockers, oil pump did not come off - it was not dry attempt four - reground new cam, reground rockers, possibly a dry oil pump - my engine builder installed it - pressure kit installed on oil temp sender before start up, most likely back-filled pump. attempt five - the most recent - pump was not dry My cam is a Sunbelt cam made with an Estas blank. It probably doesn't need break in either. I just wanted to run it at some RPMs that were high enough beyond "Idle speed" that psi would be up. -
New Cam and Rockers - odd looking at 500+ miles
inline6 replied to inline6's topic in Nissan L6 Forum
Ah... I see what you are saying. The pump is not dry... you are just turning off the engine, and the next time you start, you get it up to 2000 quickly rather than just start and idle. Ok... good to know. -
New Cam and Rockers - odd looking at 500+ miles
inline6 replied to inline6's topic in Nissan L6 Forum
Given my past experiences, I am conflicted about jumping right to 2000 RPM. I understand that with spinning the engine faster, the pump primes faster. But, the faster lobe rotation without oil flowing for a few seconds (this is assumed, not measured) scares me. Given that the oil has to "follow the tortured path" inside the block, head, cam, etc., as my engine builder likes to call it, the unknown is just how long it takes to get oil to the cam under the different scenarios. Obviously, you are not seeing any priming at 800. Do you put oil in your pump before you install it? On the attempt before last, when I used the pressure kit, the engine fired on the first try. It coughed and stuttered for the first 5 seconds, but by second 6 or 7, revs reached north of 1500 and I started rolling the throttle to try to keep between 2000 and 2800 RPM (I have a video of this start up session). The rockers/cam had the most damage of any prior attempt that time around. For that session, I had not primed the oil pump. I had not put any oil inside it and it was dry, as it had been off the car during the engine tear down and inspection. I didn't learn the lessen that my dry oil pump wouldn't prime until after that attempt. After that attempt, I took the pump apart to check that everything was ok there. I put it back on the car dry. Using my fake aluminum shaft, I tried repeatedly to get oil to the cam and couldn't. Even with the drill at full speed for something like 10 seconds, I got no oil to the cam at all. When I pulled the pump off, it had no oil in it. I was only successful with the drill and fake shaft after I filled the pump with oil before re-installing. It could very well be. I'm glad I found these new ones with help from Zredbaron. My engine builder liked them a lot more. He said they were much more consistent across the 12 as far as lb rate specs at important measured heights. And using an installed height micrometer I was able to juggle valve spring shims to get installed heights within .001" of the necessary installed height spec for each. -
New Cam and Rockers - odd looking at 500+ miles
inline6 replied to inline6's topic in Nissan L6 Forum
They look fine to me... -
New Cam and Rockers - odd looking at 500+ miles
inline6 replied to inline6's topic in Nissan L6 Forum
So, there has been a long silence because I damaged the cam a third time on fire up weeks ago. Yes, for a third time. Things changed for the third attempt were: Block sent to engine builder, dissembled, everything checked, only change was a touch up hone There were no blockages Cylinder head galleys checked for blockages. There were none - I cleaned them while I was there. Cylinder head oil supply hole opened up to .125" Nissan Comp head gasket opened a touch at Cylinder head supply hole for correction of alignment Brad Penn 30 wt break in oil - high zinc content Red line assembly lube on cam lobes Use of pressure oiling kit to blast oil through all oil galleys just before startup Rebello camshaft spray bar - I replaced the factory oil spray bar Same induction set up - everything adjusted as prior, when engine last ran - assures quick initial start up I hooked up the pressure tank to the oil sender location on the block. Opened the valve until I saw oil come out of the cam lobe that can be seen with the oil cap off. I closed the valve, removed the tank supply line from the block, put the oil pressure sender back on, and sprayed a touch of starter fluid in the carb air horns. The engine fired immediately. I ran it only for four minutes, pulled the valve cover, and most of the rocker pads had deposited some of their pad material onto the cam lobes. Third time was not a charm. Sent cam off for repairs (again). Sent rockers off for repairs (again). Received rockers back from Delta, 10 of 12 were good. Two had to be sent back. One of those came back good, one was about .013" out of plane with the rocker tip surface and had to be sent back again (this was like regrind four, or five, or six on this one - I lost count). Many hundreds of dollars later... I made a shaft out of 1/2 inch diam aluminum from Home Depot. I modded it to the fit the oil pump so I could drive the pump with a drill from above the distributor mount location. I tested that out with a dry oil pump. Despite repeated tries, oil never flowed. Don't ever put a dry oil pump on your l series. I then put some oil in the pump through the inlet/outlet holes and re-installed the pump with my "fake" shaft. I attached the drill and then squeezed the trigger to run the drill slowly. Wait for it (drill still running) wait for it... drill still running... and finally here comes the oil out of the cam and the Rebello spray bar. You can see a video of this here: https://www.youtube.com/watch?v=pzW6H88qWF4 It is scary how long it takes for oil to start coming out of this cam. Today, I very carefully went about getting the engine started. The changes from last time were: Use of a block heater (a heating pad my engine builder sent to me) to heat Brad Penn 30 wt oil prior to starting - shop temperature was only something like 50 degrees Don Potter oil pump spring kit for oil pump bypass. Only one washer installed for maximum oil pressure kit supplies New valve springs which allow .050" to coil bind instead of the old ones which were around .028" to coil bind. Moly oil lube used on cam lobes Rocker arms left off, spark plugs out, for initial attempt to get oil to come from cam. Once the oil was up to very warm temperature, with the oil pump and the real oil pump shaft installed, and with the rockers left uninstalled and the spark plugs not installed, I turned the engine over with the starter. I did this tentatively at first. First just a few seconds. Then again, a little longer. Then a little longer... until I finally had some oil come out of the camshaft lobe holes. Next, I installed the rockers and adjusted them to .015" clearance (both intake and exhaust) per cam manufacturer. I poured the Moly lube/oil onto each of the cam lobes. Again, I turned the engine over with the starter. And again, I did it tentatively. I checked camshaft lobes and rocker arm pad for any issues. I re-lubed the cam lobes between attempts as I progressively increased the amount of time of engaging the starter. I did this until I finally got some oil to come out of the cam lobes. Even with a fully pre-lubed engine... which is left to sit for only a few minutes, my guess is that it takes something like 10 seconds of free spinning the engine (without spark plugs) via the starter (gear reduction one) for oil to come out of the cam! Next, I put the spark plugs in and fired the engine. It fired immediately, and I held RPMs at about 1200 for a minute, and then set the throttle linkage to hold about 2100 RPM for 20 minutes straight. I then shut it down and pulled the rocker cover. There is no damage. However, this thing with oil taking forever to get to the cam is not good. I'm not going to be able to preheat my oil every time I want to start this engine. So, looking back on this whole multi-year ordeal, why did I have this much trouble getting this engine fired without wrecking cams? I am not convinced that I am out of the forest yet. A thought comes to mind. I seem to recall that this cam is "rifle drilled". Could it be that there is more open volume inside this cam that takes longer to fill, and this is contributing to oil starvation during say, the first ten seconds of start up? Next, I'll be replacing the oil filter with a new one. And the very next time I start it, I'll be preheating the oil again, but I will drive the car at least 150 miles or so to try to get a bit of break in. Then, the 30 wt Brad Penn is coming out. I'll replace the filter again and put in Valvoline VR1 Racing 10W30. Going to be researching AccuSump... and looking at other options to get oil to the cam faster. G -
NA 3.1L=>head & camshaft questions. No shortcuts, max
inline6 replied to zredbaron's topic in Nissan L6 Forum
Just wanted to get back to everyone on this thread and let you know that I was able to track down a set of valve springs from Jim Wolf Technology for the Sunbelt Race #2 cam that are perfect. Item number: AVG3E-SPRNG Spring/Shim Set VG30E, VG33E Outer Spring Only, I/H 1.600 80 LB on seat .480" lift max. The "L6" spring is no longer available. I had these new springs sent to my engine builder and he came up with the following measurements on the new springs using a valve spring testing tool: At installed height of 1.690" - 65 lbs. (This is the seat pressure - valve closed) At 1.140" - this is the dimension at .550 max lift (which the Race Cam #2 has) - 195 lbs. Coil Bind occurs at 1.090", or .600 max lift. Thus, with my cam, I have .050" until coil bind with these new springs installed at a height of 1.690". Plus, my engine builder said each of the springs was extremely consistent, whereas the consistency was not as good with the set I received when I originally bought the cam. I am thrilled to have these springs instead of what I had before. Thanks again! G -
Whenever mine did that, I had a way to rich situation, not way too lean... but easy enough to check. Similarly to Tony's point, how is the syncing of the carbs? Ztherapy can't do that - it has to be done on the car.
-
I think you have a fuel delivery problem. The 23 mm measurement for float level in the Factory Workshop Manual (FSM) is from the fuel level with the float sitting in it, to the highest point on the inside of the roof of the float chamber cover. How are you checking that dimension? Since I couldn't determine an effective way, I used a section of a nail cut and then ground to a length of between 14 to 15 mm (the other spec shown in the FSM), and then pulled the SU tops off, used some wire nose pliers to hold the nail in position between metal strip on the float top... to the inside of the roof of the carb cover. I would then adjust the float arm just far enough so that when the float, nail, and top were all "bottomed out", I could not blow air through the fuel inlet pipe (with my mouth). You said you had the advance in the distributor reworked. I would hook up a timing light and spec out your advance functionality so you can verify it is not contributing to the problem. You should be able to see initial advance at idle, and then record advance movement as rpms increase. Full advance (record that amount) will probably be achieved somewhere between 3000 and 3500.
-
OS Giken TC24-BZ1 dyno run from just last month...