V-Fib
-
Posts
77 -
Joined
-
Last visited
-
Days Won
4
Content Type
Profiles
Forums
Blogs
Events
Gallery
Downloads
Store
Everything posted by V-Fib
-
If you want to drive down this Thursday, you can just have my R200 and all the accompanying hardware you need (sans the control arms and hubs/strut casings). I just don't have the time to dismantle it so you'll have to take the whole assay. Call me and let me know. I won't charge you for it... I need the space and you need the parts.
-
Very creative with the air dam to channel air to the intercooler. Reminds me of the factory air dam I have on my Evolution.
-

~73 Turbo L28 to N/A RB25 240z Project~
V-Fib replied to ~KnuckleDuster~'s topic in S30 Series - 240z, 260z, 280z
Nice! Very 1980s chic. -
~73 Turbo L28 to N/A RB25 240z Project~
V-Fib replied to ~KnuckleDuster~'s topic in S30 Series - 240z, 260z, 280z
This is random but what side mirrors are you using on your 240? -
Wow, you and I have nearly identical cars. Bought a 1977 that is fairly clean but generously rattle canned black all over. In fact I'm in the same spot as you with regards to my restoration. Sitting on a rotisserie stripping paint, killing rust and welding in new panels. I've decided to keep my ugly sunroof however.
-
My 240Z with supercharged BMW engine
V-Fib replied to TeemuM's topic in S30 Series - 240z, 260z, 280z
That is a real nice rear differential forward-mount. You wouldn't happen to have any schematics or drawings for it that you would be willing to share? I'm working on an R200 short nose swap myself. -
Very clean build. Great attention to detail! If it's one thing I learned from your build is that leave the car primed (except for the underside, inside and engine bay) until you assemble the suspension and drive-terrain to avoid scratching the final finish. BTW How's that Scorpion lining holding up? Is it rubberized in texture or pretty solid? I'm looking for something similar to apply to the underside of my car once it's all prepped and ready.
-
Strong work. Looking good man, simple yet elegant at the same time. Inspiration for me to keep working on mine.
-
Barn find,untouched for 25 years Starts right up!
V-Fib replied to Joemama's topic in S30 Series - 240z, 260z, 280z
A true barn find indeed. Very nice. -
Rusted out panels being cut with only mild surface rust underneath. Clean front left side. Some rust converting agents to treat the surface rust inside and out.
-
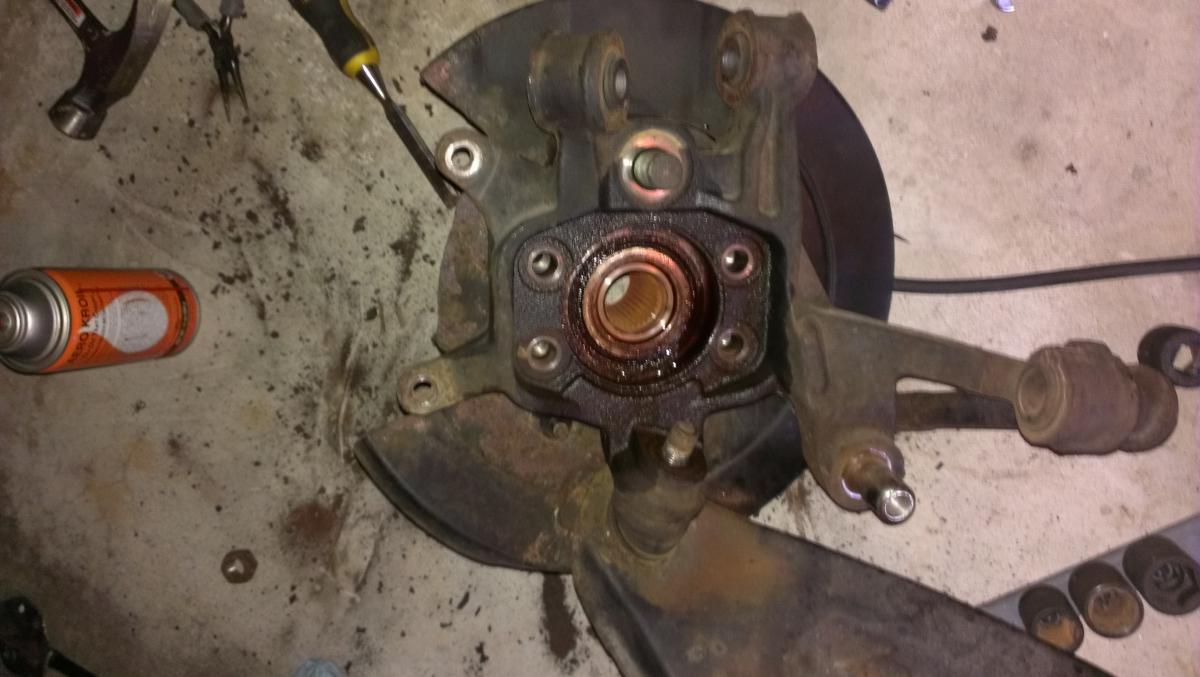
Need Assistance: R33 GTS-T Rear Hub Removal
V-Fib replied to V-Fib's topic in Brakes, Wheels, Suspension and Chassis
Thank you guys for the help. I claim victory... I used a liberal amount of Kroil, then a 1/4" steel disk that I put in the back of the hub followed by locking the 5 ton puller over it and driving it with my Milwaukee 300 ft-lb impact wrench. Just went *ping* and popped right out. Got frazzled initially hence the post. Next time I'll use my head prior to taking up forum space. lol -
Need Assistance: R33 GTS-T Rear Hub Removal
V-Fib replied to V-Fib's topic in Brakes, Wheels, Suspension and Chassis
Should have been more specific... I fail. The bolts came out like butter with an impact gun. The rear portion of the hub assay is stuck inside the backing plate. I knew I should have posted a photo of my own. I've tapped from the axle side and tried using a three jaw puller to "push" it out.
-
As the title implies attempting to remove the rear hub assay from the backing plate. Got my axles, R200 and brakes dismounted but this is not coming off. Any bright ideas are welcome. See photo attached (it's borrowed but mine looks exactly the same). I know it's not the best place to post this but it's quicker compared to registering on a Skyline forum... and Dr. Google didn't help either.
-
WTB: Patch Panels for fender lower and rear valence/corners.
V-Fib replied to V-Fib's topic in Parts Wanted
Still looking. -
Speaks for itself. Needed for 280z - rear valence is what's going to be focal. Good used from a donor or aftermarket patch is fine. Beggars can't be choosers.
-
The bottom end now devoid of all plumbing and mechanics. More sound-deadening peeled off and then washed with mineral spirits. Got a Millermatic MIG Wire-Feeder today. Patching her up soon!
-
Time for the MEGA UPDATE... Cut out the battery tray and surrounding fender plus firewall area that were impacted by rust the most: Now for the cancer free area: I subsequently moved into a house with a two-car garage so the Z was relocated to my home: My friend and I spent a solid 5 hours with oscillating multi tools stripping away the undercoating: Followed by a mineral spirits bath to remove the residual tar: Got part way under but the rear is yet to come: The next step is to weld up the patch panels to the existing holes. No new rust has been found at this point. Once it has been patched it is off to the media blaster!
-
Thank you for your input guys. Very reassuring to know this is simply a common manufacturing blemish.
-
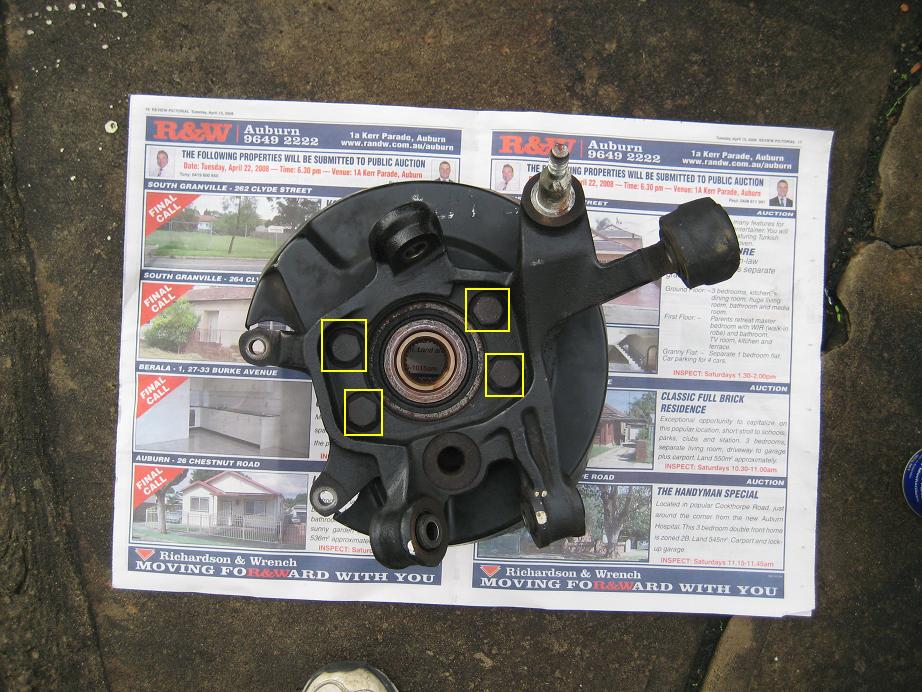
Yeah a bit of a noob question. Here is a photo for reference. Good to know my initial response was...
-
So I have finished stripping away the sound deadning material and the undercoating and it has exposed wavy ripples in two places: the rear portion of the passenger's side floor pan and the metal surrounding the spare tire well on the driver's side. Has anyone seen this before and is this at all a bad sign? Similar to a pop can that has been crumpled and then straightened back out. There is no signs of repaired body damage and no signs of similar rippling anywhere else. These spots are in two distinctly separate places with not signs of rippling or warping anywhere else. I have photos but my phone is acting up - will post some later. This is my first restoration and I may be overreacting - but has anyone seen this before?
-
Is anyone using these forged rods in their build and can anyone attest to the quality and reliability? Don't really care to hear "I know a guy who I think used these..." I am considering using these for my turbo L28 that I am building. Will be used in a primarily street car with intermittent auto cross and track use. Rarely to exceed 7K RPM, and a horsepower goal of 350-500 HP.
-
The rear end finally came out suspension, subframe and differential. All that is left on the car is the brake/fuel lines, the windshield and the sound deadening. Underneath the tar coating - is clean virgin metal. SURPRISE NO RUST!
-
Car is finally up on the rotisserie.
-
RHD Jp marks up the price but it's better then paying the 150-200% markup that the US distributors put on these parts. I've been taking advantage of the low exchange rates to buy Kameari parts through an acquaintance in Japan like it's going out of style.
-
My 1st Engine Build Ever ( L26 Refresh Log )
V-Fib replied to Nite_Grind's topic in S30 Series - 240z, 260z, 280z
Which engine/machine shop did you send your block parts to?