manimal
-
Posts
32 -
Joined
-
Last visited
-
Days Won
3
Recent Profile Visitors
4188 profile views


manimal's Achievements
")


-
Probably not helpful for you at this point, but Iron front caliper w/new pads, 2x mounting bolts(54g), and the stubby hardline(26g) - 4.53kg 260/280 front rotor, new - 5.27kg Front brake shield w/hardware - 0.505kg Rear aluminum drum, pads, backing plate, hardware, short hard+soft line, worn ~30% - 5.92kg Complete front brake assembly weight per side - 10.3kg(22.65lb), rear - 5.92kg(13lbs) My setup for reference added 18.32lbs compared to the OEM disc/drum setup Front - Z32 aluminum caliper(2.795kg), pads (0.735kg), Odyssey 296mm rotor(7.7kg), adapter, and hardware - 11.73kg (25.81lbs) Rear - VW aluminum caliper(2.55kg), pads (0.38kg), Z31 84-86 NA rear rotor(4.96kg), adapter, and hardware - 8.64kg (19.0lbs) Seats aren't 35lbs. The stock vinyl seat is 11.65kg(25.6lb) without the sliders and 13.70kg(30.1lbs) with them. Antigravity ATX30 restart battery, no terminals 2.45kg Front subframe, no hardware - 4.95kg Front subframe with engine mount risers removed - 4.28kg Brake booster with aluminum clocking plate - 2.78kg Wilwood 1" master w/Z reservoirs - 0.90kg Front tow hooks pair with 4x bolts - 0.88kg Stock 240z/260z spare - 17.1kg 07-12 Sentra 16" spare - 12.28kg Konig Rewind 16x7 with 205/55 Firestone Indy500 - 17.56kg Factory scissor jack 3.21kg Front early 260z bumper mounts with hardware, pair - 4.80kg Front early 260z bumper, no rubber trim panels or end mounts - 4.67kg Horn pair with hardware - 0.96kg Steel splash pan with hardware - 1.71kg front control arm w/rubber bushing- 1.20kg Outer tie rod - 0.61kg front ball joint - 0.70kg TC rod, no bushing/washers - 0.785kg 240z front spring - 2.175kg front spring top hat - 0.26kg Eibach 10" 225lb 2.5id spring - 1.135kg OEM strut top isolator w/hardware - 0.82kg Strut top bearing - 0.145kg 260z Front hub with bearing and grease, no studs - 3.04kg 4x ARP 2.7" extended studs - 0.223kg Rear control arm with poly bushings, spindle pin, and M20(?) bolt - 5.46kg Rear strut, shortened 1.5in w/5" aluminum coilover sleeve & adjuster, bilstein VW MK2 insert, stub axle - 11.78kg Bilstein VW MK2 insert with gland nut and top M14 nut - 1.60kg Front Diff/control arm mount w/4x bolts - 2.06kg Front Diff rubber mount(inc 2x M12 bolts, 245g) - 1.33kg Diff hold down strap w/hardware - 1.10kg R180 mustache bar w/rubber bushings - 2.75kg R180 260z with axles and fluid - 38.75kg Subaru R180 3.91 torsen lsd, dry, no stub shafts - 25.40kg 4spd 260z driveshaft w/hardware - 4.25kg 4spd trans w/clutch fork & TOB, no fluid or shift lever - 34.90kg 260z trans mount beam, M14 bolts, and rubber isolator - 2.15kg clutch disc and pressure plate - 5.20kg OEM flywheel + crank bolts - 10.05kg OEM chonky starter, not gear reduction version - 5.70kg Champion aluminum radiator 2.25" core w/mounting hardware - 5.52kg MSA aluminum dual fan shroud w/2x 12in fans + hardware - 3.07kg 260z steering wheel and horn pad - 2.33kg steering column shroud w/hardware - 0.17kg half dash cap - 0.60kg 260z console w/fat arm rest 2.53kg Rear side/taillight panels - 2.00kg Fender "assembly" with headlight bucket, hella H4, and side marker - 8.50kg Hella H4, old west germany stamp - 0.505kg koito H4, 2024 production 0.675kg datsun headlight bucket and retaining ring w/wire harness - 0.60kg Cowl - 2.09kg early 260z grill - 1.07kg Washer fluid bottle and pump - 0.225kg hood prop rod and hardware - 0.16kg Charcoal canister + bracket and hardware - 1.37kg
-
Progress, that's what matters most! I'd strongly recommend adding more to that engine plate. It looks like 1/8" and with the way the tube is attached it will flex and eventually crack. I'd do at least another 1/8" which could be added to the back side all around, except for where the hole without the standoff is. Drill a few holes in the backing plate and plug weld it too. If you used 1/8" on the drivers side I'd do the same thing.
-
Apex Engineered suspension and brakes
manimal replied to Apex's topic in S30 Series - 240z, 260z, 280z
No worries, I enjoy simple CAD projects. It doesn't need to be on the car, all I need is the 370z wheel bearing on the strut assembly. I looked over my rear brake setup and I could adapt it to the 258mm rear rotor so it should be easy to do the same rotor on the Apex strut. -
When you do the final assembly on your motor, use hondabond on the rear water neck. I tried to use the included orings and it leaked. I put a generic temp sensor from ebay in the 1/8" npt port on the water neck and connected it to the factory wiring. My OEM water temp gauge works fine and reports a position which seems to match what Hondata is telling me. Careful with a lot of the cheap temp sensors. I tried two different amazon sellers which had 3pks listed as 1/8npt, but after multiple returns they kept sending M10x1.0 sensors. The single $10ish sensor I bought off ebay was 1/8 npt.
-
Apex Engineered suspension and brakes
manimal replied to Apex's topic in S30 Series - 240z, 260z, 280z
What wheels are you wanting to run? If they're low offset with lots of dish that gravel rally front brake kit won't work, probably the same with the rear. They mention running 25mm spacers to gain clearance for the calipers and using a +35 wheel. Based on the wheels listed on their website that would probably be a 15x6.5 et35. If you are trying to run something like a 15x9 it would need around a +15 offset and +25mm or greater spacers to potentially clear. I have the 300zx calipers on odyssey rotors and a VW rear caliper with the 290mm 84/5 300zx NA rear rotor with 16x7 et0 Konig Rewinds. There's no chance the 15" konigs would clear front or rear, maybe up front with some big spacers. The front gravel rally brake kit their offering uses rotors with 2mm less offset which would bring the caliper even closer to hitting. Not to mention the caliper was designed for 30mm wide rotors and the 350z rotors are 24mm wide. That's getting kinda iffy with potentially pushing your pistons out. It probably isn't an issue with rally cars because they're constantly being serviced. It might be OK if you had some 1/8" shims cut from AR500 steel and put them behind the pads, but I've never had to do anything like that. I can try to mock up the 300zx caliper & rotor on your front suspension. I have a model of the caliper and my 16" wheel and a different 15" wheel. I would need you to 1. Assemble your front hub/strut 2. Measure the distance from the hub face where the rotor rests to where the brake mounts(using calipers) 3. Take a picture of the hub/strut from a distance, zoomed in, with the hub the center of the image, the camera parallel to the hub face, and at least a 12" ruler clamped to the hub Ditto for the rear if you do the steps above. I don't have a 240sx caliper model, but if my vw caliper fit with a 240sx rotor, then the SX caliper would work. -
Apex Engineered suspension and brakes
manimal replied to Apex's topic in S30 Series - 240z, 260z, 280z
Z32 front rotors are 5 lug 280mm OD, 240sx rear are 258mm OD. The Z32 calipers are dual 40mm pistons and the 240sx rear caliper is 38mm with a built in parking brake mechanism. The balance would be pretty close to stock 300zx with a bit more front bias since the Z32 has a 297mm rear rotor with the same 38mm caliper piston. I doubt anyone makes a brake kit utilizing these parts, but adapters could be made if you have the skills/tools available. Sorry I can't be of more help. -
Anyone ever used Gyraline DIY alignment tool?
manimal replied to kaibiagi's topic in Brakes, Wheels, Suspension and Chassis
Have you reached out to any of the automotive YT creators? Having a review from someone impartial like superfastmatt would help convince people of it's utility. He seems like one of the few who would give an honest review. This seems like a really great tool and I might be interested in a lifetime membership if there was some way to guarantee you'll be supporting it for at least 5 years. -
Apex Engineered suspension and brakes
manimal replied to Apex's topic in S30 Series - 240z, 260z, 280z
He sells front and rear wilwood kits and states "fits under most 15" wheels" as well as providing a fit template you can test. The front appears to use 300x32mm rotors which are commonly used on brake kits with 15" wheels, the rears look like 290mm 84/85 300zx turbo rotors. -
Beautiful work! I'd love to see more pics of the rear diff cradle and what's going on around the transmission and the matching(I assume) front control arms. The driveline work to fit the Z31 parts and Z32 brakes is so clean! Are you doing all your machining on a 3 axis mill? Turned parts not withstanding. That Alodine coating looks really good. It's a nice compliment to the cadmium/yellow zinc fasteners and fits the vintage car vibe. I hadn't heard of that coating before, based on some youtube videos it looks pretty easy. I've got a few vintage bicycles where that would be the perfect color compliment. Dual is correct btw. I think the other poster didn't realize you meant dual exhaust.
-
@Martin, Do you have 2.5" coilovers or factory springs/perches? Is your car lowered? Do you have any negative camber? Can you post a link to the wheels you found? It looks like @Primaz, hasn't visited in a few months and the above information will help others with that wheel size answer your question. Personally I'm running 16x7 et0 with a 205/55 Indy500. My car is lowered with 2.5" coilover springs, 2deg TTT camber/RCA spacers in front, nothing in back, and unmodified fenders. Even with the 205/55's I'm getting contact between the tire and fender in the back. A 16x8 et0 would push the lip 13mm outward making this worse while a 16x8 +20 should tuck the tire in enough to eliminate the interference while not appearing sucked in, see post #8. In a week I'll have a chance to crawl under my car and see how much clearance I have between the tire and strut/body.
-
$1200 for the used Panasports is a bit high IMO unless they have good tires in the size you need. I have 16x7 et0 Konig Rewinds from MSA (thezstore.com) which were $600. With 205/55 Firestone Indy 500s(budget RE-71r w/higher 340TW rating, $143) they will rub approaching full compression without rolled fenders. The combo weighs 37.6lbs and the rim is 15.5lbs, both numbers from my scale. I doubt the Panasports are lighter. Unfortunately I don't have my notes on the rocker panel to ground distance for this shot, but the car is ~1/2" from hard bottom. The car is lowered and I plan to roll the fenders. Rough math, (25" tire/2)+(rim diameter 17"/2)+40mm means the top of my rear fender is 22.5" off the ground with the 25" tall tire. Measure from the ground to the top of your fender + your current rocker height and you'll have a close approximation of how low this is in relation to what you're going to run. 205/50 likely won't rub and some other 205/55 tires may not rub. The Indy 500's are fairly square.

-
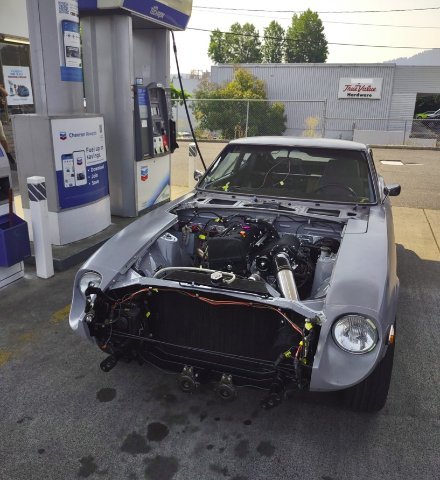
Drove it for the first time yesterday. Still more testing to do, but it didn't overheat. A lesson for anyone K swapping with Hondata Kpro who doesn't have experience tuning is start with the provided TSX 04-05 91 octane basemap and the original 310cc injectors. This is my first tunable ecu engine swap. I tried to start with 550cc injectors using the stated base map with corrected injector size and voltage compensation numbers. It ran so bad and ended up throwing a P1166 code for a bad o2 sensor, even though the o2 sensor is a new OEM unit. I bought another new one and installed it, no change, though the P1166 code didn't come back. AFRs were crazy reading in the low 20's at idle. After making some adjustments to the fuel numbers based on the datalog it still ran terrible and had a high idle around 1350. After messing with it for a few days and reading everything I could find I put the stock 310cc injectors in, loaded the TSX 91 octane base map, and it immediately started to idle around 950-1000. With some minor adjustments to the throttle stop it smoothed out, held close to 1000 idle, and had much more stable AFRs around 14.5-15. It still has a weird idle issue where when it warms up it like to idle around 1200. Sometimes after driving for a bit it'll idle at 1050-1100, other times when the temp is the same it wants to idle at 1300. Still a lot more to do, but getting it out for a drive really helps the motivation on a very long project.
-
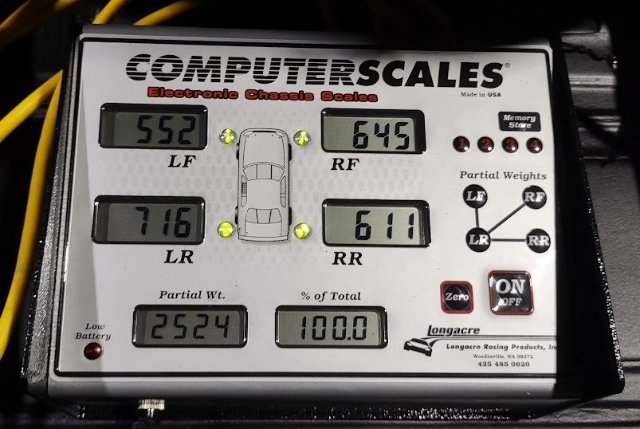
As of earlier this evening, right after I got it running/idling for the first time. I've got a few full days the next week so I might not update this for a bit. I plan on cleaning up my wiring notes, spreadsheet of purchased parts, and collection of helpful links. I'll post all that in the next few weeks. I'm also going to be selling the engine/transmission mounts. I haven't decided on a price yet, but I do have a few sets welded and powder coated already. Something I was very curious about during the process is the final weight of the car and what the difference between the L26 and K24 was. I weighed every major part and most of the minor ones, all of that will end up in a spread sheet eventually. I don't have automotive scales, but I do have two 400lb bathroom scales. To make this as accurate as I could I made three platforms the same height as the scales with a bridge board on them so the corner being measured is at the same height as the other three. As it sits with 4 gallons of gas and missing ~175lbs worth of body parts the car is 1860lbs. If those bathroom scales are correct it should weigh <2100lbs with a full tank. In a few weeks I'll have a chance to throw it on actual scales and get a much more accurate reading. ***** Edit: I'll leave the prior text in, but the double home scale method didn't work. I put the car on scales recently and with just under half a tank based on the gauge I was at 2461 without the spare/jack. This includes the roof rack and trailer hitch which adds 39lbs, so 2420-2430 with half a tank. I'm still working through all my weight pics and organizing it, but as it sits the K24/S2000 trans swap is right around 80lbs lighter than the L26/4spd with dual weber 32/36s. This K24 has a type S oil pump which is 8-10lbs lighter than the balance shaft K24 pump, but the increased oil capacity and weld in oil pan baffle negate that savings. Flywheel is a steel clutchmasters. The 2524lb weight is with a 16" Nissan 2007-12 spare(& spacers to clear brakes), oem jack & tire chock, one "big red AT43004BR" jack stand, my own tool kit, 12v tire inflator, noco jump starter, and some miscellaneous roadside repair nice-to-haves.
-
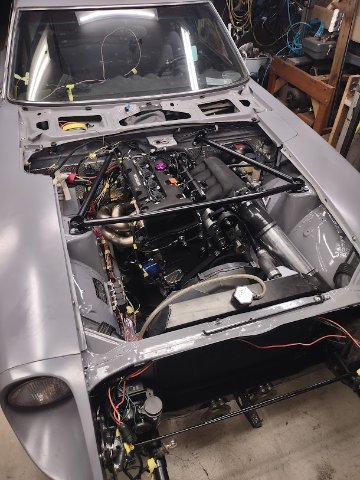
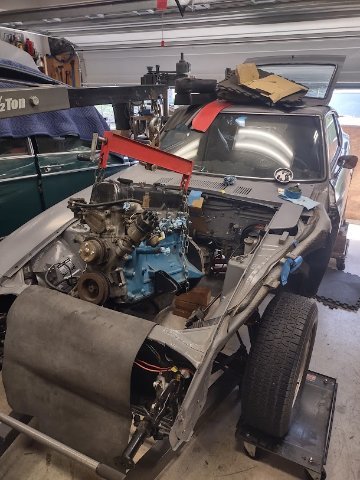
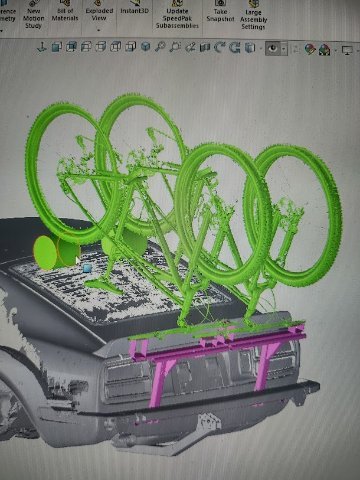
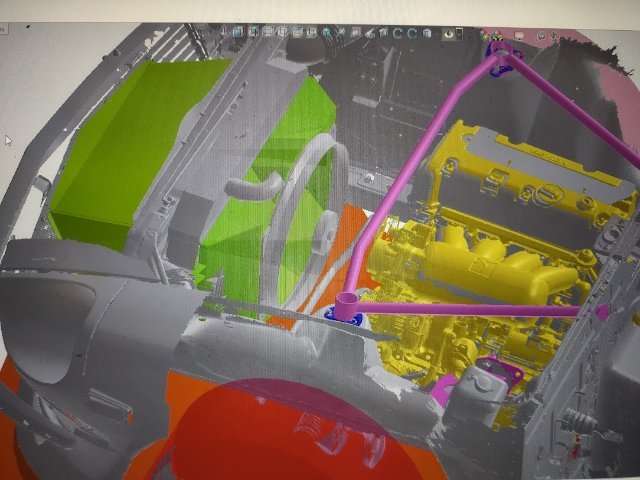
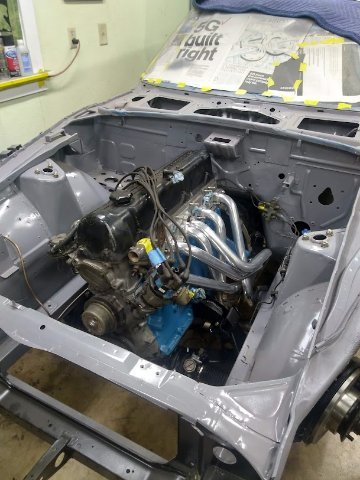
RWD K swaps started showing up in social media a lot around this time. After running the numbers, I figured I could do the entire K swap for around the cost of a reputable built higher output L28, but then I'd have a lighter car, better transmission, more reliable running/starting, better mpg, and an engine which can be replaced at any point for <$1000. I was working for a company with the industrial tools a home fabricator dreams about, 4kw sheet/tube laser, cnc press brakes, professional 3d scanner, and a lot of scrap metal in many thicknesses/tube profiles. ***this is a very short summary of a 12-18 month project, more to come later*** April 2022 I moved the car to my parents packed garage and got to work with the 3d scanner. After reading a lot of forum posts I made a spreadsheet of what I thought I needed and started buying parts. The 3d scanner was incredible to use, though the entire process of scan to workable model oriented in space was a lot more involved than I expected. Bye bye L26 Hello K First test fit, many hours spent getting the alignment just right. First test fit with the prototype mounts The project involved many detours like a bike rack w/1.25" hitch receiver. Mainly due to the excitement of being able to build whatever I could dream up with sheet metal and tube, this project took 9-12 months longer than if the only goal was the engine swap. Overlay of the K24 located in the model(yellow) vs the engine scanned in the car(grey). Pretty close, adjustment side to side/fore-aft was built into the mounts.
-
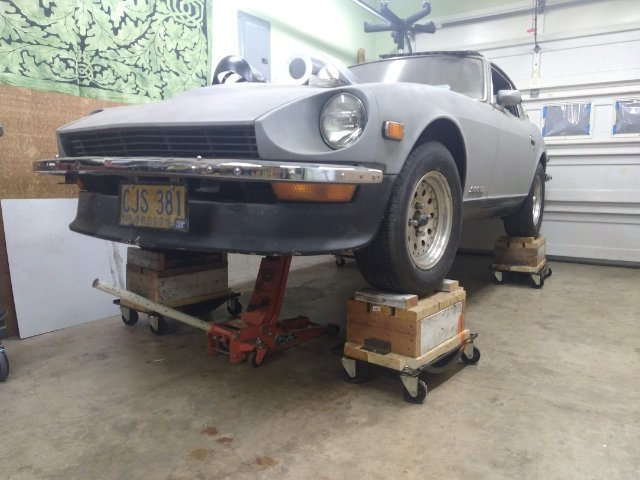
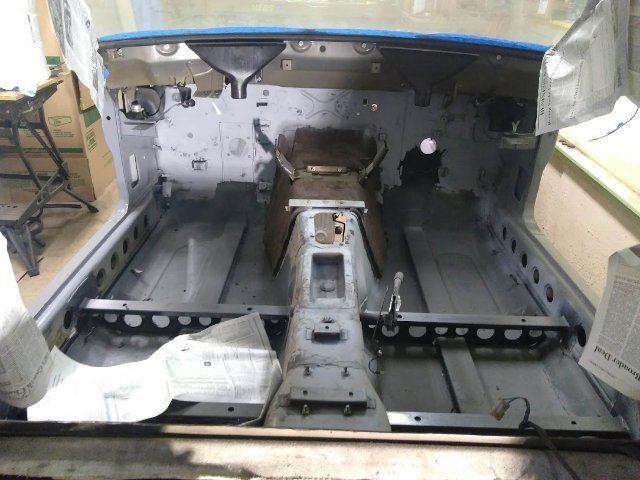
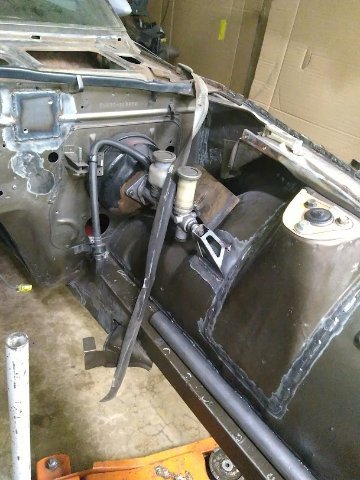
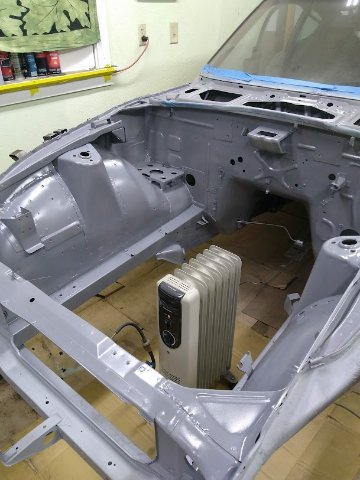
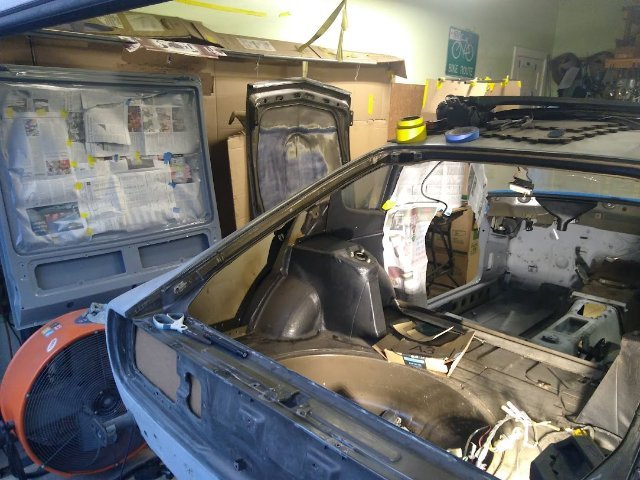
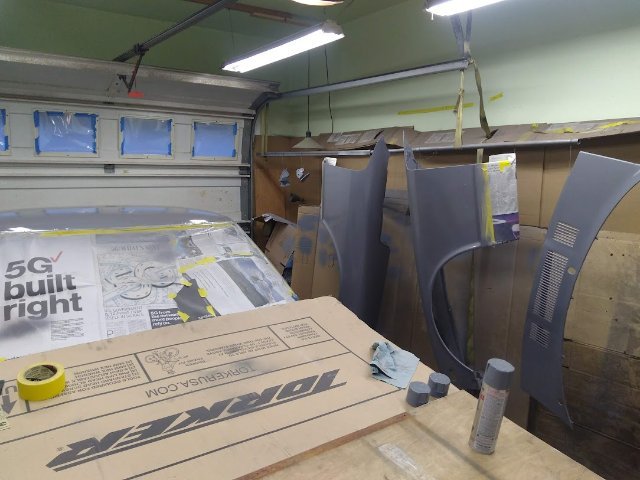
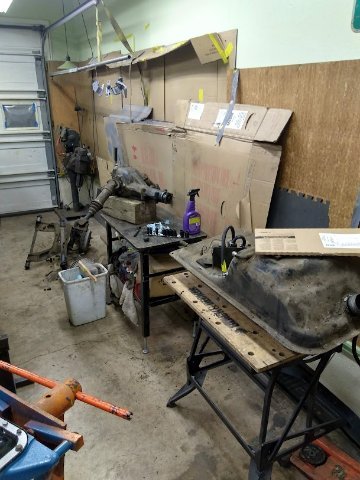
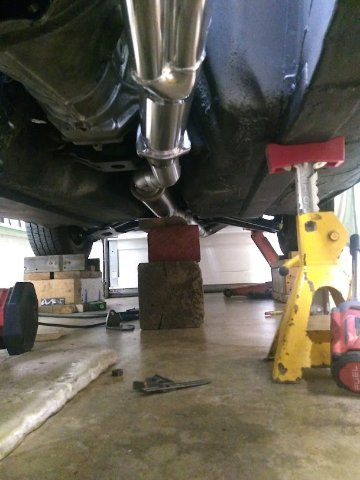
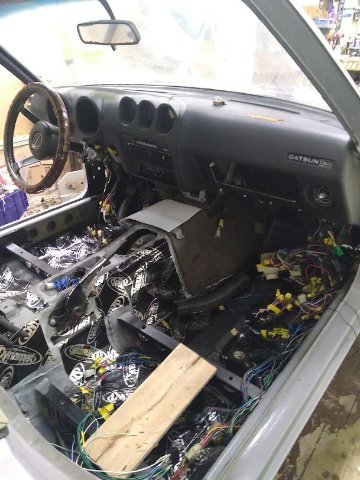
It's been a long time coming, but the car finally runs in it's second iteration. I purchased it around 10 years ago when I had a few non-running projects thinking "buying another project that runs and needs work is a good idea". It stops running almost immediately, then a move disrupts the progress. Two years later a second move is motivation to get it to running since driving it into the garage is the only way it'll make it. The moment I got it running again and had a rather scary drive around the block. Fuel lines dripping, brakes barely working, and really struggling to hold an idle. Replaced the fuel lines and got it to run just enough to drive it up the steep single car driveway. Oct 2018, up on blocks for a refresh. Rust ended up being worse than I expected. The bushing/brake/engine/suspension refresh turned into disassembling it to the shell, leaving on the windshield in since it had a crack. Over the next year I patched the floor panels and battery area. Replaced the OE "frame rails" with some 40x70x2.4mm box tubing. Made some "K" braces and a brake master cyl brace. Added plates for a strut/firewall brace. Now in November 2019 I had a change which necessitated getting the car done by may 2020... Unfortunately the car was poorly done primer when I bought it and the PO had sanded through the paint in many places so surface rust was showing all over it. I decided to sand and do my best with Rustoleum Industrial primer, then paint, in late November-December. The results are meh, but I don't have to worry about it getting dinged and the plan was/is to make it my daily. 1 After the painting I sectioned the struts, fitted Bilstein VW rabbit inserts, retained the factory top hats, and added 2.5" adjustable sleeves + springs. The rest of the suspension/driveline was cleaned up, fluids replaced, new brake pads/rotors/master cyl, and front wheel bearings. Cleaned the fuel tank and replaced the vent lines. Also fabricated a 2.5" header back exhaust tucked up tight for ground clearance. The car is an early '74 and has the stupid interlock system. I decided to remove it from the wiring harness. While doing this I also re-routed power for the headlights, running lights, wiper(honda motor swap there too), etc... No all of that is on relays and the combi switch is only supplying a few amps so it shouldn't burn up. This was my first time doing any electrical beyond a simple relay harness for an electric fan. Many hours were spent staring at wiring diagrams, tracing, and labeling. reassembly I got lucky and it started first try. Definitely didn't think that would happen considering all of the wiring harness changes. May 2020. Moved out three days later and parked the car at a friend's shop since I didn't have space at the time...and it sat again. Worked on it a bit, but never got it to run as well as I had hoped. It was running the factory L26 with a pair of weber 32/36s. The motor was definitely a bit tired. I was facing another move to a much bigger city(late 2021) where I wouldn't have a garage, spare parking spot, or place to work on the car. I debated a few options like L28/old fuel injection, Ztherapy carbs on a rebuilt or better condition L24/6/8, megasquirt, etc... At the time there weren't any running engines within 200 miles and the above options all cost quite a lot for something still questionable. I considered a LS, but at the time believed that would have led to needing a rear end update as well. Enter, the K.