wingwalker
-
Posts
64 -
Joined
-
Last visited
-
Days Won
3


wingwalker's Achievements
")


-
Five years later--a 280Z project
wingwalker replied to wingwalker's topic in Gen I & II Chevy V8 Tech Board
rxx2rxx2 The JTR mounts placed the engine low enough for a stock hood (this one is off a 240Z). I fretted about it, but even with that rather large air cleaner, it clears nicely. JTR makes a pair of spacers that lift the front end in relation to the front crossmember for more under-hood clearance, and I purchased those. But I didn't need them. -
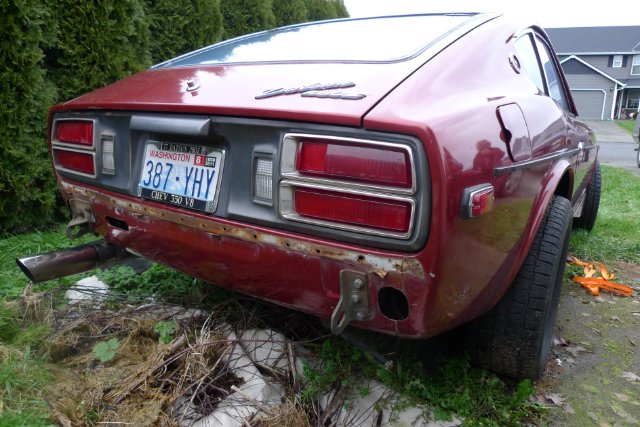
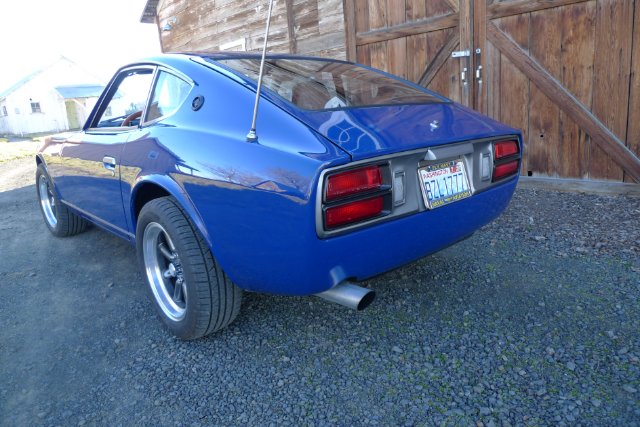
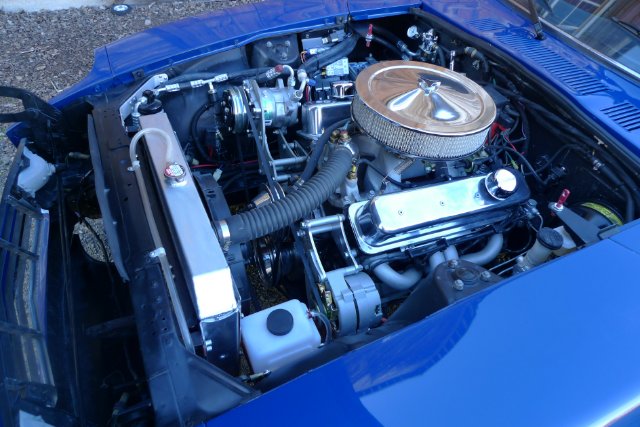
A little over five years ago I joined this forum, having just purchased a stalled project, a 280Z with a partially installed small block. When I started, I'd have guessed six months to a year until it was on the road. But as I dug into it, I found I'd have to undo much of what had been done. And I found rust--a lot more than I saw when I bought it. The transmission was an old-looking 350 automatic, a three-speed, and I wanted a fourth gear so it would cruise at a reasonable rpm, rather than scream. I bought a 2004R and rebuilt it over the winter--a nice project for the heated part of my shop. I bought motor mounts from JTR and scrapped the front mounts that the engine had been sitting on. There was no rear crossmember; the tail of the old 350 tranny had been sitting on the exhaust pipe! Along the way, I received a lot of help and good advice from folks on this site. Thank you again. All good advice. I did all the body work, which took a ton of time. The battery area was eaten up, so I had to rebuild that and part of the firewall. And acid had dripped down onto the lower passenger side of the front fender (on the inside) and eaten a hole there. I eliminated the side markers and holes from the rear bumper to smooth the car up (which required a lot more welding). Accompanying photos will tell the rest of the story. in other posts under my moniker, are write-ups on some of the efforts that went into this thing. I knew the engine was either a crate engine or had been built by a very good shop. It had never been run until I started it recently, but I have no other information on it. I pulled the rocker covers and discovered new roller-rockers, so that told me the heads had been done and likely the cam was an upgrade. Along with the car came a new (in the box) Holley 670 Avenger, and the intake was aftermarket. I was not, however, prepared for the aggressive cam in this engine. Yikes. Very lumpy, and it revs very quickly. There are still issues to sort out. The headlights didn't work properly, and after many hours I traced that to a loose wire in a relay socket. The turn signals didn't work, and that turned out to be because the new flasher unit had worked itself loose in its socket. The Holley 670 carb doesn't deliver enough fuel when I put my foot into it, so I've bought a larger accelerator nozzle to try to keep it from stumbling (but haven't yet put that in). The Holley website says that's an issue in lighter cars--that the accelerator pump system as delivered is dialed in for heavy vehicles. The Vintage Air air conditioner doesn't work, so I need to have the refrigerant pulled out in order to troubleshoot (I'm going to have a shop do it). And the tach doesn't work, so I need to pull it and see what's going on. Maybe another loose wire or something else simple. Other than that, everything else works fine. It's scary fast--too fast for a guy my age (I'll turn 80 this July). I'll post a few photos below. The bottom two are as it sat when I bought it. Lots more rust than meets the eye--all properly patched now. I have painted my recent projects until now, but this was done by a local body shop. I then did all the cut and buff (and it still needs a final buffing, then after it warms up and the paint has hardened more, I do one more swirl removal and wax it.

-
Yep, Rossman, it's a jokey name for what turns out to be a very cool town. We moved here in 2004 from California (and Mexico before that), where we had lived and cruised aboard a sailboat for two and a half years. In the mid-1970s two hobby wine-makers discovered that grapes grown on what formerly had been Walla Walla wheat land (and later on rocky hillsides) produced wonderful wine grapes. Now there are some 120 world-class wineries here. One recently had a red judged best in the world (in London judging). So, this has become the Napa of the Northwest, and with this has come fine restaurants and lodging. I ran a wire from the "tach" post on the HEI directly to the tachometer feed, and nada. Dead. Then I noticed that the needle is stuck at about the 800rpm spot. It should fall to zero, so I think the that gauge itself is toast. I'm going to move on. I don't need that input to drive, and I do want the car painted and the interior finished so I can use it this summer and fall. Later I'll likely replace the dead tach with a Speedhut gauge. Maybe the rest of the instruments at the same time. Thanks for checking out the book. I'm rather proud of it, since it has garnered some great reviews. And, along with some of the guys mentioned in the book, I've been invited to sit on a panel at the annual Tailhook Reunion in Reno in September. Theme of the reunion this year is the Vietnam Air War. I got in 137 combat missions, but the other pilots on the panel were all over 200 (and they managed to not get shot down). I have already purchased plane tickets for my wife and me, but I'm thinking it would be great fun to drive the Z down to Nevada from here--it's about a 10-hour run. I'll need to hustle to get her painted and finish the interior by then.
-
Fridge Gnome, I should respond to your post of last year. Urged on by you, I bought a 140-amp alternator. Then I went to a chart that told me I was way short on capacity of the alternator wire. And as mentioned, my alternator is on the wrong side (air conditioning considerations drove this). So this distance required far heavier gauge wire to the alternator. More wiring hell. Nothing is simple when you start making changes to these old cars (hot rodding, we called it back in my day ... and yes, I'm a geezer in his 80th year). At any rate, I was pleased to see the generator was charging properly after I started the car. By the way, one of the reasons for the extended length of this project is that I spent a great deal of time finishing a book on my exploits (and shootdown) as a Navy pilot during the Vietnam Air War. That book is finally out in hardback, paperback, e-book and recently as an audiobook. Reviews have been very favorable on both Amazon and Goodreads. It is titled Return to Saigon, and it is available through bookstores, Amazon and other outlets. Check it out. Like the 280Z V8, it's a project I'm proud of. I'll solve the the tach issue, then it's off to the body shop for paint. But, whoa, have you checked the prices for paint lately? Around here, all the shops are super busy with insurance work, so they are quoting prices ranging from $6,500 ("if it doesn't need any body work") to $10K. Yikes!
-
JHM. that does help. Now I just need to know where to hook up what. On the HEI there is a tach terminal, so I'm assuming a wire directly to the tach from that? Does it need to be switched or any other deviation from a straight line? Forgive me, I know little about wiring (even after wiring two cars--but then I always had my dad to advise me ... but he's gone). Is that one wire all that is needed (in addition to lighting), or is there a source of power involved? And if anyone wants to draw up a schematic, I'd be forever grateful--or at least grateful for a very long time.
-
I have made a bunch of progress and have the car running (and what a lovely sound that aggressive cam gives the engine as its exhaust blasts through a Flowmaster). Wiring is my weak area, so I was pleased with the following: 1. Started on first crank 2. Did not smoke anywhere 3. Did not blow any of the big fuses replacing the fusible links 4. And I was thrilled to see all the gauges actually working (I didn't try the lighting for them or the lights on the car). However, the tach doesn't work. Nada. I tried to follow the book as it pertains to HEI, but as I've written before, the wiring on this car had been butchered. This means I very well may have grabbed the wrong blue wire or the wrong black/white wire (or both). So I want to bypass the existing wiring and go directly from the HEI to the tach. And I know I need a 15k ohm 1/2 watt resister in there somewhere. Can someone please supply me with a simple schematic, maybe suggesting where I can pick up switched power as needed? Thanks P.S. I'm finishing the body work (block sanding in 100+ degree heat) and now trying to line up an affordable painter. The interior is all restored and ready to be installed after the paint--so the end is in sight. Whew. I started this in 2017--a long, hard process. But fun.
-
Front fender scraps from a flare installation
wingwalker replied to wingwalker's topic in Body Kits & Paint
Thanks to all of you for the generous responses. Walkerbk, you are closest, and since we get over to your side of the state a few times a year, I'll contact you before we make our next trip. I'm of course running slower than hoped on the body work, so it may be a month before I get back to you. Again, thanks to each of you for the responses. -
Do you still have the air dam for sale?
-
Front fender scraps from a flare installation
wingwalker replied to wingwalker's topic in Body Kits & Paint
Thanks, AydinZ71. I'm hoping to finish body work soon. Any chance you might move up the timeline for the front fenders? Or is there another Z-person out there who has recently done it and still has the trimmings? -
If you are installing flares on the front of your Z and have to cut away part of the fender. I'd be interested in your scraps. I have a 280Z that I'm doing body work on now, and find that a previous own cut away the edge of my front fenders to clear some aftermarket wheels with fat tires on them. I can't find patch panels, so believe your scraps may be my answer. I'm in the Pacific Northwest (Walla Walla), so nearby would be great. Let me know. Thanks.
-
I'm pretty sure my alternator has a bad diode, and it's only 65 amps, so I plan on replacing it. I just ordered a Vintage Air a/c and intend to add a hefty sound system--both of which will require more power than the stock 280Z ate (the a/c and heater uses electric servo controls rather than vacuum that the stock system used), so I'm thinking of ordering a 100-amp or larger alternator. The choices are overwhelming. Anyone care to steer me to the right choice? Cost is a facotr.
-
Rear end and driveshaft woes
wingwalker replied to wingwalker's topic in Gen I & II Chevy V8 Tech Board
The proper U-joint flange from JTR (the DAT-110-2 flange version) arrived in the mail--a nice piece, and I swapped it out for the improper one the previous owner had on it. Mated perfectly without any drama whatsoever. Tightening the four bolts that hold the flange to the differential is tedious, with two open-end wrenches achieving about a 1/16th turn at a time, but it's in . I finished rebuilding the brakes yesterday with the help of my son (who drove over from the Seattle area, about five hours from here). Wonderful father's day gift--two masked men getting grimy doing brakes on a car precisely as old as my son. When we flushed the brakes, we used up almost a liter of fluid until we achieved clear stuff--it was nasty stuff. Glad I replaced the master, the calipers and rear brake cylinders, along with flex hoses. Should be a tidy-clean system now. Miles, you asked if I have a JTR manual. I do, and it has been a great help. But on the drive-shaft issue I didn't refer to it, since all I was doing was putting a part I had taken off back on. I am still astounded that that the previous owner was driving and racing with a driveshaft improperly mated and fastened. It depended on nothing more than the shearing strength of the four bolts--not the strongest way to use a bolt. Also, the flange had to have been misaligned. Must have vibrated like crazy! But thanks for the reminded; I plan on going to the manual as soon as something seems amiss--even if the P.O. had been using it that way! -
Rear end and driveshaft woes
wingwalker replied to wingwalker's topic in Gen I & II Chevy V8 Tech Board
Great help, everyone. Thanks. I measured carefully and then spoke on the phone with someone at JTR. It is the DAT 110-2 flange I need. So, another $85.00 into this never-ending project, and I should have the driveshaft and differential properly mated.The man at JTR said they have it on hand, so it should ship on Saturday. With new brakes on all four corners, that should take care of the moving parts needed to move this thing down the road. A close look at the differential reveals no bolts around the axle holes and a rectangular bar across the bottom of the cover. I hope the ratio will be good for highway driving. My transmission, a GMC 2004R, has a decent overdrive ratio in fourth--so I'm not worried. What I want out of this is a nice highway cruiser with pep. I still can't get over discovering that a previous owner ran this car on the quarter-mile, running fast, with only bolts in shear holding the driveshaft onto it. Ignorance is bliss, I guess. I want to get this thing on the road, then I can go back and pull stuff such as the differential, refurbishing what needs it, and cleaning up and detailing as I go along. I have welded patch panels into all the holes and indentations on the rear, so a day or so of body filler, sanding, priming, more filler, more primer, block-sanding and lots of dust lies ahead. Then I'll bolt the gas-tank in after all that mess is finished. I was happy to find that the tank was clean and rust-free. It was in the trunk of the car when I hauled it home, so I expected the worst. I pulled the sender and used a flashlight and mirror to see as much as I could, and was pleased. It's painted, and I have new strap-liners, so that should be an okay project. Next big issue will be the a/c installation. It looks like a lot of work, but all of it appears straight-forward. I have the dash out, so that will help. Thanks again everyone. -
Rear end and driveshaft woes
wingwalker replied to wingwalker's topic in Gen I & II Chevy V8 Tech Board
Thanks, I'll go out and inspect the differential more closely--sounds as if the bolts around the axle holes are the clue. And I need to make some careful measurements to ensure that part is the one I need. Always a challenge working on these old things--especially when some PO had creative engineering notions. -
Rear end and driveshaft woes
wingwalker replied to wingwalker's topic in Gen I & II Chevy V8 Tech Board
New Zed, Thank you. Both links are very helpful. Looks like I need the DAT110 flange, but before I order it I need to go back under the car (for the million and first time) to take careful measurements to ensure it is what I need. My 280Z is a '77 built with auto transmission. The u-joint does disassemble with clips, so it may be the converted Chevy part per the JTR manual. Your first link shows that the flange is on a spline, so I doubt it'll need a puller. And that's good. But nothing is simple. I have the rear drums and brake parts off, so I won't be able to set the handbrake to hold that shaft steady when I go to take the big nut loose. So, I need to finish rebuilding the brakes before I can fix this driveshaft issue. I've ordered a liter of brake fluid that won't be here until Monday evening. I want to use it to flush the lines before putting new hoses and brake cylinders on it. Every step hinges on another, Nothing is simple. Can anyone ID that differential?
.JPG.d405e15e72e209211cd9cdba1579f259.JPG)
.JPG.0f07322fa1df71a4ac904b27f77be4b7.JPG)
.JPG.6ee7b481f83c0cca9309da53ceb1c25c.JPG)
.JPG.56a2eabda78dbabb83b052b7a8b42576.JPG)