JMortensen
-
Posts
13742 -
Joined
-
Last visited
-
Days Won
68
Content Type
Profiles
Forums
Blogs
Events
Gallery
Downloads
Store
Everything posted by JMortensen
-
If you're running on the ragged edge and need to know EXACTLY what the a/f ratios are, get the wideband. If not, the narrowband will get you in the ballpark.
-

Jon's 2 year roll cage saga...
JMortensen replied to JMortensen's topic in Brakes, Wheels, Suspension and Chassis
Not really. I just grabbed the sheet metal flange that the weatherstrip hooks onto and bent it out of the way. I haven't bent it back yet, but at worst a hammer and dolly should make pretty quick work of it. I didn't make one big square cut, unfortunately. I was trying to get by with the smallest hole I could possibly make (believe it or not) so I cut the hole, then cut it bigger, then cut it bigger still. I can't reassemble all that stuff anymore. It would be more of a pain than just patching it. Yeah, I would definitely stitch rather than seam weld all that stuff. At present I'm leaning towards several small .060" gussets rather than the long sheet gussets with the flanged holes. I haven't absolutely decided one way or the other, but that's where I'm leaning at the present. That might be a good one to learn from. I still have the .pdf that they were using to sell that car, I'll check it for pictures of this area. I don't think it would be hard to get the bar in that position, its again just going to be a pain to patch the cowl and firewall. Thanks for the feedback. -
Nice Alex...
-
With those DOT tires you could also run O/SP if they offer it. Open street prepared is anything on DOT tires...
-
Jon's 2 year roll cage saga...
JMortensen replied to JMortensen's topic in Brakes, Wheels, Suspension and Chassis
Thinking about this some more just now I'm thinking bj's bracing to the firewall then at an angle to the strut tower looks pretty good, as that would eliminate all this hassle with the cowl area... -
Jon's 2 year roll cage saga...
JMortensen replied to JMortensen's topic in Brakes, Wheels, Suspension and Chassis
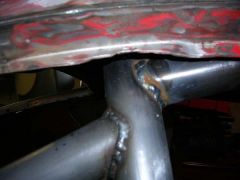
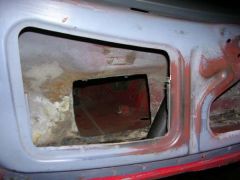
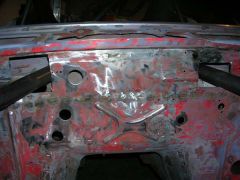
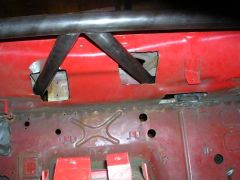
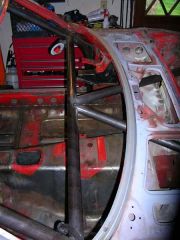
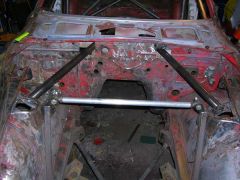
Strut tower bracing is next up. I wanted to do a V bar from the towers to the middle of the dash bar. That part is tacked in now (pics below). I found that I had to cut oddly sized holes to get the bars through the cowl area and make them meet in the center, and I think this is going to be quite a pain in the ass to patch. My best idea so far is to cut the inside of the cowl so that there is one big wide hole that both bars come through. Then I'll make a center piece to patch the hole with 24 gauge sheet (easy to bend and form to the weird shape going on here, then I'll make some .060" plates to attach to the firewall side. I'll also need to patch the fresh air vent on the passenger side. It was in the way so I had to remove it as well. I'm not looking forward to this task of patching these weird holes on a weird complex curved surface. Anyone have a better or easier idea for me than a big ol patch in the interior? Also, looking at this now, I am inclined to NOT do bars from the struts to the A pillar dash bar intersection. I still feel like they would help, but I'm wondering if they're worth the hassle. The area of the cowl I'd have to cut through is an even weirder shape than the center part... -
-
-
-
-
-
The main problem I wanted to deal with was friction in the suspension. The rod ends were a convenient way to reduce friction at the outboard end of the control arm, and easily mounted. There have been many different rear control arms sold over the years which put the rod ends in bending, and to this point I haven't heard of a rod end failure. We have seen control arms fail, but I have yet to hear of a rod end failure.
-
I would figure that if you flexed the rear strut towers that would be more inclined to flex the B pillars and shift the rear of the roof around the main hoop. If the defection was in the front struts I would figure this would be more inclined to flex the A pillars around the hoop. How much any one gusset contributes to a reduction in flex is anyone's guess. I haven't seen any numbers, anyone else? I get the feeling that a lot of this is boy racer stuff (no offense intended John but you do see this in every "tuner" magazine on the shelf), and a lot of the Japanese roll cages I've seen were purely for show, but there are enough real race cars using these holed gussets that I have to believe that there is some merit to it. The question is: At what point does it become overkill?
-
Jon's 2 year roll cage saga...
JMortensen replied to JMortensen's topic in Brakes, Wheels, Suspension and Chassis
I'd like to hear your opinion on the gusseting issue. Is too much not enough? -
Mine goes to 11.
-
Jon's 2 year roll cage saga...
JMortensen replied to JMortensen's topic in Brakes, Wheels, Suspension and Chassis
Joe's has them for $1.25 each for 1.5, 1.625, and 1.75" tube sizes. They fit 70-90 degree angles, so you might have to trim it to fit another angle, but I really can't imagine them being too much cheaper... -
Advice on tuning out understeer
JMortensen replied to Zmanco's topic in Brakes, Wheels, Suspension and Chassis
You don't want that part. That thing replaces the flexible rubber tophat with polyurethane which is anything but flexible. Puts a lot of load on the strut, causing premature strut failure. I'd look at some longer control arms or redrilling the hole in the crossmember further out. You can also slot the strut top mounting holes a little bit for a camber plate type effect. I'm not a big fan of the camber bushings in the front, but that would also work and wouldn't require a lot of work to install. -
Jon's 2 year roll cage saga...
JMortensen replied to JMortensen's topic in Brakes, Wheels, Suspension and Chassis
You can buy them from http://www.joesracing.com/ -
Jon's 2 year roll cage saga...
JMortensen replied to JMortensen's topic in Brakes, Wheels, Suspension and Chassis
I bent the halo and the A pillar bars myself, and I kinda screwed it up a bit, but it was usable. The hoop I had bent by a guy who does rally car cages locally. He went off of the jpg template that 74_5.0_Z has in his gallery. The hoop is perfect. Definitely want gas shielded mig for this. -
I've actually cut and disected this part of the roof in the back. Haven't taken it apart in the A pillar or the front of the roof, but in the back I actually had the inside of the structure exposed. From what I could tell it looked like there was a roughly triangular shape to the... uh... "roof rail" (?) and it roughly followed the outside of the roof line then bent in towards the car. This piece was thicker than the sheet metal on the roof or in the sill area, and the sill area was spot welded to it. What I cut off was sheet metal and didn't look nearly as structural as the part underneath. When I patched the hole I felt that it was attached better than when I cut it off, especially considering the rust that was going on in there. In my opinion the drip rail is not really the main structural part of the roof. The main part is the channel or roof rail, and the drip rail is just a convenient way to make a water tight seam, instead of having to seam weld the whole roof. There are some pics of the roof rail in this thread: http://forums.hybridz.org/showthread.php?t=107679
-
The one roof gusset I've seen previously was a center gusset about 8" long. That car was squeaky before and totally silent after the installation of the 4 point bar and some reinforcement of the A pillars (one side actually broke off the fender after an autox). I thought that gusseting at the sides of the hoop would be more stable and still feel it's better than in the middle, and John Coffey suggested attaching to the area where the hinges go as that is the most reinforced area of the roof. I may be wrong, but I was going to make my gussets with .060" sheet, and just do a couple 3" strips on each end.
-
Advice on tuning out understeer
JMortensen replied to Zmanco's topic in Brakes, Wheels, Suspension and Chassis
I missed this earlier, sorry. With stockish suspension, often times increasing tire pressure will help traction because the tire is rolling over on the sidewall. It has been my experience with street tires, DOT tires, and slicks, that you want to run the minimum pressure you possibly can and keep that tire from rolling onto the sidewall. In your case that might be 40 lbs or more, since you don't have enough negative camber in the front. But when you can get some negative camber going then you can really drop the tire pressure down. The more changes I make to my suspension the lower the air pressure gets and the faster the car goes. -
Jon's 2 year roll cage saga...
JMortensen replied to JMortensen's topic in Brakes, Wheels, Suspension and Chassis
OK, halo is welded in all the way around. A pillars are welded in all the way around. Dash bar is in, A pillar to halo gussets are in. I was able to bend the flange that the weatherstripping pushes onto out of the way enough to get the welder in there to weld the halo without cutting the roof off. Thanks guys for suggesting that, probably saved me a hell of a lot of time. Basically I now have a 6 point cage with the X and the rear strut brace. Thinking more about this dash to strut tower V, and what else to do up there. I'm really thinking about doing the V to the center of the dash bar, then going with an additional straight bar on each side from the strut tower straight back to the dash/A pillar bar connection. Also planning a dash bar to tunnel connection right on the bottom of the intersecting V. Any other suggestions welcome... -
-