JMortensen
-
Posts
13742 -
Joined
-
Last visited
-
Days Won
68
Content Type
Profiles
Forums
Blogs
Events
Gallery
Downloads
Store
Everything posted by JMortensen
-
-
-
-
-

Advice on tuning out understeer
JMortensen replied to Zmanco's topic in Brakes, Wheels, Suspension and Chassis
Just to clarify, bumpsteer is usually most extreme at the ends of the suspension travel. A bumpsteer spacer does raise roll center, but it also moves the bumpsteer to a part of the suspension travel where it is not so extreme. -
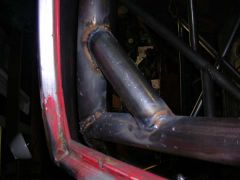
Looking a little closer at my own car and bj's, it appears as though he has 2 sections of tube between the A pillar bars and the strut towers. One goes at an angle from the strut tower down to the firewall, then a second goes from the A pillar straight forward to the firewall. I like the idea of having a bar from the strut tower down to the A pillar bar (braces the struts in another plane), but it doesn't look like you can make a straight shot there without interfering with the pedals or the master cylinders. I'm thinking a straight bar would be better in terms of stiffness, so now I'm thinking more along the lines of the V to the dash bar at the dash bar height, and two straight bars back to the dash/A pillar bar connections at the same height. Any thoughts on which is better.
-
Advice on tuning out understeer
JMortensen replied to Zmanco's topic in Brakes, Wheels, Suspension and Chassis
You really can't go wrong with adding some more adjustability to the front end. From the looks of it you can basically tune with tire pressure, the adjustable shock, and how tight you have your endlinks. Adding caster and some more negative camber would be my first suggestions, but those aren't really on your list. I'd suggest you loosen up your front end links and tighten down the rears. Drop the front tire pressure until the tire rolls all the way to the edge of the tread. If it rolls onto the sidewall add more pressure. I wouldn't suggest messing with the swaybars yet. I'd see about getting more adjustments available to you first. -
My engine has been on a HF stand for longer than my car has been on the rotisserie I built with HF engine stands. Probably 2+ years. No problems here.
-
I'm right at this stage too. Nice timing. I think that attaching to the A pillar does attach the cage to the roof for all intensive purposes. That said my plan has been to attach the roll bar to the roof near where the hinges attach. I wasn't going to do a long strip with the punched and flanged holes, rather I was just going to do maybe a 3" section on both sides of the top of the hoop. I don't know how much more benefit you get from running a 2' section of gusset rather than something like I'm planning at 6" long, but I'm guessing the difference in this part of the cage wouldn't be too great. You are after all just attaching to the roof, and we both have quite a bit of structure supporting the strut towers already, and thats where the major loads get introduced to the rest of the chassis (well there and the control arm bushing cups).
-
You get what you pay for - Chinese drill press
JMortensen replied to blueovalz's topic in Fabrication / Welding
I haven't bought a HF impact in about 15 years, but the last one I bought put out about 60 lb/ft of torque for the first hour, and it was downhill from there. It pretty consistently would not break lug nuts loose. I was 17 years old and changing tires at Pep Boys at the time, so it was pretty frustrating... -
You get what you pay for - Chinese drill press
JMortensen replied to blueovalz's topic in Fabrication / Welding
My experience has pretty much mirrored all of the above. When I bought my drill press (one of the smaller ones they sell), I had trouble installing the chuck. You're supposed to put the chuck on a piece of wood and drive the spindle onto it with the handle. Well, the handle was held on with a tiny roll pin, so that sheared off before I could even get the chuck on. So I welded the handle to that shaft and then was able to get the chuck on. Since then I've found that when you put pressure on the handle the chuck moves around ~3/16" or so, making it fairly useless for anything but the most general work. So the drill press was a bad purchase. That said, I've also pretty much built my whole car with HF tools. I have an HF press, I made my rotisserie out of three of their engine stands, lately their 4 ton portapower is getting a lot of use, as has a pair of their 4.5" grinders. I've got mostly HF air tools, die grinders and such, although for the important stuff like impact guns I have Matco and IR guns. I've thoroughly abused my 5" vise, and it has held up well. I'm about ready for another tubing notcher, it lasted through most of my cage build. It is clearly not the right place to buy tools for a full time professional, at least not the all day every day tools, but there are jobs that I never would have gotten done without cheap tools, and for that I'm glad I have the HF hookup. -
Cranking it around by hand isn't so bad. I offset my mount like the other thread describes. That offset is for a 280, so my 240 was a little bottom heavy. Now with the cage in there it's a bit top heavy. Even so, it's not THAT hard to flip over. Not hard enough that I'd be looking at gear driven stuff. I do like Steve's setup with the counterweight, but it's more effort than I wanted to put into the stand itself.
-
Free is always good. Even just being able to tip the car sideways is a HUGE help, especially when you're doing a lot of work on the bottom of the car. If I had to do mine over I'd make it about 4" taller. As it is I cut the rear fenders for flares, but if I put them on and flip the car, the flares wouldn't clear the bottom part of the engine stand. Luckily I figured that one out before I tried it...
-
If you spliced in just a bit more height on the main mast then you could flip it all the way over. I can flip mine and it is basically the same as what you've got there. Here's a link and some pics: http://forums.hybridz.org/showthread.php?t=104151&page=2&highlight=rotisserie
-
The bracketry looks nice but it appears you've drastically shortened the TC rod. This is not a good thing because it makes the caster sweep really bad. Ideally you'd like the TC rod and the control arm to be as long as possible. That would minimize the geometry change. Two ideas to fix the caster issue would be to either relocate the bracket and use a longer turnbuckle or make the control arm into an A arm instead of a control arm and a TC rod.
-
Yeah, the only stock adjustment on a Z is the front toe. I guess you can shim caster a bit, but that's pretty much it. Instead of the wood, I always set it with a tape measure. You just measure on the same tread in the front and back of the tire as high up on the tire as you can reach. Set it for about 1/8" toe in and that should be fine for the street. Remember that one side of the tie rods has reverse threads. And I wouldn't worry about getting the steering wheel straight. You can always take the car to an alignment place tomorrow. Also your thread title is very vague, so I'm going to add the word "alignment" to make it more clear.
-
Vented rotors on the rear? Yes/No
JMortensen replied to NZeder's topic in Brakes, Wheels, Suspension and Chassis
I'd go with the vented for the simple reason that it will run cooler. Since you're having to machine the rotor to work, I'd think you would want to get a rotor that lasts as long as possible. To my mind that's going to be the vented one. I've always considered rotors are a consumable item, and I would try really hard to avoid running rotors that require machining. -
7500. That's a good number for an L. It will be interesting to see how much hp comes from that extra 2000 rpm. Sounds like an L should... nice and lopey.
-
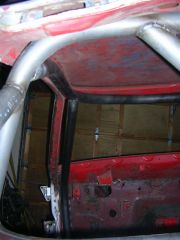
Jon's 2 year roll cage saga...
JMortensen replied to JMortensen's topic in Brakes, Wheels, Suspension and Chassis
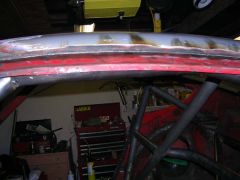
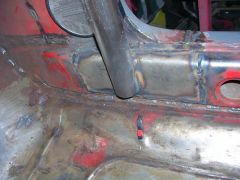
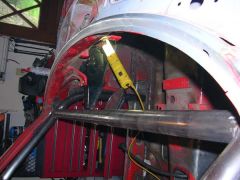
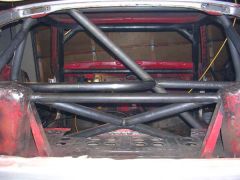
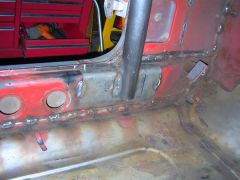
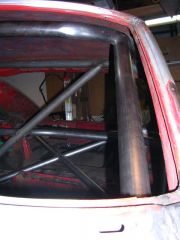
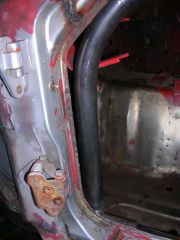
More stuff. Did one A pillar today. It came out nice. Had to fiddle with it a bit but in the end it was good. Used Cary's 4x the pipe diameter area formula for the plate. That gave me roughly 7" squared, so my plate is 4.5 x 8. This was all just rough calculations, the plate is probably a bit bigger than absolutely necessary. I tacked the A pillar bar in, took a good look at the angles and everything, then welded the bar to the mounting plate. Then I welded the plate to the rocker, and then put about a 1" long weld on the A pillar to the halo, and also about a 1" weld on the halo to the main hoop. So... its officially in there. I did also lower the front of the halo down about 5/8" so that there is a small gap of maybe 3/8" between the side of the halo and the section of the roof where it was resting before. Hopefully that will elliviate any clearance issues when I weld the roof back on. I'm going to do the A pillar for the passenger's side tomorrow and then maybe I'll cut the roof off if I'm feeling spunky. So much progress after waiting so long! It's pretty damn cool. -
-
-
-

-
-