wal280z
-
Posts
70 -
Joined
-
Last visited
Content Type
Profiles
Forums
Blogs
Events
Gallery
Downloads
Store
Everything posted by wal280z
-
 RE: http://forums.hybridz.org/index.php?/topic/88182-alternate-heater-ac-controls-in-a-280/
 -
 RE: http://forums.hybridz.org/index.php?/topic/88182-alternate-heater-ac-controls-in-a-280/
 -
From the album: Heat / AC Control
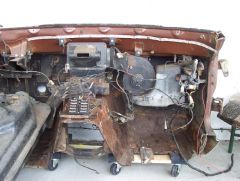
240 firewall section for mock up purposes. http://forums.hybridz.org/index.php?/topic/88182-alternate-heater-ac-controls-in-a-280/ -
Thanks Joel - I am narrowing the possibilities... I have found three different panels that will work with the bezel - now it's time to buckle down and actually get something to work. My search criteria is a 'somewhat' flat firewall, heater and AC firewall fittings somewhat in the same general area (excluding anything that would be centered on the firewall).... I've got three options (all mechanical / electrical+mechanical heat / all electrical). Again, it won't happen tomorrow... There was a Cobalt in there late summer that looked like it might fit but I was too late in getting to it and it got crushed before I could take measurements. I do hope to document/measure/record/etc. everything so it will be less painful to the next guy... thanks for keeping me focused...
-
Well, I think I hit 'my jackpot' today at the local Pick and Pull. Found a 1995 Nissan Maxima with a fully electronic control panel. No mechanical cables, just a bunch of splicing. For some reason, the photo will not upload to this post, here is the link to the gallery: http://forums.hybridz.org/index.php?/gallery/image/23490-nissanjpg/ Note on the control panels reported in the original post: The Rav4 was completely mechanical, the Subi was electronic with the exception of the temperature control which was cable operated.
-
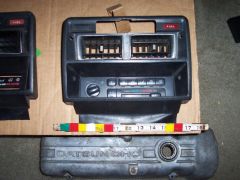
1995 Nissan Maxima heater control panel will fit the opening of a 280Z bezel opening.
-
From the album: Heat / AC Control
-
I know first hand that the "factory installed" version on the 280Z is different in shape and size than the aftermarket one. I've seen a few different versions. Right now, they are in storage and I can't get you any pictures or measurements - not sure what you are really looking for... Hopefully, when this is all said and done, I can toss all the antique 'stock' and aftermarket stuff away that I have collected over the years... Why I started this thread is to find alternative ways to control the heater / AC ass'y in an S30, because I want to upgrade the heater/AC housing. In case you don't know, the control unit bolts to the heater housing. Eventually, I hope to replace all the stock internals with more modern stuff, as a unit (or some facsimile thereof...) Here is a teaser picture... the stock heater housing side by side to a air management unit from a Honda S2000... Note - the unit from the S2000 does NOT include the heater core or the AC parts or the fan, for that matter. It won't be installed tomorrow, but I hope if anyone else has any ideas or suggestions, please chime in.

-
I apologize in advance if I misread your post, but keeping the stock system was NOT my intent of this post. The only stock part that I wanted to retain was the bezel that screwed to the dash. I want to install all new parts (under dash and under hood) for the new system. I want to be able to control the AC on/off while using the defrost. The stock (and aftermarket, back in the day) had the AC evaporator AFTER the heater/vent unit. It did not allow the AC compressor (with heat from the heater core) to the windshield to defog as needed.
-
I've been searching for a more efficient and modern heater/AC unit to install into my 280. I haven't quite found one where the guts will fit inside the dash yet, but I wanted the control panel to look like it belongs there... Please note: I'm not pushing for stock, or factory, or something from Nissan. I just want something that doesn't look like I hacked it together in my back yard. I'm not very experienced in molding plastic, nor have I given thought of making a new one. I figured it would be cost prohibitive. So, I want to retain the stock bezel. The opening of the bezel for the control unit is about 7 3/4" X 2" I've included three pictures. "Both.jpg" shows the two panels, side by side. "RAV4.jpg" is a close up on the RAV4 panel, and "SUBI.jpg" is a close-up on the Subaru panel. RAV4.jpg: I found this in a first-gen Toyota RAV-4 (I'm pretty sure it was the first gen - the local Pick-N-Pull rarely has anything newer than 6 years old). Anyways, if anyone is looking to swap control panels in their 280, the RAV4 model offers a decent look. The large rectangular space to the left of the fan switch is for the AC switch. The unit is all mechanical (except for the AC switch). I didn't get the whole control ass'y for this, but the control panel fits like a glove. SUBI.jpg: For those that have far more electrical wiring experience than I, I found a control panel from a 1994 Subaru Legacy that fills the hole size beautifully. This panel controls the servos by an electrical signal rather than mechanical cable. The temperature is cable operated. I won't be using this panel (due to the wear and the fact there is no recirc or separate AC button), but was giddy when I measured it and saw it would fit the hole. It may work for others. Anyone else have any other ideas (control panel and/or the heater/AC housing units) that would work, I would like to hear what you have found.... Thank you.
-
Sounds like the safety feature to shut the fuel pump off is working correctly. To assist in troubleshooting it - remove the white/black wire from the starter solenoid to test if the relays are turning the fuel pump on when the key is in the 'START' position, and/or opening the flap in the AFM w/ a screwdriver to test if the relays are turning the fuel pump on with the key in the 'ON' position. Is some debris possibly jammed in the pump causing a 'no-pump' condition? Just so I understand, you want to run a new wire from the INPUT of the relay or the OUTPUT of the relay to the fuel pump? Is it even connected at the bullet connectors (behind the passenger seat)?
-
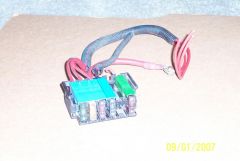
Indirectly, the link did. That is, if you had one to verify the color of it. On my '77, there is a black link with two connectors on it held together by a nylon tie. Not for certain if it changed through the years. FWIW, the microfiche states for production years 8/76 - 7/77 P/N 24022-N4200 - 1 req'd per car for 8/77 up: P/N 24022-U8700 AND 24022-N7600, one each per car. (Info found: Fiche E8, 54B-3, item #45) provides a ground for the control unit. The reason it has a nylon connector? my guess is so the positive and negative connections to the control unit would not get mixed up. I can't say for certain from the picture you provided. I just checked mine, both the positive and negative leads from the control unit are heavy gauge red wires. Hope this helps. Wayne
-
Don't move it in your Z - I was stupid and moved a 35" TV (on a whim) for a friend with my Z - never again. Always have a buddy w/ a truck. It'll cost ya a 6 pk of beer at the most (oh crap, I guess I work cheap). Family members, but then you have to deal with that drama. Home Depot would be the next best bet. Uhaul (around here) rents the 1/2 ton Chevy pickups for 20 bucks +. Enterprise rents trucks - you get it all day for 30 bucks +. Oh, sorry, just saw you lived over there - California slightly higher. If you had more time, you could make a cart - I welded casters on a damaged front crossmember and used the engine/tranny to move like a wheelbarrow. I got tired of that and welded back legs (used some heavy-duty shelving pieces) and casters to make an engine cart. But, the most action that has seen is going from one end of the garage to the other (and I got a pretty small garage). The HF furniture dolly works great too - and when you are done with it for that purpose - it works great as a dolly for a set of your extra wheels / tires. Wayne
-
Pick and pull here in Virginia Beach wouldn't let you remove it from the body - no sawzall, blue wrenches or cutting wheels allowed. If you can unbolt it, you can buy it. Do you need the exact shape and size that is in the first picture, just for the passenger side? What year / model do you have? I've got a '77 coupe, not 2+2, that I was getting ready to call the scrap man to come get - however, I wouldn't trust any of the metal 2" forward of the sidemarker cutout. I wouldn't be able to get to cutting it out until after the end of February / early March timeframe - if you wanted to make the trip down and cut it out yourself - that would fine as well. So if you have a sawzall, and a free weekend coming up (3 day weekend of 2/16 - 2/18 coming up), come on down and get what you need. PM me with your email address so I can send pictures. Wayne
-
Cameron - on the '77 (and possibly other models - I haven't studied the wiring specifically on those) the fusible links are for: 1) Alternator output (then connected to battery and the other 3 fusible links) 2) ECU (oversize 6-way connector @ steering column), and ignition relay 3) Combo switch 4) Ignition switch FWIW, the un-fused output of the alternator went to the other side of the ignition relay, the 'back half' of the fuse block and the voltage regulator. Is this what you were asking? Again, I haven't studied the diagrams for other models, so it would be a guess on what the fusible link(s) were protecting on the earlier ones. Wayne
-
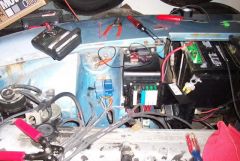
Finally got around to installing this setup. http://album.hybridz.org/showphoto.php?photo=17953&cat=500&ppuser=10978 Electrically speaking, the output of the alternator is still fused and I have an extra two junctions, one for the headlight relays, one will be for the electric fan. Looks nice - by all appearances it appears to be less troublesome to maintain. If salvaged correctly from the donor car (carefully slice open donor wiring harness at the right front of firewall behind strut tower, cut the (3) 10 ga red wires, remove 3 way modular housing), you should be able to harvest enough wire length to make the spliced connection on the inside of the passenger cabin.
-

-
-
Datsun's are notorious for having a bad connection from the starter to the fusible links (which also feed the ignition relay, that clicks inside the passenger cabin when you turn the key). Of course, if you are talking about a louder click, the sound the bad solenoid makes (yes, even new ones come out bad...), then change out the solenoid. Where did you get the replacement starter? Disconnect the black/yellow lead from the solenoid, hook up a test light from that wire to ground and turn the key. Does it light? If so, problem is w/ the solenoid, sorry to say. (Just changed mine out tonight, same problem) I got a reman HITACHI from Bap Geon for seventy bucks and some change for a '83 280ZX gear reduction starter/solenoid ass'y. Wayne
-
Ok, good news and bad news..... First, the bad news: 1) I initially checked on AMP's website for the plastic housings, terminals and such, and could not find a match to the numbers indicated on the part. 2) I checked with the local AMP dealer with the parts in hand and "sorry, can't help you..." 3) I stopped in to the local Cadillac Parts dept, they had no clue what I wanted. (they did supply me with the attachment which I scanned, kudos to them) Now, the good news: A) Cadillac sells the "Block, Pwr Distr-Fuse" unit [GM P/N 90494449] (not sure what all comes with it) for sixty bucks and some change. Darn cheap for something that goes in a Caddy IMHO. Currently, the closest unit (to me) is in Memphis - sorry, I'm not going to order it to find out if it does / doesn't come with open contacts / housings / terminals / what not.... I think I found the part number(s) for the terminal. However, I want to be very sure that what I am looking at on-screen is the same thing I pulled out of the connector assembly last night. C) Armed with the information from 'B' above, it appears that terminal is available from a German website similar to Eagle Day that sells individual terminals (at a premium, of course....) I need to check a few more places, and also check back in to the local AMP distributor to see if they can get samples from the MFR.... I hope to post a DIY how-to when I figure it all out... Maybe I should just cut my losses and use those darn $0.19 butt connectors.... Question is (since there is not an option to create a poll in this thread now), anyone intersted in purchasing new terminals to use this setup in their project? Phew.... I'm shuttin' up now... Wayne (pics to follow sometime later - don't hold your breath) cad_catera.pdf
-
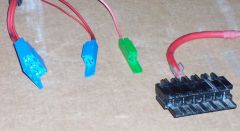
I spotted this maxi-fuse setup in a 1997 Cadillac Catera. This is what it looks like stripped down: This is what they look like separated from the base. http://album.hybridz.org/showphoto.php?photo=16619&cat=500 I'll try and take some better pictures if anyone is interested, but my camera likes to use too much flash.... A couple of notes on this setup. Each fuse holder goes in the spot as shown in the picture w/o any modifications. Meaning, each fuse link is 'keyed' - some modification will be necessary. It is simple as shaving one of the embossed key way with a razor to remove it. When the unit was removed from the vehicle, the 3-gang blue modular unit had 3 separate 80A fuses, with wires going into the passenger cabin, with a green (I think it was 30A installed), along with an open slot for a sixth fuse. I like the bare contact on the positive lead as an alternative battery connection, just need to place that out of harms way, insulate the back of it so you don't short anything out first time you jump start somebody.... What I am looking for is a replacement terminal kit, so I can finish it out as a more professional looking rather than the hack job that I have in my car right now. Sure, I could 'splice and dice' (and probably will for the first one - I really like the look of this maxi-fuse setup. I looked on AMP's website, could not find any info on any of the following part numbers. It does appear as though the stamping of ''>PA66-GF13<'' is the material it's made of. All items are embossed with the "GM" logo and "AMP" identifying marks. The part numbers I can see are: 964728-1 black 'base' 964762-6 3-way blue holder 964734-6 single blue holder 964727-2 single green holder 964730-1 black cover (not shown) - has a GM logo with identifier of "ZF6-4" Wayne
-
-
 Removed from a junked 1997 Cadillac Catera - fusible link panel. Mfr'd by AMP, need to chase down part numbers for new terminals.
 -
I was apprehensive to say the least about the free shipping, but they did honor it. IMHO, I doubt they would honor it for an overseas shipment. Sorry to hear you had such a problem with them. I actually recommend them. It's been a few years since I ordered from them. Of course, if it's not in stock, you have to wait until they have enough orders to make a run of that item. Seems silly for you or me to have to order 10 ( or 20 or 50 - yikes) pieces of an item when you only need one, right? Can any of us really justify paying $216.00 for a part that normally sells for only $21.60? (silly Ebay antics aside, of course...) I'll call them when I order it, if it's not in stock, I'll ask what will it take to be 'in stock'? (of course, we have forums now that we can discuss who/what/where is going to ordering from who/what/where) and order that many pieces to get the order shipped and eBay the remaining... there are other people out there that don't want to/unwilling/lazy/do I need to go on/ are reluctant to order anything unless they can 'put their fingers on it' .... me being one of them... just trying to give you another look at what the other guy is looking at....
-
Don't know if this helps, but let me add to my previous solution a tad bit.... I've got 300Z seats in mine, after rambling on before about a bad relay (which, is still bad, I haven't gotten around to seeing if I can update it), I just disconnected the relay. All was good until I moved the car. Go figure. Now I'm scratching my head. I just got the darn thing to go off, and now as I roll out of my driveway, the sucker comes back on... So I lift the latch to angle the passenger seat (back) forward, let go of the seat back and it slams back on itself, the brake light goes off... hmmmm.. it got me thinkin... what's up with that? Maybe I have a loose ground down there. Sure, I'll get to that next week. So, with the relay disconnected, the e-brake off and its switch intact, everything says the light should be off.... and it is when I tap underneath the passenger seat..... Kinda hard to do that while drivin'.... Fast forward THREE weeks... yeah, I know... I finally remove the passenger seat, and see my answer lying there. ::shakes head in a disgusted manner:: The green/yellow wire that connects to the ebrake switch was pinched between the seat mount of the chassis and the mounting rail of the front left passenger seat mount. I removed the crushed part of the wire, spliced, reconnected, everything is good to go. Now I just need to get off my butt and wire in a newer relay. I'll save that for next weekend. At least I don't have that red light blinding me anymore! That should account for at least a tenth of a second on the autocross course tomorrow, eh? Enough rambling....hope this helps somebody.